

10 React Best Practises I’ve Learned From Code Reviews
source link: https://blog.bitsrc.io/react-best-practises-a57c29c709d1
Go to the source link to view the article. You can view the picture content, updated content and better typesetting reading experience. If the link is broken, please click the button below to view the snapshot at that time.
10 React Best Practises I’ve Learned From Code Reviews
Want to learn React faster? Here are some lessons I’ve learned over the years.

Being a React developer isn’t an easy thing to do. Learning the framework is one thing. But, taking your skills to the next level is another.
You need to be able to write clean React code while ensuring that it’s optimal at the same time. And, the best way that I’ve learned that is through my code reviewed with seniors.
So, I’d like to share the top 10 best practises that I’ve learned during my code reviews to help you get ahead faster!
TL;DR: This article outlines 10 best practices for React development gleaned from code reviews:
1. Component Modularity: Use independent Bit Components for modularity, enhancing reusability, testing, and maintainability.
2. Follow The Single Responsibility Principle: Ensure each component has a single purpose for cleaner, more maintainable code.
3. Avoid Unnecessary Re-renders: Optimize performance by preventing unnecessary re-renders with techniques like useCallback and React.memo.
4. Use Prop Types and TypeScript: Employ PropTypes or TypeScript to prevent type-related errors and enhance code reliability.
5. Use Functional Components instead of Class: Start new projects with Functional Components for simplicity, but maintain consistency with existing standards.
6. Avoid Prop Drilling: Use React’s Context API to avoid passing props down multiple layers of components unnecessarily.
7. Properly Handle Errors (Error Boundaries): Implement error boundaries to prevent cascading failures and ensure a smoother user experience.
8. Code Splitting: Enhance performance by loading only necessary parts of code when required using dynamic imports or React.lazy.
9. Accessibility: Make applications inclusive by using semantic HTML, providing alternative text for images, and ensuring keyboard navigation.
10. Documentation: Document your code comprehensively to facilitate understanding and collaboration among developers.
1. Component Modularity
Firsty, it’s important to make sure your React components are module and composable. Essentially, you need to make sure that your React components are reusable in nature and can be moved around without any breaking changes.
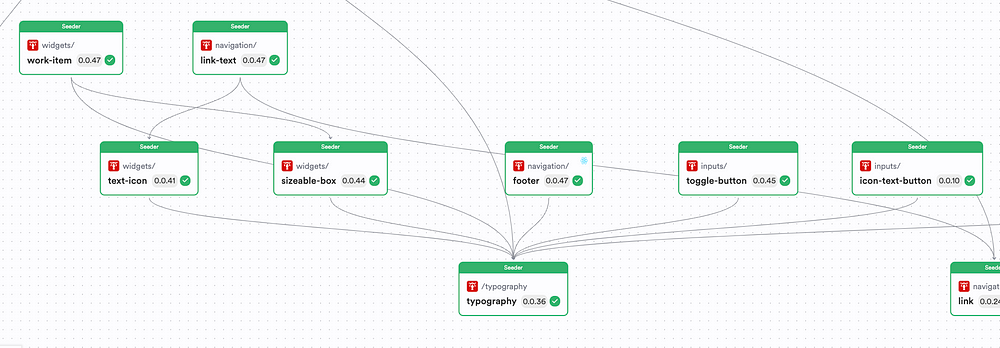
To do so, our team moved from NPX to Bit to create React components as independent Bit Components. With NPX, you’re trapped in a monolith, but with Bit, you’re able to design, develop, build and version your components in an independent manner.
And we’ve also been able to increase our cycle time with its CI Server — Ripple Server that essentially propagates component changes across the tree.
By adopting such modularity into your code, you can achieve the following:
- Enhances code reusability: Pieces of code become like Lego bricks, usable in various configurations, saving time and effort.
- Simplifies testing processes: It makes it easier to test individual components by identifying potential problems and ensuring more reliable code.
- Improves overall UI maintainability: With modular components, making changes or fixing bugs in one part doesn’t disrupt the entire application, leading to easier maintenance.
For example, this code demonstrates how to use React components to create a modular structure, separating UI elements from logic.
It consists of a Presentational Component (MyComponent) responsible for rendering UI elements and a Container Component (MyContainer) managing logic and state.
// Presentational Component
const MyComponent = ({ message }) => (
  <div>
    <h1>{message}</h1>
  </div>
);

// Container Component
const MyContainer = () => {
  const [message, setMessage] = useState('Hello from MyContainer!');

useEffect(() => {
    setTimeout(() => {
      setMessage('Data loaded successfully!');
    }, 2000);
  }, []);

return <MyComponent message={message} />;
};
This modular approach streamlines development and enhances the codebase’s manageability.
Bit enables building independent, modular, and composable components, making them reusable and simple.
If you’re interested in working with Bit, check out this end-to-end guide:
2. Follow The Single Responsibility Principle
I used to design components where I chunked everything onto a single component. For example, back in the day, when I created components, it often looked like this:
import React, { useState, useEffect } from 'react';
import axios from 'axios';

const AxiosComponent = () => {
  const [data, setData] = useState(null);
  const [error, setError] = useState(null);

useEffect(() => {
    const fetchData = async () => {
      try {
        const response = await axios.get('https://api.example.com/data');
        setData(response.data);
      } catch (error) {
        setError(error);
      }
    };

fetchData();

// Cleanup function
    return () => {
      // Optionally handle any cleanup needed
    };
  }, []); // Empty dependency array to run effect only once

return (
    <div>
      {data ? (
        <div>
          <h2>Data Received:</h2>
          <pre>{JSON.stringify(data, null, 2)}</pre>
        </div>
      ) : (
        <p>Loading...</p>
      )}
      {error && <p>Error: {error.message}</p>}
    </div>
  );
};

export default AxiosComponent;
For instance, if I was invoking an API, I’d include that code inside the React component as well. But, in reality, that’s a bad practise. Instead, it’s better to follow the Single Responsibility Principle.
By doing so, you ensure that each component has a single purpose, aligning with the Single Responsibility Principle (SRP). This practice:
- Promotes cleaner and more maintainable code: By assigning one clear purpose to each component, the codebase becomes more readable and easier to maintain.
- Facilitates easier testing and debugging processes: Components with a single responsibility are more straightforward to test, and debugging becomes less complex.
So, if we were to rewrite this same bad code with the Single Responsibility Principle, you’d have a specialized React Hook, useDataFetcher, to tidy up the mess.
This hook focuses solely on fetching data, adhering to the Single Responsibility Principle.
// DataFetcher Hook
const useDataFetcher = () => {
  // ... code for data fetching using Axios or any other library
  const fetchData = async () => {
    // ... fetch data logic
  };

return { fetchData };
};

// Presentation Component
const Presentation = ({ data }) => {
  // ... code for presenting the data
};

// Component using DataFetcher Hook
const App = () => {
  const { fetchData } = useDataFetcher();

useEffect(() => {
    fetchData();
  }, []);

return (
    <div>
      <Presentation />
    </div>
  );
};
This implies the codebase and improves how clear and testable our components are. Plus, your components become more maintainable.
Each component now has a specific job, following the idea that one component should do one thing well. For instance, in this case, we’ve neatly organized the data-fetching process into a reusable hook, making our components more focused and maintainable.
3. Avoid Unnecessary Re-renders
Optimizing for performance in the fast-paced world of React involves steering clear of unnecessary re-renders. This practice:
- Enhances overall application efficiency: By preventing unnecessary re-renders, the application runs more efficiently, providing a better user experience.
- Mitigates performance bottlenecks: Memoization techniques, such as using
React.memoor the useMemo hook, help mitigate performance bottlenecks by ensuring components update only when necessary.
Example:
In this example, we’ll explore how to efficiently manage state updates and prevent unnecessary re-renders using the useCallback hook, ensuring optimal performance in your application.
ParentComponent.js
import React, { useState, useCallback } from 'react';
import ChildComponent from './ChildComponent';

const ParentComponent = () => {
  const [counter, setCounter] = useState(0);

// Using useCallback to memoize the onClick handler
  const onClick = useCallback(() => {
    console.log('Handler executed');
    // Perform some logic here
  }, []);

return (
    <div>
      <button onClick={() => setCounter(counter + 1)}>Increase Counter</button>
      <h2>{counter}</h2>
      {/* Passing memoized onClick handler to ChildComponent */}
      <ChildComponent name="child" onClick={onClick} />
    </div>
  );
};
export default ParentComponent;
ChildComponent.js
import React from 'react';

const ChildComponent = ({ name, onClick }) => {
  console.log(${name} component rendered );

return (
    <div>
      <h2>{name}</h2>
      {/* Triggering the memoized onClick handler */}
      <button onClick={onClick}>Click me</button>
    </div>
  );
};

export default React.memo(ChildComponent);
In this example, the ParentComponent renders a counter and a ChildComponent. The onClick handler is memoized using useCallback to prevent unnecessary re-renders of the ChildComponent. The memoized handler is then passed down to the ChildComponent as a prop. The console logs help illustrate when each component is rendered.
Tip, don’t over memomize your app. If you over do it, you go to the bad side of it and can experience severe performance issues. So, a rule of thumb is to memoize only compute heavy operations.
4. Use Prop Types and TypeScript
Preventing type-related errors is crucial in development. We started our project with JavaScript, and that was absolute troublesome! Weeks after writing our code, we couldn’t remember:
- The API payloads.
- The prop definitions
So, essentially, we couldn’t maintain our app. So, we refactored the entire project to TypeScript. By doing so, this let us:
- Prevent type-related pitfalls: By introducing PropTypes or adopting TypeScript, you create a safety net that catches potential type-related issues during development.
- Have a safety net for code reliability: This proactive approach enhances code reliability and ensures your application behaves as expected.
Example:
Imagine a component responsible for displaying user details, and it receives a prop called userInfo:
// InsecureComponent - Component without Type Annotations
const InsecureComponent = ({ userInfo }) => (
  <div>
    <p>Name: {userInfo.name}</p>
    <p>Age: {userInfo.age}</p>
  </div>
);
Without prop types, it might be unclear what structure userInfo should follow. Now, let's introduce Prop Types to bring clarity and avoid potential pitfalls:
// SecureComponent - Component with Prop Types
import PropTypes from 'prop-types';

const SecureComponent = ({ userInfo }) => (
  <div>
    <p>Name: {userInfo.name}</p>
    <p>Age: {userInfo.age}</p>
  </div>
);

SecureComponent.propTypes = {
  userInfo: PropTypes.shape({
    name: PropTypes.string.isRequired,
    age: PropTypes.number.isRequired,
  }).isRequired,
};
Adding Prop Types not only documents the expected structure of userInfo but also serves as a helpful reminder when revisiting the code.
This simple practice significantly contributes to code reliability, preventing potential issues and making the development experience smoother.
5. Use Functional Components instead of Class
Transitioning from class components to functional components with hooks has been transformative.
The Functional components introduced the Hooks API that made it simpler and cleaner to create and manage React components.
So, a good rule of thumb is, if you’re starting a new project in 2024, start with Functional Components. However, there can be cases where you’d still use a Class Component — For example, if you’re building an Error Boundary, you’d still need to use a Class Component.
But, let’s say you’re working on a project that started off with Class Components. What should you do now?
Well, the answer is simple. Stick to your project standards. Continue using Class Components, but don’t have a mix of the two as it can get confusing to navigate through your codebase.
6. Avoid Prop Drilling
Prop Drilling is something I struggled with when I started off with React. I used to pass props down layers of components where some layers didn’t even need to use the prop.
For instance, here’s a good example of prop drilling:
// Component at the Bottom of the Tree
const BottomComponent = ({ data }) => (
  <div>{data}</div>
);

// Intermediate Components Prop-Drilling
const IntermediateComponent = ({ data }) => (
  <BottomComponent data={data} />
);

// Top-Level Component Initiating Prop Drilling
const TopComponent = ({ data }) => (
  <IntermediateComponent data={data} />
);
You have the TopComponent passing data down all the way to your BottomComponent through the IntermediateComponent even though it isn't being used there.
That’s unnecessary information to the information. So, how can we do better? Well, leverage React’s Context API to do so:
// Context Setup
const DataContext = React.createContext();

const ContextProvider = ({ children }) => {
  const data = //... get data from somewhere;
  return (
    <DataContext.Provider value={data}>
      {children}
    </DataContext.Provider>
  );
};

// Context Consumer Component
const ContextConsumerComponent = () => (
  <DataContext.Consumer>
    {data => <div>{data}</div>}
  </DataContext.Consumer>
);
The Context API is a way of passing props down component trees without using Props. Instead, you create a Context Provider and a Consumer and any component that is wrapped within your Provider can use data within your context.
We just solved prop drilling!
7. Properly Handle Errors (Error Boundaries)
Errors are an unavoidable part of software development, but how you manage them defines your application’s resilience.
Implementing error boundaries acts as a safety net, preventing the entire application from crashing when unexpected errors occur.
Example:
Consider a scenario where an error occurs during the mounting of a component, potentially causing a cascade of failures:
ErrorBoundary.tsx
import React, { Component, ErrorInfo, ReactNode } from 'react';

interface ErrorBoundaryProps {
  children: ReactNode;
}

interface ErrorBoundaryState {
  hasError: boolean;
}

class ErrorBoundary extends Component<ErrorBoundaryProps, ErrorBoundaryState> {
  state: ErrorBoundaryState = { hasError: false };

static getDerivedStateFromError(_: any) {
    return { hasError: true };
  }

componentDidCatch(error: Error, errorInfo: ErrorInfo) {
    console.error('Error caught by error boundary:', error, errorInfo);
    // You can log the error or report it to a service for further analysis
  }

render() {
    if (this.state.hasError) {
      return <div>Something went wrong!</div>;
    }

return this.props.children;
  }
}
App.tsx
import React from 'react';
import ErrorBoundary from './ErrorBoundary';

class BuggyComponent extends React.Component {
  componentDidMount() {
    // Simulate an error during component mounting
    throw new Error('Error during mounting');
  }

render() {
    return <div>This is a buggy component!</div>;
  }
}

function App() {
  return (
    <div>
      <h1>Error Handling Demo</h1>
      <ErrorBoundary>
        <BuggyComponent />
      </ErrorBoundary>
    </div>
  );
}

export default App;
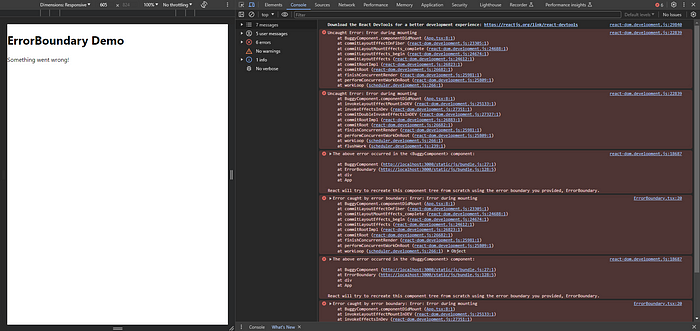
Without error boundaries, such unchecked errors could lead to a cascade of failures. With error boundaries in place, the application gracefully handles errors, ensuring a smoother user experience even in the face of unexpected glitches.
8. Code Splitting
Enhancing the performance of your React application goes beyond efficient components. Code splitting, a potent technique, enables loading only the necessary parts of your code when required, reducing initial loading times and improving overall responsiveness.
Example:
Imagine a large application loading all its components upfront, resulting in sluggish performance:
// Loading All Components at Once
import ComponentA from './ComponentA';
import ComponentB from './ComponentB';
import ComponentC from './ComponentC';

// Implementing Code Splitting with React.lazy
const LazyLoadedComponent = React.lazy(() => import('./LazyLoadedComponent'));

// Loading Components On Demand
const App = () => (
  <div>
    <ComponentA />
    <ComponentB />
    <ComponentC />
    <Suspense fallback={<div>Loading...</div>}>
      <LazyLoadedComponent />
    </Suspense>
  </div>
);
By using code splitting through dynamic imports or React.lazy, your application becomes a nimble, on-demand loader of code chunks. This transformation reduces initial loading times and enhances the overall responsiveness of your React application.
9. Accessibility
Crafting applications that are inclusive and accessible to all users, including those with disabilities, is a commendable goal. By embracing practices such as using semantic HTML, providing alternative text for images, and ensuring keyboard navigation, you create a web experience that leaves no one behind.
- React application becomes accessible to users with diverse needs, fostering a more inclusive digital environment.
- This ensures your application complies with standards, making it more likely to meet legal requirements and industry regulations.
Example:
// Interface without Accessibility Features
const InaccessibleInterface = () => (
  <div>
    <div>Content without semantic HTML</div>
    <img src="image.jpg" alt="A decorative image" />
    <div>Non-accessible content</div>
  </div>
);

// Interface with Accessibility Features
const AccessibleInterface = () => (
  <div>
    <header>
      <h1>Accessible Web Page</h1>
    </header>
    <img src="image.jpg" alt="A meaningful description of the image" />
    <main>
      <p>Accessible content with semantic HTML</p>
    </main>
  </div>
);
By implementing changes such as using semantic HTML and providing alternative text for images, your React application transforms into a welcoming and inclusive digital space, ensuring a positive experience for users of all abilities.
10. Documentation
Code is not just for machines; it’s a means of communication among developers. Documenting your code is like providing a roadmap for others to navigate and understand your creation.
- Comprehensive documentation offers clear insights, helping developers understand the intricacies of your codebase.
- Documentation fosters a collaborative development environment, enabling team members to work more efficiently.
Imagine that developers are required to navigate a maze without a map if there is no documentation for a codebase. Now imagine the same codebase with extensive documentation that provides clear explanations for anyone exploring its subtleties. With the help of this thorough documentation, developers can confidently and easily understand the complexities of the software.
Wrapping Up
Well, that was a lot to digest. But, that’s essentially stuff that I’ve learned through my years of working with React. And, I hope that it will be of good use to you.
If you have any additional practises that you’d like to share, feel free to drop them in the discussions!
Thank you for reading!
Recommend
About Joyk
Aggregate valuable and interesting links.
Joyk means Joy of geeK