

Top 5 React Best Practices Every Developer Should Know
source link: https://blog.bitsrc.io/react-best-practices-55aca2f38606
Go to the source link to view the article. You can view the picture content, updated content and better typesetting reading experience. If the link is broken, please click the button below to view the snapshot at that time.
Top 5 React Best Practices Every Developer Should Know
Explore Composable Software, State Management, Immutability, Lifecycle Methods, Hooks and Optimization

Every React developer, whether an experienced professional or someone just starting their journey, should be familiar with certain best practices.
In this article, I’m going to share five essential practices that can elevate your React programming career; those are,
- Composable Software Architecture
- State Management
- Immutability
- Lifecycle Methods and Hooks
- Optimization
Are you excited to dive in? Let’s explore each of these features one by one.
1. Composable Software Architecture

Have you ever heard of this? Perhaps you haven’t, but you might already know its meaning.
Composable software architecture decomposes complex software systems into independent, reusable components.
These components can be easily combined and recombined to create different functionalities, promoting modularity, scalability, and maintainability. Think of it as building with Lego bricks — each brick is self-contained, yet they can be snapped together to form intricate structures.
Composability in React
React, with its component-based architecture, is a natural fit for the composable software architecture.
Let’s take a look at how React embraces this approach,
- Atomic Design: This encourages building components from basic elements (atoms) to complex layouts (molecules and organisms). Think buttons, forms, and finally, entire pages — all independent and ready to be combined!
- Higher-Order Components (HOCs): These components “wrap” existing ones, adding functionality without modifying their core logic. Imagine decorating a button with a loading indicator — a HOC to the rescue!
- Render Props: Pass down rendering logic as a prop, allowing child components to control how they’re displayed. Think of it as handing over the paintbrush and letting your components express themselves creatively.
But composability isn’t just about individual components. It’s about seamless integration and collaboration.
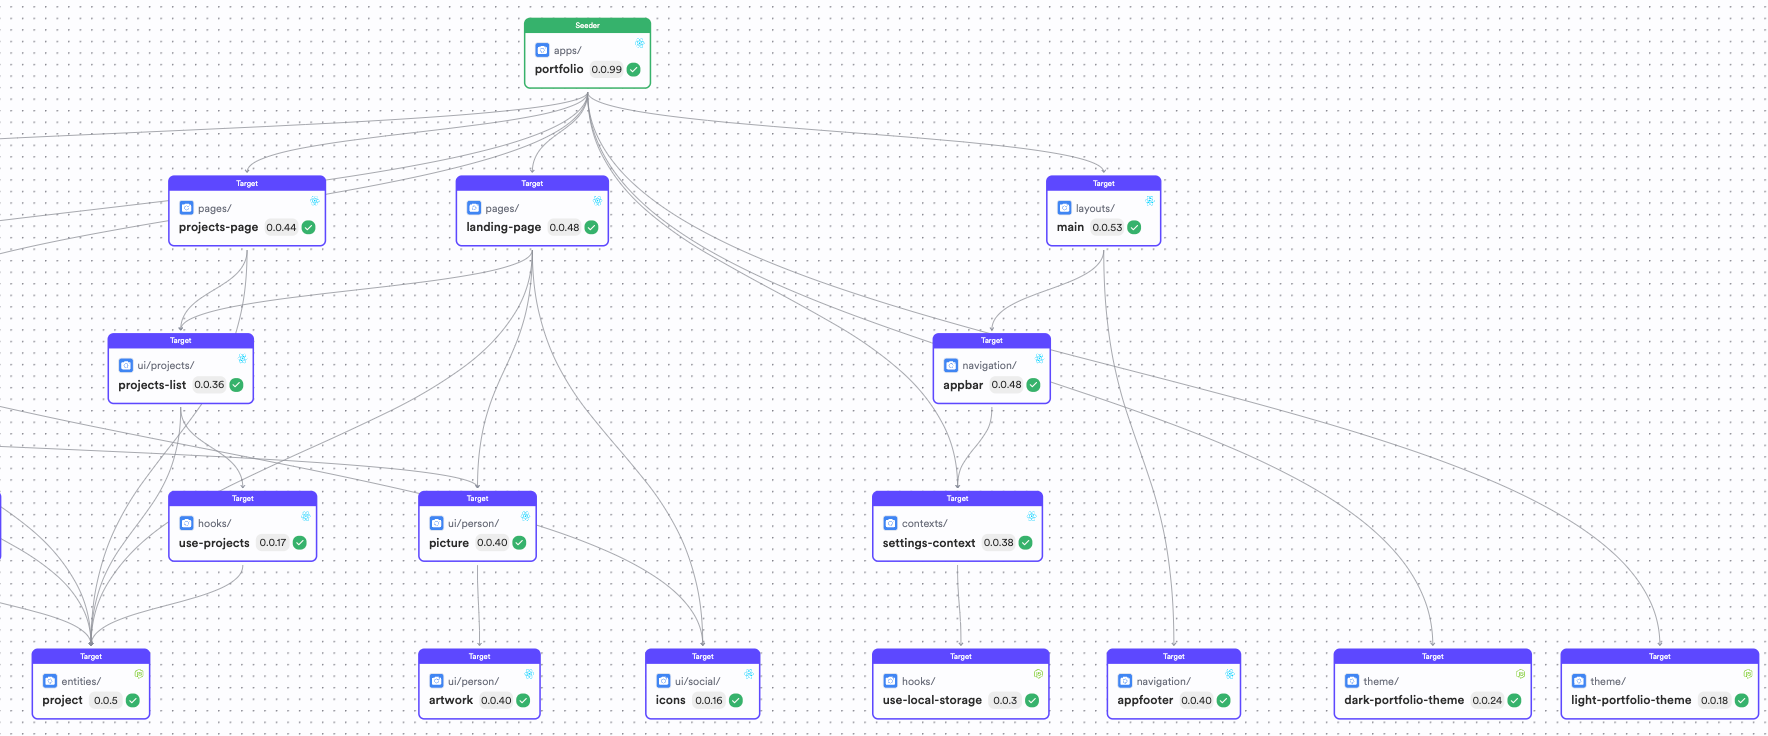
Take a look at the image above. If you look at it closely, you can see it’s comprised of different React components pieced together to form a single React app.
You have components like — picture, items and hooks all aggregated together through compositions that can be swapped at any given time to create a composable React app. By doing so, you make sure that you aren't tied to a single monolith, but rather have the capacity to scale your app without worrying about any monolith limits.
2. State Management

While composability focuses on the structure, state management is the heart of data flow in your React application. This ensures that every component receives the right information at the right time.
State management is the process of controlling and manipulating data that drives the dynamic behavior and UI updates within your React application.
React provides several state management options out of the box, such as React useState, useReducer, and context. However, these tools aren’t always enough to handle the complex data flows of modern applications. Therefore, numerous external state management libraries are out there, such as Redux, MobX, Hookstate, and Zustand, offering additional capabilities.
Let’s quickly take a look at the React inbuilt state management methods that we discussed above. Whether you are a React beginner or an expert, these methods are very crucial in your React journey.
1. useState
Perfect for managing simple, local states within a single component. Think of toggling buttons, handling form data, or tracking basic UI elements. It’s lightweight and efficient for quick interactions.
const Counter = () => {
  const [count, setCount] = useState(0);

const handleClick = () => {
    setCount(count + 1);
  };

return (
    <div>
      <p>Count: {count}</p>
      <button onClick={handleClick}>Increment</button>
    </div>
  );
};
2. useReducer
Ideal for handling complex states with multiple values or derived values. Consider managing complex forms, shopping carts, or global states with intricate dependencies. It offers more control over updates using actions and reducer functions.
const reducer = (state, action) => {
  switch (action.type) {
    case 'increment':
      return { ...state, count: state.count + 1 };
    default:
      return state;
  }
};

const Counter = () => {
  const [state, dispatch] = useReducer(reducer, { count: 0 });

const handleClick = () => {
    dispatch({ type: 'increment' });
  };

return (
    <div>
      <p>Count: {state.count}</p>
      <button onClick={handleClick}>Increment</button>
    </div>
  );
};
3. Context API
Enables sharing data across multiple, related components without prop drilling. Useful for global states like user authentication or theme preferences, keeping component structure clean and maintainable.
// Creates the new context
const ThemeContext = React.createContext('light');

const App = () => {
  const [theme, setTheme] = useState('light');

const toggleTheme = () => {
    setTheme(theme === 'light' ? 'dark' : 'light');
  };

return (
    <ThemeContext.Provider value={theme}>
      <Toolbar toggleTheme={toggleTheme} />
      <Content />
    </ThemeContext.Provider>
  );
};

const Toolbar = ({ toggleTheme }) => {
  // Access the context
  const theme = useContext(ThemeContext);

return (
    <div>
      <p>Current theme: {theme}</p>
      <button onClick={toggleTheme}>Toggle Theme</button>
    </div>
  );
};

const Content = () => {
  // Access the context
  const theme = useContext(ThemeContext);

return (
    <div style={{ backgroundColor: theme }}>
      {/* Content based on theme */}
    </div>
  );
};
There is a lot to cover in React state management; it’s not easy to explain in just a few words. For a deeper understanding, consider reading React’s official documentation.
Additionally, exploring other external state management libraries can unveil many more useful features compared to these built-in methods.
3. Immutability

While managing the state is crucial, ensuring its predictability and stability is equally important. This is where the concept of immutability comes in.
By treating data as immutable, meaning it cannot be directly modified.
With immutability in React, you unlock several benefits:
- Predictable Rendering: When data remains unchanged, React can efficiently determine which components need to re-render, leading to smoother performance and fewer unexpected side effects.
- Easier Debugging: Immutability creates a clear history of changes, allowing you to easily track down the source of issues and debug more effectively.
- State Management Libraries: Many popular state management libraries like Redux, MobX, and HookState are built around the principle of immutability, providing predictable data flow and simplified reasoning.
However, implementing immutability in JavaScript can seem cumbersome due to the mutability of objects. Here are some common approaches:
- Type safety: Declare variables as
constor use Typescript read-only types (readonly<{}>) to prevent accidental modifications. TypeScript's static type checking acts as a robust line of defense, catching potential immutability violations at compile time. - Spread operator: When updating data, utilize spread syntax (
{...object, ...changes}) to create entirely new objects with the desired modifications. This ensures the original data remains untouched, preserving immutability. - Concat and Slice:
concatgenerates a new array by combining existing ones, upholding immutability as long as you deal strictly with arrays andsliceextracts a portion of an array into a new array, ensuring immutability by its inherent nature.
Want to see how to practically use these methods in your project? Then, let’s quickly delve into some examples to get an idea of how to handle type safety, and utilize the spread operator, concat, and slice.
- Type Safety
// Without TypeScript:
let user = { name: "John", age: 30 };
user.age = 31; // Can modify the object accidentally

// With TypeScript:
const user: Readonly<{ name: string; age: number }> = { name: "John", age: 30 };
// user.age = 31; // TypeScript will throw an error
2. Spread Operator
const originalArray = [1, 2, 3];
const newArray = originalArray.concat([4]); // Modifies original array
const updatedArray = [...originalArray, 4]; // Creates a new array with spread

const originalObject = { name: "Jane" };
const updatedObject = { ...originalObject, age: 30 }; // Creates a new object with spread
3. Concat and Slice
const originalArray = [1, 2, 3];
const newArray = originalArray.concat([4]); // Returns a new array
const subArray = originalArray.slice(1, 3); // Returns a new sub-array
Apart from these, there are dedicated libraries for handling immutability, such as Immer, Immutable.js, and immutability-helper.
You don’t need to use all of these in your next project, but the concept of immutability is essential for every React developer. Also, take a look at this React document about immutability.
4. Lifecycle Methods and Hooks

React components undergo a series of well-defined phases throughout their existence, known as their lifecycle.
Understanding these phases and how to leverage them effectively is crucial for building robust and responsive applications.
Traditionally, class-based components relied on lifecycle methods:
You can hook into these stages and perform specific actions. However, with the introduction of Functional Components and Hooks, a new paradigm emerged.
With Functional Components, there’s no need to worry about lifecycle methods like componentDidMount. React Hooks like
useEffectanduseStatecan handle these for you.
useEffect
Think of useEffect as your gateway to performing actions that interact with the outside world, like fetching data, setting up subscriptions, or manipulating the DOM. It executes after a component renders or updates, giving you precise control over when these actions occur.
Here’s how it works:
- Callback function: This function houses the actual side effect logic.
- Dependency array (optional): This array specifies which changes trigger the effect to re-run. An empty array ensures it runs only once on mount.
Example: Fetching data from an API and updating the component’s state:
useEffect(() => {
  fetch('https://api.example.com/data')
    .then(response => response.json())
    .then(data => setData(data));
}, []); // Empty array for one-time execution on mount
useState
Remember our discussion about
useStatein the state management section?
Under the hood, this is a React Hook. Now, let’s revisit them, exploring their functionalities and how they work together within functional components.
Integrating useState:
Imagine you have a counter component that needs to fetch data once it mounts and update the counter value based on the fetched data. You can use useState to manage the counter state and useEffect to trigger the data fetch:
const [data, setData] = useState(null);

useEffect(() => {
  if (!data) {
    fetch('https://api.example.com/data')
      .then(response => response.json())
      .then(data => setData(data));
  }
}, [data]);
In this example, useEffect only runs when the data state is null, ensuring the data is fetched only once on mount.
By mastering these hooks and understanding their interplay, you can build React applications with efficient state management and well-defined lifecycle behaviors.
5. Optimization
Every React developer should have a good knowledge of building optimized applications for enhanced user experiences and better overall efficiency.
1. Code Splitting
This allows you to break down your code into smaller, independent bundles. Users only load the bundles needed for the current view, significantly reducing initial load time.
Popular libraries like React.lazy and dynamic import() make this process seamless.
Example:
// App.js
import React, { Suspense } from 'react';

const Home = React.lazy(() => import('./components/Home'));
const About = React.lazy(() => import('./components/About'));

function App() {
  return (
    <div>
      <Suspense fallback={<div>Loading...</div>}>
        <Home />
      </Suspense>
      <Suspense fallback={<div>Loading...</div>}>
        <About />
      </Suspense>
    </div>
  );
}
Tip: While code splitting offers immense benefits, excessive splitting can lead to many small network requests, impacting performance. So, consider the trade-off between bundle size and loading time for optimal results.
2. Memoization
This comes into play if you want to cache a complex calculation that performs with every render. This prevents redundant computations and unnecessary re-renders, boosting performance. Libraries like React.memo and useMemo simplify implementing this technique.
Example:
// ExpensiveComponent.js
import React, { useMemo } from 'react';

function ExpensiveComponent({ data }) {
  const processedData = useMemo(() => {
    // Perform expensive calculations on data
    return processedResult;
  }, [data]);

return (
    <div>{processedData}</div>
  );
}
Tip: Don’t over-memoize! Use memoization strategically for pure functions and components that re-render frequently due to changing inputs.
Wrapping Up
And that’s pretty much it. Master these 5 practices, and you’ll see a huge improvement in the overall scalability and performance of your React apps.
Here’s a quick recap of what we discussed:
- Composable Architecture: Build modular, scalable, and maintainable applications.
- Effective State Management: Ensure predictable data flow and simplify complex scenarios.
- Immutability: Enhance performance, improve debugging, and embrace safer code.
- Lifecycle Hooks: Leverage useEffect and useState for efficient side effects and state management in functional components.
- Optimization Techniques: Speed up your app with code splitting, memoization, virtualization, and more.
If you have any thoughts or anything you’d like to add, feel free to leave a comment in the discussions!
I hope you found this article helpful.
Thank you for reading.
Recommend
About Joyk
Aggregate valuable and interesting links.
Joyk means Joy of geeK