

Rust on Apache NuttX OS
source link: https://lupyuen.github.io/articles/rust2
Go to the source link to view the article. You can view the picture content, updated content and better typesetting reading experience. If the link is broken, please click the button below to view the snapshot at that time.

Rust on Apache NuttX OS
Rust on Apache NuttX OS
📝 12 Jan 2022
Apache NuttX is an embedded operating system that’s portable across many platforms (8-bit to 64-bit) and works like a tiny version of Linux (because it’s POSIX Compliant).
Can we create (safer) Embedded Apps with Rust on NuttX?
Can we take a Device Driver from Rust Embedded… And run it on NuttX?
Today we shall…
-
Build and run Rust programs on NuttX
-
Access GPIO and SPI ports with Rust Embedded HAL
-
Run the Semtech SX1262 LoRa Driver from Rust Embedded
-
And transmit a LoRa Message over the airwaves with Rust on NuttX!
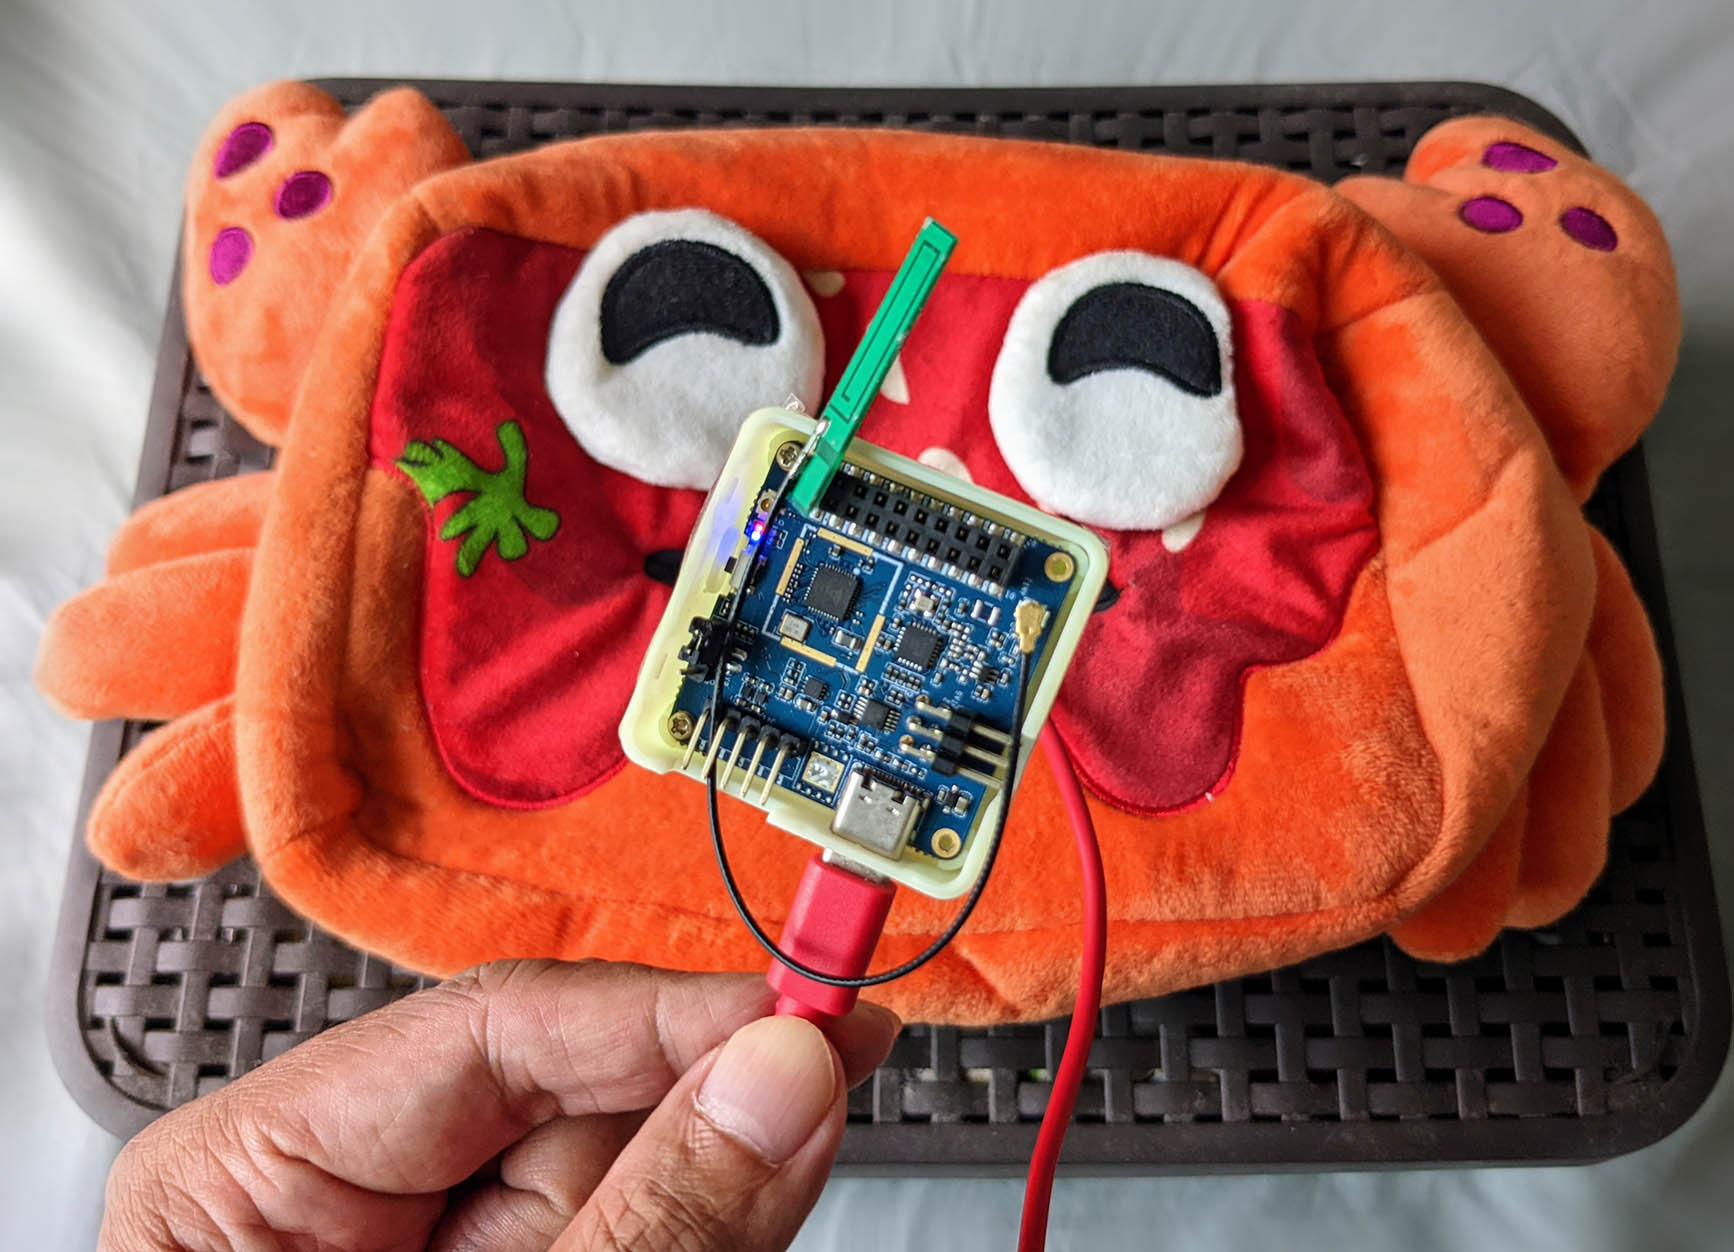
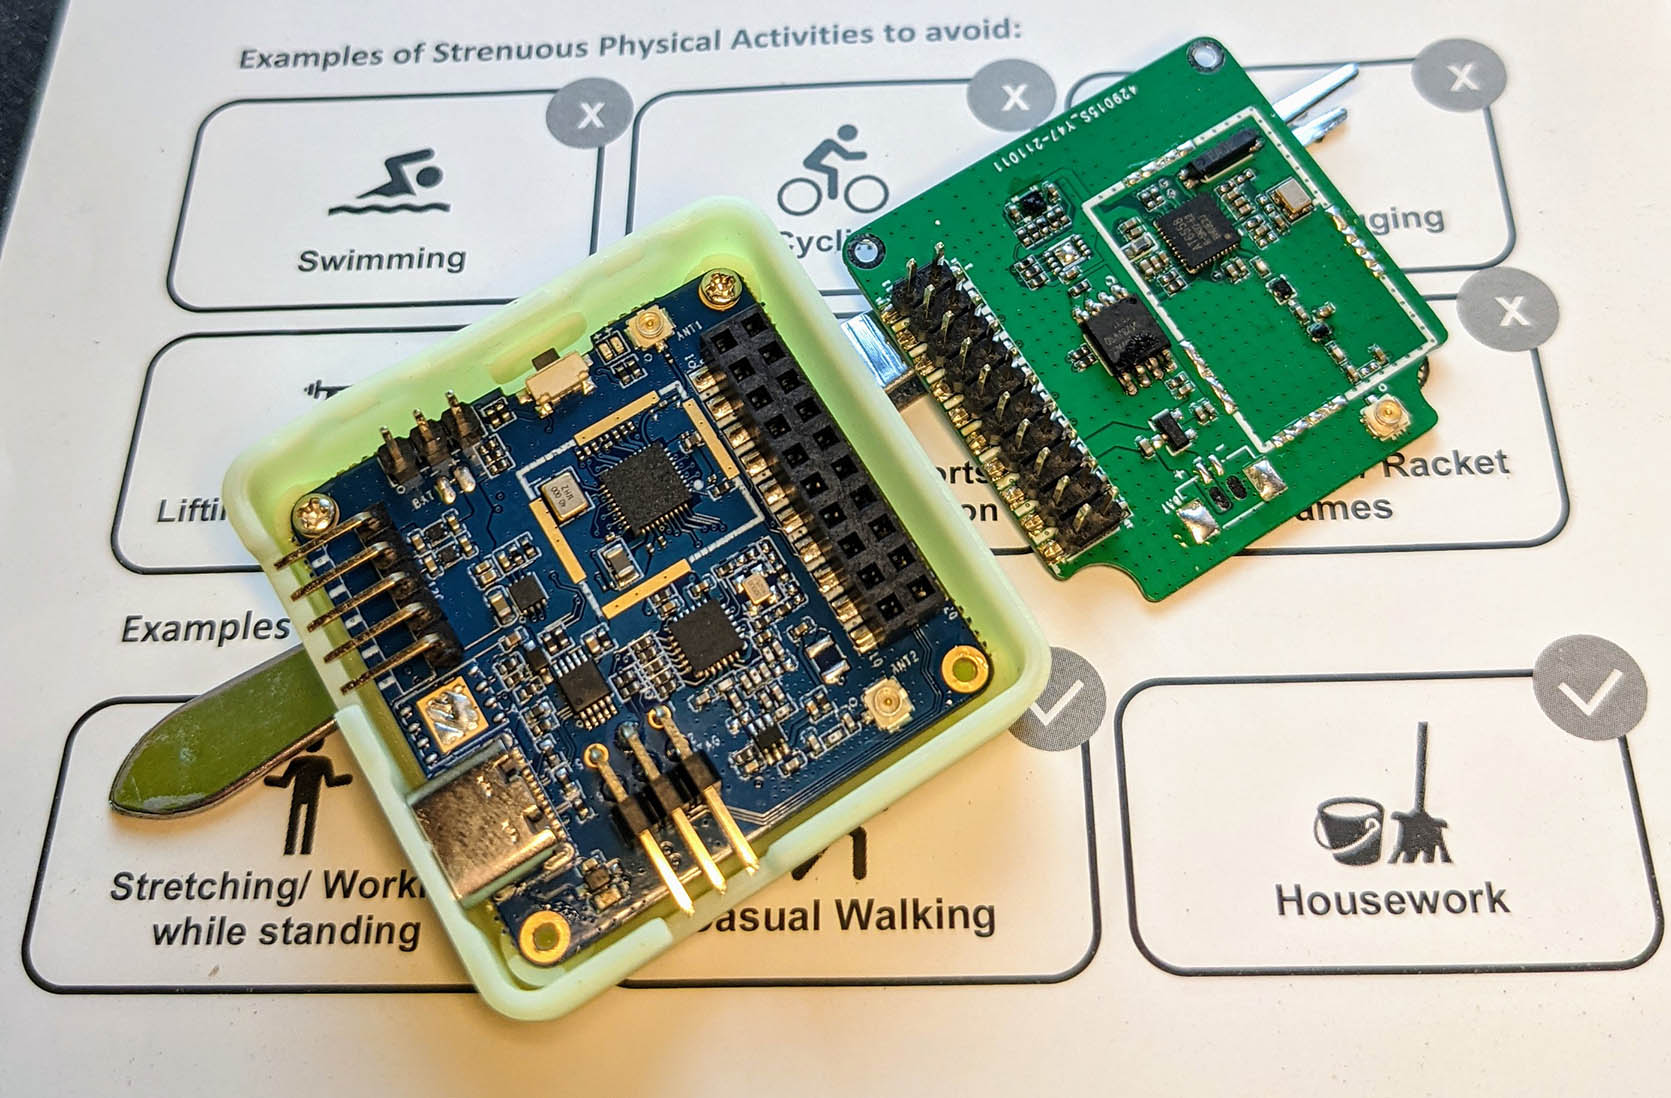
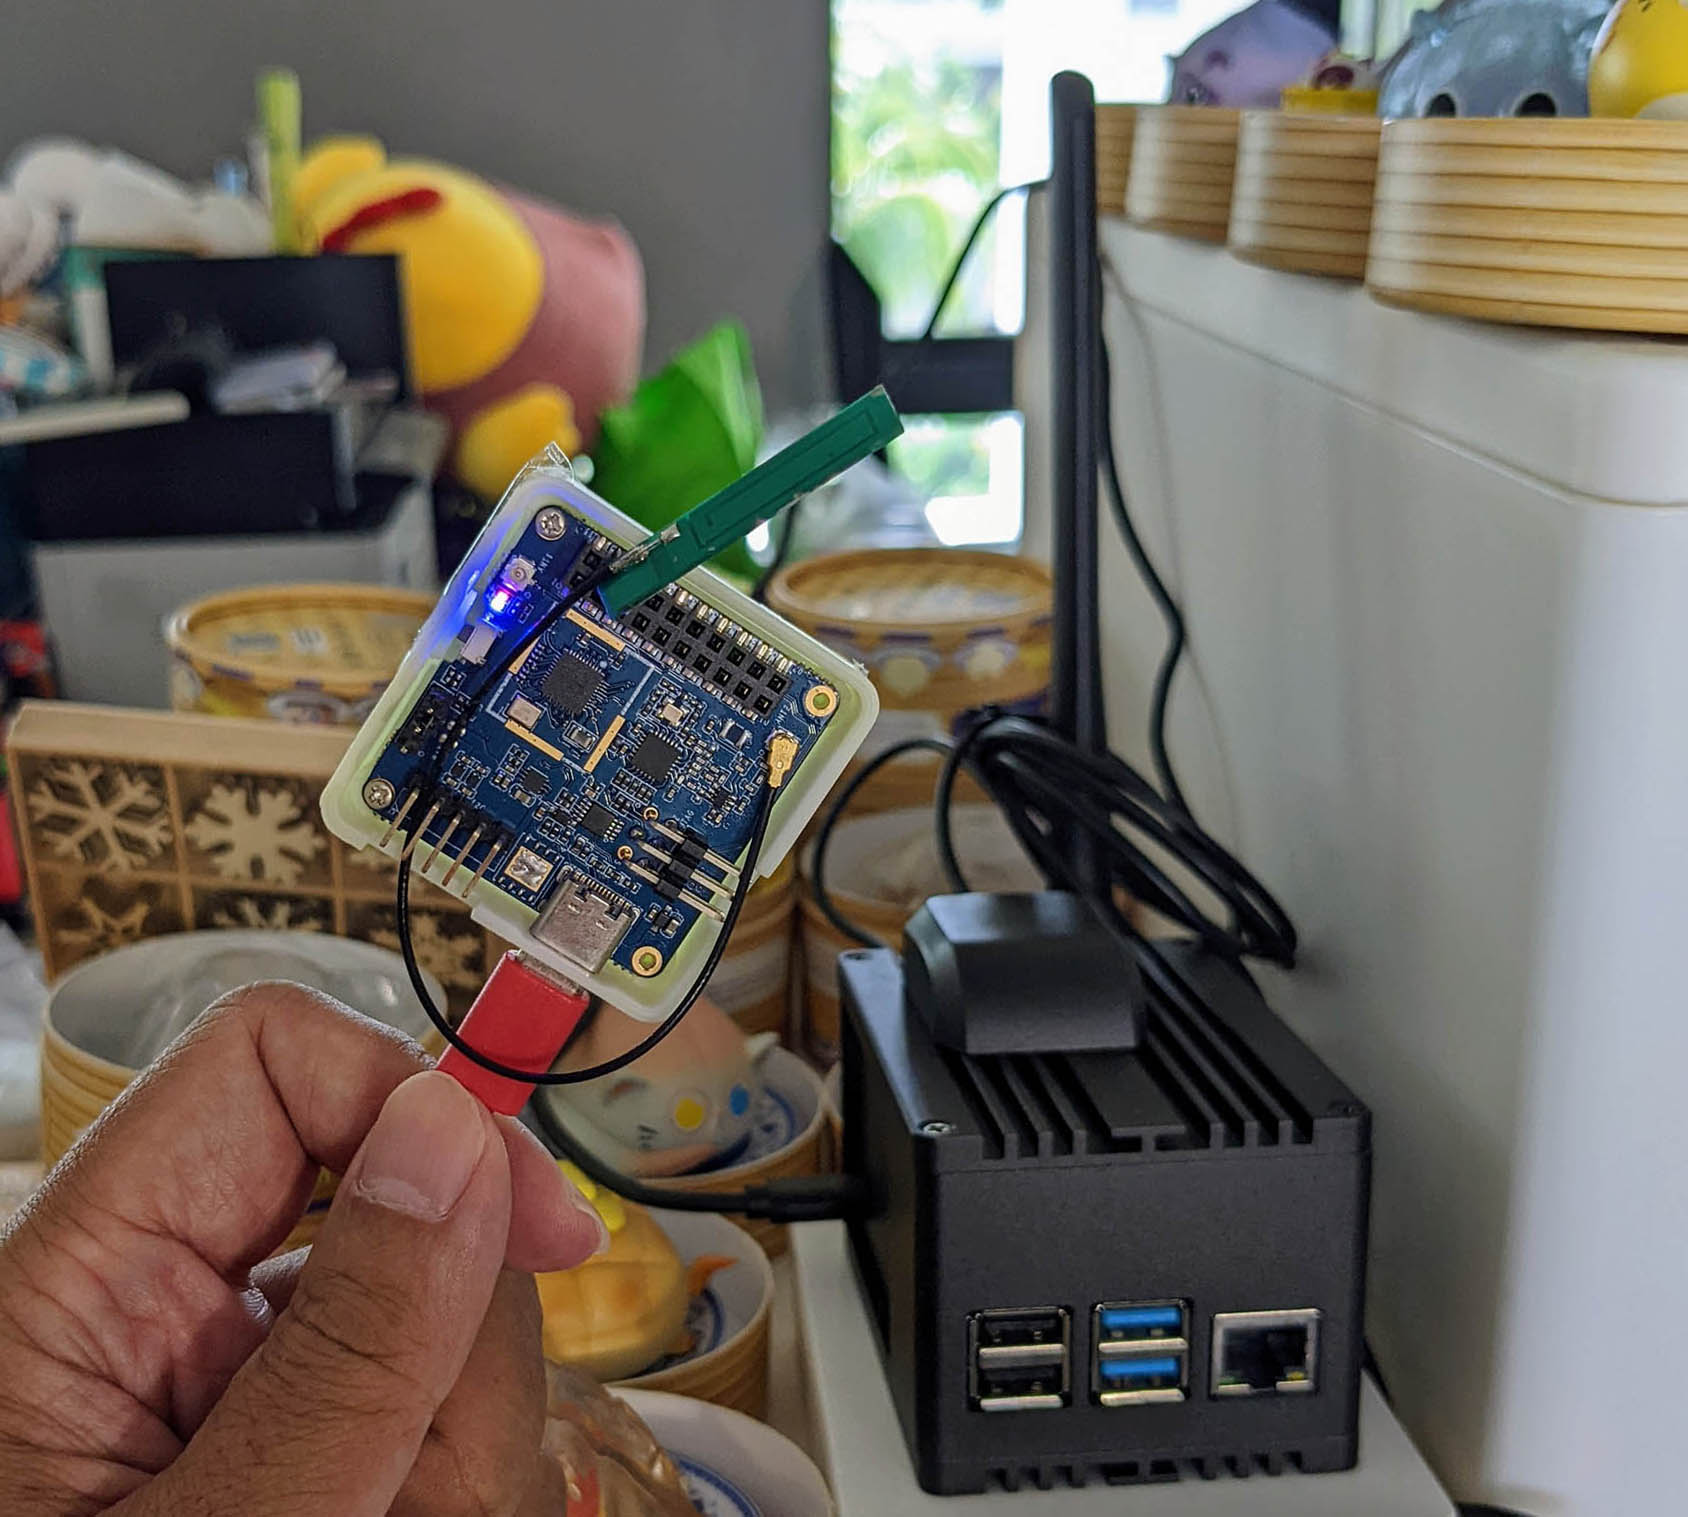
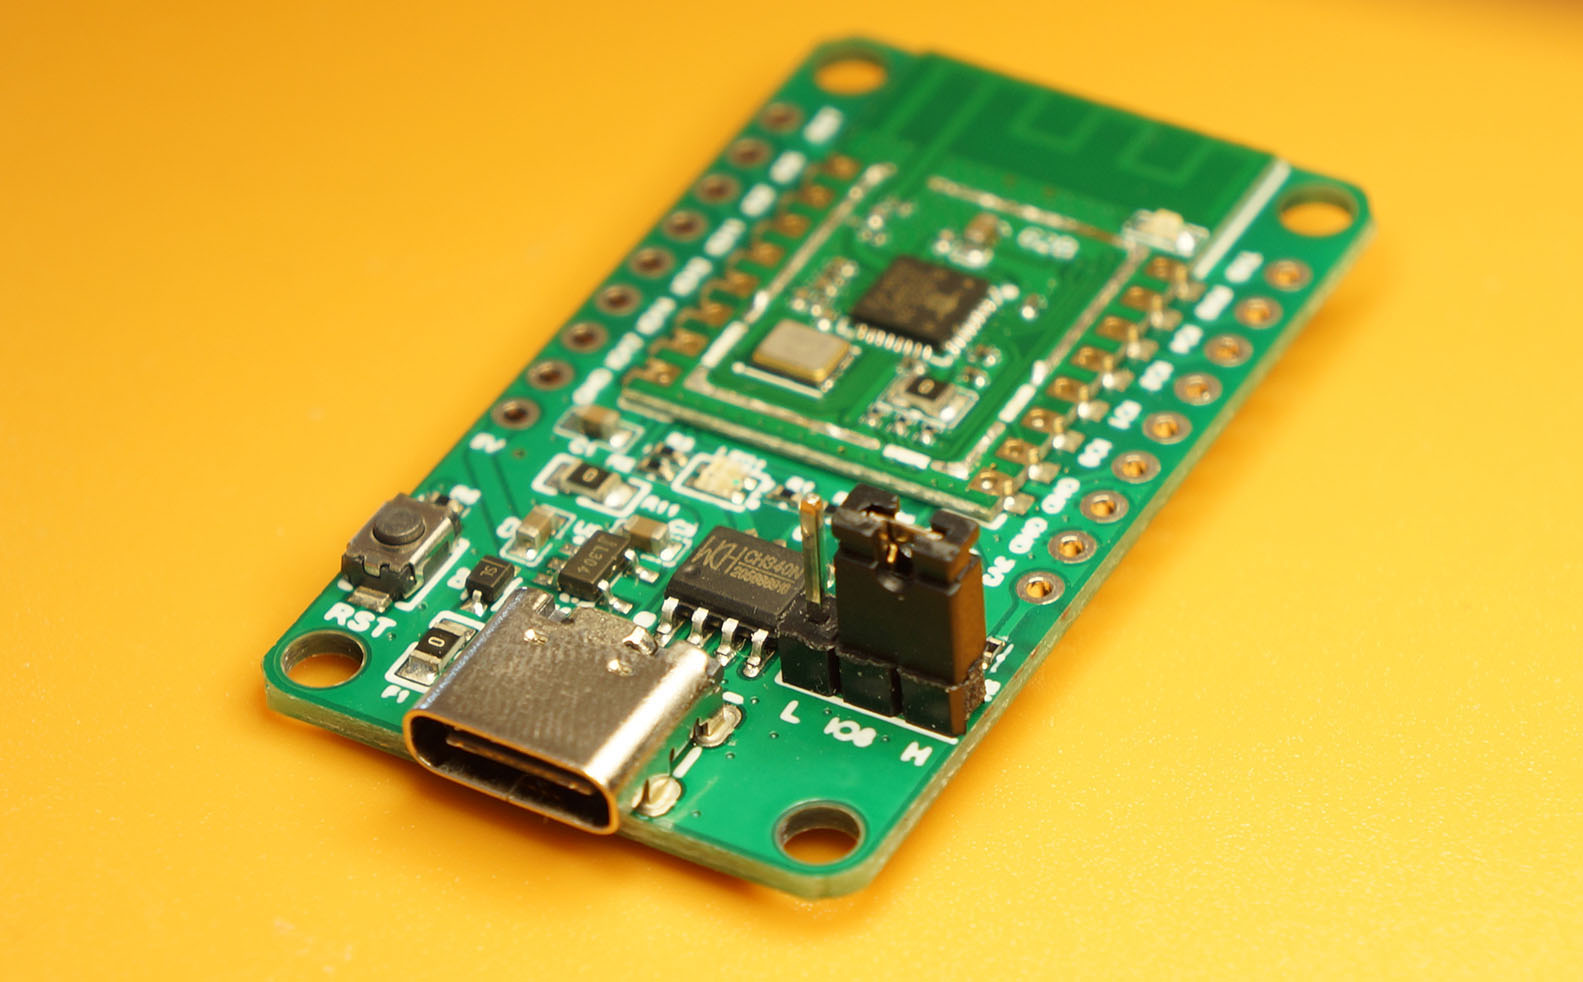
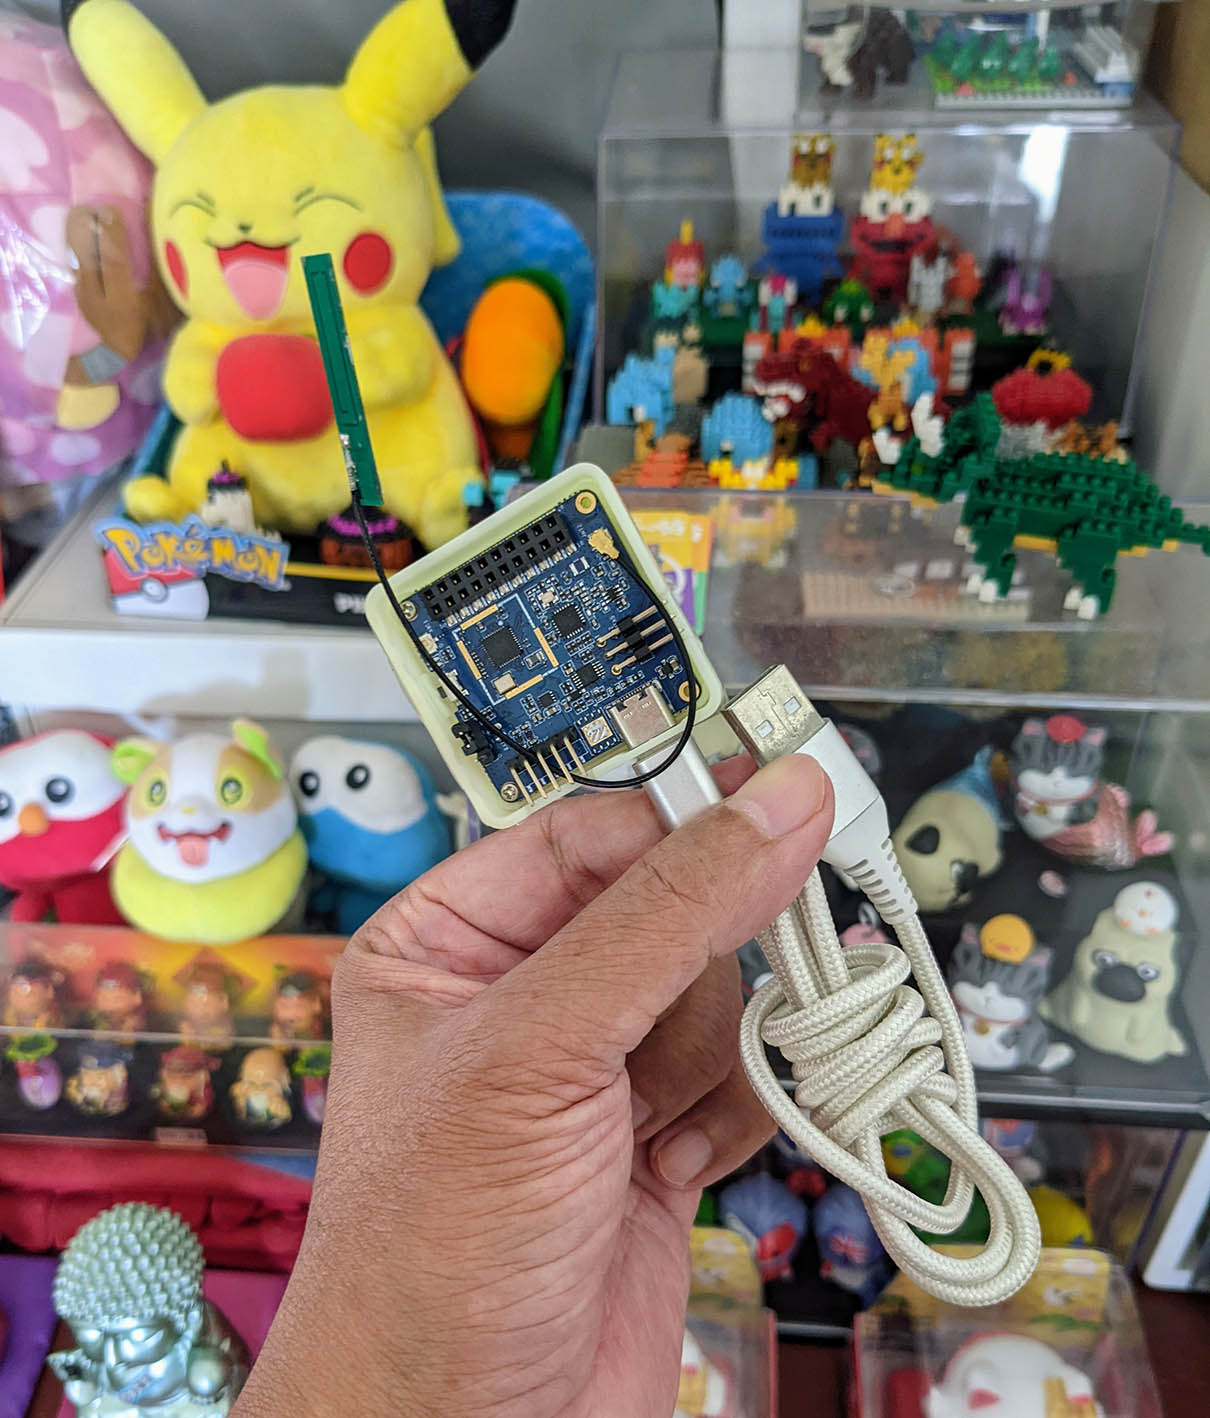
We tested Rust on NuttX with PineDio Stack BL604 RISC-V Board (pic above) and its onboard Semtech SX1262 Transceiver.
But it should work on ESP32, Arm and other NuttX platforms. (With some tweaking)
Caution: Work in Progress! Some spots are rough and rocky, I’m hoping the NuttX and Rust Communities could help to fill in the potholes before release 🙏
1 Rust Meets NuttX
This is the simplest Rust program that will run on NuttX and print “Hello World!”: lib.rs
#![no_std]  //  Use the Rust Core Library instead of the Rust Standard Library, which is not compatible with embedded systems

#[no_mangle]  //  Don't mangle the function name
extern "C" fn rust_main() {  //  Declare `extern "C"` because it will be called by NuttX

  extern "C" {  //  Import C Function
    /// Print a message to the serial console (from C stdio library)
    fn puts(s: *const u8) -> i32;
  }

  unsafe {  //  Mark as unsafe because we are calling C
    //  Print a message to the serial console
    puts(
      b"Hello World!\0"  //  Byte String terminated with null
        .as_ptr()        //  Convert to pointer
    );
  }
}
Let’s break it down from the top…
//  Use the Rust Core Library instead of the Rust Standard Library,
//  which is not compatible with embedded systems
#![no_std]
We select the Rust Core Library (for embedded platforms), which is a subset of the Rust Standard Library (for desktops and servers).
Next we declare the Rust Function that will be called by NuttX…
//  Don't mangle the function name
#[no_mangle]
//  Declare `extern "C"` because it will be called by NuttX
extern "C" fn rust_main() {
(Why is it named “rust_main”? We’ll find out in a while)
NuttX provides the “puts” function because it’s POSIX Compliant (like Linux), so we import it from C…
  //  Import C Function
  extern "C" {
    /// Print a message to the serial console (from C stdio library)
    fn puts(s: *const u8) -> i32;
  }
This declares that “puts”…
-
Accepts a “
*const u8” pointer(Equivalent to “
const uint8_t *” in C) -
Returns an “
i32” result(Equivalent to “
int32_t” in C)
We call “puts” like so…
  //  Mark as unsafe because we are calling C
  unsafe {
    //  Print a message to the serial console
    puts(
      b"Hello World!\0"  //  Byte String terminated with null
        .as_ptr()        //  Convert to pointer
    );
  }
Passing a string from Rust to C looks rather cumbersome…
-
Calls to C Functions must be marked as “
unsafe” -
We construct a Byte String in Rust with the
b"..."syntax -
Rust Strings are not null-terminated! We add the Null Byte ourselves with “
\0” -
We call “
.as_ptr()” to convert the Byte String to a pointer
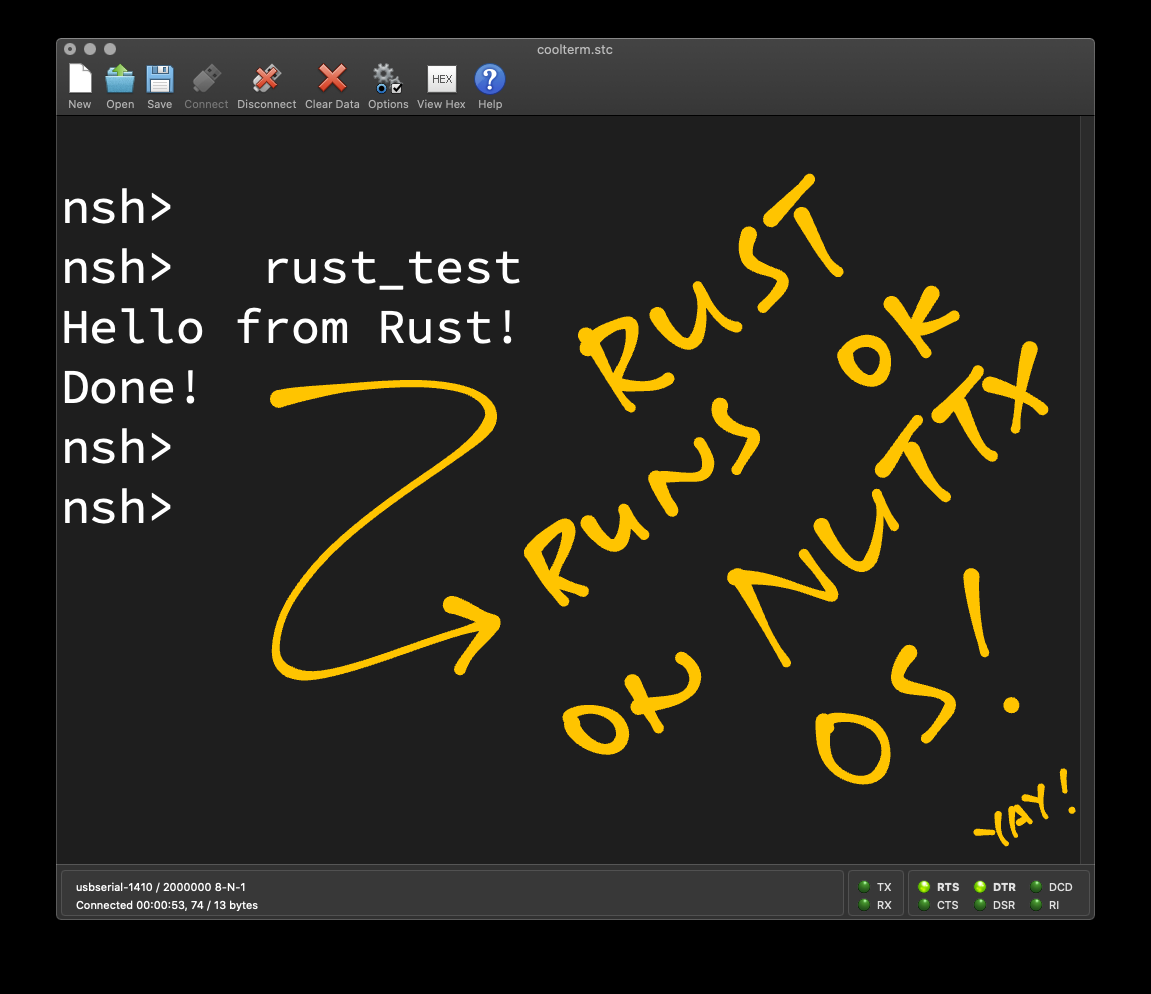
Though it looks messy, the Rust code above runs perfectly fine from the NuttX Shell…
nsh> rust_test

Hello World!
We’ll make it neater in the next chapter.
Is there anything we missed?
We need to define a Panic Handler that will be called when a Runtime Error or Assertion Failure occurs.
(Our Panic Handler is defined here)
2 Putting Things Neatly
Do we really need the cumbersome syntax for “puts” when we print things?
We can do better! Let’s wrap this cumbersome code…
//  Mark as unsafe because we are calling C
unsafe {
  //  Print a message to the serial console
  puts(
    b"Hello World!\0"  //  Byte String terminated with null
      .as_ptr()        //  Convert to pointer
  );
}
…with a Rust Macro. And we’ll get this…
//  Print a message to the serial console
println!("Hello World!");
Much neater! We’ll see later that “println!” supports Formatted Output too.
(println! is defined here. Thanks Huang Qi! 👍)
Why is our Rust Function named rust_main instead of main?
Our Rust code (rust_main) is compiled into a Static Library that will be linked into the NuttX Firmware.
Our NuttX Firmware contains a NuttX App (rust_test) that calls rust_main from C: rust_test_main.c
//  Rust Function defined in rust/src/lib.rs
void rust_main(void);

//  Our Main Function in C...
int main(int argc, FAR char *argv[]) {
  //  Calls the Rust Function
  rust_main();
  return 0;
}
Thus it’s indeed possible to call Rust from C… And C from Rust!
(More about the Rust build script in the Appendix)
3 Flipping GPIO
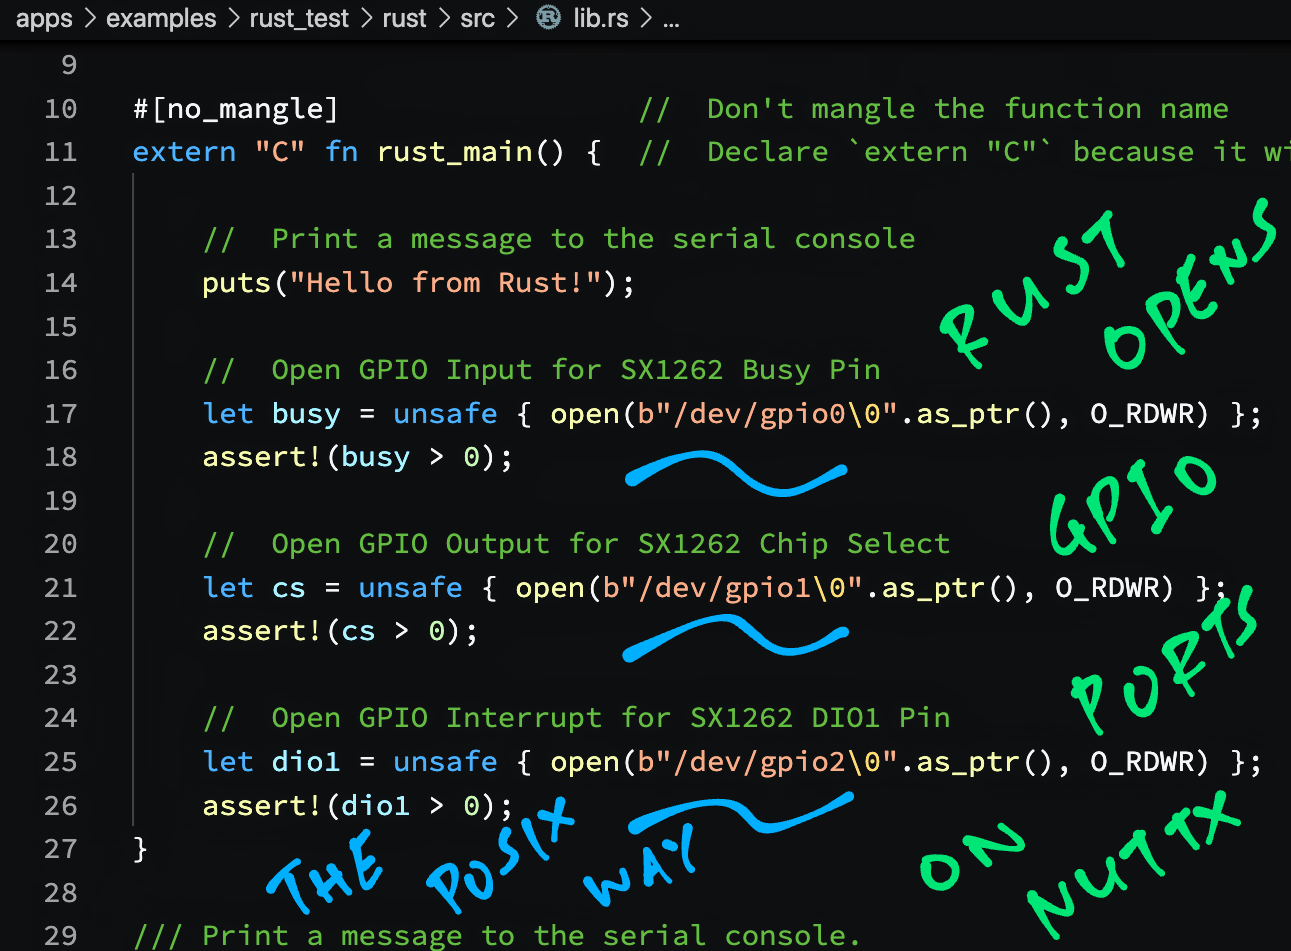
Since we can call NuttX Functions from Rust, let’s flip a GPIO High and Low the POSIX way: lib.rs
//  Open GPIO Output
let cs = unsafe {
  open(b"/dev/gpio1\0".as_ptr(), O_RDWR)
};
assert!(cs > 0);
We open the GPIO Output at “/dev/gpio1” with read-write access.
Then we call ioctl to set the GPIO Output to Low…
//  Set GPIO Output to Low
let ret = unsafe {
  ioctl(cs, GPIOC_WRITE, 0)
};
assert!(ret >= 0);
We sleep for 1 second…
//  Sleep 1 second
unsafe {
  sleep(1);
}
We set the GPIO Output to High…
//  Set GPIO Output to High
let ret = unsafe {
  ioctl(cs, GPIOC_WRITE, 1)
};
assert!(ret >= 0);
Finally we close the GPIO Output…
//  Close the GPIO Output
unsafe {
  close(cs);
}
This code works OK for blinking an LED on a GPIO pin, but we’ll do something more ambitious… Transfer data over SPI!
Won’t this code get really messy when we do lots of GPIO and SPI?
Yep it might get terribly messy! (Like this)
In a while we’ll mop this up with Rust Embedded HAL.
4 Import NuttX Functions
How did we import the NuttX Functions: open, ioctl, sleep, close, …?
We imported the NuttX Functions like so: lib.rs
extern "C" {  //  Import NuttX Functions. TODO: Import with bindgen
  pub fn open(path: *const u8, oflag: i32, ...) -> i32;
  pub fn read(fd: i32, buf: *mut u8, count: u32) -> i32;
  pub fn write(fd: i32, buf: *const u8, count: u32) -> i32;
  pub fn close(fd: i32) -> i32;
  pub fn ioctl(fd: i32, request: i32, ...) -> i32;  //  On NuttX: request is i32, not u64 like Linux
  pub fn sleep(secs: u32) -> u32;
  pub fn usleep(usec: u32) -> u32;
  pub fn exit(status: u32) -> !;  //  Does not return
}
We (very carefully) imported the NuttX Constants as well: lib.rs
//  Import NuttX Constants. TODO: Import with bindgen from https://github.com/lupyuen/incubator-nuttx/blob/rust/include/nuttx/ioexpander/gpio.h
pub const GPIOC_WRITE: i32 = _GPIOBASE | 1;  //  _GPIOC(1)
pub const GPIOC_READ:  i32 = _GPIOBASE | 2;  //  _GPIOC(2)
pub const _GPIOBASE:   i32 = 0x2300;         //  GPIO driver commands
pub const O_RDWR:      i32 = O_RDOK|O_WROK;  //  Open for both read & write access
(Someday we should auto-generate the Rust Bindings for NuttX with the bindgen tool)
5 Rust Embedded HAL
What is Rust Embedded HAL?
Rust Embedded HAL (Hardware Abstraction Layer) defines a standard interface that’s used by Rust Embedded Device Drivers to access the hardware: GPIO, SPI, I2C, …
(Check out the Rust Embedded Drivers)
What if we implement Rust Embedded HAL for NuttX: GPIO, SPI, I2C, …?
That would be super interesting… It means that we can pick any Rust Embedded Driver and run it on NuttX! (Theoretically)
In a while we’ll test the Semtech SX1262 LoRa Driver from Rust Embedded, and see if it works on NuttX!
How do we call Rust Embedded HAL from NuttX?
We have created a barebones Rust Embedded HAL for NuttX.
(More details in the Appendix)
To call it, we import the NuttX HAL Module (nuttx_hal) and Rust Embedded Library like so: lib.rs
//  Import NuttX HAL Module
mod nuttx_hal;

//  Import Libraries
use embedded_hal::{       //  Rust Embedded HAL
  digital::v2::OutputPin, //  GPIO Output
  blocking::{             //  Blocking I/O
    delay::DelayMs,       //  Delay Interface
    spi::Transfer,        //  SPI Transfer
  },
};
(NuttX HAL Module lives in its own source file nuttx_hal.rs)
To open GPIO Output “/dev/gpio1” we do this: lib.rs
//  Open GPIO Output
let mut cs = nuttx_hal::OutputPin
  ::new("/dev/gpio1");
(Looks cleaner now!)
We declare it as “mut” (mutable) because we expect its Internal State to change as we flip the GPIO.
Next we fetch the Delay Interface that we’ll call to sleep…
//  Get a Delay Interface
let mut delay = nuttx_hal::Delay
  ::new();
Then we set the GPIO Output to Low…
//  Set GPIO Output to Low
cs.set_low()
  .expect("cs failed");
(“expect” works like an Assertion Check)
We sleep for 1 second…
//  Wait 1 second (1,000 milliseconds)
delay.delay_ms(1000);
Finally we set the GPIO Output to High…
//  Set GPIO Output to High
cs.set_high()
  .expect("cs failed");
Rust Embedded HAL makes GPIO programming more fun! Let’s do SPI now.
6 SPI Transfer
Let’s test SPI Data Transfer to the Semtech SX1262 LoRa Transceiver.
For PineDio Stack BL604 with its onboard SX1262 (pic above), we control SPI Chip Select ourselves via GPIO Output “/dev/gpio1”
We begin by opening the GPIO Output for SPI Chip Select: lib.rs
/// Test the NuttX Embedded HAL by reading SX1262 Register 8
fn test_hal() {

  //  Open GPIO Output for SX1262 Chip Select
  let mut cs = nuttx_hal::OutputPin
    ::new("/dev/gpio1");
Next we open the SPI Bus…
  //  Open SPI Bus for SX1262
  let mut spi = nuttx_hal::Spi
    ::new("/dev/spitest0");
“/dev/spitest0” is our SPI Test Driver that simplifies SPI programming. (See this)
Before talking to SX1262, we set Chip Select to Low…
  //  Set SX1262 Chip Select to Low
  cs.set_low()
    .expect("cs failed");
We transmit 5 bytes of data to SX1262 over SPI…
  //  Define the SX1262 Command: Read Register 8
  let mut data: [ u8; 5 ] = [ 0x1d, 0x00, 0x08, 0x00, 0x00 ];

  //  Transfer the command to SX1262 over SPI
  spi.transfer(&mut data)
    .expect("spi failed");
The data transmitted over SPI is the SX1262 Command that will read SX1262 Register 8…
1D 00 08 00 00We pass the data as a Mutable Reference “&mut” because we expect the contents to be changed during the SPI Transfer.
The value of SX1262 Register 8 is returned as the last byte of the SPI Response…
println!("test_hal: SX1262 Register 8 is 0x{:02x}", data[4]);We set Chip Select to High…
  //  Set SX1262 Chip Select to High
  cs.set_high()
    .expect("cs failed");
And we’re done! Running this Rust code on NuttX shows…
nsh> rust_test
...
test_hal: SX1262 Register 8 is 0x80That’s the correct value of SX1262 Register 8: 0x80!
(Later we’ll talk about building and flashing the NuttX Firmware)
7 Rust Driver for LoRa SX1262
Can we pick ANY Device Driver from Rust Embedded…
And run it on NuttX?
Now that we have a (barebones) Rust Embedded HAL for NuttX, let’s find out!
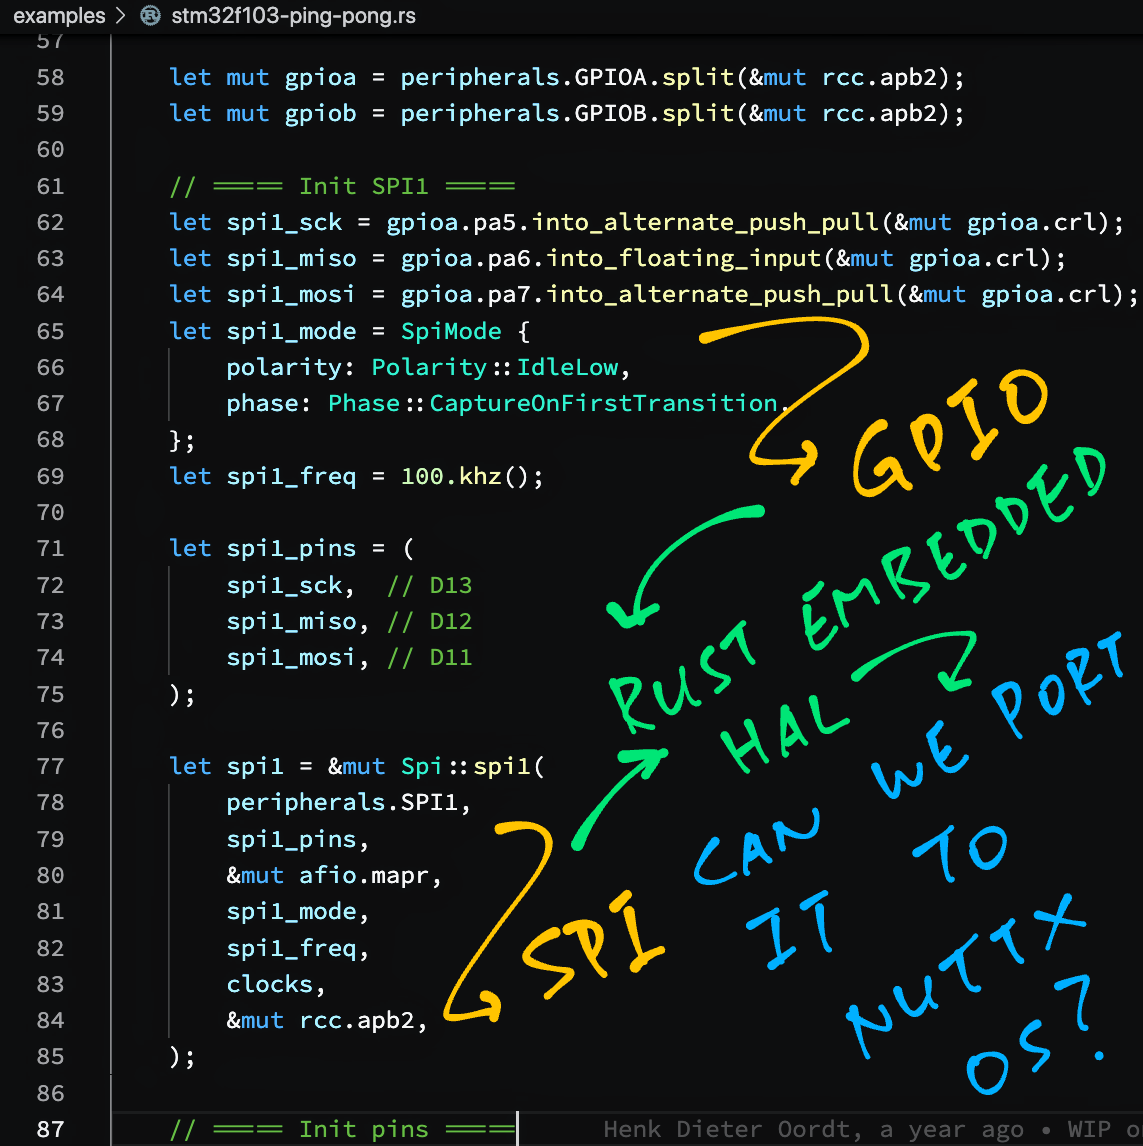
We’ll test this Rust Embedded Driver for Semtech SX1262…
That we tweaked slightly from tweedegolf/sx126x-rs
(Details in the Appendix. Thanks Tweede golf! 👍)
Let’s do the same test as last chapter: Read SX1262 Register 8
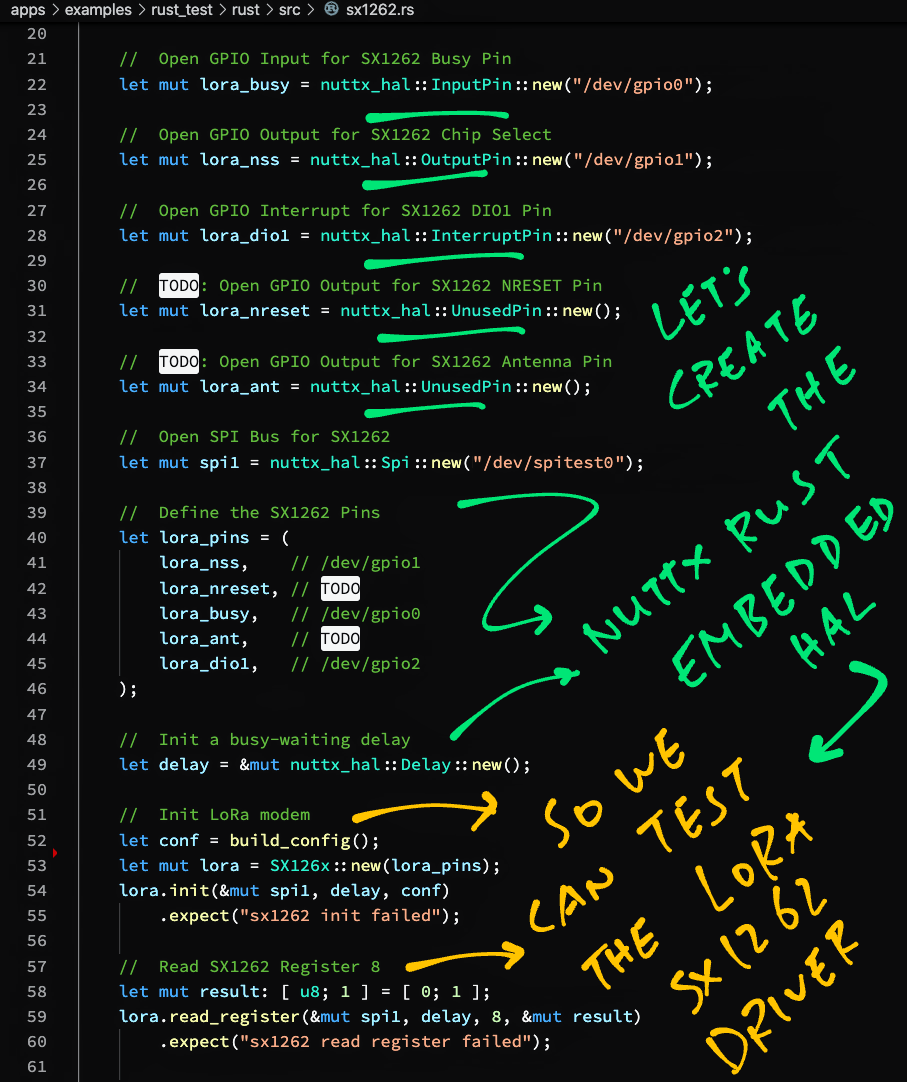
We begin by opening the GPIO Input, Output and Interrupt Pins for SX1262: sx1262.rs
/// Test the SX1262 Driver by reading a register.
/// Based on https://github.com/tweedegolf/sx126x-rs/blob/master/examples/stm32f103-ping-pong.rs
pub fn test_sx1262() {

  //  Open GPIO Input for SX1262 Busy Pin
  let lora_busy = nuttx_hal::InputPin
    ::new("/dev/gpio0");

  //  Open GPIO Output for SX1262 Chip Select
  let lora_nss = nuttx_hal::OutputPin
    ::new("/dev/gpio1");

  //  Open GPIO Interrupt for SX1262 DIO1 Pin
  let lora_dio1 = nuttx_hal::InterruptPin
    ::new("/dev/gpio2");
(We won’t handle interrupts today)
The NRESET and Antenna Pins are unused for now…
  //  TODO: Open GPIO Output for SX1262 NRESET Pin
  let lora_nreset = nuttx_hal::UnusedPin
    ::new();

  //  TODO: Open GPIO Output for SX1262 Antenna Pin
  let lora_ant = nuttx_hal::UnusedPin
    ::new();

  //  Open SPI Bus for SX1262
  let mut spi1 = nuttx_hal::Spi
    ::new("/dev/spitest0");
And we open the SPI Bus like before.
We define the pins for our SX1262 Driver…
  //  Define the SX1262 Pins
  let lora_pins = (
    lora_nss,    // /dev/gpio1
    lora_nreset, // TODO
    lora_busy,   // /dev/gpio0
    lora_ant,    // TODO
    lora_dio1,   // /dev/gpio2
  );

  //  Init a busy-waiting delay
  let delay = &mut nuttx_hal::Delay
    ::new();
We initialise the SX1262 Driver…
  //  Build the SX1262 Configuration
  let conf = build_config();

  //  Construct the SX1262 Driver
  let mut lora = SX126x::new(lora_pins);

  //  Init the SX1262 Driver
  lora.init(&mut spi1, delay, conf)
.expect("sx1262 init failed");(build_config is defined here)
Lastly we read SX1262 Register 8 and print the result…
  //  Init Result Buffer as 1 byte of 0x00
  let mut result: [ u8; 1 ] = [ 0; 1 ];

  //  Read SX1262 Register 8 into Result Buffer
  lora.read_register(&mut spi1, delay, 8, &mut result)
    .expect("sx1262 read register failed");

  //  Show the register value
  println!("test_sx1262: SX1262 Register 8 is 0x{:02x}", result[0]);
When we run the Rust code we’ll see…
nsh> rust_test
...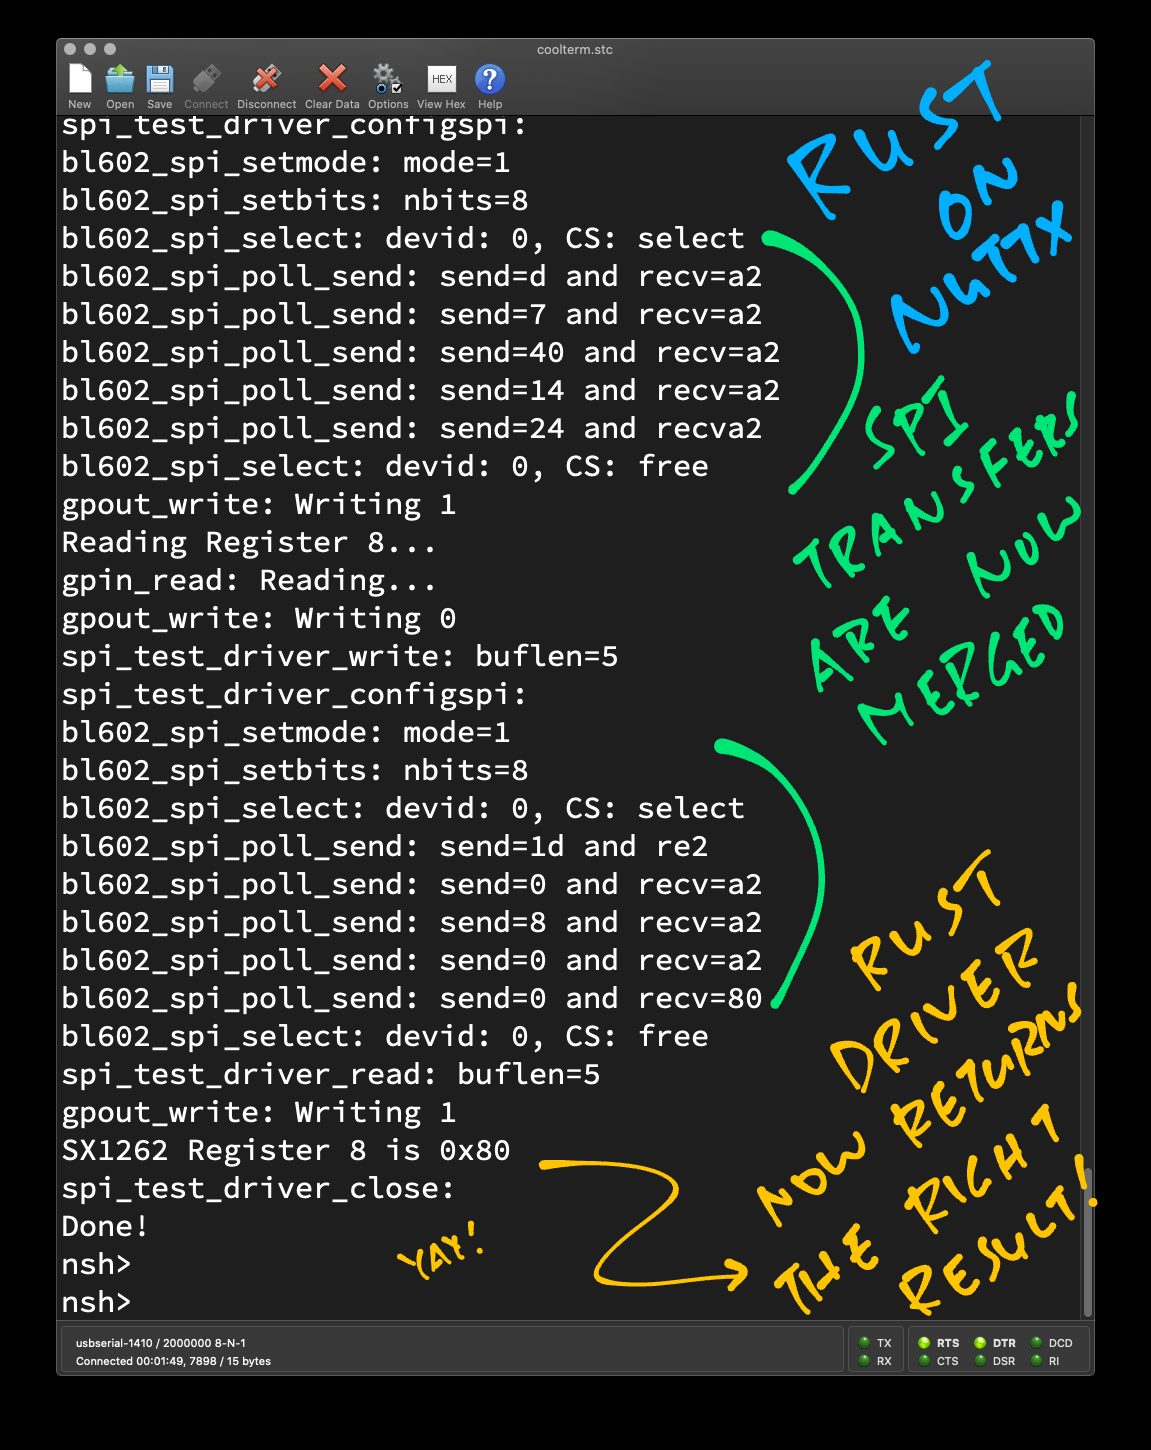
test_sx1262: SX1262 Register 8 is 0x80Which is the same result from the previous chapter. Yep the Rust Driver works OK with our NuttX Embedded HAL!
Let’s test the Rust Driver to the limit… And send a LoRa Message over the airwaves!
8 Transmit LoRa Message
For our final test we shall transmit a LoRa Message with the Rust Driver for SX1262.
We configure the LoRa Frequency for our region like so: sx1262.rs
/// TODO: Change this to your LoRa Frequency
// const RF_FREQUENCY: u32 = 868_000_000; // 868 MHz (EU)
// const RF_FREQUENCY: u32 = 915_000_000; // 915 MHz (US)
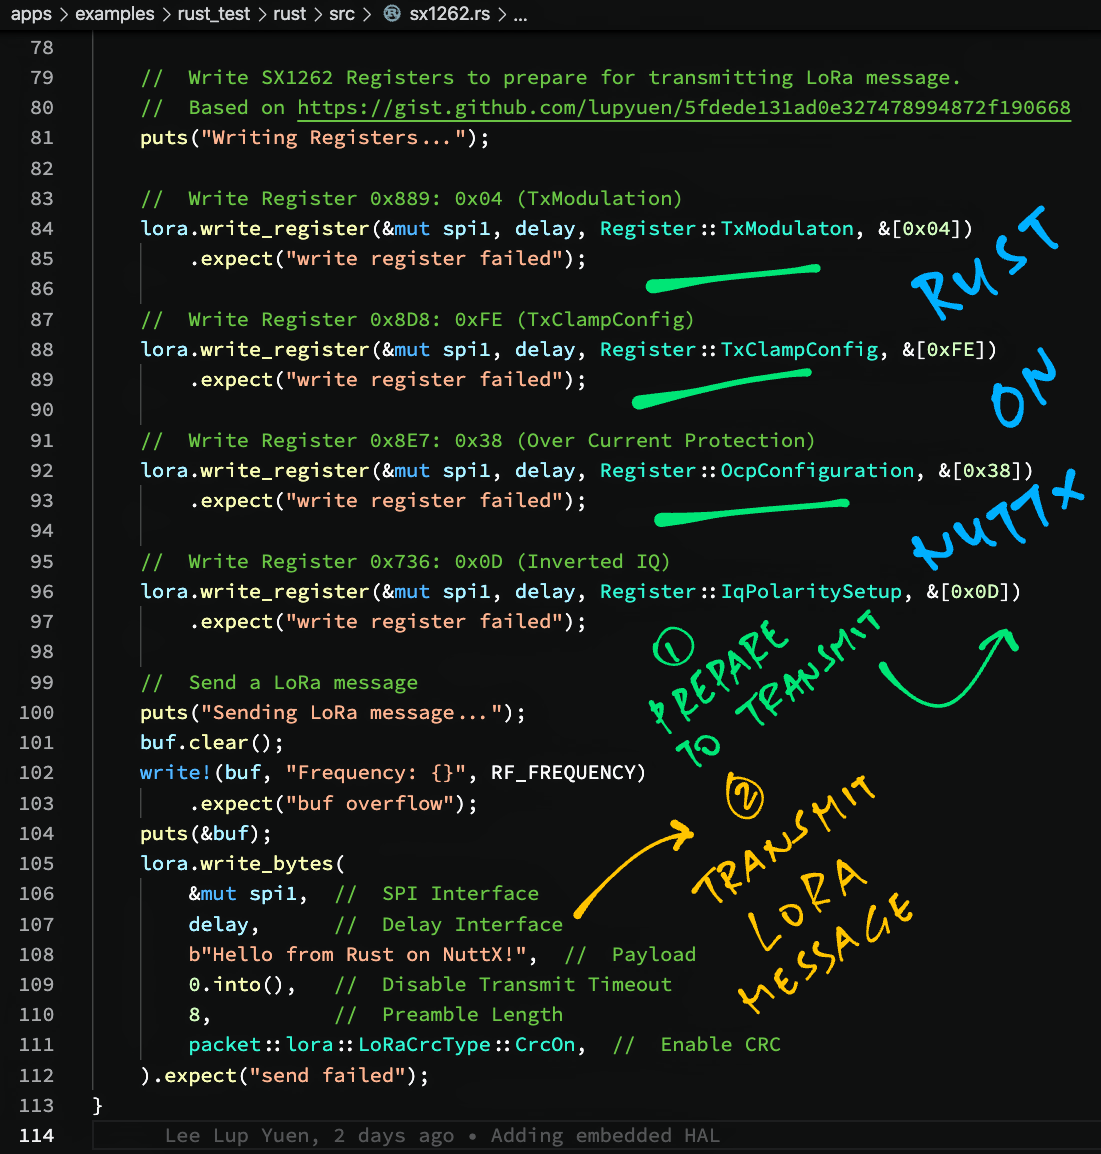
const RF_FREQUENCY: u32 = 923_000_000; // 923 MHz (Asia)We prepare for LoRa Transmission by setting some SX1262 Registers: sx1262.rs
/// Transmit a LoRa Message.
/// Based on https://github.com/tweedegolf/sx126x-rs/blob/master/examples/stm32f103-ping-pong.rs
pub fn test_sx1262() {
  //  Omitted: Init the SX1262 Driver
  ...
  //  Write SX1262 Registers to prepare for transmitting LoRa message.
  //  Based on https://gist.github.com/lupyuen/5fdede131ad0e327478994872f190668
  //  and https://docs.google.com/spreadsheets/d/14Pczf2sP_Egnzi5_nikukauL2iTKA03Qgq715e50__0/edit?usp=sharing

  //  Write Register 0x889: 0x04 (TxModulation)
  lora.write_register(&mut spi1, delay, Register::TxModulaton, &[0x04])
    .expect("write register failed");

  //  Write Register 0x8D8: 0xFE (TxClampConfig)
  lora.write_register(&mut spi1, delay, Register::TxClampConfig, &[0xFE])
    .expect("write register failed");

  //  Write Register 0x8E7: 0x38 (Over Current Protection)
  lora.write_register(&mut spi1, delay, Register::OcpConfiguration, &[0x38])
    .expect("write register failed");

  //  Write Register 0x736: 0x0D (Inverted IQ)
  lora.write_register(&mut spi1, delay, Register::IqPolaritySetup, &[0x0D])
.expect("write register failed");Then we transmit a LoRa Message over the airwaves…
  //  Send a LoRa message
  lora.write_bytes(
    &mut spi1,  //  SPI Interface
    delay,      //  Delay Interface
    b"Hello from Rust on NuttX!",  //  Payload
    0.into(),   //  Disable Transmit Timeout
    8,          //  Preamble Length
    packet::lora::LoRaCrcType::CrcOn,  //  Enable CRC
  ).expect("send failed");
Containing the Message Payload…
Hello from Rust on NuttX!And we’re done! We’ll see the results in a while. But first we run through the steps to build and flash our Rusty NuttX Firmware.
9 Download Source Code
To run Rust on NuttX, download the modified source code for NuttX OS and NuttX Apps…
mkdir nuttx
cd nuttx
git clone --recursive --branch rust https://github.com/lupyuen/incubator-nuttx nuttx
git clone --recursive --branch rust https://github.com/lupyuen/incubator-nuttx-apps apps
Or if we prefer to add the Rust Library and App to our NuttX Project, follow these instructions…
10 Build The Firmware
Let’s build the NuttX Firmware that contains our Rust App…
-
Install the build prerequisites…
-
Assume that we have downloaded the NuttX Source Code…
-
Edit the Pin Definitions…
# For BL602 and BL604:
nuttx/boards/risc-v/bl602/bl602evb/include/board.h

# For ESP32: Change "esp32-devkitc" to our ESP32 board
nuttx/boards/xtensa/esp32/esp32-devkitc/src/esp32_gpio.c
Check that the Semtech SX1262 Pins are configured correctly in board.h or esp32_gpio.c…
-
Configure the build…
cd nuttx # For BL602: Configure the build for BL602 ./tools/configure.sh bl602evb:nsh # For ESP32: Configure the build for ESP32. # TODO: Change "esp32-devkitc" to our ESP32 board. ./tools/configure.sh esp32-devkitc:nsh # Edit the Build Config make menuconfig -
Enable the GPIO Driver in menuconfig…
-
Enable the SPI Peripheral, SPI Character Driver and SPI Test Driver…
-
Enable GPIO and SPI Logging for easier troubleshooting…
-
Enable Stack Canaries for stack checking…
Check the box for “Build Setup” → “Debug Options” → “Compiler Stack Canaries”
-
Enable Stack Backtrace for easier troubleshooting…
Check the box for “RTOS Features” → “Stack Backtrace”
-
Enable our Rust Library…
Check the box for “Library Routines” → “Rust Library”
-
Enable our Rust Test App…
Check the box for “Application Configuration” → “Examples” → “Rust Test App”
-
Save the configuration and exit menuconfig
-
For ESP32: Edit the function esp32_bringup in this file…
# Change "esp32-devkitc" to our ESP32 board
nuttx/boards/xtensa/esp32/esp32-devkitc/src/esp32_bringup.c
And call spi_test_driver_register to register our SPI Test Driver.
-
Build, flash and run the NuttX Firmware on BL602 or ESP32…
11 Run The Firmware
We’re ready to run the NuttX Firmware and test our Rust App!
-
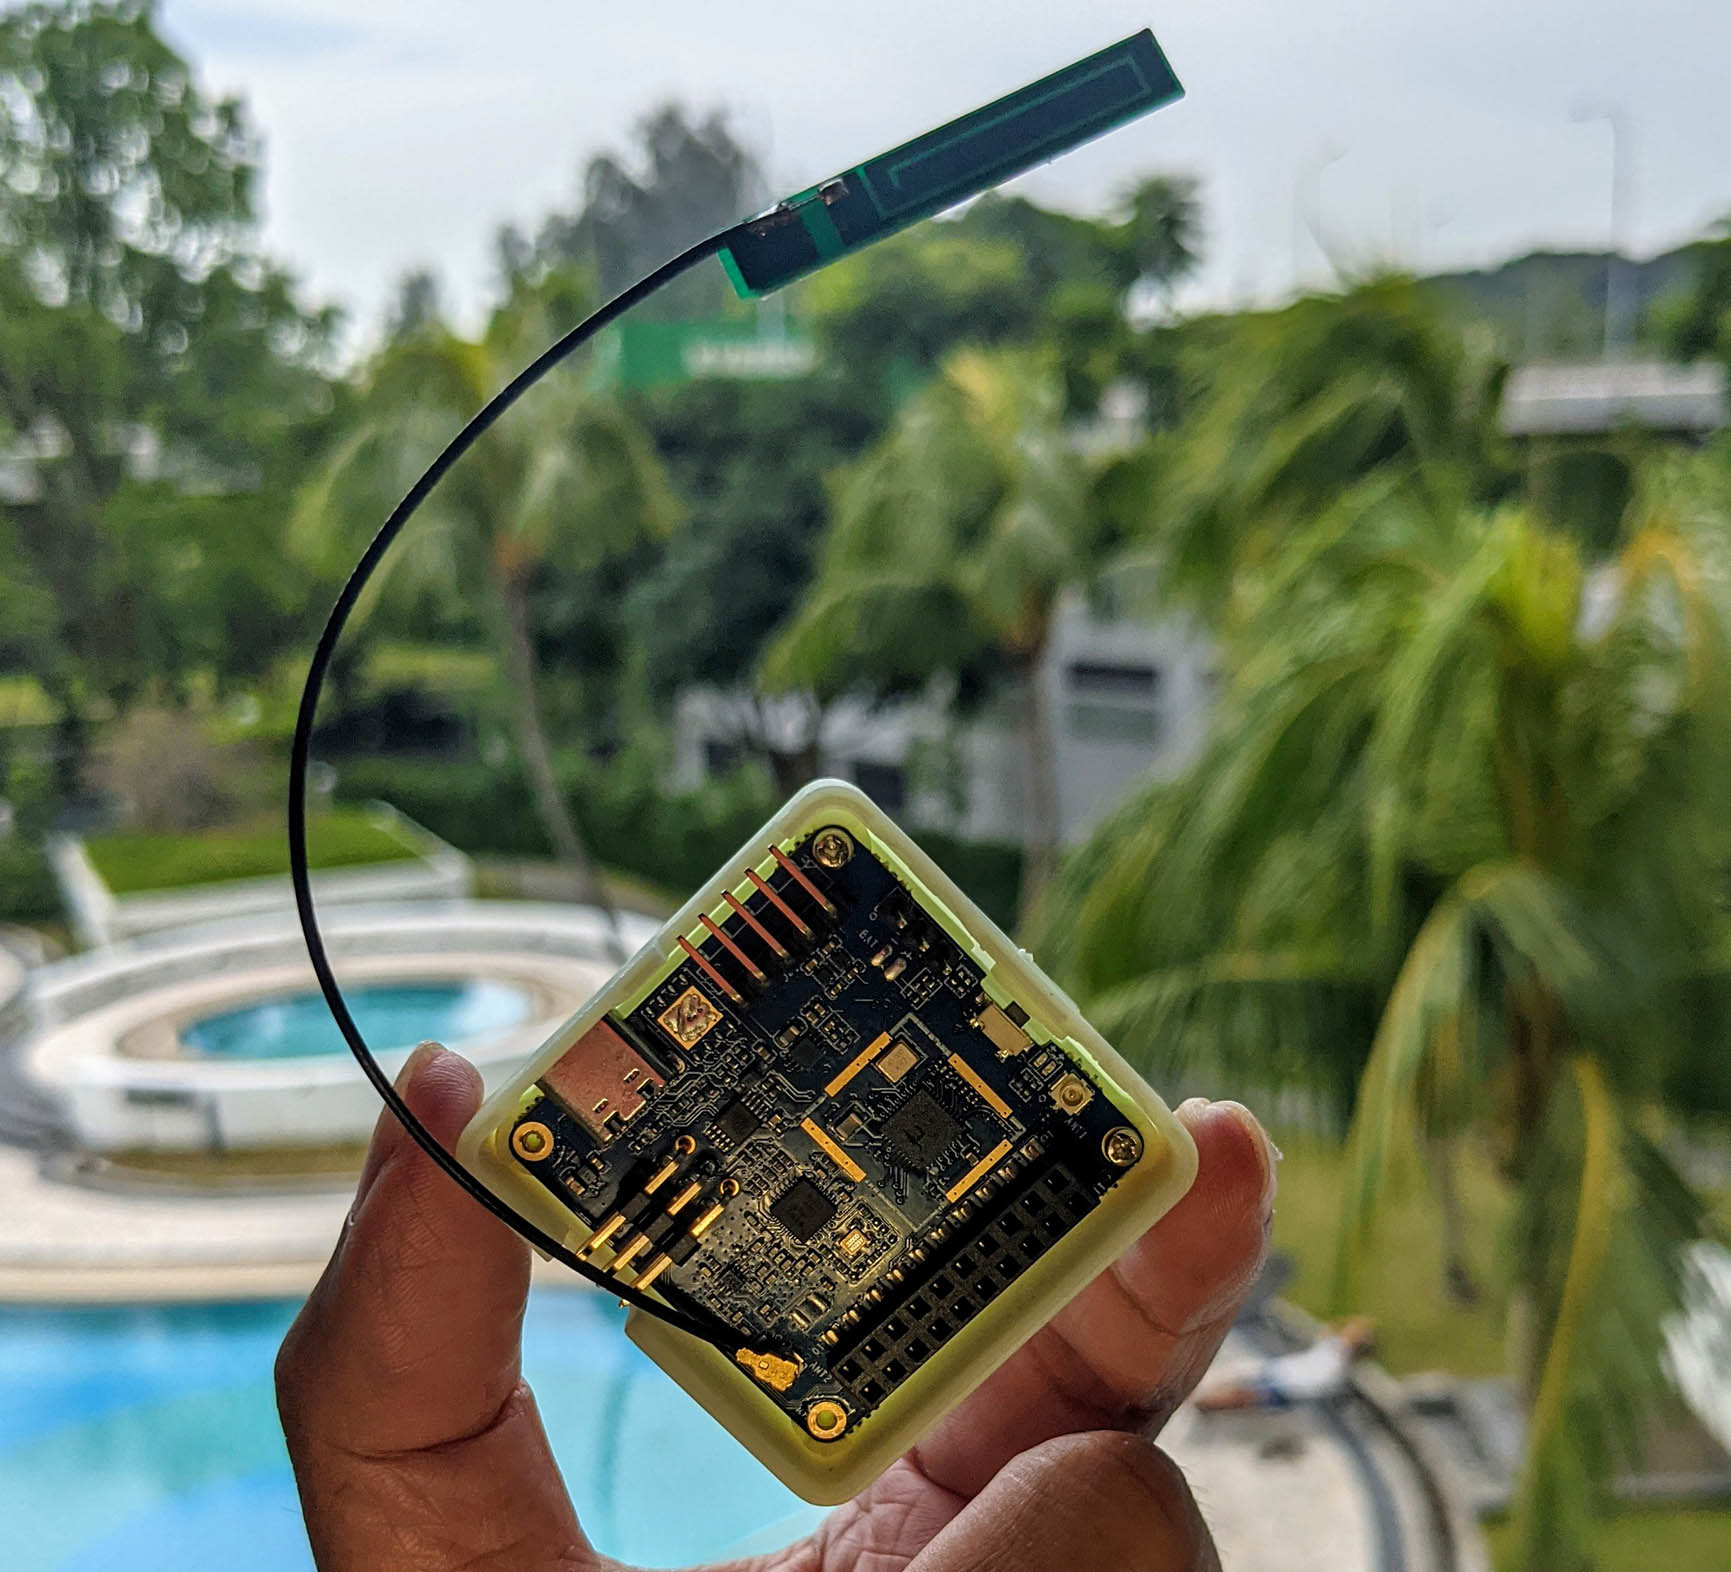
Before testing, remember to connect the LoRa Antenna, as shown in the pic above.
(So we don’t fry the SX1262 Transceiver as we charge up the Power Amplifier)
-
In the NuttX Shell, list the NuttX Devices…
ls /dev -
We should see…
/dev:
  gpio0
  gpio1
  gpio2
  spi0
  spitest0
  ...
Our SPI Test Driver appears as “/dev/spitest0”
The SX1262 Pins for Busy, Chip Select and DIO1 should appear as “/dev/gpio0” (GPIO Input), “gpio1” (GPIO Output) and “gpio2” (GPIO Interrupt) respectively.
-
In the NuttX Shell, run our Rust App…
rust_test -
We should see Rust on NuttX transmitting our LoRa Message…
Sending LoRa message...
Frequency: 923000000
...
Done!
Let’s check whether Rust on NuttX has successfully transmitted our LoRa Message.
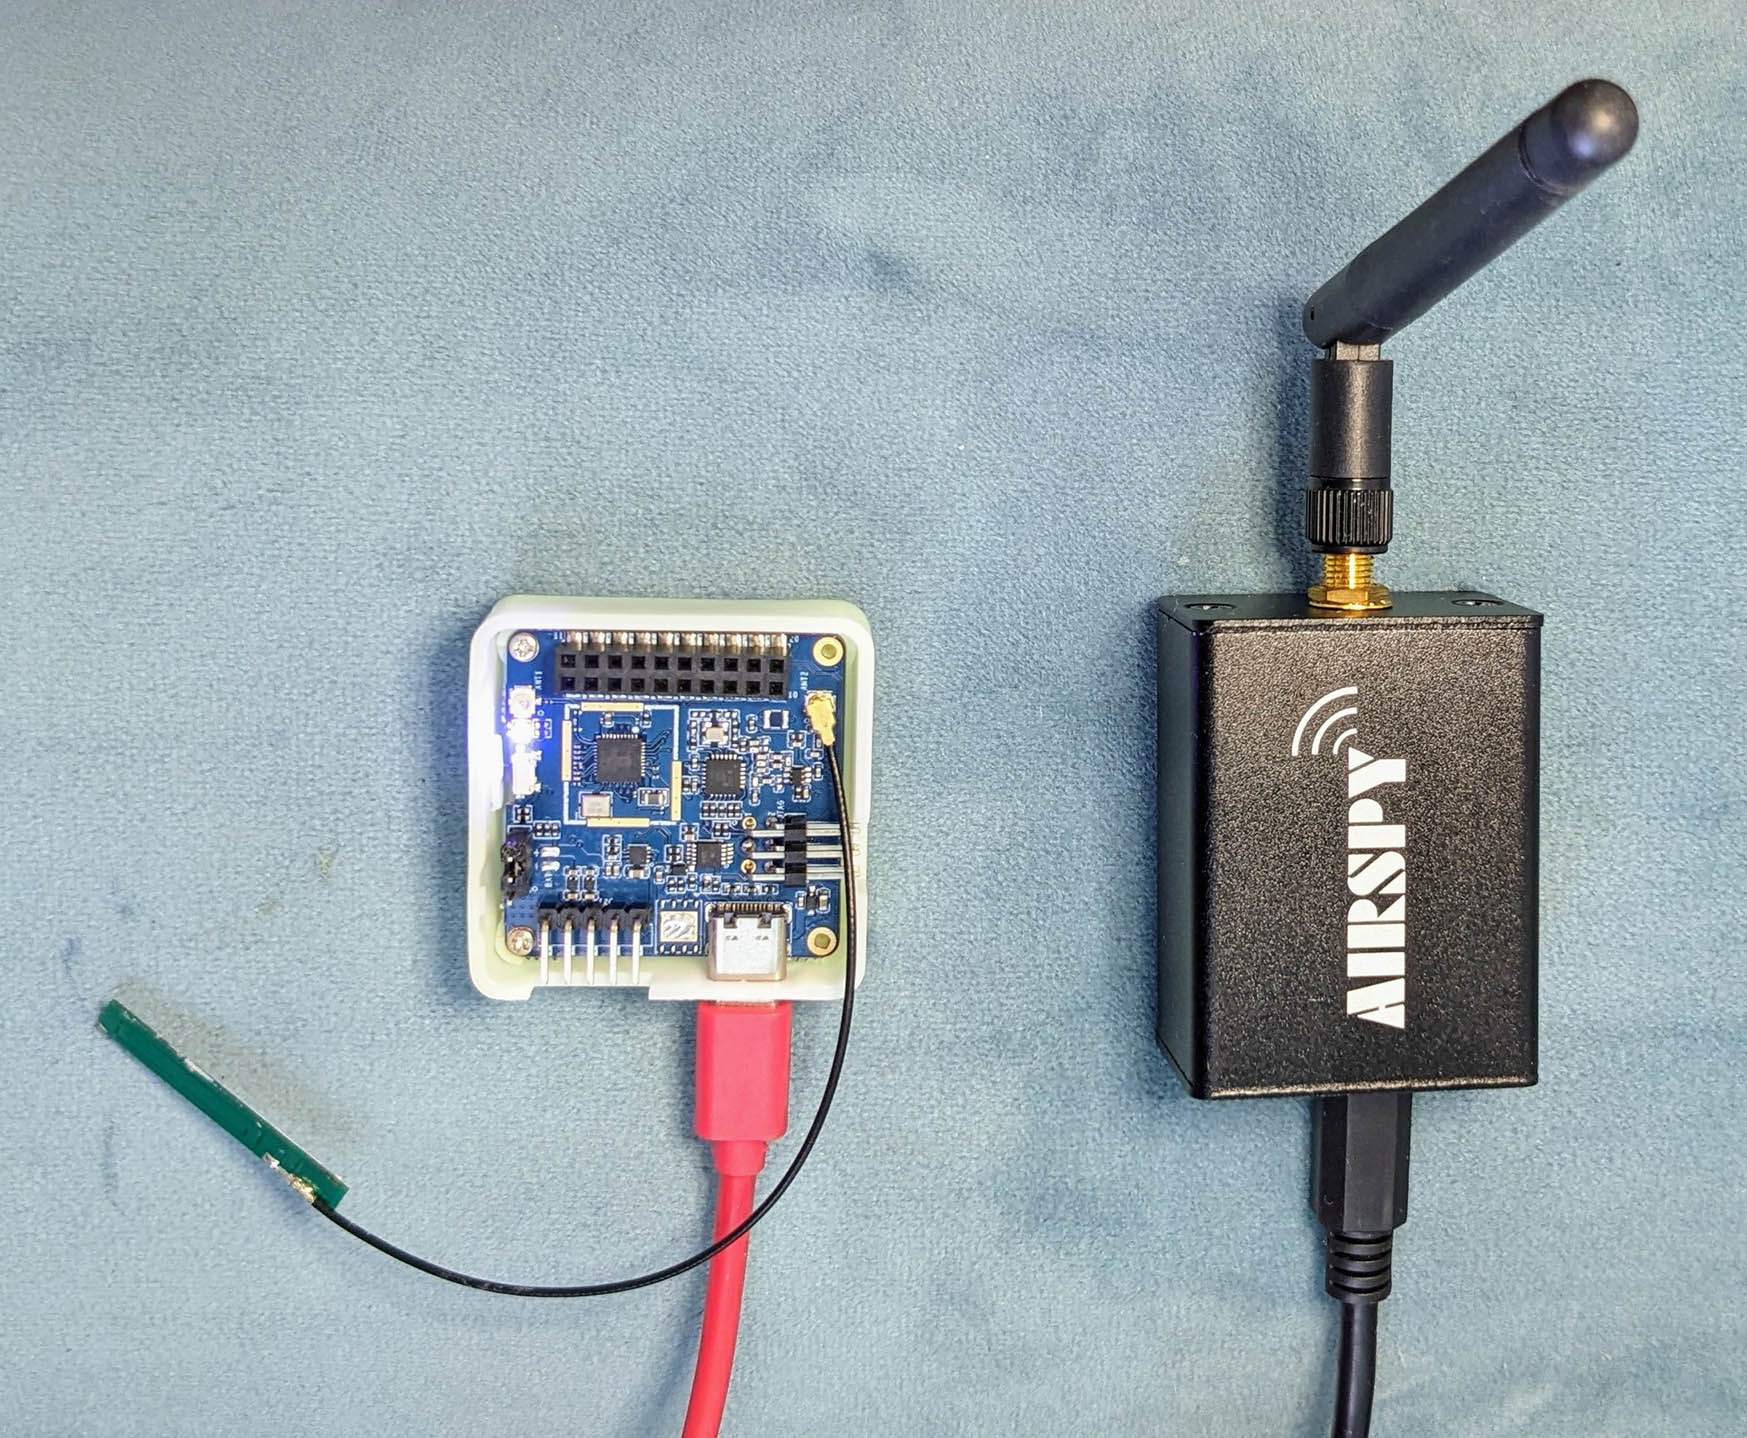
PineDio Stack BL604 RISC-V Board with onboard Semtech SX1262 LoRa Transceiver (left)… Sniffed wirelessly with Airspy R2 Software Defined Radio (right)
12 Verify LoRa Message
Did Rust on NuttX transmit our LoRa Message successfully?
Let’s verify the LoRa Transmission in two ways…
-
With a Spectrum Analyser
-
With a LoRa Receiver
12.1 Spectrum Analyser
We use a Spectrum Analyser (like Airspy R2, pic above) to sniff the airwaves…
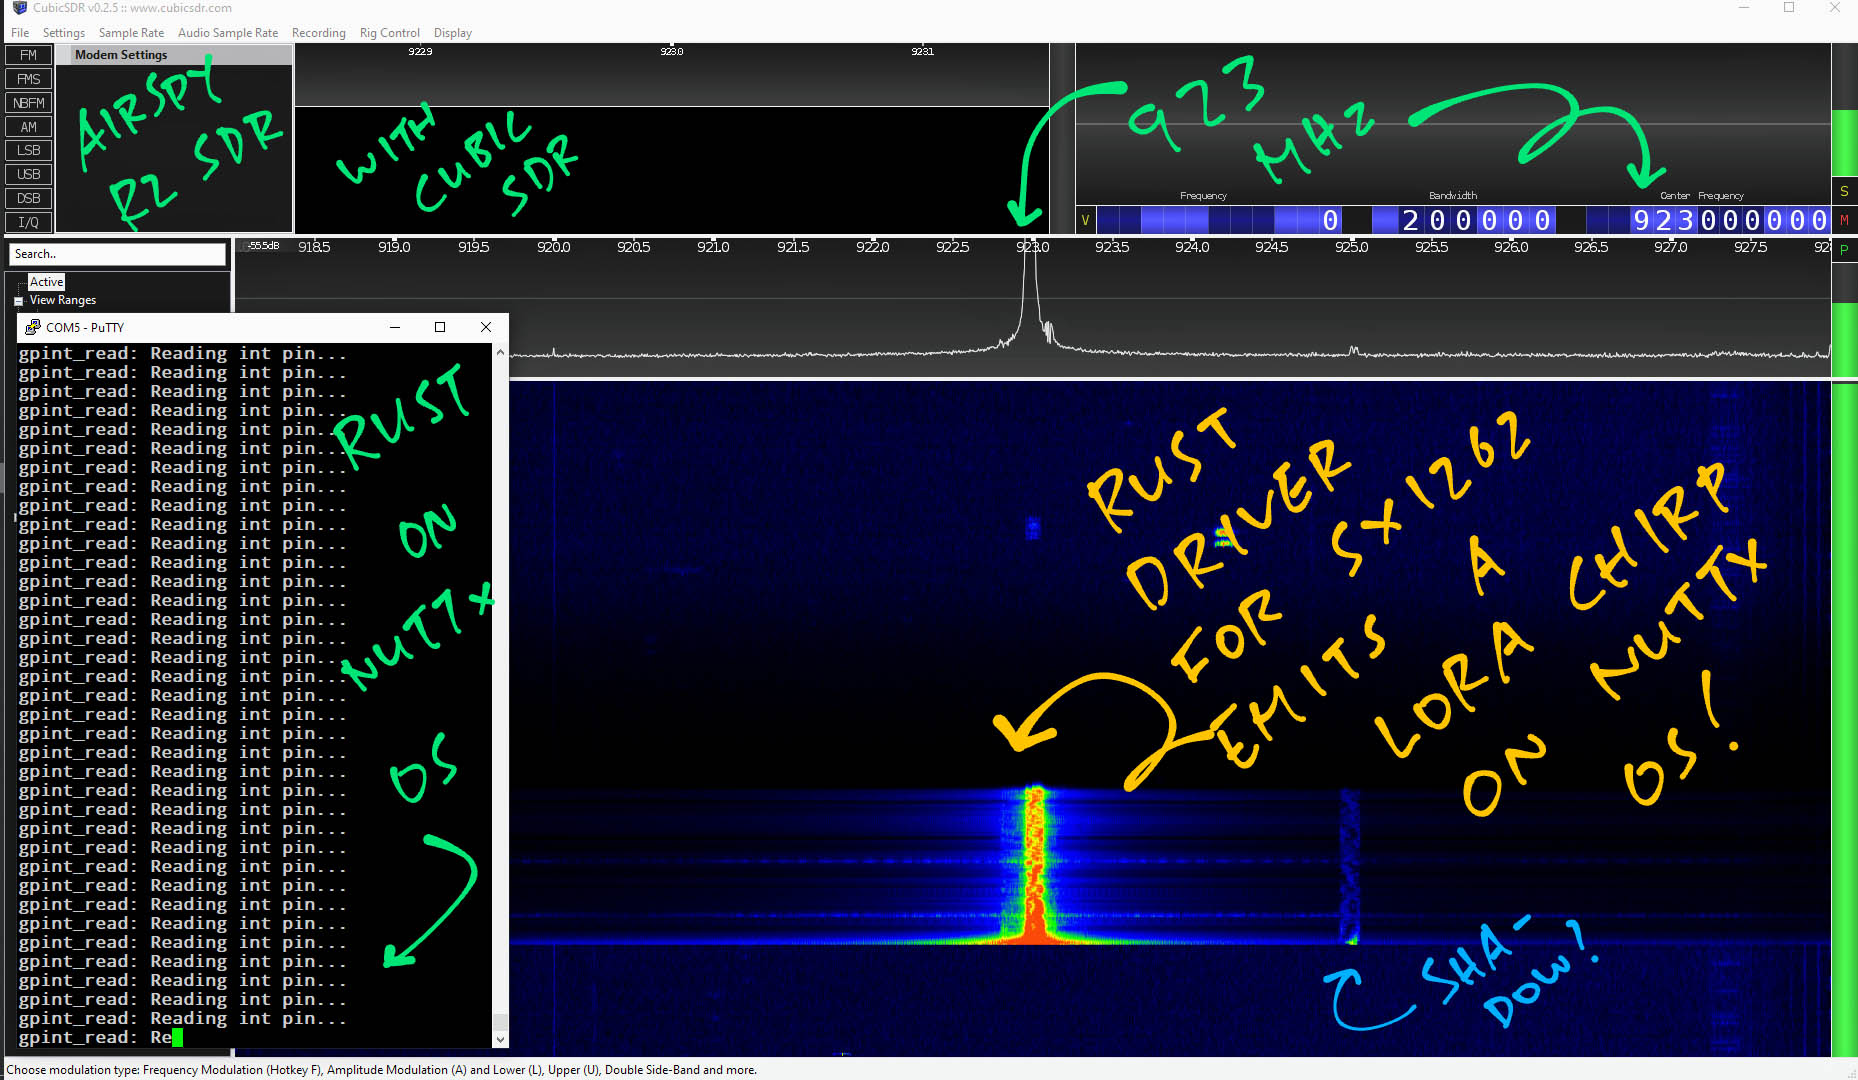
This shows that our LoRa Message was transmitted…
-
At the right Radio Frequency
(923 MHz)
-
With sufficient power
(Because of the red bar)
LoRa Messages have a characteristic criss-cross shape known as LoRa Chirp. More about this…
12.2 LoRa Receiver
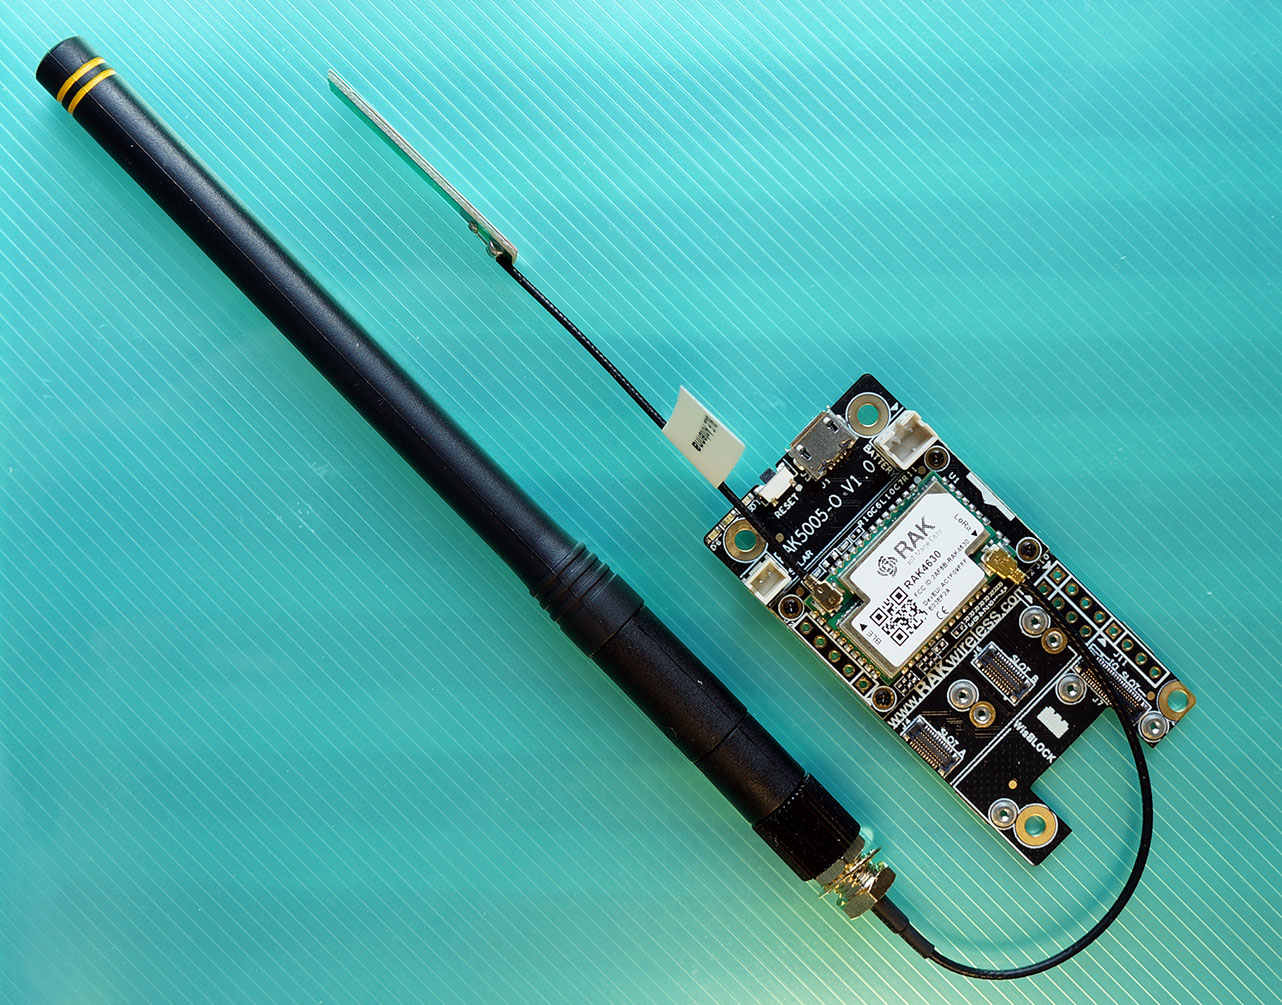
Next we use RAKwireless WisBlock (pic above) as a LoRa Receiver. We run this Arduino code on WisBlock…
Check that the LoRa Parameters are correct…
In the NuttX Shell, enter this to transmit a LoRa Message…
rust_testOn WisBlock we should see the received LoRa Message…
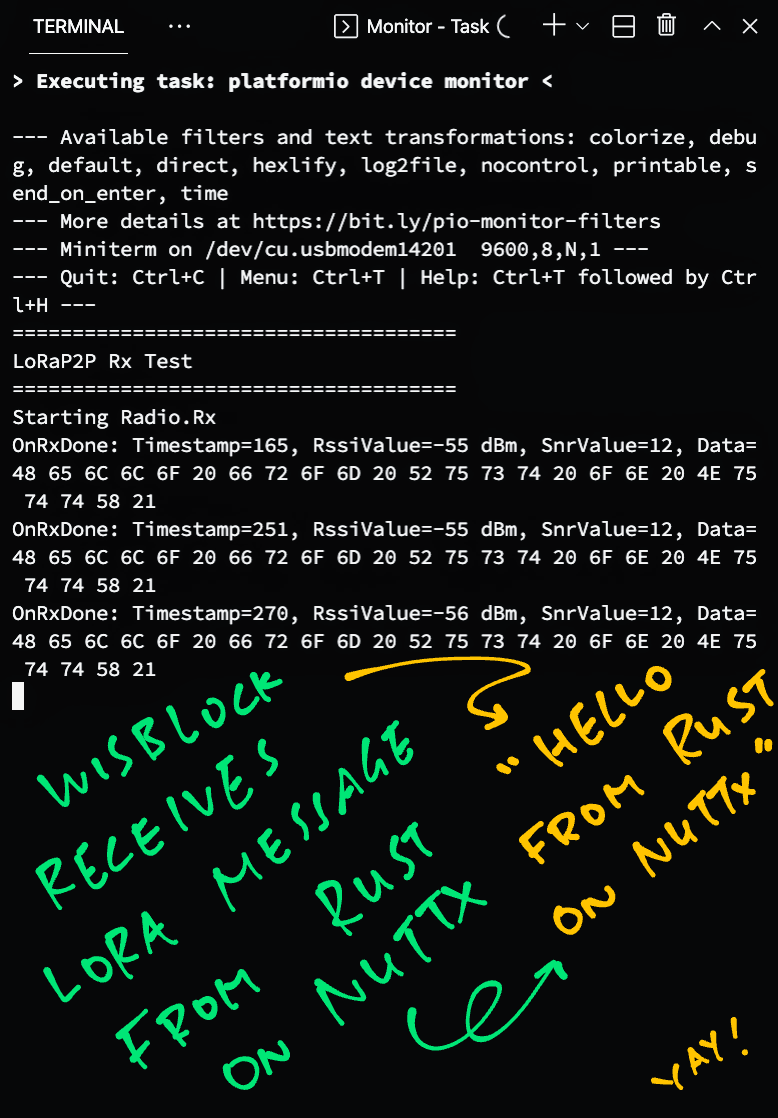
Which is ASCII for…
Hello from Rust on NuttX!Our SX1262 Rust Driver has successfully transmitted a LoRa Message to RAKwireless WisBlock!
PineDio Stack BL604 RISC-V Board (left) talking LoRaWAN to RAKwireless WisGate LoRaWAN Gateway (right)
13 LoRaWAN Support
What about LoRaWAN on Rust?
We need LoRaWAN if we wish to route LoRa Packets securely to a Local Area Network (ChirpStack) or to the internet (The Things Network).
Sadly we haven’t found a Complete LoRaWAN Stack for Rust yet.
(Probably because LoRaWAN is super complex… We need to sync up the Regional Parameters with the LoRaWAN Spec whenever LoRaWAN Regions are added or modified)
But we have a working LoRaWAN Stack for NuttX (in C) that’s based on the official LoRaWAN Stack by Semtech…
So perhaps our Rust code could call out to the LoRaWAN Stack in C and interoperate.
14 What’s Next
In the next article we shall head back to C as we connect NuttX to The Things Network over LoRaWAN.
If you’re keen to make Rust on NuttX better, please lemme know! 🙏
Many Thanks to my GitHub Sponsors for supporting my work! This article wouldn’t have been possible without your support.
Got a question, comment or suggestion? Create an Issue or submit a Pull Request here…
lupyuen.github.io/src/rust2.md
15 Notes
-
This article is the expanded version of this Twitter Thread
-
This article was inspired by Huang Qi’s Rust Wrapper for NuttX…
Which has many features that will be very useful for our implementation of Rust Embedded HAL.
-
Since NuttX behaves like Linux, can we use the
libccrate to import the POSIX Functions?Possibly, if we extend
libcto cover NuttX.Note that the Function Signatures are slightly different:
libcdeclares ioctl as…fn ioctl(fd: i32, request: u64, ...) -> i32Whereas NuttX declares ioctl as…
fn ioctl(fd: i32, request: i32, ...) -> i32The type of the request parameter is different:
u64vsi32.So beware!
-
What about the
nixcrate?nixdoesn’t supportno_stdyet, so sorry nope. -
Instead of
no_std, can we run the Standard Rust Library on NuttX?Sony worked on porting Standard Rust Library to NuttX, but it appears to be incomplete.
16 Appendix: Rust Embedded HAL for NuttX
This section explains how we implemented the barebones Rust Embedded HAL for NuttX: rust_test/rust/src/nuttx_hal.rs
16.1 GPIO HAL
Let’s look at the HAL for GPIO Output (OutputPin), since GPIO Input (InputPin) and GPIO Interrupt (InterruptPin) are implemented the same way.
Our OutputPin Struct contains a NuttX File Descriptor: rust_test/rust/src/nuttx_hal.rs
/// NuttX GPIO Output Struct
pub struct OutputPin {
  /// NuttX File Descriptor
  fd: i32,
}
We set the File Descriptor when we create the OutputPin: rust_test/rust/src/nuttx_hal.rs
/// New NuttX GPIO Output
impl OutputPin {
  /// Create a GPIO Output Pin from a Device Path (e.g. "/dev/gpio1")
  pub fn new(path: &str) -> Self {
    //  Open the NuttX Device Path (e.g. "/dev/gpio1") for read-write
    let fd = open(path, O_RDWR);
    assert!(fd > 0);

    //  Return the pin
    Self { fd }
  }
}To set the OutputPin High or Low, we call ioctl on the File Descriptor: rust_test/rust/src/nuttx_hal.rs
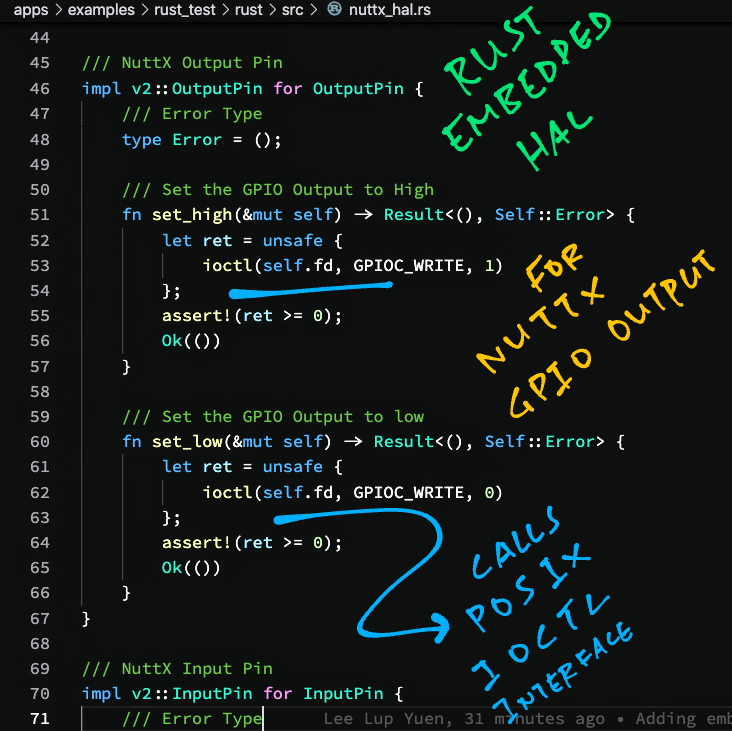
/// Set NuttX Output Pin
impl v2::OutputPin for OutputPin {
  /// Error Type
  type Error = ();

  /// Set the GPIO Output to High
  fn set_high(&mut self) -> Result<(), Self::Error> {
    let ret = unsafe {
      ioctl(self.fd, GPIOC_WRITE, 1)
    };
    assert!(ret >= 0);
    Ok(())
  }

  /// Set the GPIO Output to low
  fn set_low(&mut self) -> Result<(), Self::Error> {
    let ret = unsafe {
      ioctl(self.fd, GPIOC_WRITE, 0)
    };
    assert!(ret >= 0);
    Ok(())
  }
}
When we’re done with OutputPin, we close the File Descriptor: rust_test/rust/src/nuttx_hal.rs
/// Drop NuttX GPIO Output
impl Drop for OutputPin {
  /// Close the GPIO Output
  fn drop(&mut self) {
    unsafe { close(self.fd) };
  }
}
16.2 SPI HAL
Now we study the SPI HAL for NuttX.
Our Spi Struct also contains a File Descriptor: rust_test/rust/src/nuttx_hal.rs
/// NuttX SPI Struct
pub struct Spi {
  /// NuttX File Descriptor
  fd: i32,
}

/// New NuttX SPI Bus
impl Spi {
  /// Create an SPI Bus from a Device Path (e.g. "/dev/spitest0")
  pub fn new(path: &str) -> Self {
    //  Open the NuttX Device Path (e.g. "/dev/spitest0") for read-write
    let fd = open(path, O_RDWR);
    assert!(fd > 0);

    //  Return the pin
    Self { fd }
  }
}

/// Drop NuttX SPI Bus
impl Drop for Spi {
  /// Close the SPI Bus
  fn drop(&mut self) {
    unsafe { close(self.fd) };
  }
}
We open and close the File Descriptor the same way as OutputPin.
To do SPI Write, we write to the File Descriptor: rust_test/rust/src/nuttx_hal.rs
/// NuttX SPI Write
impl Write<u8> for Spi{
/// Error Type
type Error = ();
/// Write SPI data
fn write(&mut self, words: &[u8]) -> Result<(), Self::Error> {
// Transmit data
let bytes_written = unsafe {
write(self.fd, words.as_ptr(), words.len() as u32)
};
assert!(bytes_written == words.len() as i32);
Ok(())
}
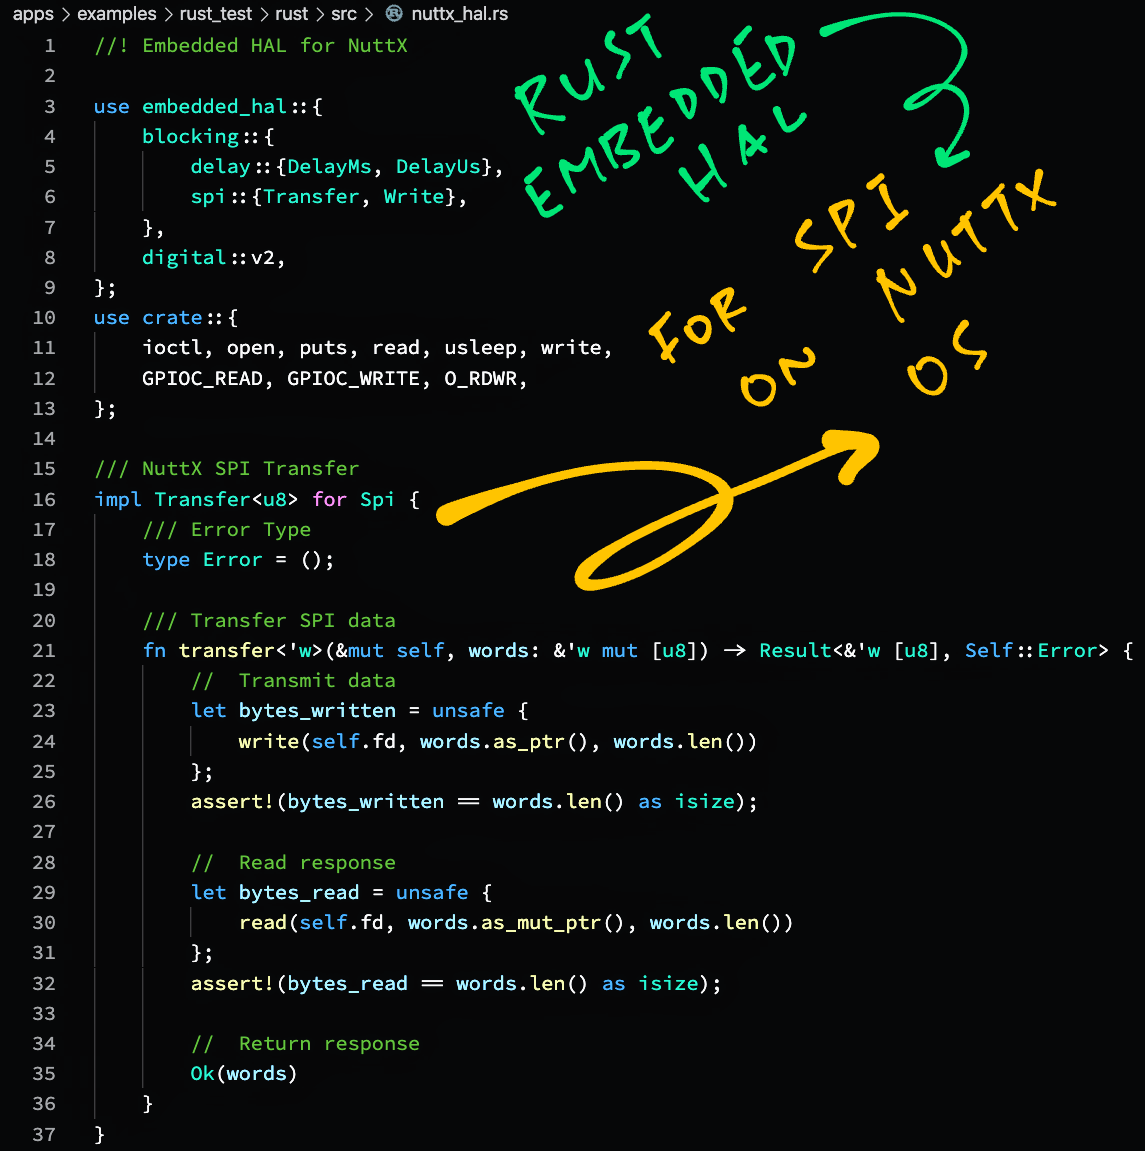
}SPI Transfer works the same way, except that we also copy the SPI Response and return it to the caller: rust_test/rust/src/nuttx_hal.rs
/// NuttX SPI Transfer
impl Transfer<u8> for Spi {
  /// Error Type
  type Error = ();

  /// Transfer SPI data
  fn transfer<'w>(&mut self, words: &'w mut [u8]) -> Result<&'w [u8], Self::Error> {
    //  Transmit data
    let bytes_written = unsafe {
      write(self.fd, words.as_ptr(), words.len() as u32)
    };
    assert!(bytes_written == words.len() as i32);

    //  Read response
    let bytes_read = unsafe {
      read(self.fd, words.as_mut_ptr(), words.len() as u32)
    };
    assert!(bytes_read == words.len() as i32);

    //  Return response
    Ok(words)
  }
}
17 Appendix: Fix SX1262 Driver for NuttX
In this article we used this Rust Embedded Driver for Semtech SX1262…
That we tweaked slightly from…
(Thanks Tweede golf! 👍)
Let’s look at the modifications that we made.
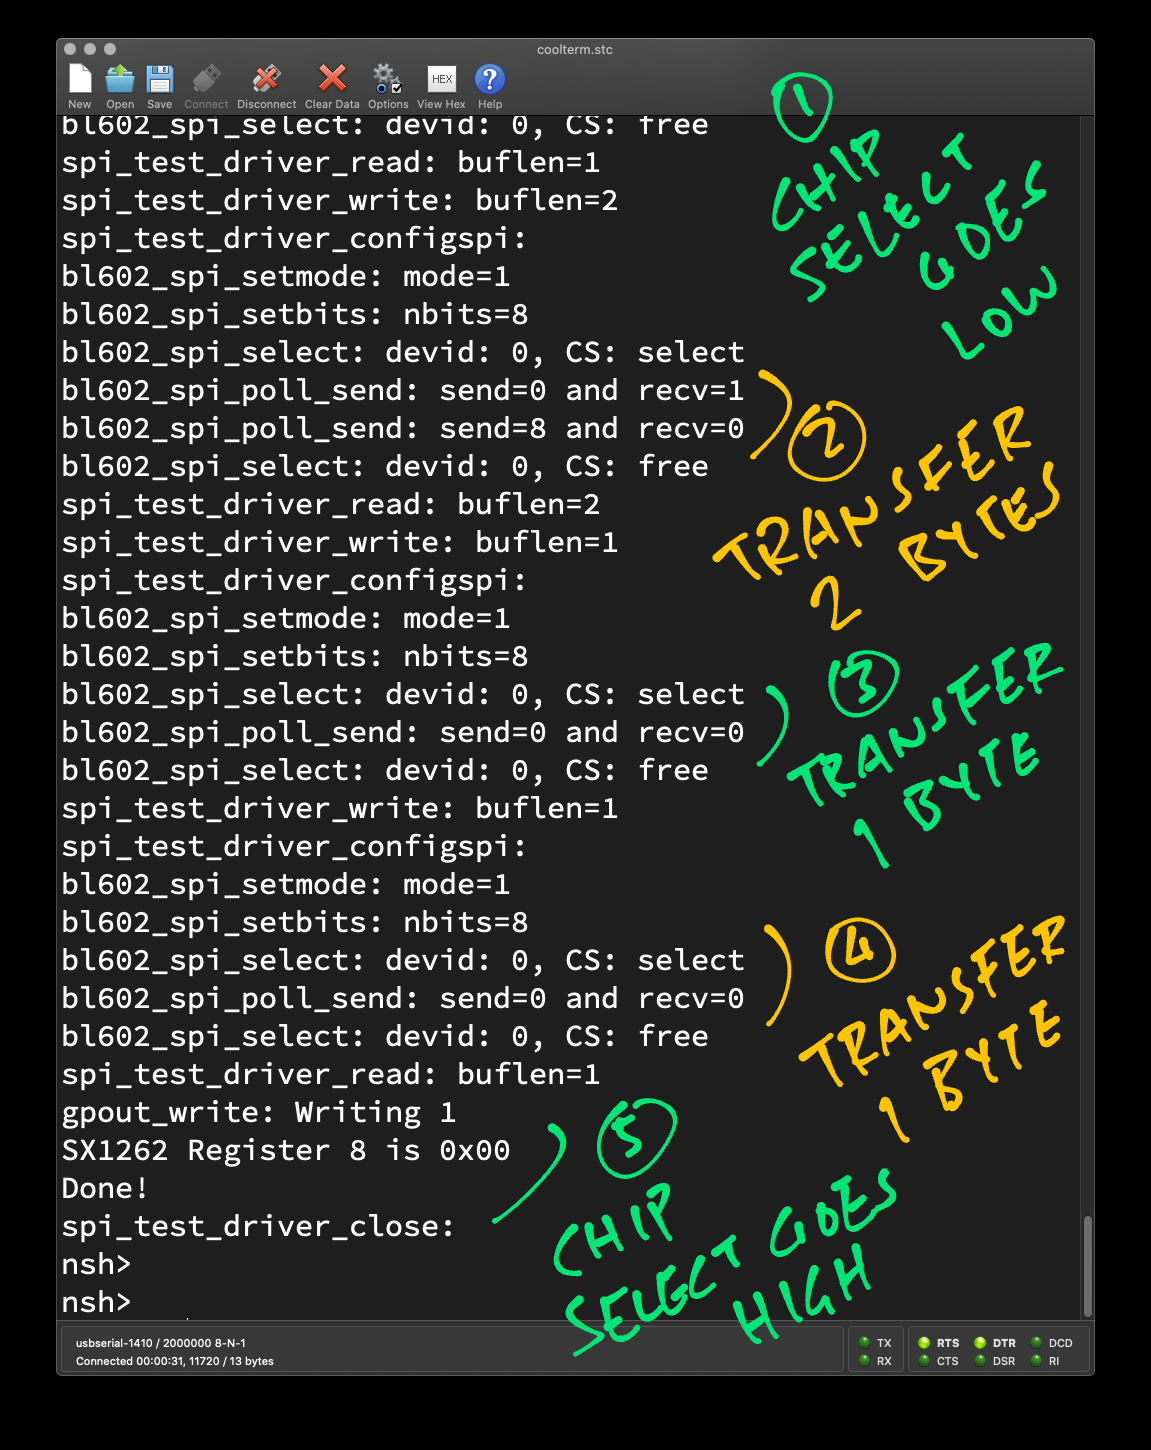
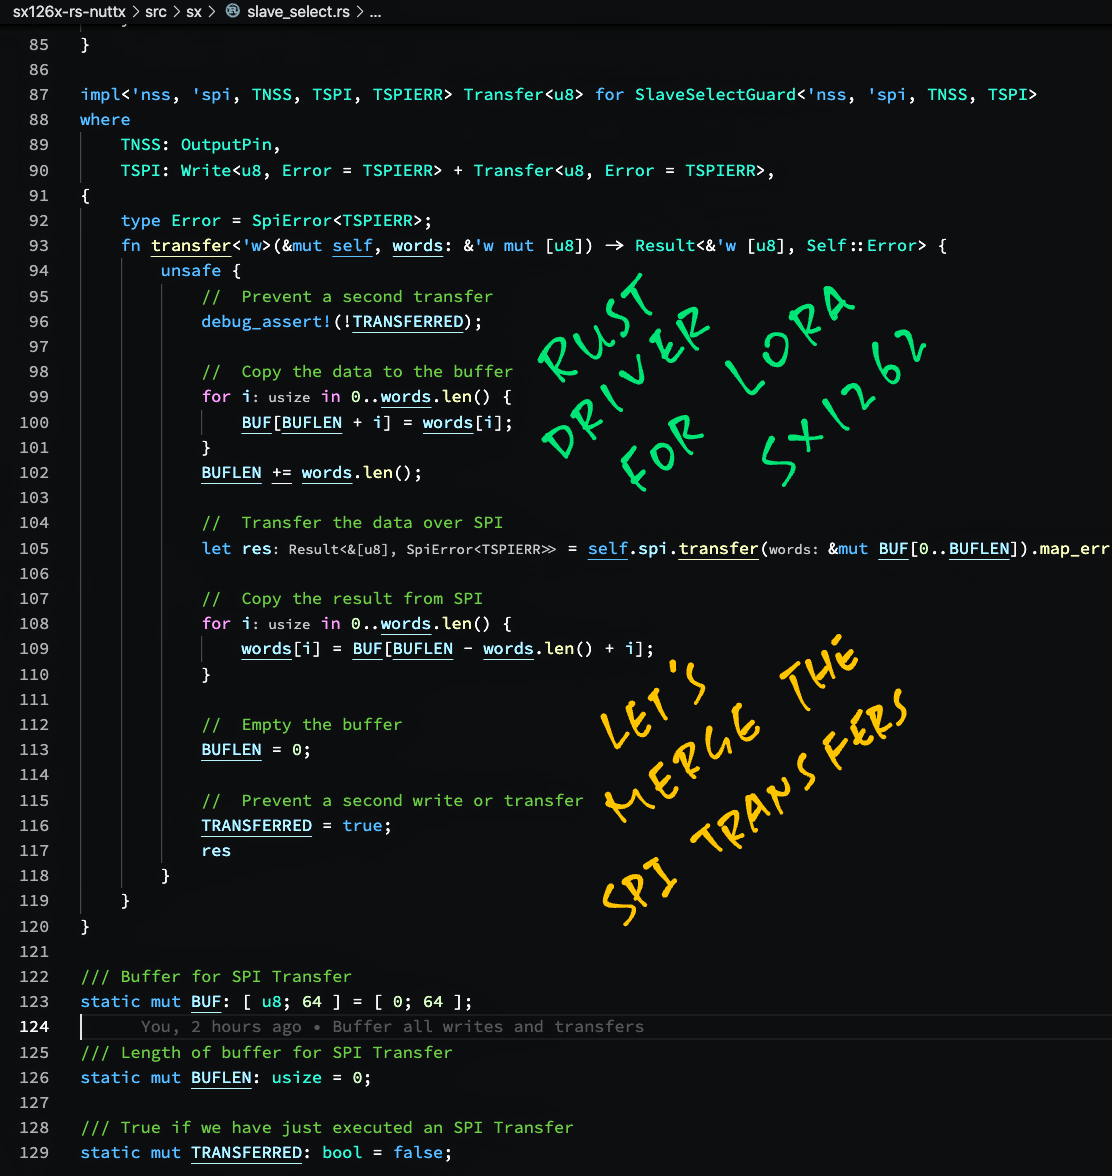
17.1 Merge SPI Requests
While testing sx126x-rs, we discovered that the SPI Requests were split into 1-byte or 2-byte chunks. (Pic above)
This fails on NuttX because the SPI Request needs to be in one contiguous block as Chip Select flips from High to Low and High.
To fix this, we buffer all SPI Requests in the Chip Select Guard: sx126x-rs-nuttx/src/sx/slave_select.rs
impl<'nss, 'spi, TNSS, TSPI, TSPIERR> Transfer<u8> for SlaveSelectGuard<'nss, 'spi, TNSS, TSPI>
where
  TNSS: OutputPin,
  TSPI: Write<u8, Error = TSPIERR> + Transfer<u8, Error = TSPIERR>,
{
  type Error = SpiError<TSPIERR>;
  fn transfer<'w>(&mut self, words: &'w mut [u8]) -> Result<&'w [u8], Self::Error> {
    unsafe {
      //  Prevent a second transfer
      debug_assert!(!TRANSFERRED);

      //  Copy the transmit data to the buffer
      BUF[BUFLEN..(BUFLEN + words.len())]
        .clone_from_slice(words);
      BUFLEN += words.len();

      //  Transfer the data over SPI
      let res = self.spi.transfer(&mut BUF[0..BUFLEN])
        .map_err(SpiError::Transfer);

      //  Copy the result from SPI
      words.clone_from_slice(&BUF[BUFLEN - words.len()..BUFLEN]);

      //  Empty the buffer
      BUFLEN = 0;

      //  Prevent a second write or transfer
      TRANSFERRED = true;
      res
    }
  }
}

/// Buffer for SPI Transfer. Max packet size (256) + 2 bytes for Write Buffer Command.
static mut BUF: [ u8; 258 ] = [ 0; 258 ];

/// Length of buffer for SPI Transfer
static mut BUFLEN: usize = 0;

/// True if we have just executed an SPI Transfer
static mut TRANSFERRED: bool = false;
Then we patched the driver code to ensure that all SPI Request chains consist of…
-
0 or more SPI Writes
-
Followed by 1 optional SPI Transfer
Such that we flush the buffer of SPI Requests only after the final SPI Write or final SPI Transfer.
So this chain of SPI Requests…
spi.transfer(&mut [0x1D])
  .and_then(|_| spi.transfer(&mut start_addr))
  .and_then(|_| spi.transfer(&mut [0x00]))
  .and_then(|_| spi.transfer(result))?;
After patching becomes…
spi.write(&[0x1D])  //  Changed from `transfer` to `write`
  .and_then(|_| spi.write(&start_addr))  //  Changed from `transfer` to `write`
  .and_then(|_| spi.write(&[0x00]))      //  Changed from `transfer` to `write`
.and_then(|_| spi.transfer(result))?; // Final transfer is OKThe driver works OK on NuttX after merging the SPI Requests…
17.2 Read Register
We inserted a null byte for the Read Register command, because Read Requests should have minimum 5 bytes (instead of 4): sx126x-rs-nuttx/src/sx/mod.rs
/// Read data from a register
pub fn read_register<'spi>(
  &'spi mut self,
  spi: &'spi mut TSPI,
  delay: &mut impl DelayUs<u32>,
  start_addr: u16,
  result: &mut [u8],
) -> Result<(), SxError<TSPIERR, TPINERR>> {
  debug_assert!(result.len() >= 1);
  let start_addr = start_addr.to_be_bytes();
  let mut spi = self.slave_select(spi, delay)?;

  spi.write(&[0x1D])
    .and_then(|_| spi.write(&start_addr))
    //  Inserted this null byte
    .and_then(|_| spi.write(&[0x00]))
    .and_then(|_| spi.transfer(result))?;
  Ok(())
}
17.3 Set Registers
The following registers need to be set for the LoRa Transmission to work correctly: rust_test/rust/src/sx1262.rs
//  Write SX1262 Registers to prepare for transmitting LoRa message.
//  Based on https://gist.github.com/lupyuen/5fdede131ad0e327478994872f190668
//  and https://docs.google.com/spreadsheets/d/14Pczf2sP_Egnzi5_nikukauL2iTKA03Qgq715e50__0/edit?usp=sharing

//  Write Register 0x889: 0x04 (TxModulation)
lora.write_register(&mut spi1, delay, Register::TxModulaton, &[0x04])
  .expect("write register failed");

//  Write Register 0x8D8: 0xFE (TxClampConfig)
lora.write_register(&mut spi1, delay, Register::TxClampConfig, &[0xFE])
  .expect("write register failed");

//  Write Register 0x8E7: 0x38 (Over Current Protection)
lora.write_register(&mut spi1, delay, Register::OcpConfiguration, &[0x38])
  .expect("write register failed");

//  Write Register 0x736: 0x0D (Inverted IQ)
lora.write_register(&mut spi1, delay, Register::IqPolaritySetup, &[0x0D])
  .expect("write register failed");
We derived the registers from the log generated by the SX1262 driver in C…
And by comparing the SPI Output of the C and Rust Drivers…
The C Driver for SX1262 is described here…
17.4 Adapt For RISC-V
The sx126x-rs crate depends on the cortex-m crate, which works only on Arm, not RISC-V (BL602).
We defined the following functions to fill in for the missing functions on RISC-V: rust_test/rust/src/sx1262.rs
/// Read Priority Mask Register. Missing function called by sx126x crate (Arm only, not RISC-V).
/// See https://github.com/rust-embedded/cortex-m/blob/master/src/register/primask.rs#L29
#[cfg(not(target_arch = "arm"))]  //  If architecture is not Arm...
#[no_mangle]
extern "C" fn __primask_r() -> u32 { 0 }

/// Disables all interrupts. Missing function called by sx126x crate (Arm only, not RISC-V).
/// See https://github.com/rust-embedded/cortex-m/blob/master/src/interrupt.rs#L29
#[cfg(not(target_arch = "arm"))]  //  If architecture is not Arm...
#[no_mangle]
extern "C" fn __cpsid() {}

/// Enables all interrupts. Missing function called by sx126x crate (Arm only, not RISC-V).
/// See https://github.com/rust-embedded/cortex-m/blob/master/src/interrupt.rs#L39
#[cfg(not(target_arch = "arm"))]  //  If architecture is not Arm...
#[no_mangle]
extern "C" fn __cpsie() {}

/// No operation. Missing function called by sx126x crate (Arm only, not RISC-V).
/// See https://github.com/rust-embedded/cortex-m/blob/master/src/asm.rs#L35
#[cfg(not(target_arch = "arm"))]  //  If architecture is not Arm...
#[no_mangle]
extern "C" fn __nop() {}
We haven’t tested the driver for receiving LoRa Messages, we might need more fixes for NuttX on RISC-V.
(But then again we might not need to receive LoRa Messages if we’re building a simple IoT Sensor)
18 Appendix: Rust Build Script for NuttX
Let’s study the Build Script for Rust on NuttX…
- Build Script: apps/examples/rust_test/run.sh
And how it compiles the following into the NuttX Firmware…
-
Rust Project: apps/examples/rust_test/rust/Cargo.toml
(Rust Dependencies and Build Settings)
-
Rust Source File: apps/examples/rust_test/rust/src/lib.rs
(Defines the rust_main function)
-
Rust Custom Target: apps/examples/rust_test/riscv32imacf-unknown-none-elf.json
(Custom Rust Target for BL602 and BL604)
-
Stub Library: nuttx/libs/librust
(Stub Library will be replaced by the compiled Rust Project)
-
Test App: apps/examples/rust_test/rust_test_main.c
(Main Function that calls rust_main)
See also the Build Log for Rust on NuttX…
18.1 Rust Target
Our Build Script begins by defining the Rust Target for the build: rust_test/run.sh
#  Rust target: Custom target for BL602 and BL604
#  https://docs.rust-embedded.org/embedonomicon/compiler-support.html#built-in-target
#  https://docs.rust-embedded.org/embedonomicon/custom-target.html
rust_build_target=$PWD/riscv32imacf-unknown-none-elf.json
rust_build_target_folder=riscv32imacf-unknown-none-elf

#  Rust target: Standard target
#  rust_build_target=riscv32imac-unknown-none-elf
#  rust_build_target_folder=riscv32imac-unknown-none-elf
For BL602 and BL604: We’re using the Custom Rust Target at…
apps/examples/rust_test/riscv32imacf-unknown-none-elf.json
This Custom Rust Target supports floating point on 32-bit RISC-V. (The standard 32-bit RISC-V target doesn’t support floating point)
(More about Custom Rust Targets)
For ESP32-C3 (RISC-V): Set “rust_build_target” and “rust_build_target_folder” to the Standard Rust Target riscv32imc-unknown-none-elf
Then run this command to install the Rust Target…
rustup target add riscv32imc-unknown-none-elfFor ESP32 (Xtensa): Set “rust_build_target” and “rust_build_target_folder” to the ESP32 Rust Target xtensa-esp32-none-elf
We need to install the Rust compiler fork with Xtensa support. (See this)
18.2 Rust Build Options
Next we define the Rust Build Options: rust_test/run.sh
#  Rust build options: Build the Rust Core Library for our custom target
rust_build_options="--target $rust_build_target -Z build-std=core"
For BL602 and BL604: Since we’re using a Custom Rust Target, we need to build the Rust Core Library for our target. That’s why we need “-Z build-std=core” for the Rust Build Options…
--target nuttx/apps/examples/rust_test/riscv32imacf-unknown-none-elf.json \
  -Z build-std=core
(More about building Rust Core Library)
For ESP32 and ESP32-C3: Since we’re using a Standard Rust Target, remove “-Z build-std=core” from “rust_build_options”.
The Rust Build Options will look like…
--target riscv32imc-unknown-none-elf18.3 Define Libraries
Next we define the libraries that will be modified during the build…
-
Stub Library: nuttx/libs/librust
This is an empty NuttX C Library that will be replaced by the Compiled Rust Library
-
Rust Library: apps/examples/rust_test/rust
This is the Rust Library (compiled as a Static Library) that will overwrite the Compiled Stub Library
That’s how we inject our Rust Code into the NuttX Build: We overwrite the Compiled Stub Library by the Compiled Rust Library.
The Stub Library is defined like so: rust_test/run.sh
#  Location of the Stub Library.  We will replace this stub by the Rust Library
#  rust_app_dest will be set to ../../../nuttx/staging/librust.a
rust_app_dir=$NUTTX_PATH/staging
rust_app_dest=$rust_app_dir/librust.a
The Rust Library is defined below: rust_test/run.sh
#  Location of the compiled Rust Library
#  rust_app_build will be set to rust/target/riscv32imacf-unknown-none-elf/debug/libapp.a
rust_build_dir=$PWD/rust/target/$rust_build_target_folder/$rust_build_profile
rust_app_build=$rust_build_dir/libapp.a
18.4 Build Stub Library
Our script builds NuttX twice.
For the first build, we compile NuttX with the Stub Library: rust_test/run.sh
#  Build the firmware with the Stub Library, ignoring references to the Rust Library
pushd $NUTTX_PATH
make || echo "----- Ignore undefined references to Rust Library"
popd
Which fails to link because rust_main is undefined. Our script ignores the error and continues.
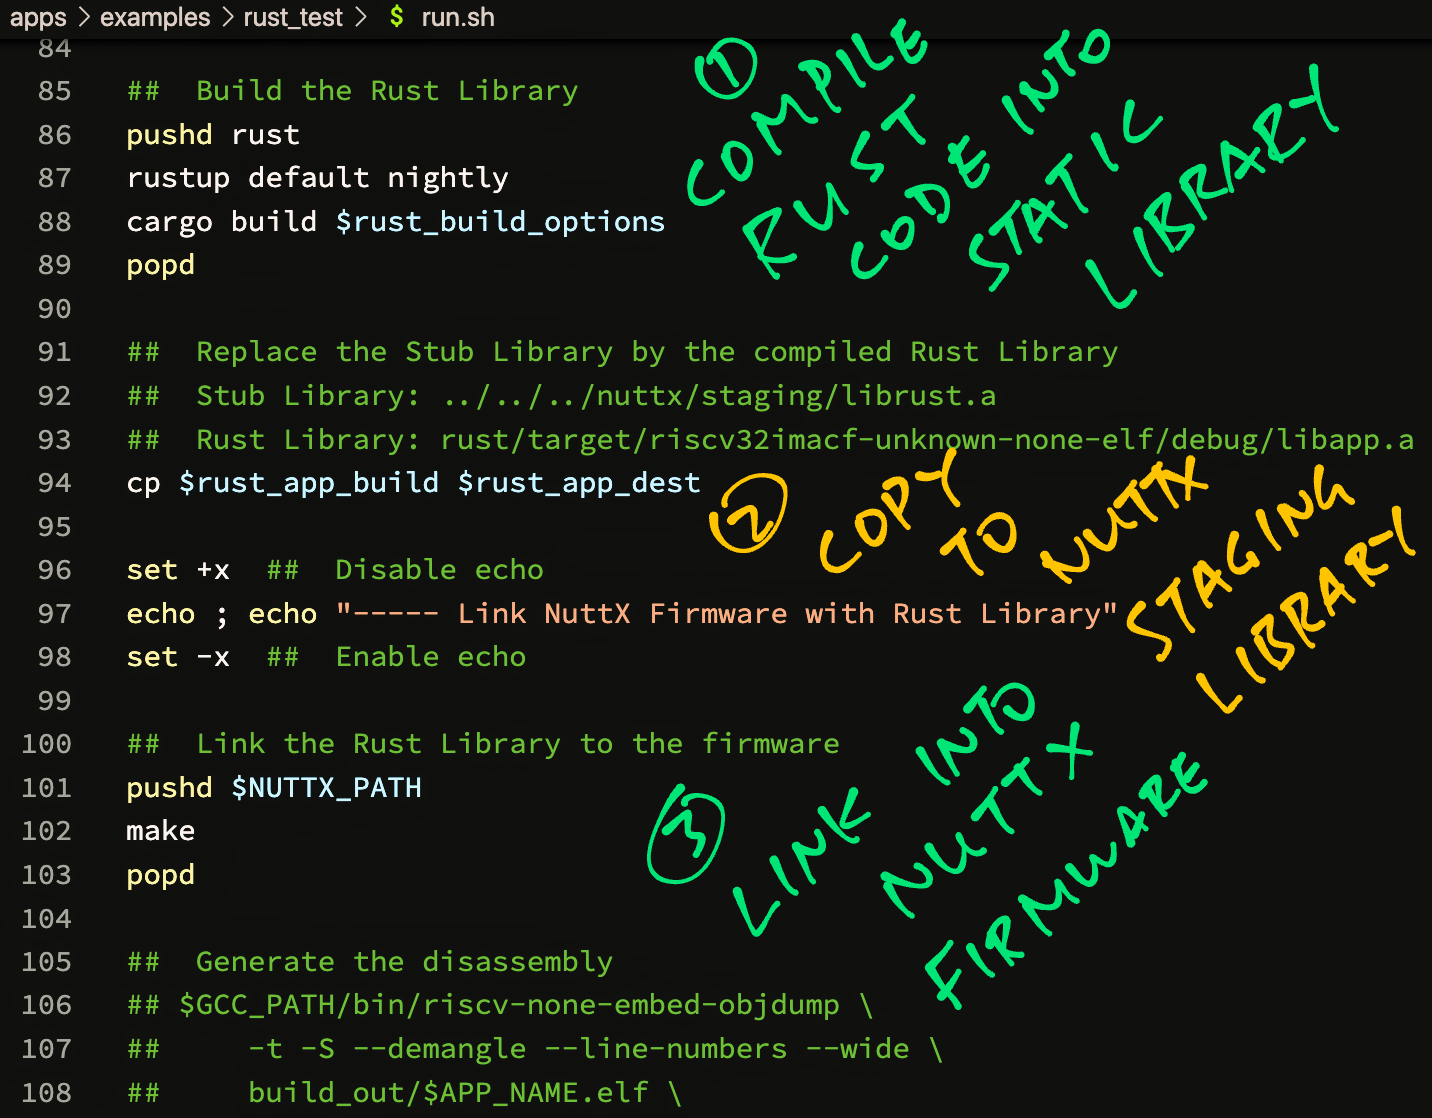
18.5 Build Rust Library
Now we build the Rust Library: rust_test/run.sh
#  Build the Rust Library
pushd rust
rustup default nightly
cargo clippy $rust_build_options
cargo build  $rust_build_options
popd
Which expands to…
cargo build \
  --target nuttx/apps/examples/rust_test/riscv32imacf-unknown-none-elf.json \
  -Z build-std=core
(For BL602 and BL604)
This generates a Static Library at…
apps/examples/rust_test/rust/target/riscv32imacf-unknown-none-elf/debug/libapp.aThe Rust Build looks like this…
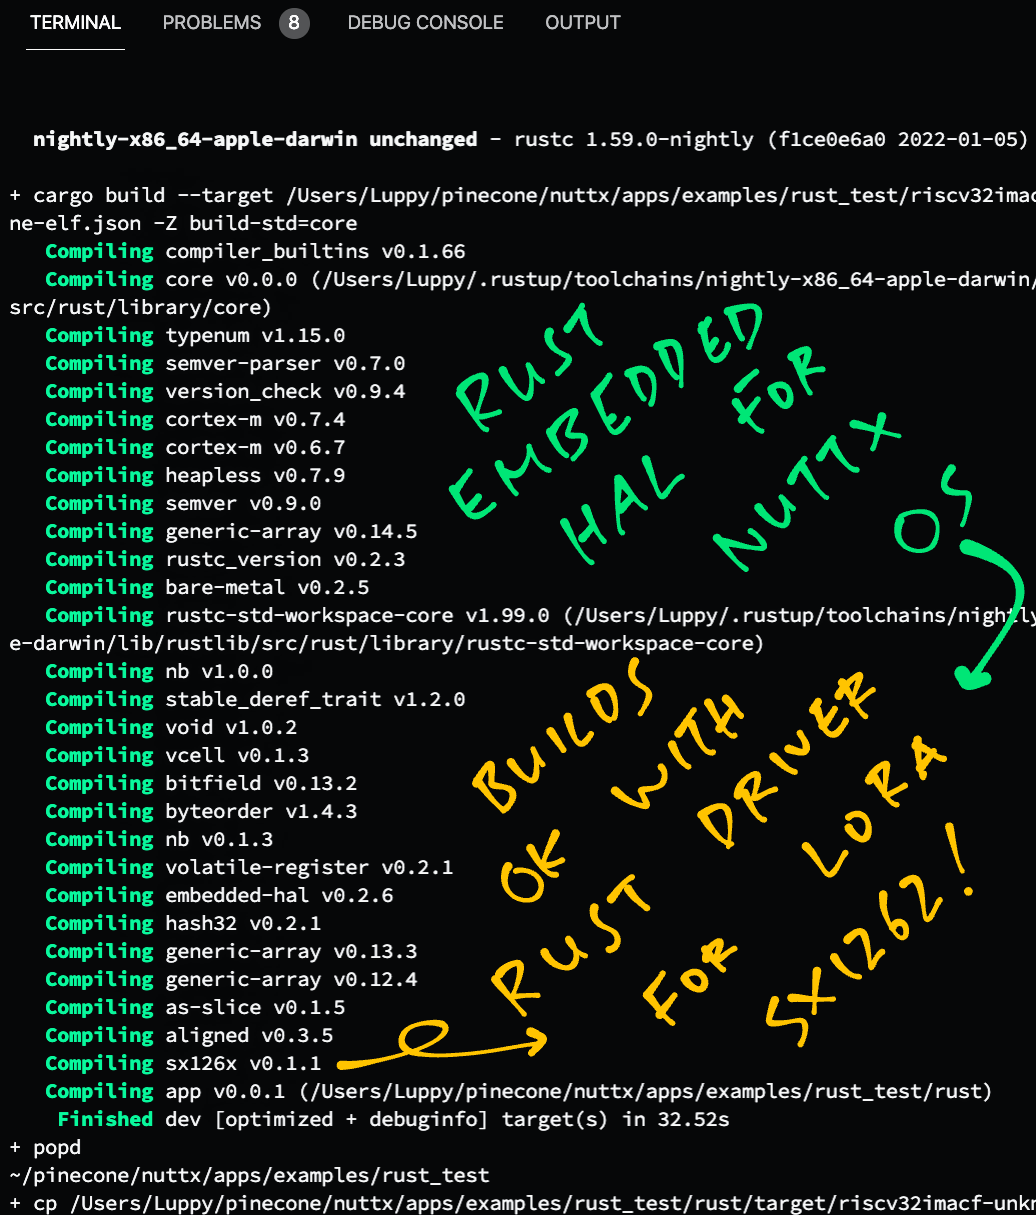
18.6 Replace Stub Libary by Rust Library
We take the Static Library (generated by the Rust Compiler) and overwrite the Stub Library: rust_test/run.sh
#  Replace the Stub Library by the compiled Rust Library
#  Stub Library: ../../../nuttx/staging/librust.a
#  Rust Library: rust/target/riscv32imacf-unknown-none-elf/debug/libapp.a
cp $rust_app_build $rust_app_dest
Which is located at…
nuttx/staging/librust.a18.7 Link Rust Library into Firmware
Finally we do the second NuttX build: rust_test/run.sh
#  Link the Rust Library to the firmware
pushd $NUTTX_PATH
make
popd
Which links the Rust Static Library (and rust_main) into the NuttX Firmware.
Our build for Rust on NuttX is complete! nuttx.bin contains our NuttX Firmware, with Rust embedded inside.
19 Appendix: Build, Flash and Run NuttX
(For BL602 and ESP32)
Below are the steps to build, flash and run NuttX on BL602 and ESP32.
The instructions below will work on Linux (Ubuntu), WSL (Ubuntu) and macOS.
(Instructions for other platforms)
19.1 Build NuttX
Follow these steps to build NuttX for BL602 or ESP32…
-
Install the build prerequisites…
-
Install Rust from rustup.rs
-
Assume that we have downloaded the NuttX Source Code and configured the build…
-
Edit the file…
apps/examples/rust_test/rust/src/sx1262.rsAnd set the LoRa Frequency…
-
To build NuttX with Rust, enter this…
pushd apps/examples/rust_test ./run.sh popd -
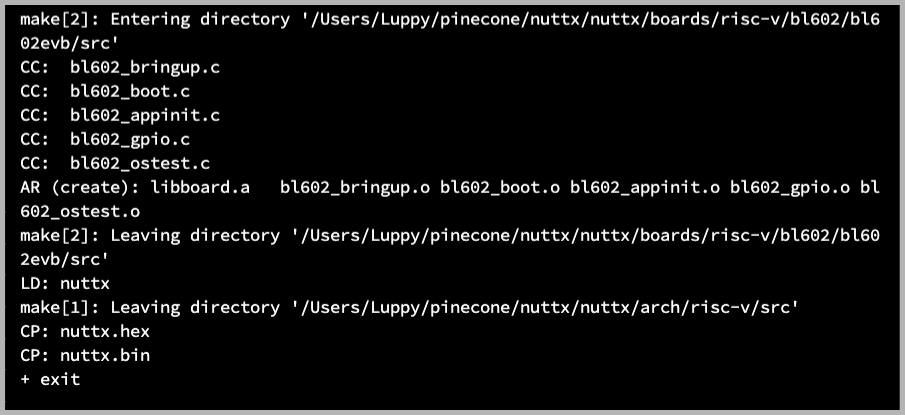
We should see…
LD: nuttx CP: nuttx.hex CP: nuttx.bin -
Ignore the errors at the “Flash NuttX” and “Run NuttX” steps
-
For BL602: Copy the NuttX Firmware to the blflash directory…
#  For Linux and macOS:
#  TODO: Change $HOME/blflash to the full path of blflash
cp nuttx.bin $HOME/blflash

#  For WSL:
#  TODO: Change /mnt/c/blflash to the full path of blflash in Windows
#  /mnt/c/blflash refers to c:\blflash
cp nuttx.bin /mnt/c/blflash
(We’ll cover blflash in the next section)
For WSL we need to run blflash under plain old Windows CMD (not WSL) because it needs to access the COM port.
-
In case of problems, refer to the NuttX Docs…
19.2 Flash NuttX
For ESP32: See instructions here (Also check out this article)
For BL602: Follow these steps to install blflash…
We assume that our Firmware Binary File nuttx.bin has been copied to the blflash folder.
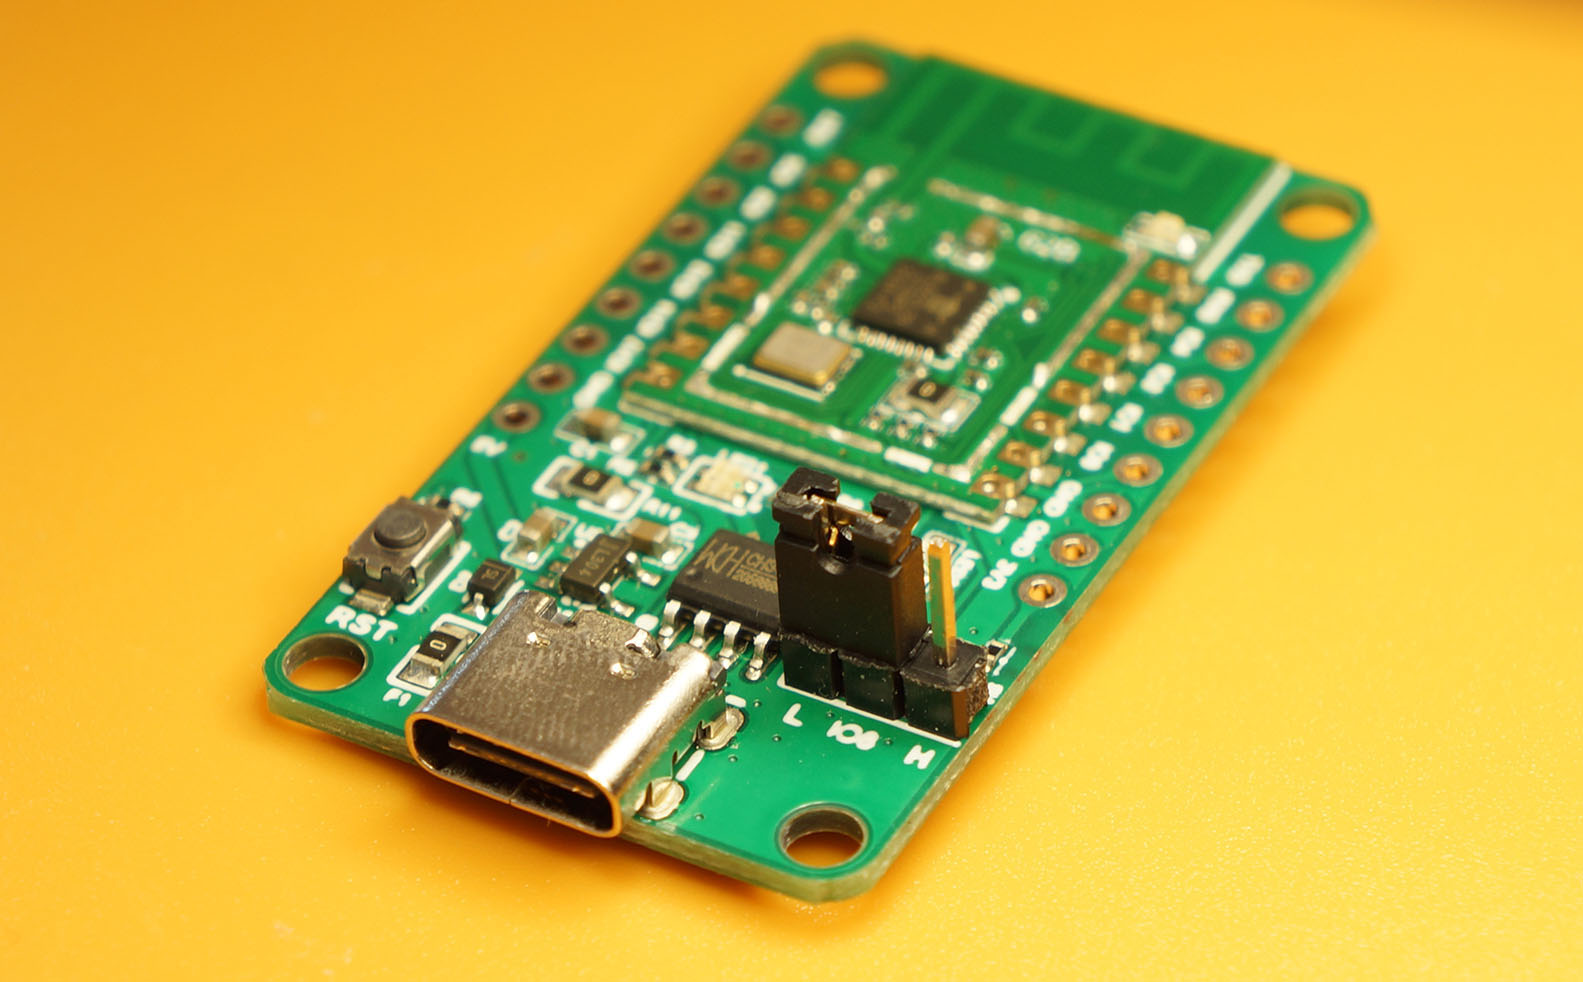
Set BL602 / BL604 to Flashing Mode and restart the board…
For PineDio Stack BL604:
-
Set the GPIO 8 Jumper to High (Like this)
-
Press the Reset Button
For PineCone BL602:
-
Set the PineCone Jumper (IO 8) to the
HPosition (Like this) -
Press the Reset Button
For BL10:
-
Connect BL10 to the USB port
-
Press and hold the D8 Button (GPIO 8)
-
Press and release the EN Button (Reset)
-
Release the D8 Button
For Pinenut and MagicHome BL602:
-
Disconnect the board from the USB Port
-
Connect GPIO 8 to 3.3V
-
Reconnect the board to the USB port
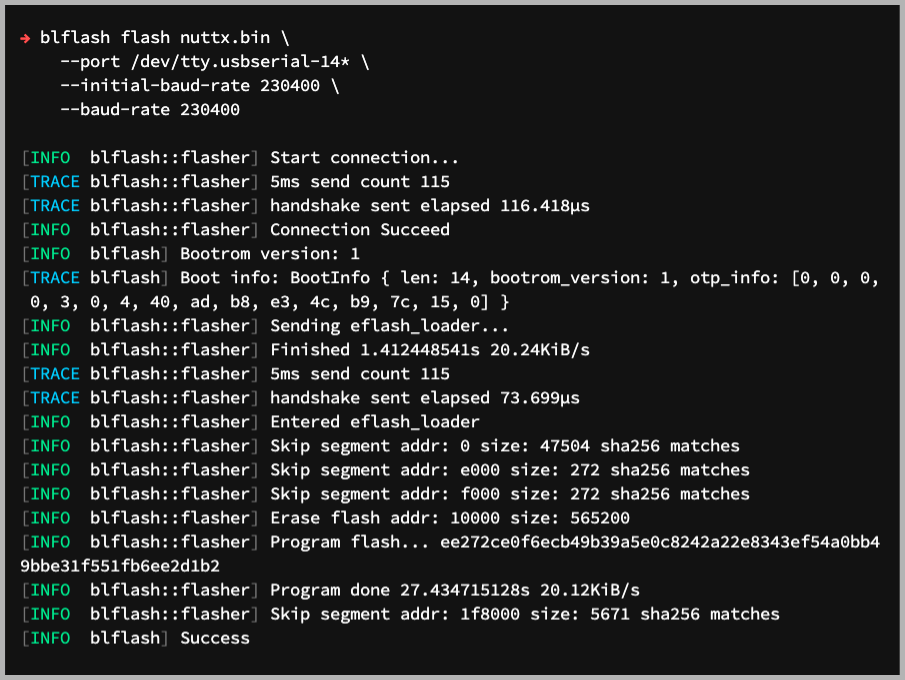
Enter these commands to flash nuttx.bin to BL602 / BL604 over UART…
# TODO: Change ~/blflash to the full path of blflash
cd ~/blflash

# For Linux:
sudo cargo run flash nuttx.bin \
    --port /dev/ttyUSB0

# For macOS:
cargo run flash nuttx.bin \
    --port /dev/tty.usbserial-1420 \
    --initial-baud-rate 230400 \
    --baud-rate 230400

# For Windows: Change COM5 to the BL602 / BL604 Serial Port
cargo run flash nuttx.bin --port COM5For WSL: Do this under plain old Windows CMD (not WSL) because blflash needs to access the COM port.
(Flashing WiFi apps to BL602 / BL604? Remember to use bl_rfbin)
(More details on flashing firmware)
19.3 Run NuttX
For ESP32: Use Picocom to connect to ESP32 over UART…
picocom -b 115200 /dev/ttyUSB0For BL602: Set BL602 / BL604 to Normal Mode (Non-Flashing) and restart the board…
For PineDio Stack BL604:
-
Set the GPIO 8 Jumper to Low (Like this)
-
Press the Reset Button
For PineCone BL602:
-
Set the PineCone Jumper (IO 8) to the
LPosition (Like this) -
Press the Reset Button
For BL10:
- Press and release the EN Button (Reset)
For Pinenut and MagicHome BL602:
-
Disconnect the board from the USB Port
-
Connect GPIO 8 to GND
-
Reconnect the board to the USB port
After restarting, connect to BL602 / BL604’s UART Port at 2 Mbps like so…
For Linux:
sudo screen /dev/ttyUSB0 2000000For macOS: Use CoolTerm (See this)
For Windows: Use putty (See this)
Alternatively: Use the Web Serial Terminal (See this)
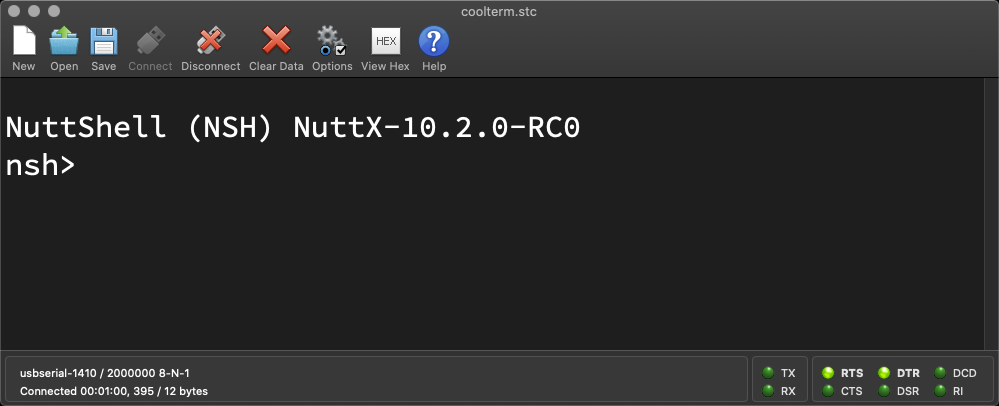
Press Enter to reveal the NuttX Shell…
NuttShell (NSH) NuttX-10.2.0-RC0
nsh>
Congratulations NuttX is now running on BL602 / BL604!
(More details on connecting to BL602 / BL604)
Loads of fun with Rust, NuttX and LoRa on PineDio Stack BL604
Recommend
About Joyk
Aggregate valuable and interesting links.
Joyk means Joy of geeK