

Container Creates Instant Database API
source link: https://dzone.com/articles/container-creates-instant-api
Go to the source link to view the article. You can view the picture content, updated content and better typesetting reading experience. If the link is broken, please click the button below to view the snapshot at that time.
Container Creates Instant Database API
Docker container to create a database server with 1 command, customize in your IDE.
Join the DZone community and get the full member experience.
Join For FreeIn this tutorial, we’ll show how to use ApiLogicServer to create, customize and run a Database based API. API Logic Server is an open-source Docker container. With the commands shown below, you get:
- Working Software, Now:
- A database API server, to unblock UI development.
- A multi-page web app, to engage Business Users — early in the project.
- Declarative logic using unique spreadsheet-like rules — 40X more concise than code, extensible with Python — for remarkable business agility.
- Customizable projects, using a standard language and tools. Operate in a cleanly isolated, containerized environment that matches your deployment architecture.
TL;DR — Create Database API and Basic Web App
Create the sample project in a minute or two, as follows. With Docker started, enter these Terminal commands (Windows, use Powershell):
cd ~/Desktop # directory of API Logic Server projects on local host docker network create dev-network # only required once (ignore errors if network already exists) # [Install and] Start the API Logic Server docker container docker run -it --name api_logic_server --rm --net dev-network -p 5000:5000 -p 8080:8080 -v ${PWD}:/localhost apilogicserver/api_logic_server# (Now inside the container) ApiLogicServer create # Return for default project-name and pre-installeddemo dbApiLogicServer run# Return for default project-name; swagger at:localhost:5000
Here's a 5-minute demo showing installation, creation, execution, and customization.
If you've got Docker installed, you can easily execute this tutorial as you read (no need to install Python, and running this demo won't affect existing Python projects). This is not required — ample screenshots are provided to illustrate the process and the actual code.
Working Software, Now
The commands above created a project. We'll review how to customize and debug it below. But let's first see what is now working.
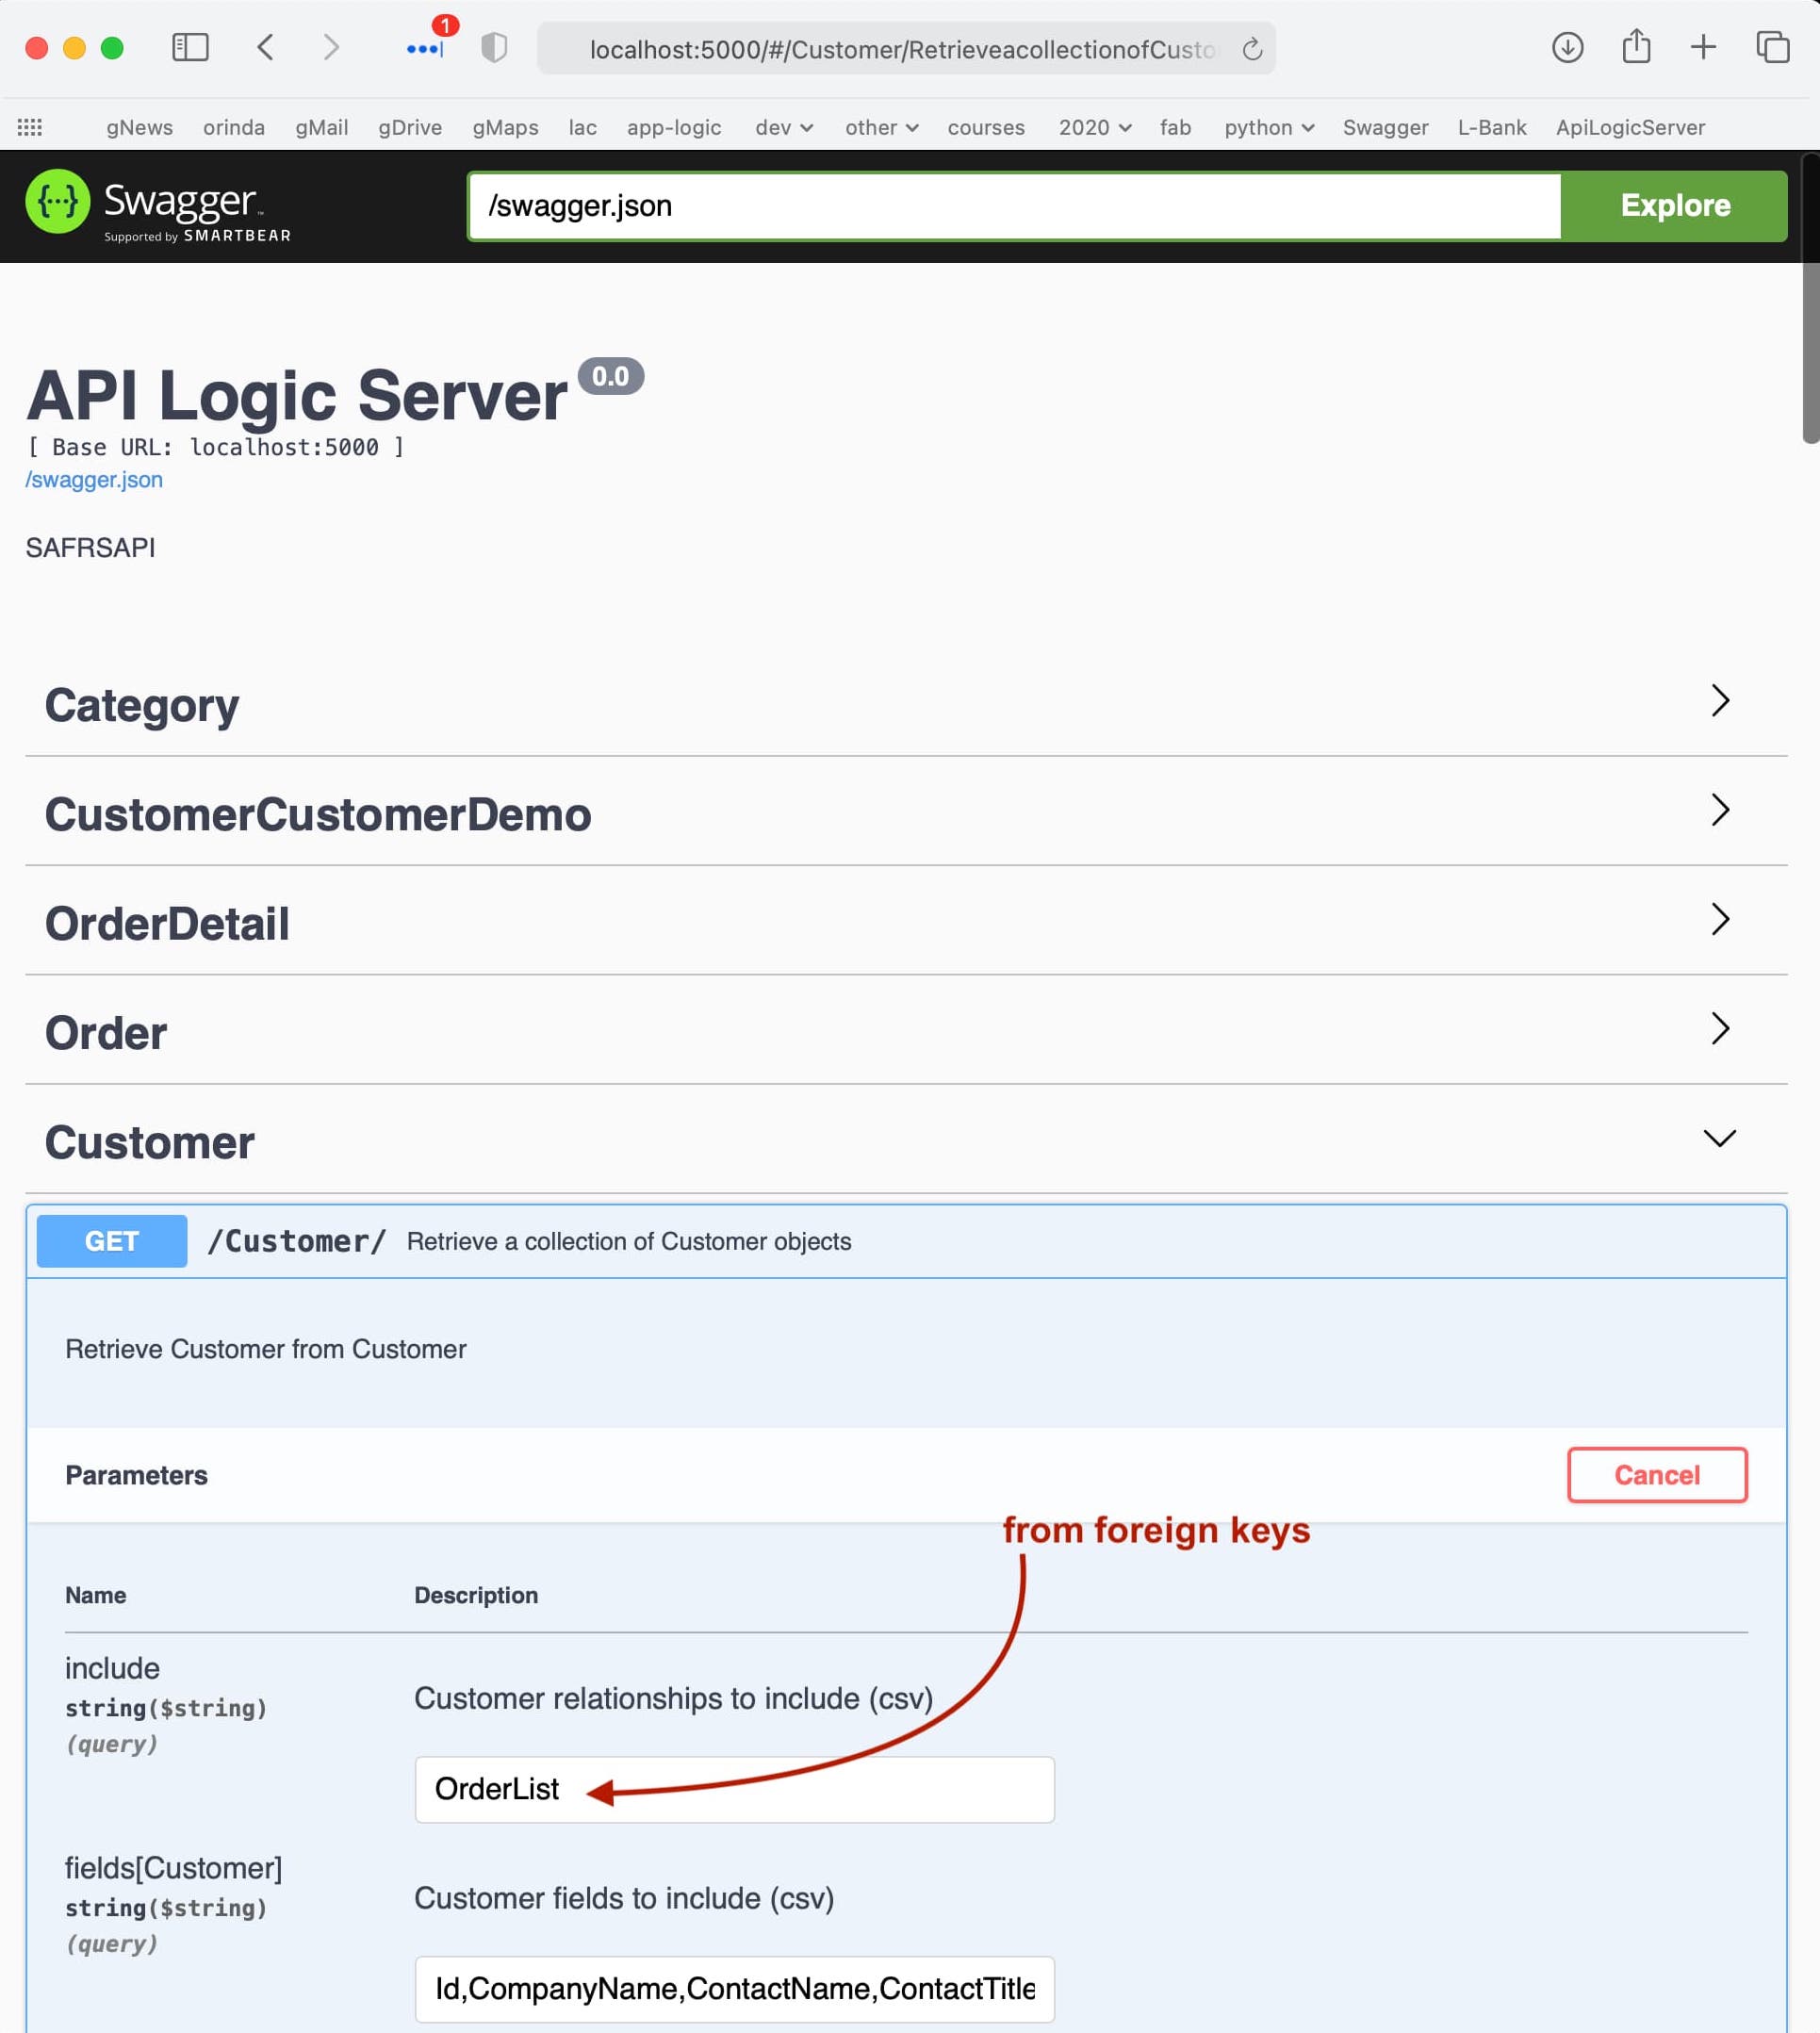
JSON:API With Swagger
Your API is instantly ready to support UI and integration development, available in swagger, as shown below. JSON:APIs are interesting because they are client configurable to reduce network traffic and minimize organizational dependencies. Explore the API with Swagger on localhost:5000:
Logic: Spreadsheet-Like Rules, Extend With Python
Transactional business logic — multi-table derivations and constraints — is a significant portion of database systems, often nearly half. Procedural coding is time-consuming to develop and maintain, reducing business agility.
ApiLogicServer provides unique spreadsheet-like rules that reduce transaction logic by 40X. Logic is declared in Python (example below), and is:
- Automatically re-used: rules are automatically re-used for all updates, eliminating common "corner-case" bugs where logic was coded, but not called.
- Extensible: logic consists of rules (see below), plus standard Python code.
- Multi-table: rules like
sumautomate multi-table transactions. - Scalable: rules are pruned and optimized; for example, sums are processed as 1-row adjustment updates, rather than expensive SQL aggregate queries.
- Manageable: develop and debug your rules in IDEs, manage them in SCS systems (such as git) using existing procedures.
The following 5 rules (lines 50-68) represent the same logic as 200 lines of Python, and directly map to the "cocktail napkin spec" (at the bottom), so business users can read and understand them:
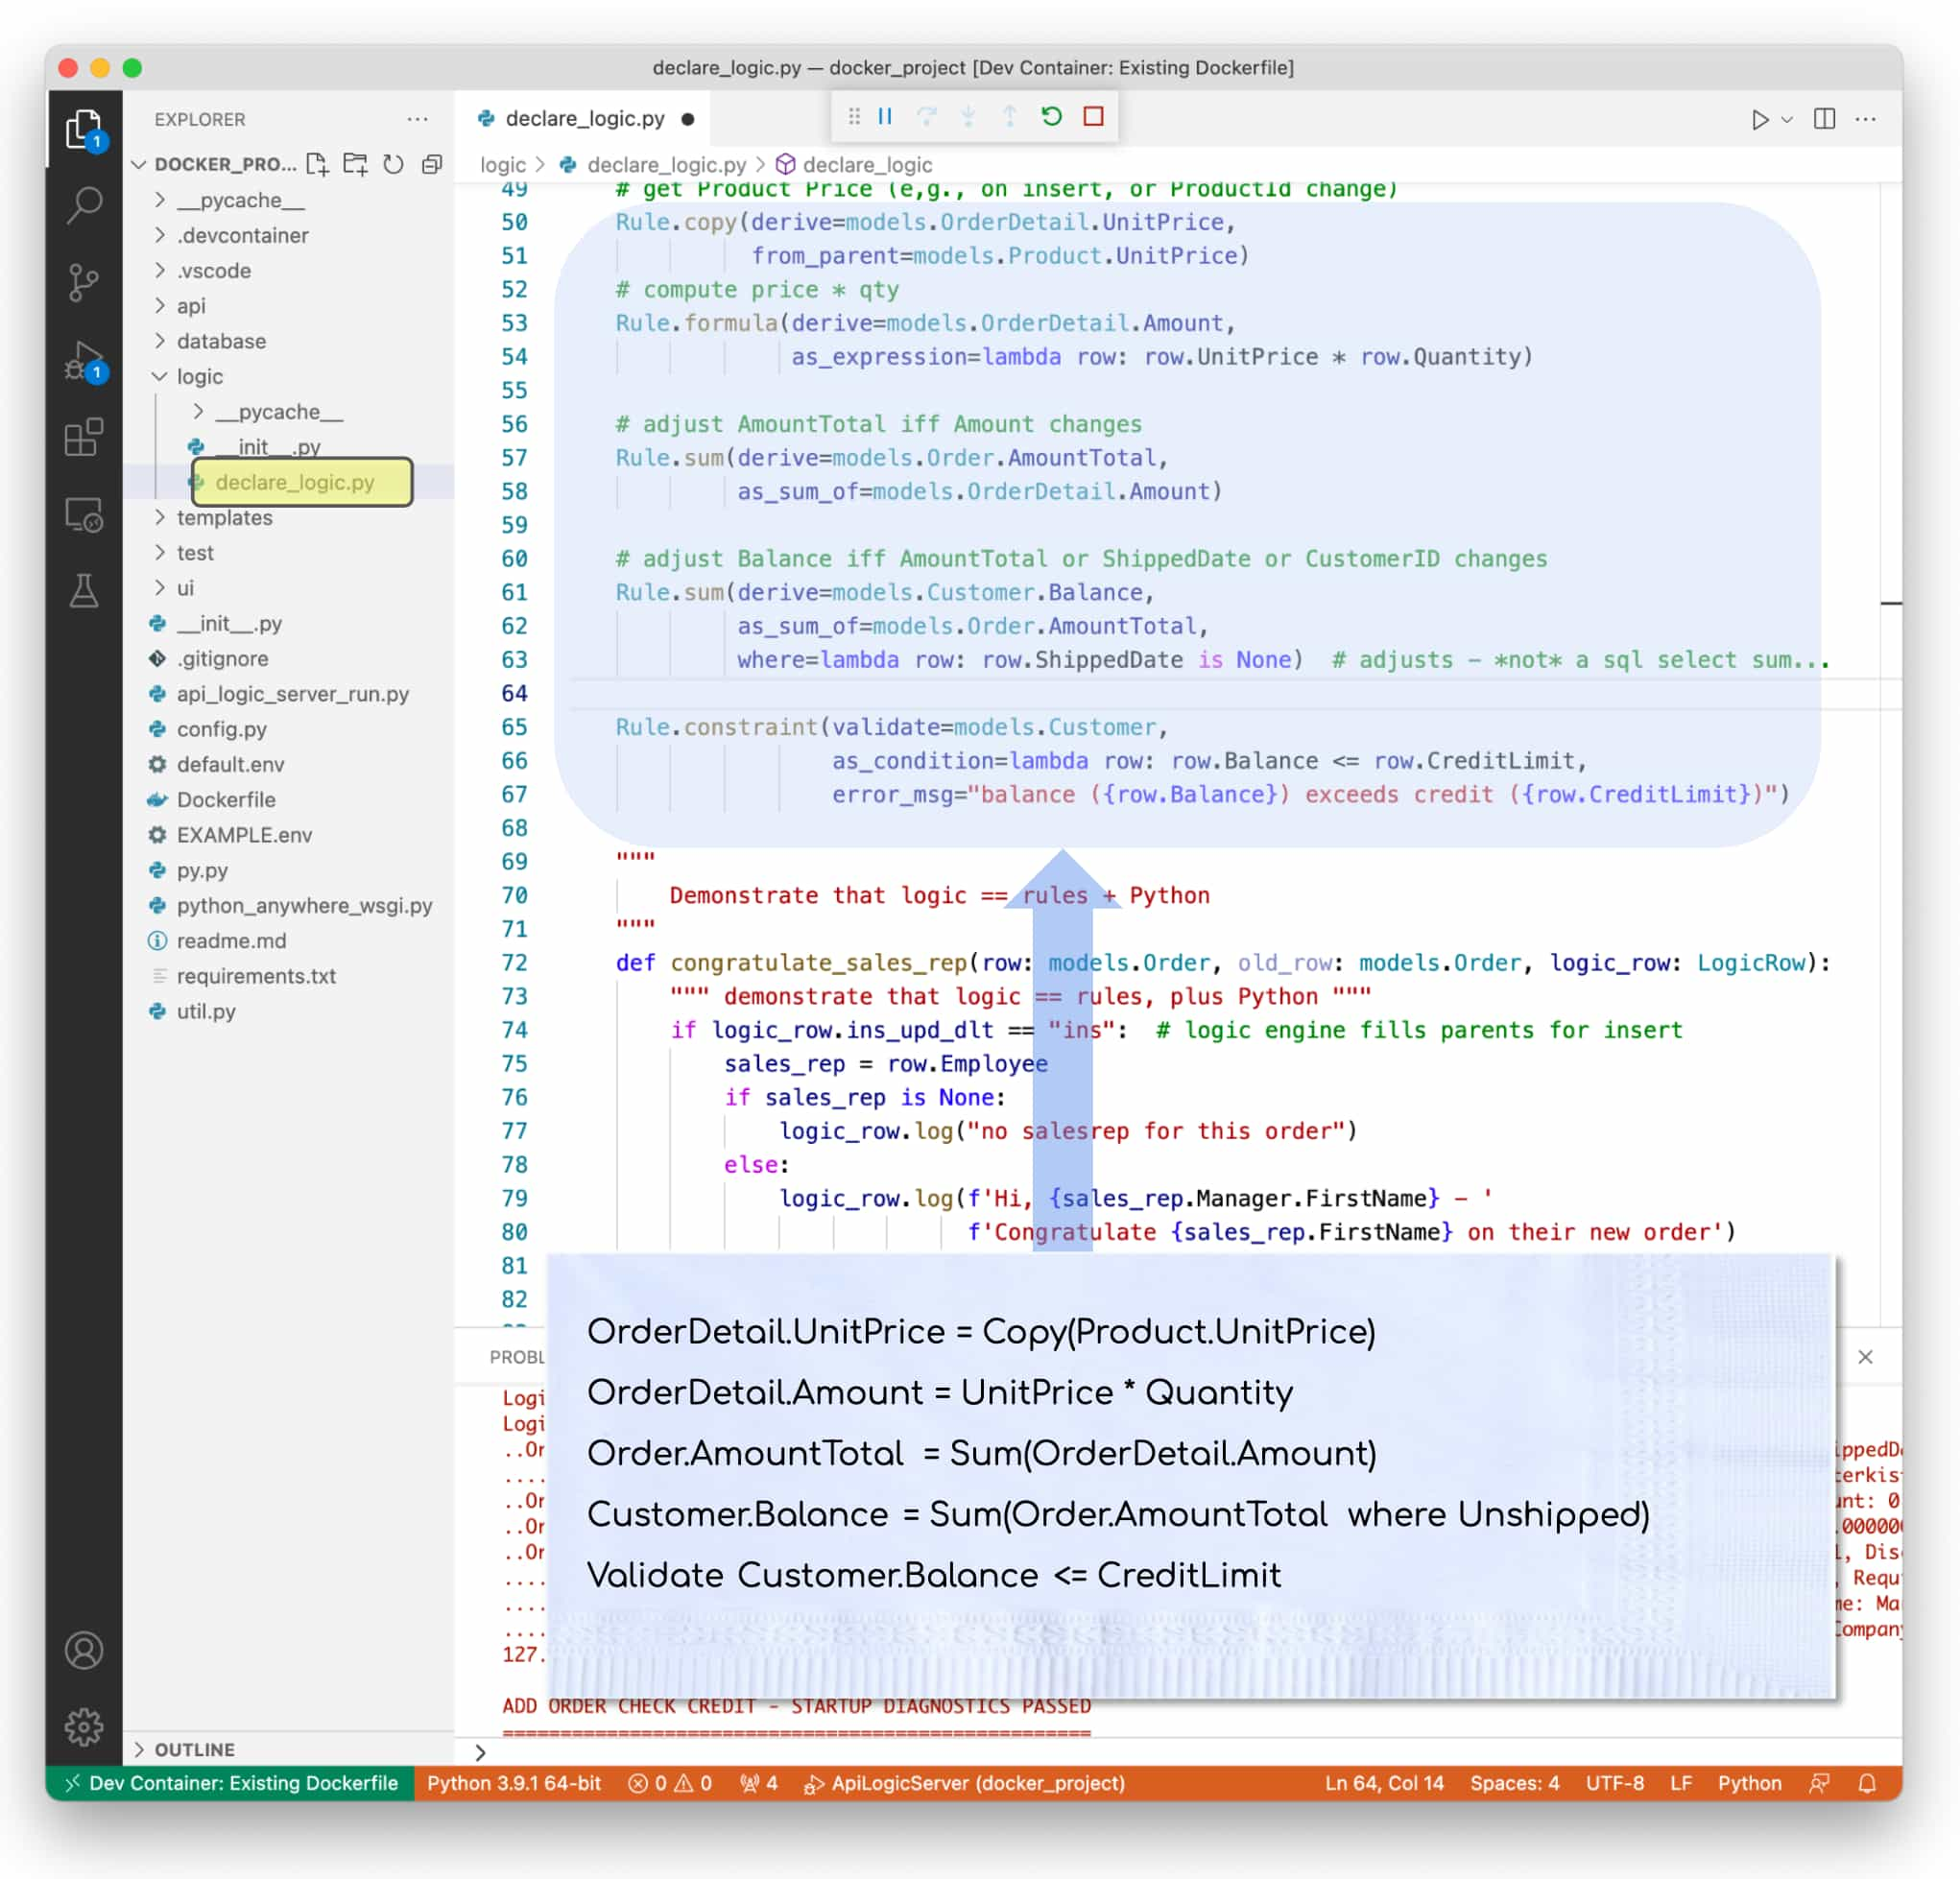
What's Pre-Built?
The API and web app (below) were automatically created from the database. So, you'd see these running with your own databases.
To allow you to explore customization, the rules above were pre-installed for the demo project — you'd normally enter these in Python, using code completion.
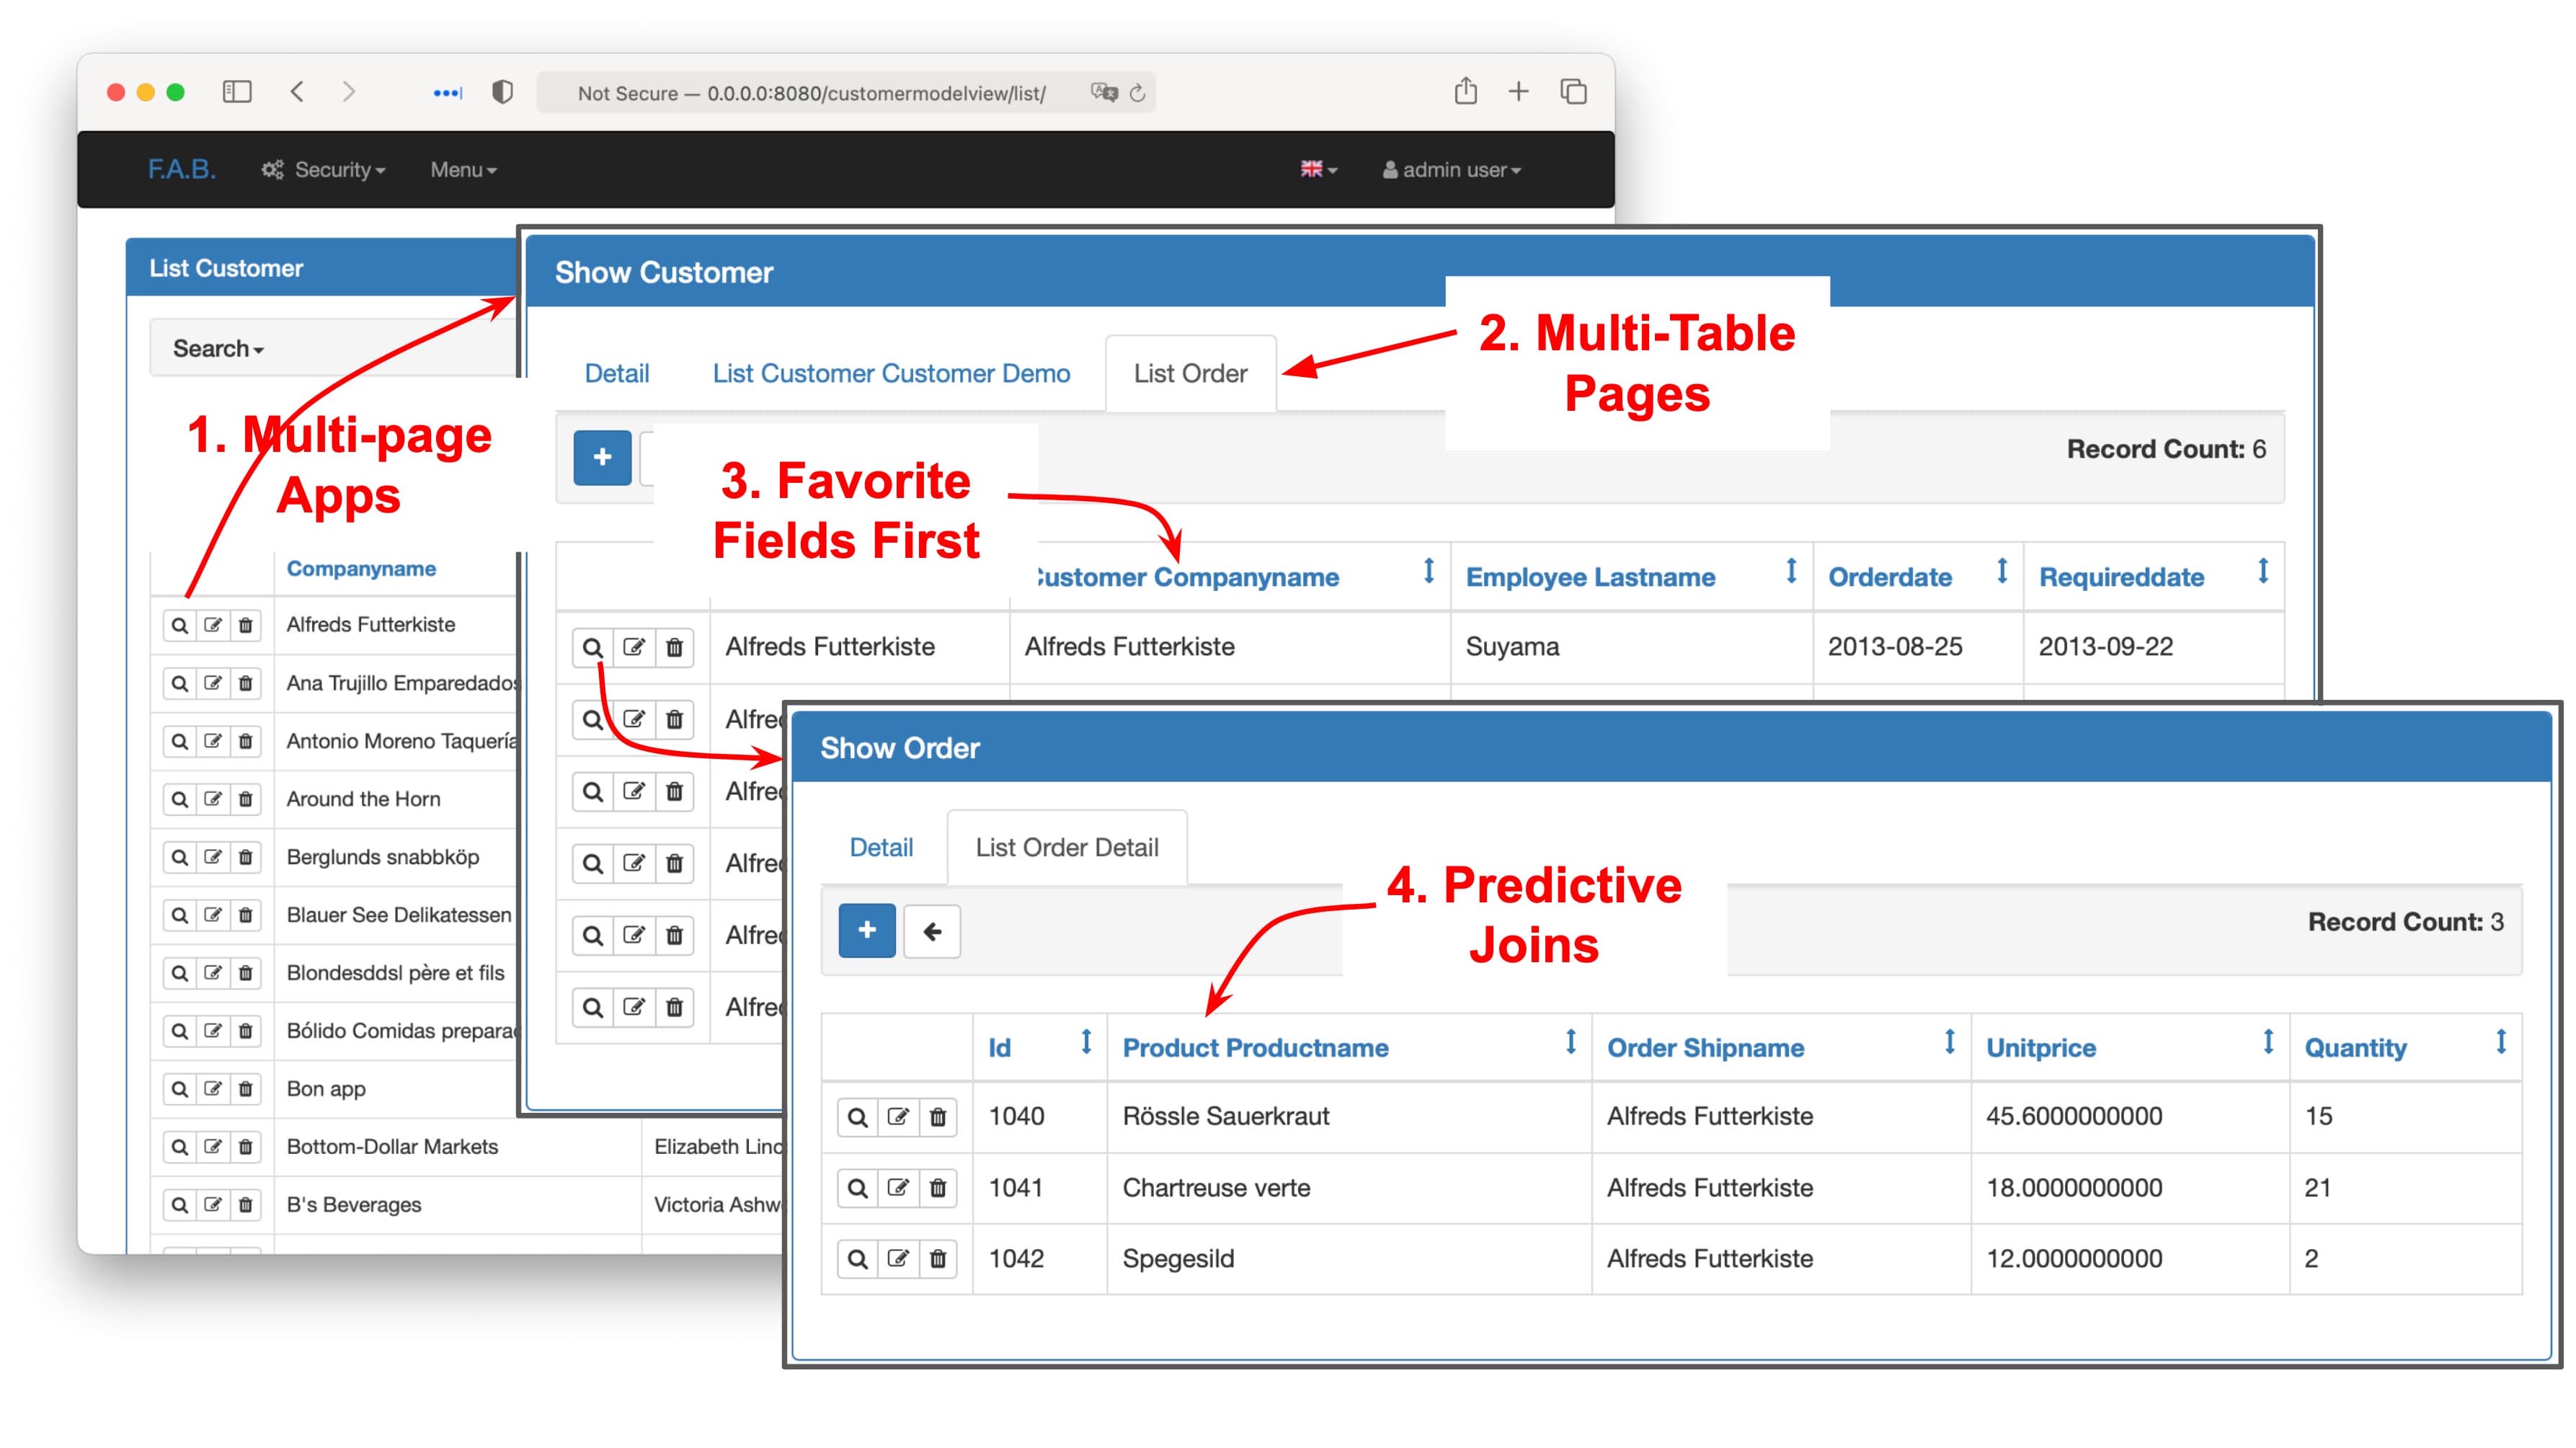
Basic Web App: Multi-Page, Multi-Table
UI development takes time. That's a problem since
- Such effort may not be warranted for admin "back office" screens, and
- Agile approaches depend on getting working software soon, to drive collaboration and iteration.
ApiLogicServer CLI, therefore, creates working software now: multi-page, multi-table applications as shown below:
- Multi-page: apps include 1 page per table.
- Multi-table: pages include related_views for each related child table, and join in parent data.
- Favorite fields first: first-displayed field is "name", or contains "name" (configurable).
- Predictive joins: favorite field of each parent is shown (product name - not product id).
- Ids last: such boring fields are not shown on lists, and at the end on other pages.
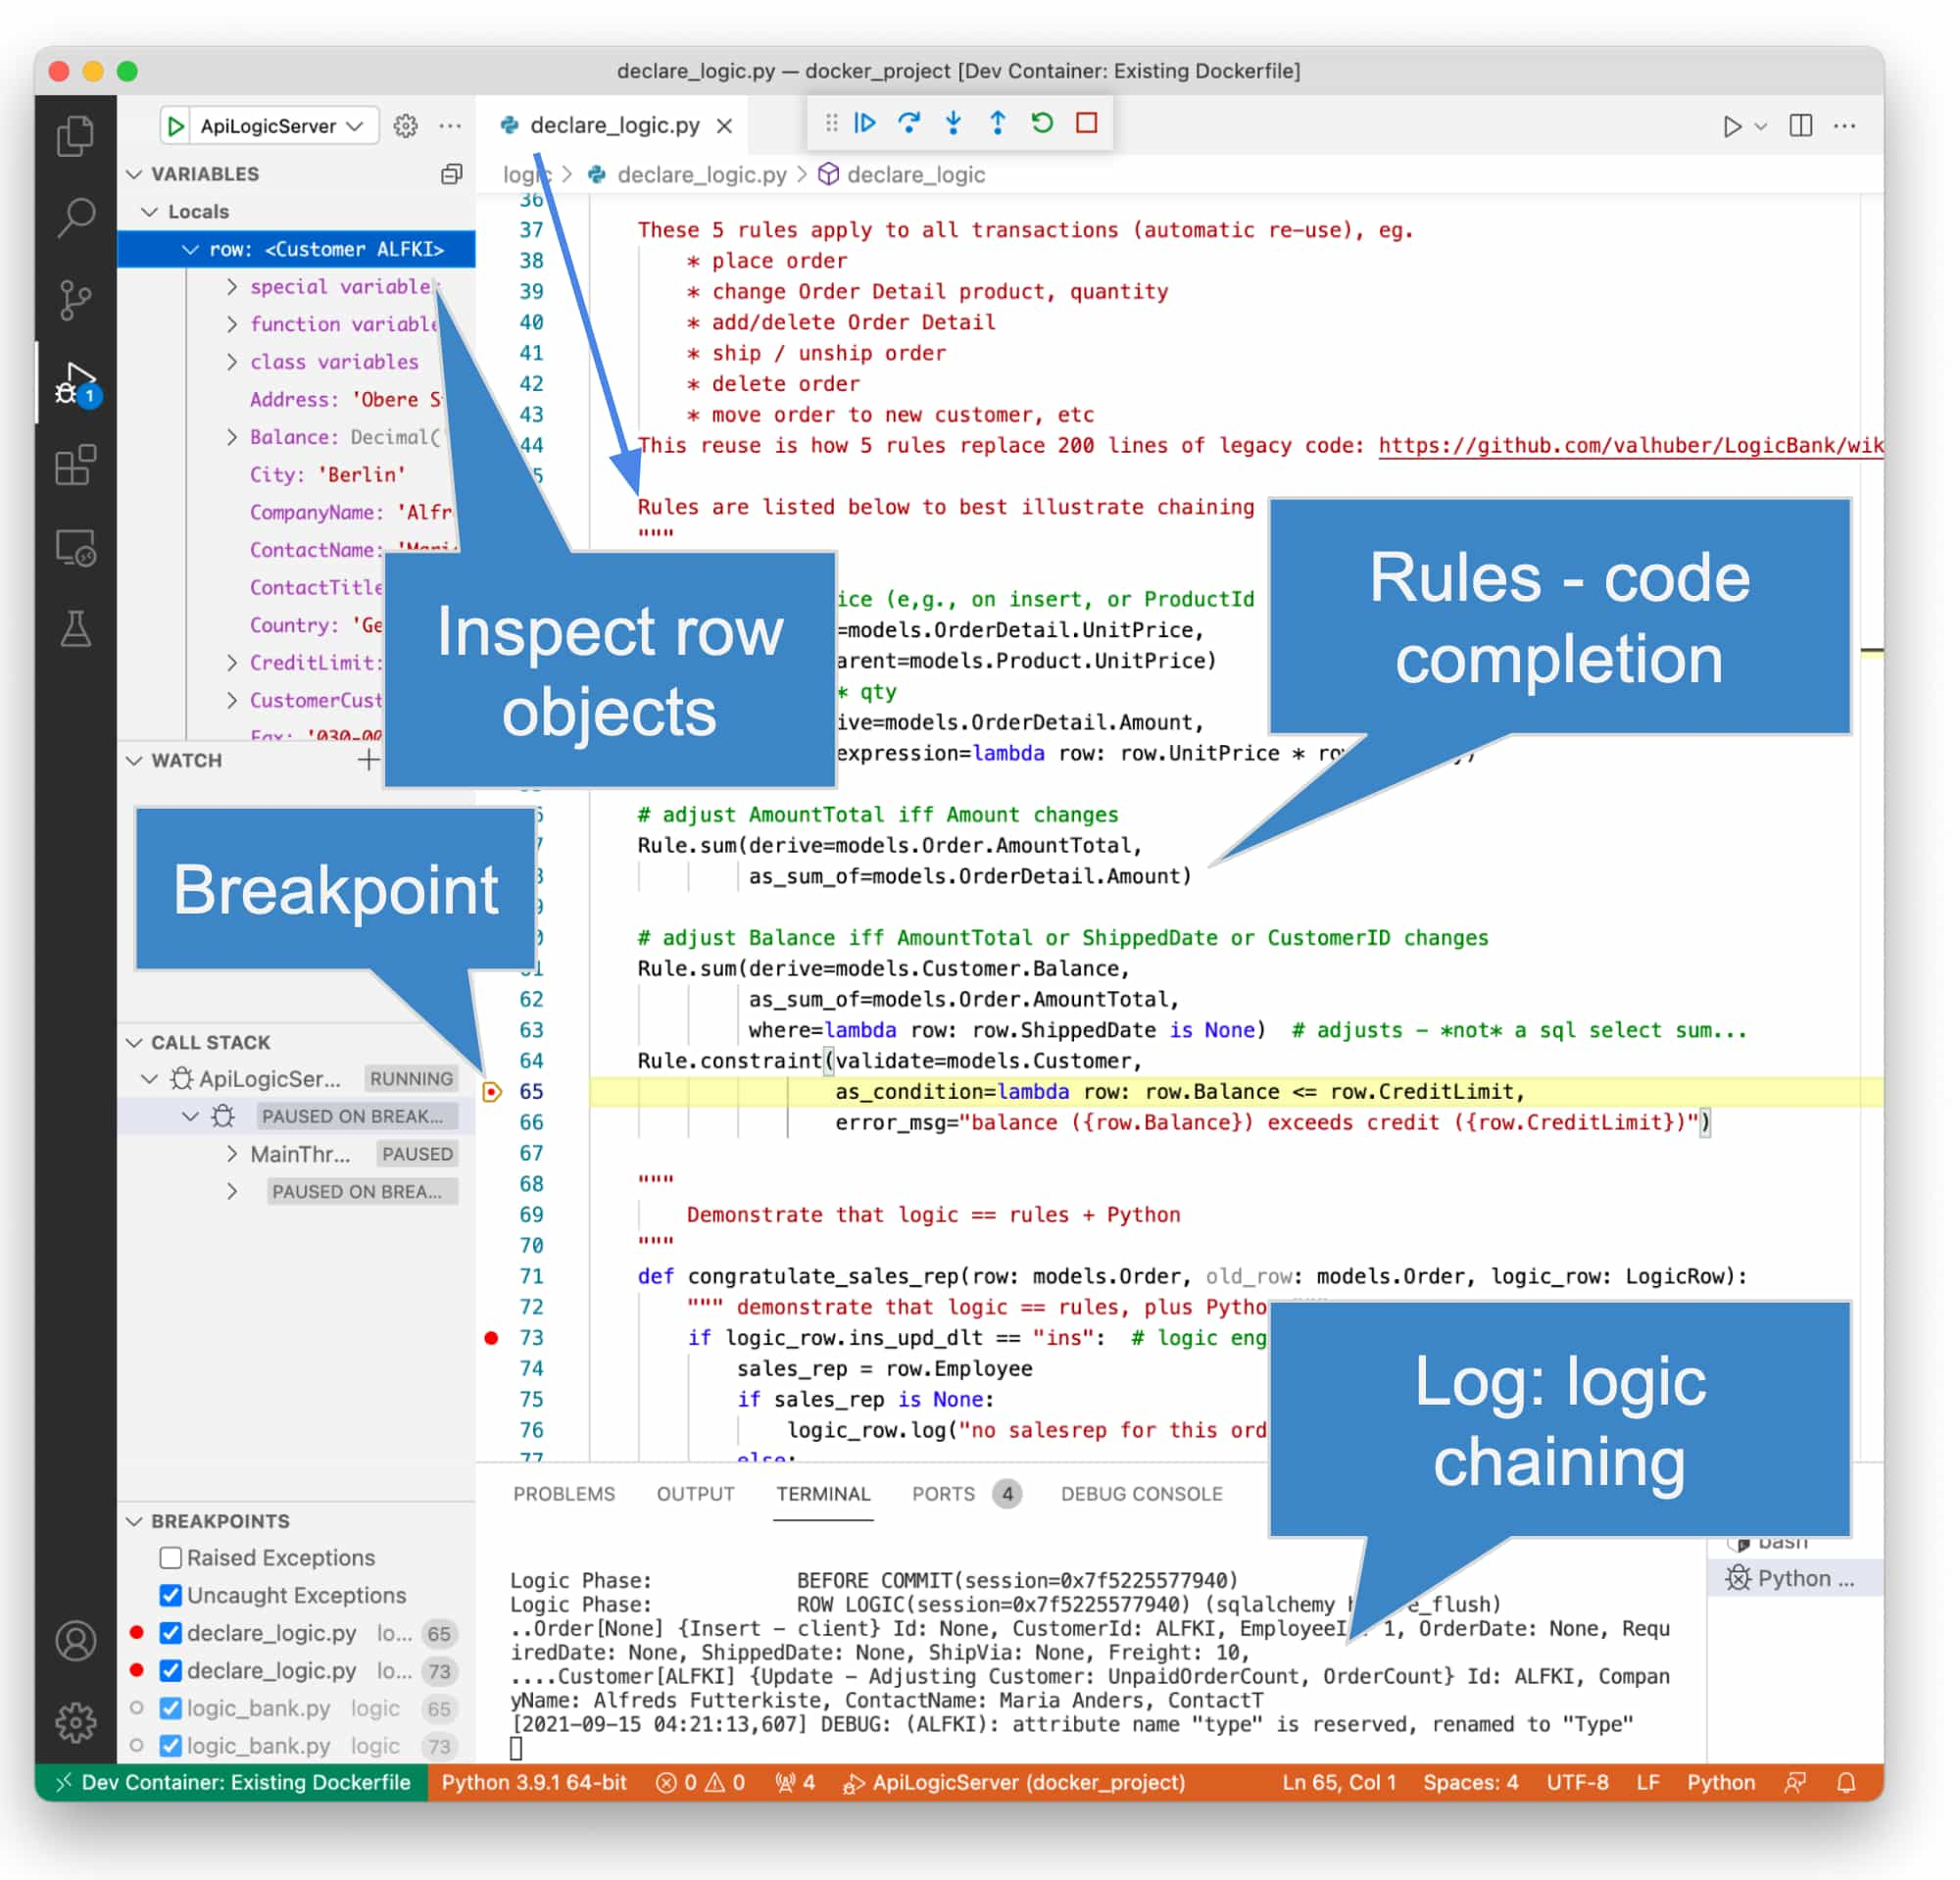
- Logic enforcement: logic is enforced on all updates. For example, try to alter the Credit Limit of the first customer to 20, and observe the error.
- This is due to the constraint rule in
logic/declare_logic.pyon Customer, containing: row.Balance <= row.CreditLimit
- This is due to the constraint rule in
You can run it like this:
ApiLogicServer run-ui# Return for default project-name; web app at:localhost:8080
Customizable: Create, Run, Customize
An API and web app are a good start, but we all know 100% automation is not possible. There needs to be provisions for customization, using standard languages, tools, and approaches.
Let's now look into customization. But first, we'll lay out the basic architecture.
Container Architecture
As shown below, there are typically 2-3 "machines" in operation:
- Your local host (in grey), where the Customizable Project files (the api_logic_server directory) are stored, and your Dev Tools (IDE, etc.) operate
- The ApiLogicServer Docker container(blue), which contains:
- The ApiLogicServer, with CLI (Command Language Interface), commands we used above:
create— create projects on your localhost.run— execute projects, utilizing the various Runtimes (Flask, SAFRS API, SQLAlchemy, Logic, Flask App Builder, etc.).
- The ApiLogicServer, with CLI (Command Language Interface), commands we used above:
- A Python environment to support execution, and development using your IDE.
- The database (purple) can run as a separate Docker container, in your local host, or (for this tutorial) within the ApiLogicServer docker container
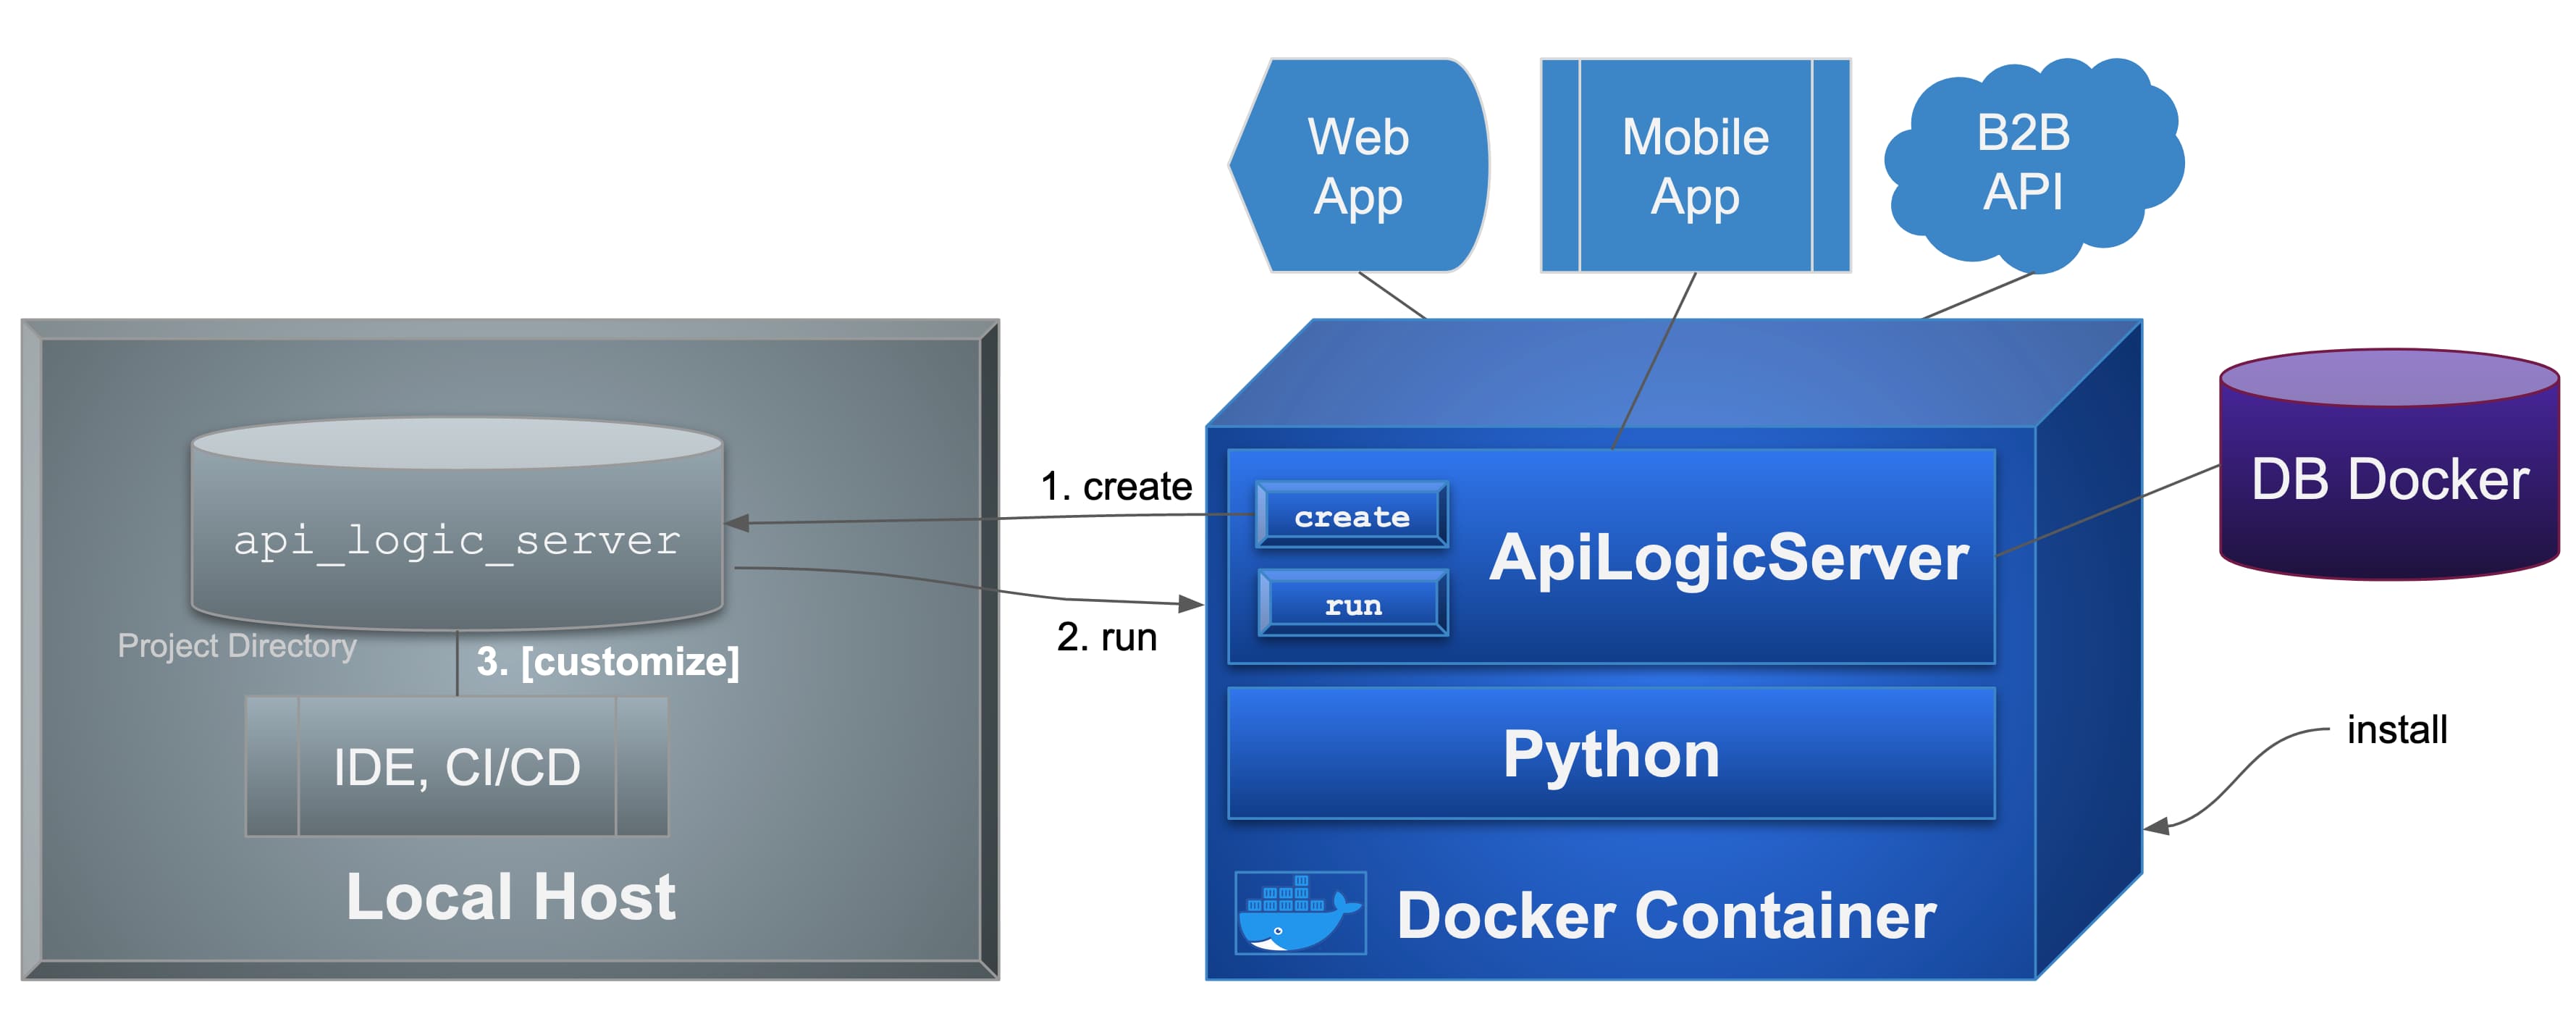
Recall the process to install and start ApiLogicServer: with Docker running, use a Terminal window (Windows: use PowerShell):
cd ~/Desktop # directory of API Logic Server projects on local host
docker network create dev-network # only required once (ignore errors if network already exists)
# [Install and] Start the API Logic Server docker container
docker run -it --name api_logic_server --rm --net dev-network -p 5000:5000 -p 8080:8080 -v ${PWD}:/localhost apilogicserver/api_logic_server
The last command downloads and runs your ApiLogicServer with... a Terminal window (-it), a local network (--net dev-network), access to a local directory where projects are created (-v ${PWD}:/localhost), and some ports (-p 5000:5000 -p 8080:8080).
Note: Docker is the simplest install, but you can also use a local version of Python and pip install
Customize, Extend, and Debug — Standard Language, IDE
The created project is a standard Python project, fully customizable using your existing IDE and other development tools (e.g., git). For example, you can load the project in Visual Studio Code as follows:
- Install VS Code 1.61, and (if required) the
shellextension- You do not need to install Python; it operates from the container
- Open the project like this from a Terminal on your local host (not Docker container):
exit exit the ApiLogicServer Docker container, if runningcode ~/Desktop/api_logic_server # open project in VS Code
3. You will be prompted to install the remote-container extension, and reload the project in the container; do so
Here is the created project, opened in VS Code:
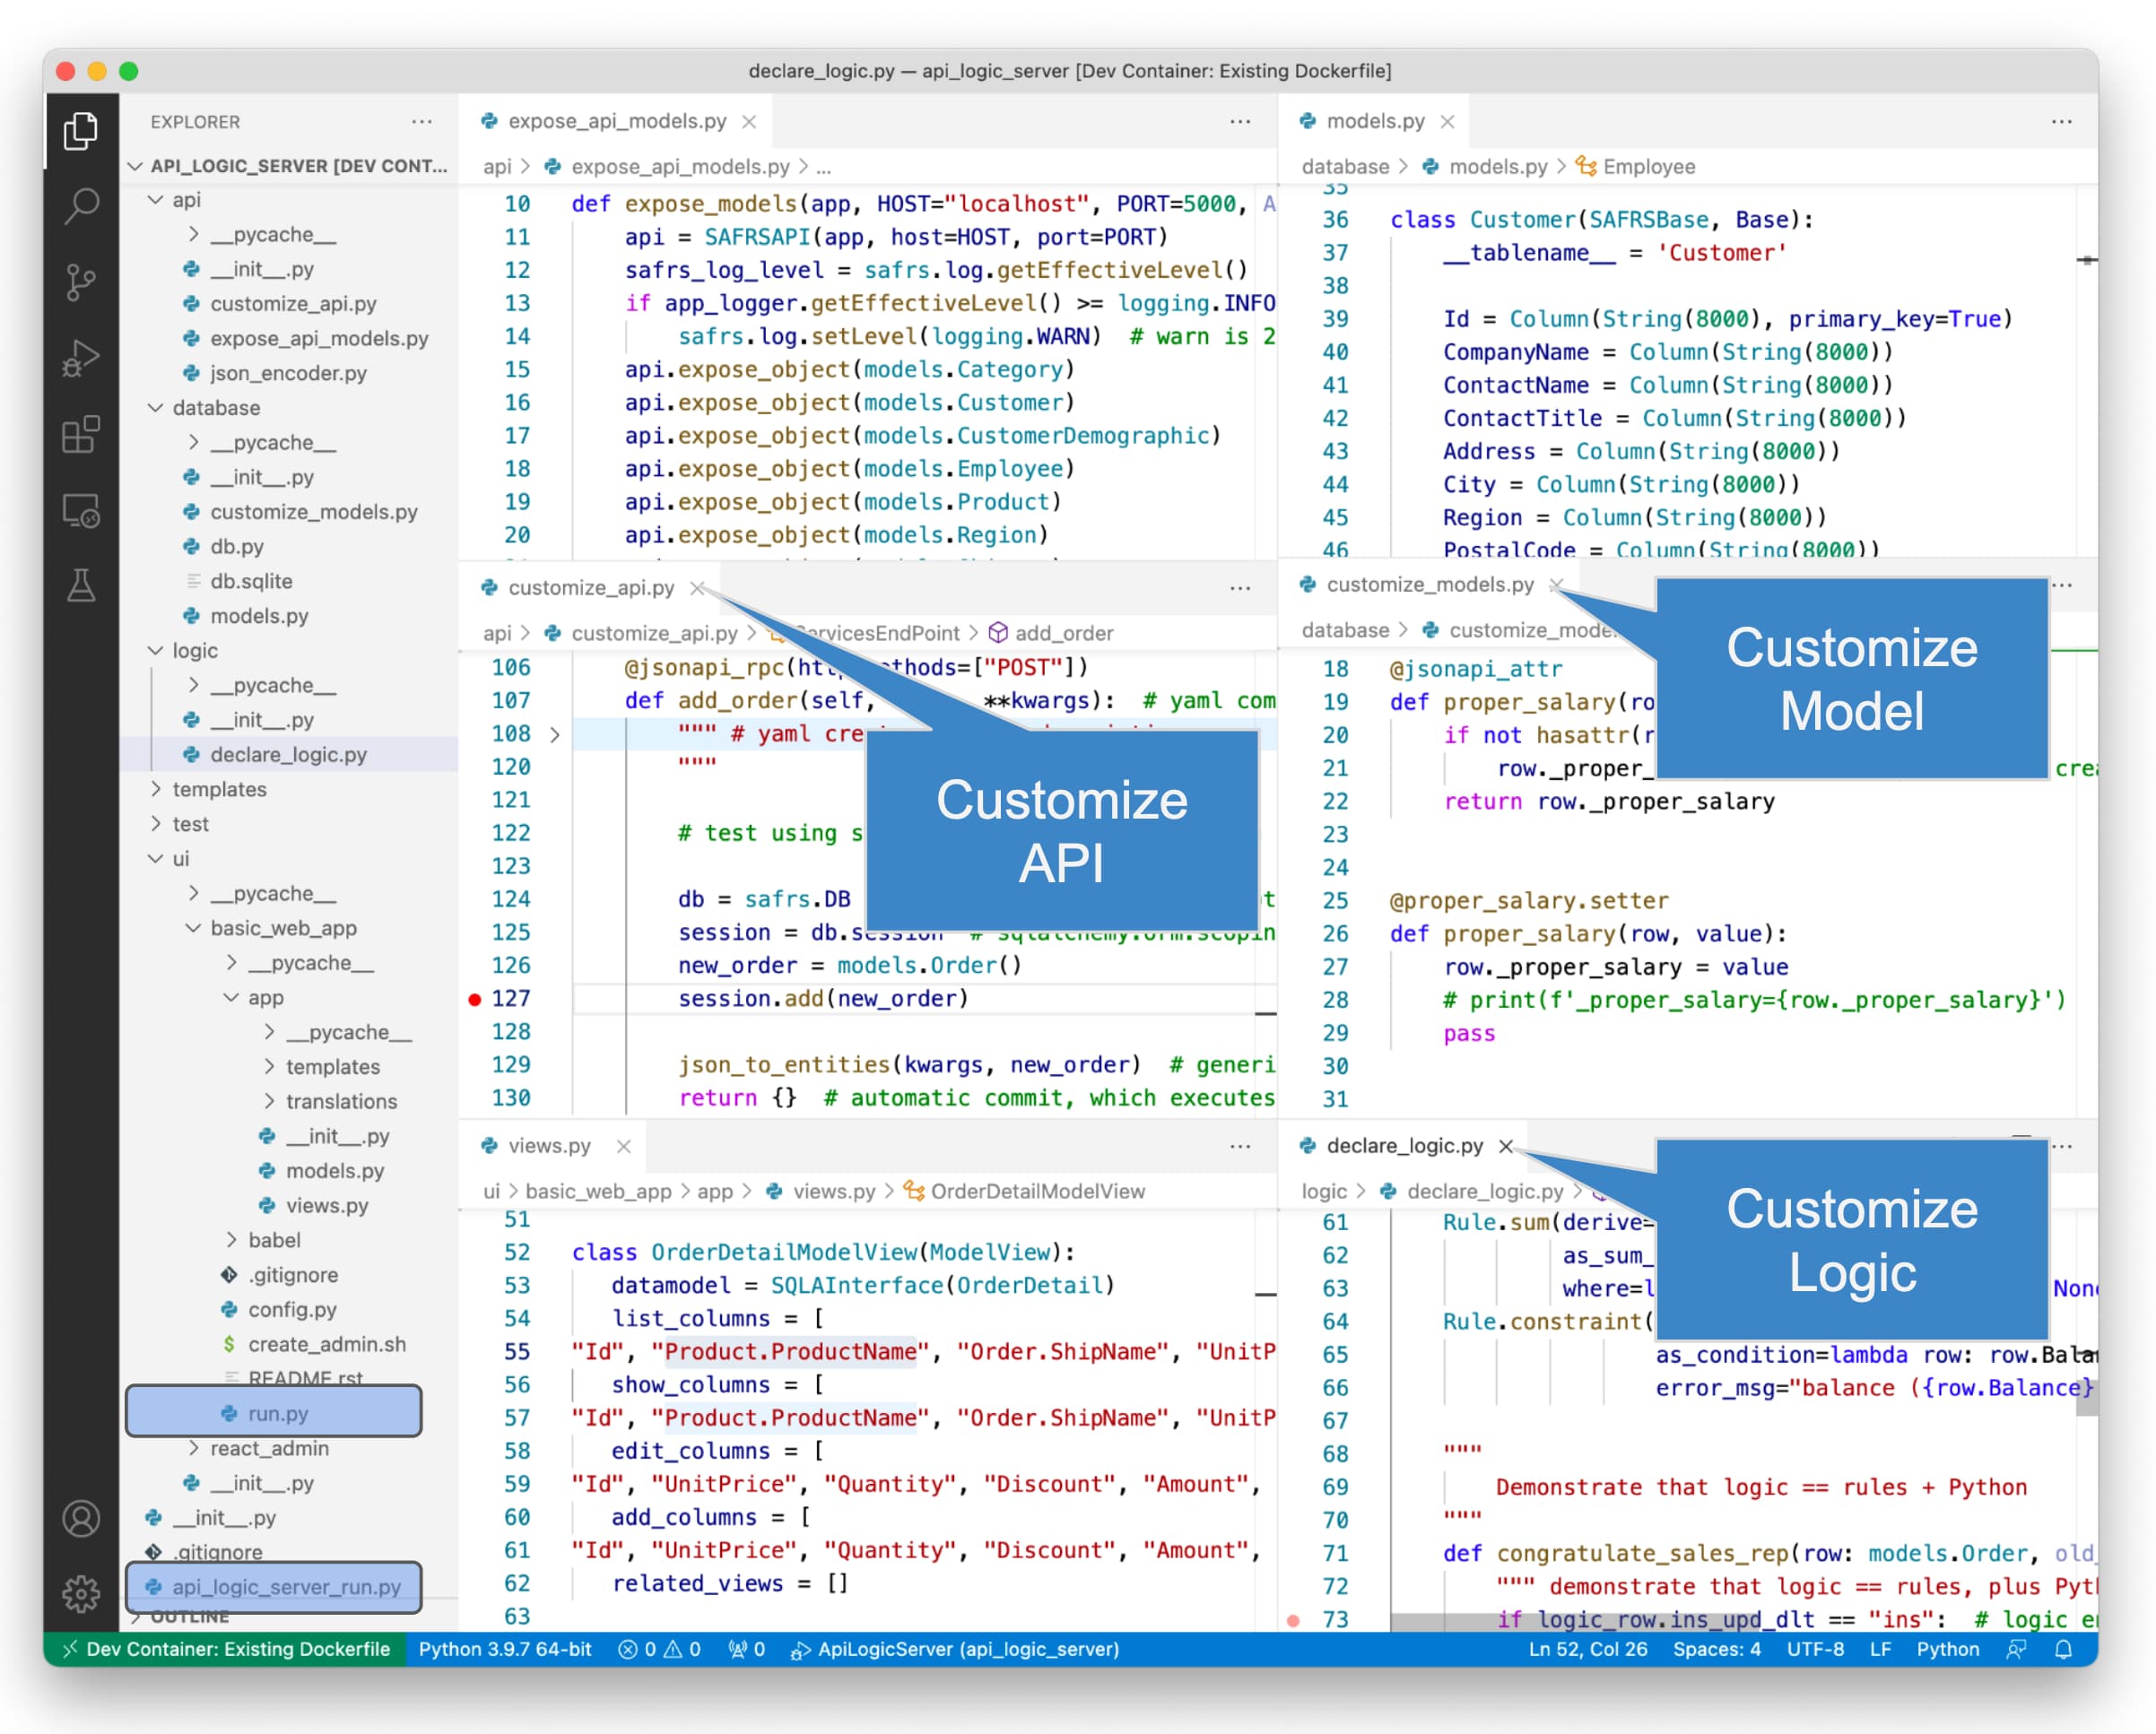
Customize Model Code
The created project is extremely small since the created code defines declarative models, rather than low-level procedural code. Not only does this make it small, but it also makes it very easy to customize the behavior.
For example, the API is defined (api/expose_api_models.py — upper left code pane) with statements as shown below. It's instantly obvious how to alter this code, e.g., to not expose a given table as an endpoint.
api.expose_object(models.Category)
api.expose_object(models.Customer)
api.expose_object(models.CustomerDemographic)
The same applies to ui/basic_web_app/app/view.py — it's clear how to control what fields are displayed (including joins), and in what order:
class OrderDetailModelView(ModelView):
datamodel = SQLAInterface(OrderDetail)
list_columns = [
"Id", "Order.ShipName", "Product.ProductName", "UnitPrice", "Quantity"]
show_columns = [
"Id", "Order.ShipName", "Product.ProductName", "UnitPrice", "Quantity", "Discount", "Amount", "ShippedDate", "ProductId", "OrderId"]
edit_columns = [
"Id", "UnitPrice", "Quantity", "Discount", "Amount", "ShippedDate", "ProductId", "OrderId"]
add_columns = [
"Id", "UnitPrice", "Quantity", "Discount", "Amount", "ShippedDate", "ProductId", "OrderId"]
related_views = []
Extend With Python
Typical extensions include (explore the default sample database to see examples):
- Customize API: edit
api/customize_api.pyto define your own endpoints, complementing those created from the model - Customize Model: edit
customize_models.py, for example- to define relationships perhaps not defined in your schema, critical for multi-table logic, APIs, and web apps
- to describe derived attributes, so that your API, logic and apps are not limited to the physical data model
- Customize Logic: edit
models/declare_logic.py(initially empty) to declare logic- As shown above, the default sample database project contains some simple rules you can explore; learn more about rules in the Logic Bank
Debug Using Your Existing IDE
Since the project is standard, you can use your existing IDE services such as code completion and debugging.
For VS Code, the created project includes pre-built launch configurations for ApiLogicServer and the Basic Web App. You can set breakpoints, examine variables, step through code, etc.
Summary: Customizable Working Software, Now
In this tutorial, we’ve shown how to use an API Logic Server to create, customize and run a Database API. Working Software Now from a database: an API and a web app, supported by spreadsheet-like logic. The project is customizable, using standard language and tools, operating in an isolated containerized development environment.
Recommend
About Joyk
Aggregate valuable and interesting links.
Joyk means Joy of geeK