

Swift Render Tests in Practice - Part II
source link: https://pspdfkit.com/blog/2021/swift-render-tests-in-practice-part-2/
Go to the source link to view the article. You can view the picture content, updated content and better typesetting reading experience. If the link is broken, please click the button below to view the snapshot at that time.
Blog Post
Swift Render Tests in Practice - Part II
In last week’s article about render tests in Xcode, we discussed what render tests are, when it makes sense to use them, when not to use them, and how to implement them on a very basic level. In this article, we’ll extend the functionality from last week to make use of the information we captured when an image comparison failed. For this purpose, we’ll talk about XCTAttachment and XCTContext, and we’ll discuss how to recover this data from a test run on your continuous integration (CI) setup.
In the final part, we’ll improve the diagnostics even further and show you how to leverage this system to generate the reference images it needs.
Computer Says No
On its own, a test failure can be as unhelpful as the accountant from the infamous “Little Britain” skits. If you paid attention to the code in last week’s post, the comparison function was a little bit more specific than just returning false whenever it encountered a mismatch. Instead, it was throwing instances of an error type that we cavalierly glossed over, but that we leveraged by wrapping the call into an XCTAssertNoThrow to get a textual representation of the error in the end.
We’ll go ahead and show the full error type now:
/// Comprehensive list of errors that can occur when evaluating a render test.
enum ImageComparisonError: Error {
    // :MARK: Test Setup Errors — see last week's article
    case unsupportedBackingStore(referenceImage: UIImage, actualImage: UIImage)
    case dimensionMismatch(expectedWidth: Int, expectedHeight: Int, actualWidth: Int, actualHeight: Int)

    // :MARK: Actual Comparison Failure
    /// The image has the same dimensions as the reference, but too many pixels differ.
    /// - Parameters:
    ///   - pixelCount:
    ///     The total number of pixels in the image.
    ///   - acceptableMismatchCount:
    ///     The maximum number of pixels that would have been allowed to differ from
    ///     the reference to still be considered a match.
    ///   - actualMismatchCount:
    ///     The actual number of pixels in the image that differed from the reference.
    case imageMismatch(
        pixelCount: Int,
        acceptableMismatchCount: Int,
        actualMismatchCount: Int
    )
}
In the case of an image mismatch, you’d be getting something like this:
XCTAssertNoThrow failed: threw error "ImageComparisonError.imageMismatch(pixelCount: 137, acceptableMismatchCount: 4, actualMismatchCount: 42)"
This is slightly better than “computer says no.” But when you see something like this on your CI report, you’ll then have to:
-
Check out the appropriate commit
-
Run that particular test
-
Realize you’ve forgotten to set a breakpoint on the failing line
-
Run that particular test again
-
Use Xcode’s QuickLook feature (click the little “eye” icon or press the spacebar after selecting a variable to invoke it) on both the actual image and the reference image
This isn’t a very pleasant workflow, even when you can skip steps 1 and 2. It only keeps getting worse if you’re changing something fundamental and there’s more than one test failure.
There are ways to improve this workflow significantly, and they start by getting the complete test report from your CI run to open in Xcode.
Getting Test Results from CI Machines
A couple of years back, Xcode started using a bundle format with the .xcresult extension. Whenever you run your tests — whether interactively in Xcode, or using xcodebuild test on the command line — a new .xcresult bundle is created, and all output generated by that particular test run is written into this bundle. Yes, all output! Each compiler invocation, any diagnostics, everything written to stderr or stdout, each test invocation, test coverage data — everything. When you repeatedly run your tests locally, you may notice that the report navigator gains additional entries, like in the following screenshot:
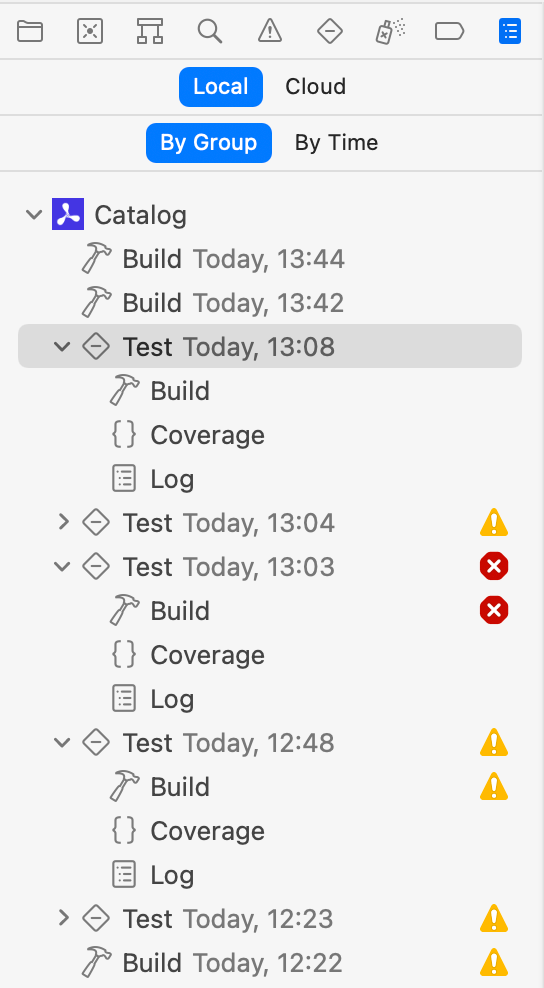
Each entry in this list is an .xcresult bundle, and clicking one of them will let you explore the individual logs it contains.
Instead of relying on configuration-dependent locations and the internals of Xcode, to get to this treasure trove of information, man xcodebuild offers a better solution:
   Options
     [lots of other goodies beyond the scope of this article]
     -resultBundlePath path
           Writes a bundle to the specified path with results from performing
           an action on a scheme in a workspace. If the path already exists,
           xcodebuild will exit with an error. Intermediate directories will
           be created automatically. The bundle contains build logs, code
           coverage reports, XML property lists with test results, screen-
           shots and other attachments collected during testing, and various
           diagnostic logs.
So, once you’ve specified where you want to store this information, you can add it to the list of artifacts each CI run should archive. This will let you download the whole thing and — after double-clicking or dragging and dropping the file’s icon onto Xcode — open the test report as if you had run those tests locally. This lets you triage your test failures much more conveniently!
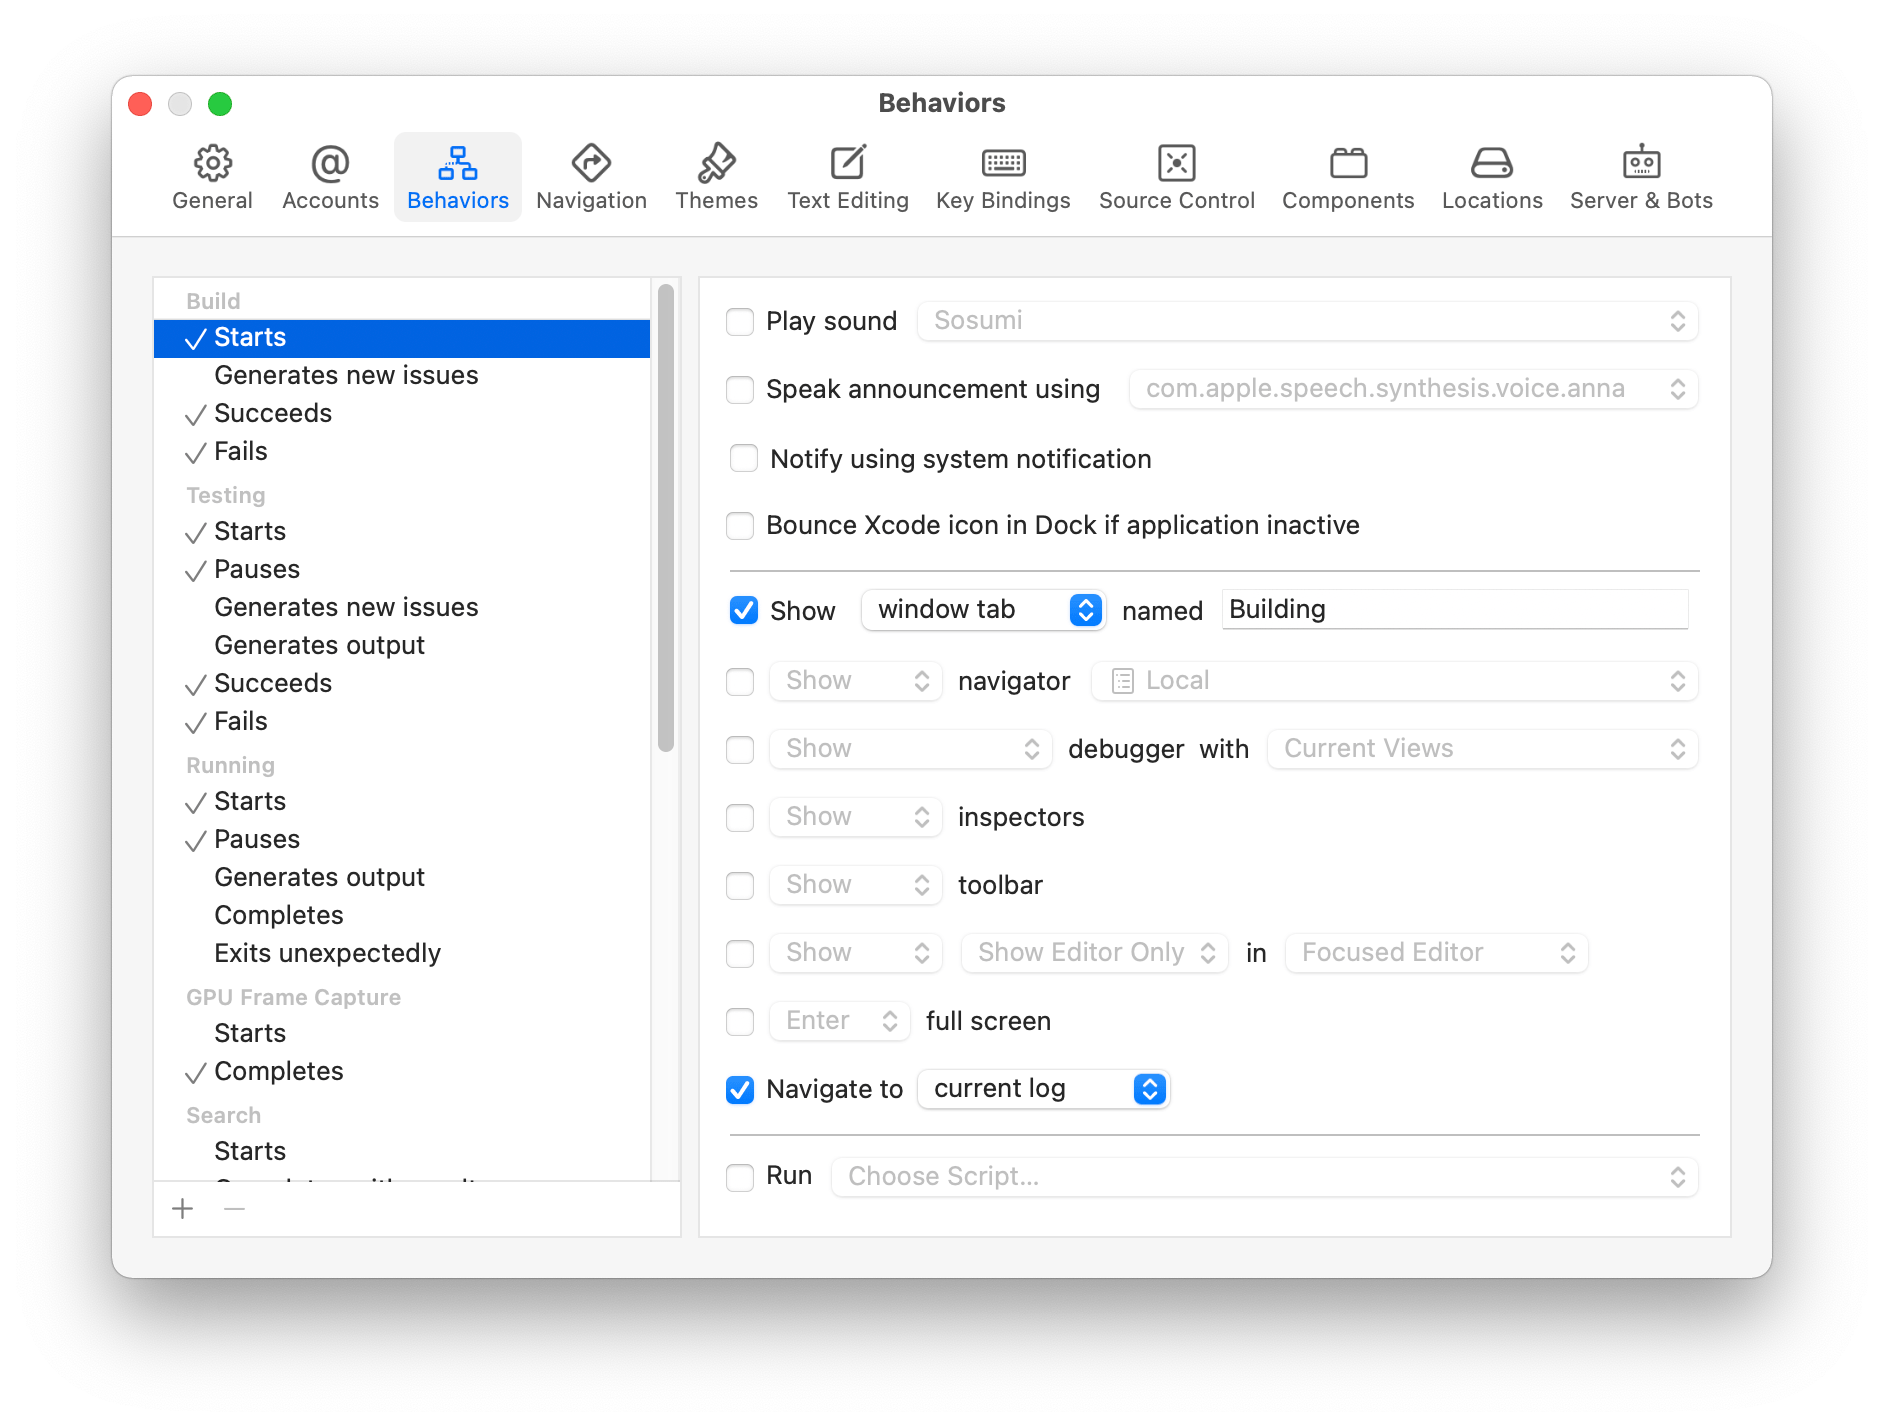
💡 Tip: You can set up Xcode Behaviors to always show a certain tab when a build starts and generates output. You can give your tabs custom names, which makes them identifiable and therefore addressable for such actions, as well as key commands. As an example: All my build-related information goes to a tab called “Building,” which is set up to always show the report navigator, with one editor in assistant mode. Similarly, I have a tab called “Debugging” in a separate window with a different configuration, and it’s shown when a run starts. All of my named tabs are bound to a unique keyboard shortcut via custom behaviors, allowing me to jump directly between them.
Adding More Context to Failures
While this makes it more convenient to relate individual CI failures to source files, you’ve just downloaded a fairly big chunk of data for not that much of an improvement: You still have to set a line breakpoint at the test failure and run that test locally to inspect the state in the debugger.
Thankfully, there’s a better option! Since you have the images at hand when the comparison fails, you can use XCTAttachment to make sure they’ll be included in the .xcresult bundle. In addition, you can use XCTContext to ensure these images are always bundled together. This is extremely handy if your test method needs to compare more than just one rendering to a reference — for example, to focus on multiple details in a complex custom drawing.
Instead of wrapping your comparison function in an XCTAssertNoThrow, you’ll use a manual do/catch block and pattern match on an image mismatch and adjust some parameters. Note how the code below lets all the other cases escape since these will be test-setup errors: There’s no point in continuing execution of a particular test when its setup is incorrect. And this way, Xcode will report an unexpected test failure with the appropriate call stack. (In contrast, each failed XCTAssert${whatever} is reported as a plain old test failure.)
func assert(
    image imageProducer: @autoclosure () -> UIImage,
    matches reference: UIImage,
    requiredAccuracy: Double,
    comparisonName: String,
    file: StaticString = #file,
    line: UInt = #line) {
    let image = imageProducer()
    do {
        try image.ensureMatches(reference: reference, requiredAccuracy: requiredAccuracy)
    } catch let ImageComparisonError.imageMismatch(
        pixelCount: totalPixels,
        acceptableMismatchCount: acceptable,
        actualMismatchCount: actual
    ) {
        XCTContext.runActivity(named: comparisonName) { activity in
            let imageAttachment = XCTAttachment(image: theImage)
            imageAttachment.name = "Actual render"
            activity.add(imageAttachment)

            let referenceAttachment = XCTAttachment(image: reference)
            referenceAttachment.name = "Reference image"
            activity.add(referenceAttachment)

            XCTFail(
                "Image with \(totalPixels) pixels differed from reference by \(actual) pixels (allowed: \(acceptable)",
                file: file,
                line: line
            )
        }
    }
}
As before, by using (and forwarding) the defaulted file and line parameters to XCTFail, each assertion failure will be reported — not against your helper function, but against the exact line where this function is called — letting you conveniently jump between the exact failing assertions in the report navigator using keyboard navigation.
Better yet, under the test name, there will now be a group with the name you passed as comparisonName containing the two images. So, you can inspect all the issues reported by your CI system visually on your own machine — without having to build and run any tests again.
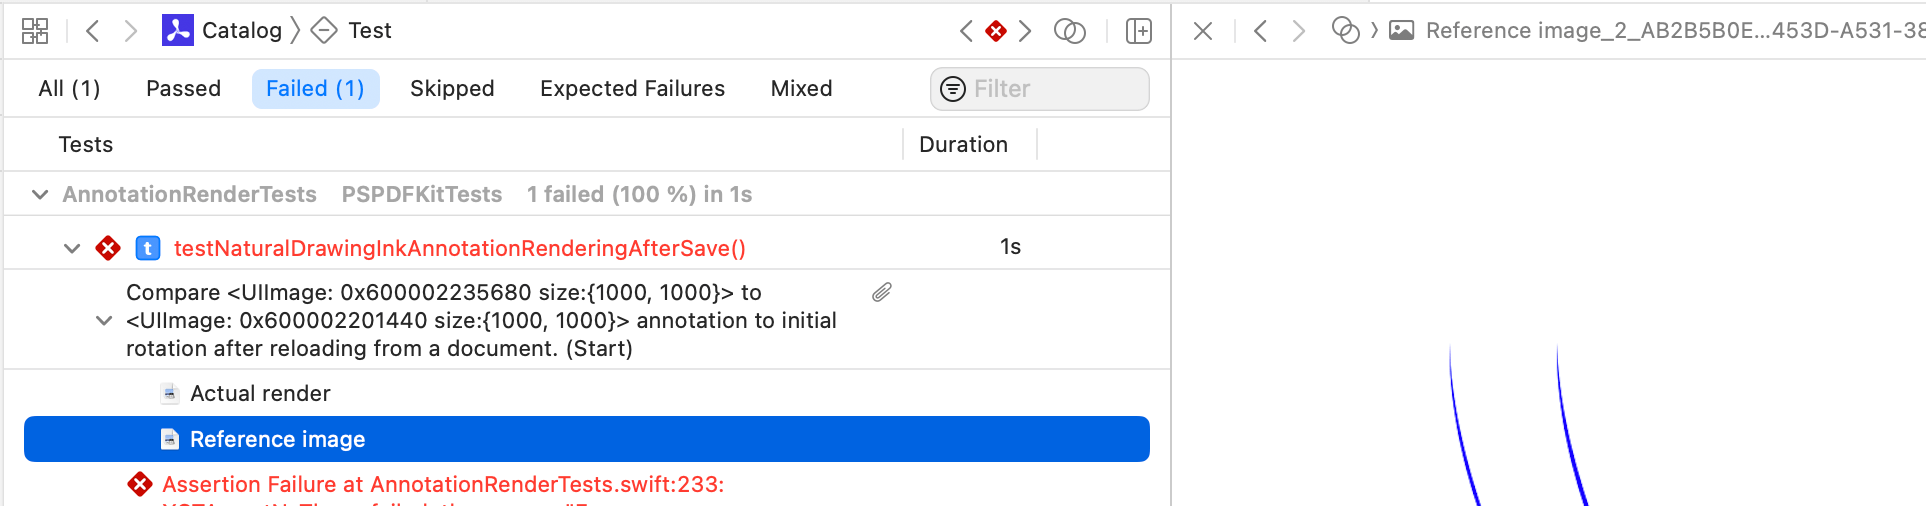
Note how the assistant editor shows the selected attachment. You’ll typically have to change the mode of the assistant editor to show Attachments instead of Referenced Files for this to work. But you can also press the spacebar on your keyboard with the attachment selected to open the QuickLook window for it.
Conclusion
In today’s article, we showed how to make sure your failing render tests don’t leave you scratching your head wondering what went wrong. For that, we discussed how to make .xcresult bundles available to your CI system so that you can download and inspect test failures within Xcode — with all the benefits this brings for code navigation. To even better organize the attachments captured when a render test fails, we also covered how to use XCTContext for grouping related test output.
In our next and final article of this series, we’ll improve the diagnostics even further, and we’ll cover a robust way of using this rig to (re)generate the reference images for your render tests.
Recommend
About Joyk
Aggregate valuable and interesting links.
Joyk means Joy of geeK