

Build Real-World React Native App #8 : implement Dark mode
source link: https://kriss.io/build-real-world-react-native-app-8-implement-dark-mode/#.YAUMY1lfiJo
Go to the source link to view the article. You can view the picture content, updated content and better typesetting reading experience. If the link is broken, please click the button below to view the snapshot at that time.

Build Real-World React Native App #8 : implement Dark mode
Build Real-World React Native App #8 : implement Dark mode
In this chapter, we are going to implement a new feature in our app. The feature is called dark mode which is very prevalent in the app nowadays. The dark mode is configured into any app to make it night friendly or low light friendly. To implement the dark mode into our react native application, we are going to use the features of react-navigation and react-native-paper. This will make it easier to trigger the dark mode manually through the app itself. The aim is to make use of React Context to change the theme of the overall app. The interesting thing is that there won’t be any re-render of components while changing the theme. We are also going to make use of the higher-order function to apply theme props to different screens and components.
We are going to implement the Settings screen in which there will be a switch to trigger on and off the dark mode. We are also going to make use of the react-native-dark-mode package. Finally, we are going to implement the configuration by which the app will automatically go into a dark mode when switching into a dark mode in the device itself.
Initial setup
First, we need to go to Navigator.js and import the theme components from react-navigation as shown in the code snippet below:
import {
   NavigationContainer,
   DefaultTheme,
   DarkTheme
} from '@react-navigation/native';
Then, we need to import the required components for dark theme and theme properties from a react-native-paper package as shown in the code snippet below:
import {
   Provider as PaperProvider,
   DefaultTheme as PaperDefaultTheme,
   DarkTheme as PaperDarkTheme,
} from 'react-native-paper';
Then, by using PaperProvider and theme prop we need to pass dark theme as a parameter as shown in the code snippet below:
<PaperProvider theme={PaperDarkTheme}>
           <NavigationContainer theme={DarkTheme}
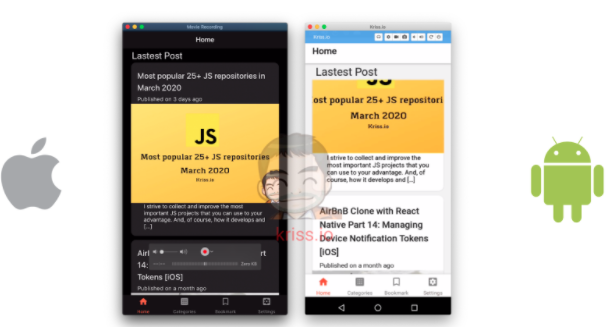
As a result, the overall UI interface theme of the app will automatically change to dark as shown in the emulator screenshots below:
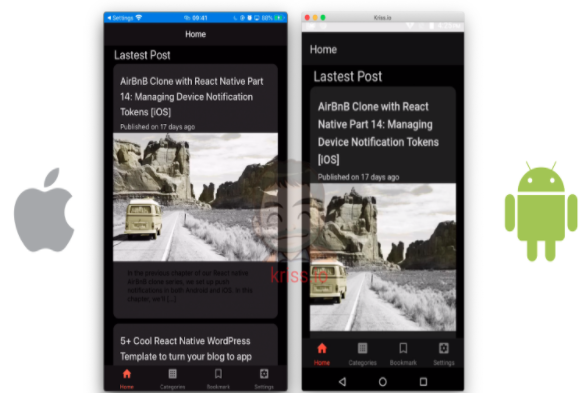
Trigger dark mode in React Native
Changing Theme with React Context
Here, we are going to control theme configuration by using React Context. We need to create ThemeContext and a global function named toggleTheme and theme variable to access the theme value as shown in the code snippet below:
import React, { createContext, useState } from 'react';
export const ThemeContext = createContext();
export const ThemeController = ({ children }) => {
const [theme, setTheme] = useState(false);
   const toggleTheme = value => {
       if (value === true) {
           setTheme(true);
       } else {
           setTheme(false);
       }
   };
   return (
       <ThemeContext.Provider value={{ theme, toggleTheme }}>
           {children}
       </ThemeContext.Provider>
   );
};
Here, we have created a new file name ThemeCotrotroller.js with state variables and ThemeController functional component.
Activate context
To make context accessible in every child component, we need to go to App.js and import ThemeController to this file as shown in the code snippet below:
import { ThemeController } from './src/components/ThemeController';
Then, we need to wrap the Navigator class with ThemeController as shown in the code snippet below:
<ThemeController>
           <Navigators />
         </ThemeController>
Next, we need to come back to Navigator.js and import useContext and ThemeContext as shown in the code snippet below:
import React, { useContext } from 'react'
import { ThemeContext } from './ThemeController'
With the help of the useContext hook, we can access theme value easily. Then, we can use value to change theme as shown in the code snippet below:
const { theme } = useContext(ThemeContext)
   let paper_theme = theme ? PaperDarkTheme : PaperDefaultTheme;
   let nav_theme = theme ? DarkTheme : DefaultTheme;
   const Tab = createBottomTabNavigator();
   return (
       <PaperProvider theme={paper_theme}>
           <NavigationContainer theme={nav_theme}>
Now, to create a theme switch button, we will use Setting.js screen. First, we need to import ThemeContext in the Setting.js file as shown in the code snippet below:
import React, { useContext, useState } from 'react';
import { View, TouchableOpacity } from 'react-native';
import {
   List, Switch,
} from 'react-native-paper';
import { ThemeContext } from '../components/ThemeController';
Now, we can use the functions and variables as shown in the code snippet below:
const Setting = ({ navigation }) => {
   const { toggleTheme, theme } = useContext(ThemeContext);
Next, we use the Switch component to switch theme which depends on the theme variable used for switch status as shown in the code snippet below:
return (
   <View style={{ flex: 1 }}>
       <List.Item
           title="Dark Mode"
           left={() => <List.Icon icon="brightness-4" />}
           right={() => <Switch value={theme} onValueChange={toggleTheme} />}
       />
Now, we can try to switch the theme from light mode to dark mode and vice-versa using the switch button in the Settings screens as shown in the emulator screenshot below:
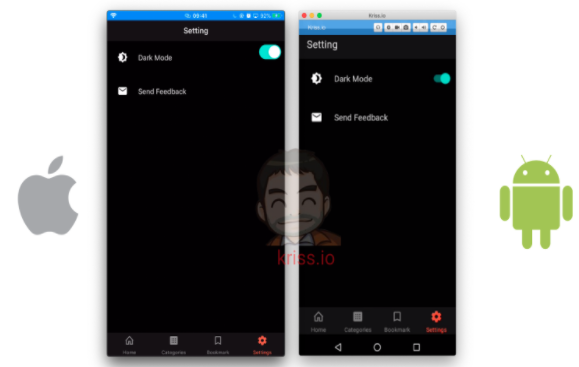
Activate dark mode
Change Theme on HTML
Since react-native-render-html does not depend on react-native-paper and react-navigation package, the theme for HTML elements in the screen doesn’t change automatically. Hence, we need to make a higher-order component named withTheme from react-native-paper and then inject theme value into it.
For that, we need to import withTheme component to a screen that uses the react-native-render-html package as shown in the code snippet below:
import {
   Card,
   Title,
   Paragraph,
   withTheme,
} from 'react-native-paper';
Now, we need to wrap component name with withTheme function while exporting as shown in the code snippet below:
export default withTheme(FlatlistItem);
Hence, we can pass theme as a parameter in this component now as shown in the code snippet below:
const FlatlistItem = ({ item, navigation, theme }) => {
For now, we will change the style of color using the following theme value:
<HTMLRender
                          html={item.excerpt.rendered}
                           tagsStyles={{
                               p: { color: theme.colors.text },
                           }}
                       />
Now, if we change the theme of the app again, we will get the following results on our emulator screen:
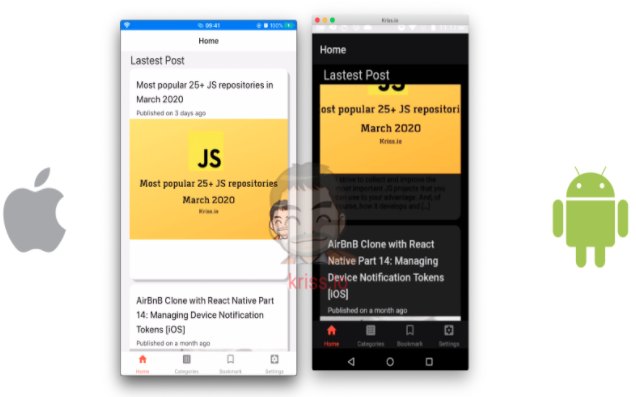
Dark theme in HTML zone
No re-render problem
Now, our final problem is that the react-native-render-html components do not re-render when the theme changes. To force the components of this package to change the style. We add key prop as shown in the code snippet below:
<HTMLRender
                           key={theme.dark}
                           html={item.excerpt.rendered}
                           tagsStyles={{
                               p: { color: theme.colors.text },
                           }}
                       />
Now, if we change the theme of the app, we will get the result as shown in the emulator screenshots below:
Solve React Native render HTML in dark mode
Change theme on SinglePost Screen
In SinglePost screen, we have used the components from a react-native-render-html package. So, we start here by adding a theme in FlatlistItem. First, we need to import withTheme Component as shown in the code snippet below:
import {
   Avatar,
   Card,
   Title,
   Paragraph,
   List, withTheme
} from 'react-native-paper';
The withTheme module is a higher-order function provided by the react-native-paper package. When applied to a component, it injects the theme instances and objects into the component props. Then, the instances and methods provided by it can be accessed through the component’s props.
Then, we need to wrap the SinglePost component before export as shown in the code snippet below:
export default withTheme(SinglePost)
Then, we need to inject the theme variable into its parameter as shown in the code snippet below:
const SinglePost = ({ route,theme }) => {
Next, we will use the theme variable to change the HTML tag styles. The coding implementation for this is provided in the code snippet below:
<Card.Content>
                       <HTML
                           key={theme.dark}
                           html={post[0].content.rendered}
                           imagesMaxWidth={Dimensions.get('window').width}
                           tagsStyles={{
                               p: { color: theme.colors.text },
                               pre: { color: theme.colors.accent },
                               h1: { color: theme.colors.text },
                               h2: { color: theme.colors.text },
                               h3: { color: theme.colors.text },
                               li: { color: theme.colors.text },
                           }}
                       />
                   </Card.Content>
Then, we need to add a theme to the icon as well:
<MaterialCommunityIcons name="bookmark" size={30} color={theme.colors.text}/>
Hence, we will get the following result on our emulator screen:
Add dark mode to icon
As we can see, the overall theme of the SinglePost screen also changed to dark.
Hence, we have successfully added the dark mode themes to different screens in our app and also configured the manual trigger in the Settings screen.
Conclusion
This chapter is the most interesting one in which we learned how to change the theme to React Native. Dark Mode is a popular feature in the latest Android updates. Many users prefer using dark mode in the device itself and especially the apps. Here, we got the detailed stepwise guidance on how to implement dark mode theme changes in the React Native app. The interesting part was to change the theme using the packages involved and manually trigger the theme change using the switch in the Settings screen. The in-built modules in react-navigation and react-native-paper packages made this implementation easier and simple.
Now, that we know how to change the theme to dark mode. We can try implementing some different themes to the UI giving a more modern look.
In the next chapter, we are going to learn how to handle the Offline mode in a React Native app.
All codes are available on Github.
The post Build Real-World React Native App #8 : implement Dark mode appeared first on Soshace.
There is no ads to display, Please add some
Related Posts
-
Build React Native WordPress App [Expo way] #15 : setup dark mode
in this chapter, we will set up dark mode for react-navigation and react-native paper, fortunately,…
-
Simple timetable app built with React Native
Clean Timetable A simple and clean timetable app for iOS.Written completely in JavaScript using React…
-
Build React Native Fitness App #5: installing Firebase in React native
for installing Firebase in React native. We did on implement UI for register and login…
-
Build React native Fitness app #1: Setup App with React navigation
this tutorial is first chapter of series build fitness tracker this app use for track…
-
Build React Native Fitness App #3: react native login screen
here next screen we gonna implement react native login screen to make work both on…
Recommend
-
16
Build Real-World React Native App #5: Single Post Screen and Bookmark
-
14
Build Real-World React Native App #3: Home Screen With React Native Paper
-
9
Build Real-world React Native App #1: Splash screen and App Icon
-
9
Build Real-World React Native App #4 : Content Placeholder
-
17
Build Real-world React Native App #2: React navigation and React native vect...
-
9
Build Real-world React Native App #0: Overview & Requirement
-
10
Build Real-World React Native App #6: Show Bookmark and Categories
-
10
Blog / JavaScript / React /
-
12
Build Real-World React Native App #11 : Pay For Remove Ads
-
9
About Joyk
Aggregate valuable and interesting links.
Joyk means Joy of geeK