

Build Real-world React Native App #2: React navigation and React native vector i...
source link: https://kriss.io/build-real-world-react-native-app-2-react-navigation-and-react-native-vector-icons/#.YAUMBFlfiJo
Go to the source link to view the article. You can view the picture content, updated content and better typesetting reading experience. If the link is broken, please click the button below to view the snapshot at that time.
Build Real-world React Native App #2: React navigation and React native vector icons
In this chapter, we use React navigation version 5 for bootstrap app navigation and create a blank screen to show how it works finally we setup react native vector icons for add icon to tabs.
install react-navigation version 5
In this version, the expo team divides into multiple packages for this app we use stack and tabs so the list below is the package that we need to install:
- react-navigation/native is the core package
- react-navigation/stack for general stack navigation style
- react-navigation/bottom-tabs for tab-style menu in bottom screen
In order to install these packages, we need to run the following command in the command prompt or command line of your IDE:
yarn add @react-navigation/native @react-navigation/stack @react-navigation/bottom-tabs
Here, we have installed the react-navigation package along with the react-navigation-stack and react-navigation-tabs package. The react-navigation-stack package enables us to create the navigator stack of our app screens. The react-navigation-tabs package enables us to create the bottom tab navigation on our main screen. Now, we also need to install the required dependencies in order to run the react-navigation package properly, Hence, we need to install the following package as well:
yarn add react-native-reanimated react-native-gesture-handler react-native-screens react-native-safe-area-context @react-native-community/masked-view
Setup React Navigation on iOS
In case of iOS, we need to navigate to ‘./ios/’ folder and then run the following command:
cd ios ; pod install ; cd..
Setup React Navigation on Android
For Android, we may need to link the packages if the version of the react-native is less than 0.60. For that, we can run the following code for each package:
react-native link <package-name>
Organizing Project files and folder structure
n this section, we need to create the required files for the screens as shown in the ‘./screens/’ folder. We also need to create a Navigator.js file in ‘./components’ which will contain an overall code for navigation as shown in the screenshot below:
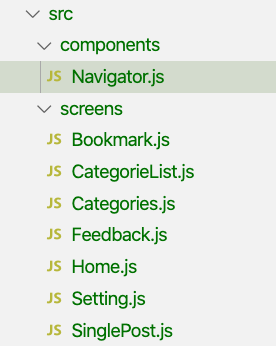
Folder structure
Now, for every screen file inside the ‘./screens’ folder, we need to add the starter react native template code. The starter template code for the Home.js screen is shown in the code snippet below:
import React from 'react'
import { View, Text } from 'react-native'

const Home = () => {
   return (
       <View>
           <Text>Home Screen</Text>
       </View>
   )
}
export default Home
Now, what we can do is, we can copy the same starter template code to each screen file and just change the main function name and the text between the Text element based on the name of the files.
Handling Navigation
Here, we are going to use Navigator.js which will contain React navigation-related code. But first, let us see the navigation flow of our app in the following diagram:
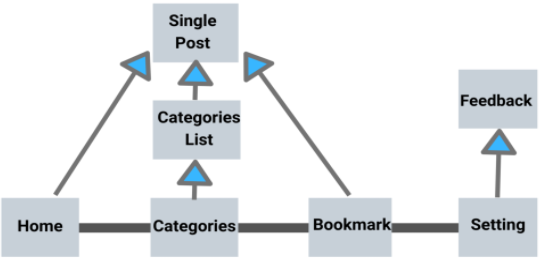
Navigation diagram
From the diagram above, we can learn that Home, Categories, Bookmark, Setting screens are on the main screen linked by bottom tabs navigation whereas SinglePost, CategoriesList, Feedback screens are linked by stack navigation. To implement the navigation configuration in the Navigation.js file, we need to import all the required packages first as shown in the code snippet below:
import React from 'react'
import { NavigationContainer } from '@react-navigation/native'
import { createStackNavigator } from '@react-navigation/stack';
import { createBottomTabNavigator } from '@react-navigation/bottom-tabs';
Then, we need to import all the screens as well, as shown in the code snippet below:
import HomeScreen from '../screens/Home';
import CategorieScreen from '../screens/Categories';
import SettingScreen from '../screens/Setting';
import BookMarkScreen from '../screens/Bookmark';
import SinglePost from '../screens/SinglePost';
import CategorieList from '../screens/CategorieList';
import Feedback from '../screens/Feedback';
Now, we have all the prerequisites necessary to configure the navigation for our app. First, we are going to code the stack navigator for each main screen namely Home, Categories, Bookmark, Setting screens. The code to implement the stack navigator is provided in the code snippet below:
const Stack = createStackNavigator()
function HomeStack() {
   return (
       <Stack.Navigator>
           <Stack.Screen
               name="Home"
               component={HomeScreen}
           />
           <Stack.Screen
               name="SinglePost"
               component={SinglePost}
           />
       </Stack.Navigator>
   );
}
function BookMarkStack() {
   return (
       <Stack.Navigator>
           <Stack.Screen name="Bookmark" component={BookMarkScreen}  />
           <Stack.Screen name="SinglePost" component={SinglePost}/>
       </Stack.Navigator>
   );
}
function SettingStack() {
   return (
       <Stack.Navigator>
           <Stack.Screen name="Setting" component={SettingScreen}  />
           <Stack.Screen name="Feedback" component={Feedback}  />
       </Stack.Navigator>
   );
}
function CategorieStack({ navigation }) {
   return (
       <Stack.Navigator>
           <Stack.Screen name="Categorie" component={CategorieScreen} />
           <Stack.Screen name="CategorieList" component={CategorieList} />
           <Stack.Screen name="SinglePost" component={SinglePost}  />
       </Stack.Navigator>
   );
}
Here, what we have done is, each stack function represents one stack for every main tab screen. Now, we can freely add what we want to the stack navigation. Now, we assemble all the stack navigators for each main screens into one single bottom tab navigator as shown in the code snippet below:
export default Navigator = () => {
   const Tab = createBottomTabNavigator();
   return (
       <NavigationContainer >
           <Tab.Navigator>
               <Tab.Screen name="Home" component={HomeStack} />
               <Tab.Screen name="Categories" component={CategorieStack} />
               <Tab.Screen name="Bookmark" component={BookMarkStack} />
               <Tab.Screen name="Settings" component={SettingStack} />
           </Tab.Navigator>
       </NavigationContainer>
   );
}
Finally, in our App.js file, we need to make the main entry point to React navigation. For that, we need to remove the previous code from the App.js file and import Navigator.js. Next, we need to create the Navigators component and return the Navigators component from the App.js file as the main entry point. The code to do this provided in the code snippet below:
import React from 'react';
import Navigators from './src/components/Navigator';
import SplashScreen from 'react-native-splash-screen'
export default function App() {
 React.useEffect(() => {
   SplashScreen.hide()
 }, [])
 return <Navigators />
}
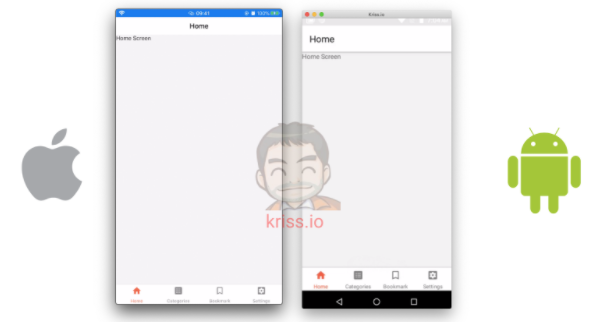
Now, if we re-run our app, we will get the following result in our emulator or device screen:
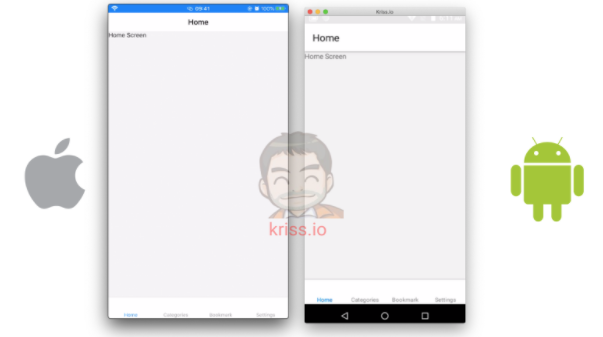
Result on add navigation
Here, we can see the bottom tab with all the main screens’ names included.
Integrating Vector Icons Package
In this step, we are going to add the icons to our bottom navigation tabs by using react-native vector icons package. The icons will make the app look more elegant and intuitive.
First, we need to install the react-native-vector-icons package by running the following command:
yarn add react-native-vector-icons
Installation on iOS
Here, we need to using Cacaopod again and run the following command:
cd ios ; pod install ; cd ..
Lastly, we need to Xcode and add the code below into info.plist file inside the ‘./ios’ folder:
<key>UIAppFonts</key>
<array>
 <string>AntDesign.ttf</string>
 <string>Entypo.ttf</string>
 <string>EvilIcons.ttf</string>
 <string>Feather.ttf</string>
 <string>FontAwesome.ttf</string>
 <string>FontAwesome5_Brands.ttf</string>
 <string>FontAwesome5_Regular.ttf</string>
 <string>FontAwesome5_Solid.ttf</string>
 <string>Foundation.ttf</string>
 <string>Ionicons.ttf</string>
 <string>MaterialIcons.ttf</string>
 <string>MaterialCommunityIcons.ttf</string>
 <string>SimpleLineIcons.ttf</string>
 <string>Octicons.ttf</string>
 <string>Zocial.ttf</string>
</array>
Here, we are manually adding the icon fonts name in case of iOS platform.
The exact location to add the fonts code manually is provided in the screenshot below:
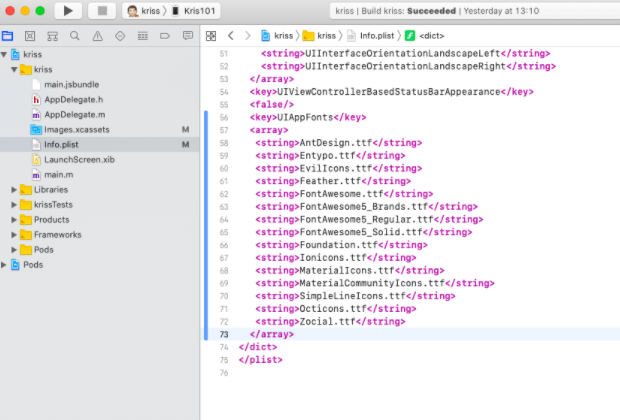
Setup vector icon in Xcode
Installation on Android
In the case of the Android platform, we need to run the following command to link the vector icons package to the native project:
react-native link react-native-vector-icons --platforms android
Adding Icons to Bottom Tabs
Now, we navigate back to Navigator.js and import the MaterialCommunityIcons icon package from the react-native-vector-icons package as shown in the code snippet below:
import MaterialCommunityIcons from 'react-native-vector-icons/MaterialCommunityIcons';
Next, we need to use screenOption parameter in the config option of tab bar NavigationContainer. Then, we choose the icons based on the route names in the tabBarIcon configuration option as shown in the code snippet below:
<Tab.Navigator screenOptions={({ route }) => ({
               tabBarIcon: ({ focused, color, size }) => {
                   let iconName;

                   if (route.name === 'Home') {
                       iconName = focused ? 'home' : 'home-outline';
                   } else if (route.name === 'Bookmark') {
                       iconName = focused ? 'bookmark' : 'bookmark-outline';
                   } else if (route.name === 'Categories') {
                       iconName = focused ? 'apps' : 'apps-box';
                   } else if (route.name === 'Settings') {
                       iconName = focused ? 'settings' : 'settings-box';
                   }
                   return (
                       <MaterialCommunityIcons
                           name={iconName}
                           size={size}
                           color={color}
                       />
                   );
               },
           })}
               tabBarOptions={{
                   activeTintColor: 'tomato',
                   inactiveTintColor: 'gray',
               }}>
Finally, if we re-run our app, we will get the following result in our emulator or device screen:
Result for add vector icon
Conclusion
In this chapter, we learned how to set up the react-navigation v5 package with all it’s dependency packages. Then, using these packages we learned how to set up the bottom tab navigation in our project. Lastly, we learned how to set up the vector icons package and use it along with our navigation configuration to set up the bottom tab bar icons. In the next chapter, we start using react-native-paper together with the Flatlist component to build the Home screen.
All the code is available on Github.
The post Build Real-world React Native App #2: React navigation and React native vector icons appeared first on Soshace.
There is no ads to display, Please add some
Related Posts
-
Using Vector Icons in React Native App | iOS Platform
In this tutorial, we are going to implement the vector icons into our React Native…
-
Using Vector Icons in React Native App | Android Platform
In this tutorial, we are going to implement the vector icons into our React Native…
-
Build React native Fitness app #1: Setup App with React navigation
this tutorial is first chapter of series build fitness tracker this app use for track…
-
Simple timetable app built with React Native
Clean Timetable A simple and clean timetable app for iOS.Written completely in JavaScript using React…
-
Build React Native WordPress App [Expo way] #3 : Add Vector Icons
This series intends to show how I build an app to serve content from my…
Recommend
About Joyk
Aggregate valuable and interesting links.
Joyk means Joy of geeK