
Build Real-World React Native App #5: Single Post Screen and Bookmark
source link: https://kriss.io/build-real-world-react-native-app-5-single-post-screen-and-bookmark/#.YAUMNllfiJo
Go to the source link to view the article. You can view the picture content, updated content and better typesetting reading experience. If the link is broken, please click the button below to view the snapshot at that time.
Build Real-World React Native App #5: Single Post Screen and Bookmark

Build Real-World React Native App #5: Single Post Screen and Bookmark
We have already implemented the Home screen in which the posts are shown in list format. Now, what happens when we tap on a post from the screen? Until now, nothing will happen. But, now we are going to create a screen that will display the details of the post. This screen will be called the SinglePost screen which we will implement in the SinglePost.js file.
The SinglePost screen will contain the detail of the entire post optimized for reading purposes. We are also going to add a share button which will be functional as well. The share button allows users to share the post on social media and other platforms. For displaying the data format properly, we are going to take the help of the moment.js package. The moment.js is a powerful Date and Time library that allows us to configure the date and time format in various ways. The package has its implementation for every framework of JavaScript.
The idea is to begin by implementing a SinglePost Screen and setting up the navigation to it through the list of posts in Home Screen or any other screen. We are going to add the share button and bookmark button as well. Lastly, we are going to make use of the async-storage to store the bookmarked posts and display them in the Bookmark Screen.
Let’s get started!
Create Single Post Screen
First, we need to create a Singlepost.js in screens folders. Then, we need to make the necessary imports as shown in the code snippet below:
import React, { useState, useEffect, useContext } from 'react';
import {
   Avatar,
   withTheme,
   Card,
   Title,
   Paragraph,
   List, Button
} from 'react-native-paper';
import HTML from 'react-native-render-html';
import ImageLoad from 'react-native-image-placeholder';
import {
   Share,
   ScrollView,
   TouchableOpacity,
   View,
   Dimensions,
} from 'react-native';
import ContentPlaceholder from '../components/ContentPlaceholder';
import moment from 'moment';
Next, we need to create a functional component called SinglePost and define a state variable to handle the loading of the post data as shown in the code snippet below:
const SinglePost = ({route}) => {
   const [isLoading, setisLoading] = useState(true);
   const [post, setpost] = useState([]);
}
export default SinglePost
Here, the parameter route enables us to fetch the data sent as a parameter from other components.
Now, we are going to create a function in order to fetch the post details data based on the post id that we receive from the route params. The post detail data will be stored in the post state that we defined before as shown in the code snippet below:
const fetchPost = async () => {
       let post_id = route.params.post_id;
       const response = await fetch(
           `https://kriss.io/wp-json/wp/v2/posts?_embed&include=${post_id}`,
       );
       const post = await response.json();
       setpost(post);
       setisLoading(false);

   }
Then, we need to use useEffect to trigger the function every time the component loads as shown in the code snippet below:
useEffect(() => {
       fetchPost()
   }, []);
And, when we successfully fetch the data and store it on our post state, we will use the components from the react-native-paper package to create the UI and display the post data appropriately. The overall coding implementation is provided in the code snippet below:
return(
     <ScrollView>
               <Card>
                   <Card.Content>
                       <Title>{post[0].title.rendered}</Title>

                       <List.Item
                           title={`${post[0]._embedded.author[0].name}`}
                           description={`${post[0]._embedded.author[0].description}`}
                           left={props => {
                               return (
                                   <Avatar.Image
                                       size={55}
                                       source={{
                                           uri: `${post[0]._embedded.author[0].avatar_urls[96]}`,
                                       }}
                                   />
                               );
                           }}
                       />
                       <List.Item
                           title={`Published on ${moment(
                               post[0].date,
                               'YYYYMMDD',
                           ).fromNow()}`}
                       />
                       <Paragraph />
                   </Card.Content>
                   <ImageLoad
                       style={{ width: '100%', height: 250 }}
                       loadingStyle={{ size: 'large', color: 'grey' }}
                       source={{ uri: post[0].jetpack_featured_media_url }}
                   />
                   <Card.Content>
                       <HTML
                           html={post[0].content.rendered}
                           imagesMaxWidth={Dimensions.get('window').width}

                       />
                   </Card.Content>
               </Card>
           </ScrollView>
)
Here, the UI code is a mix of different components from the react-native-paper package.
Now, we are going to use content placeholders to display the loading state as well. For that, we are going to use isLoading state to handle the display of preloaders as shown in the code snippet below:
if (isLoading) {
       return (
           <View style={{ paddingLeft: 10, paddingRight: 10, marginTop: 10 }}>

               <ContentPlaceholder />
           </View>
       )
   } else {
       return (
           <ScrollView>
           </ScrollView>
       );
   }
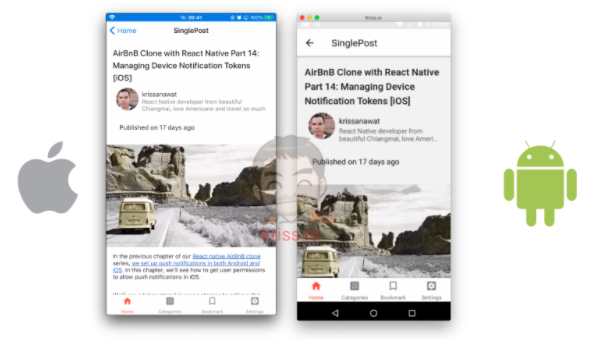
Hence, we will get the result as shown in the emulator screenshot below:

Single post screen
Adding a Share button
This is an extra section for this chapter where we are going to add a share button in SinglePost.js screen which enables us to share the post.
First, we need to import Share component from the React Native package and also import the required fonts from the react-native-vector-icons package as shown in the code snippet below:
import MaterialCommunityIcons from 'react-native-vector-icons/MaterialCommunityIcons';
Next, we need to create a function to handle share action called onShare as shown in the code snippet below:
const onShare = async (title, uri) => {
       Share.share({
           title: title,
           url: uri,
       });
   };
Here, we are using the share function provided by the Share component. The parameters applied are the title and the post URI.
Finally, we need to add the TouchableOpacity component in order to make the share button clickable as shown in the code snippet below:
<List.Item
       title={`Published on ${moment(
            post[0].date,
            'YYYYMMDD',
        ).fromNow()}`}
              right={props => {
                 return (
                    <TouchableOpacity
                        onPress={() =>
                          onShare(post[0].title.rendered, post[0].link)
                    }>
                    <MaterialCommunityIcons name="share" size={30} />
                         </TouchableOpacity>
                       );
                    }} />
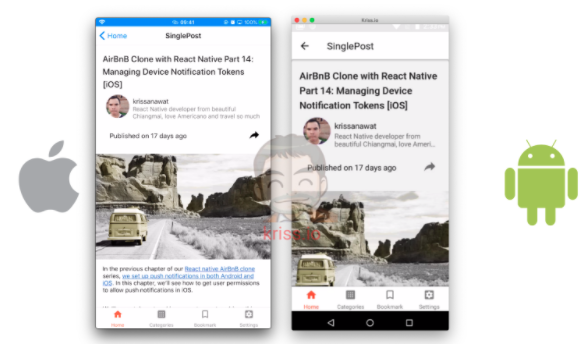
Hence, we will get the following result in our emulator screens:

Add share button
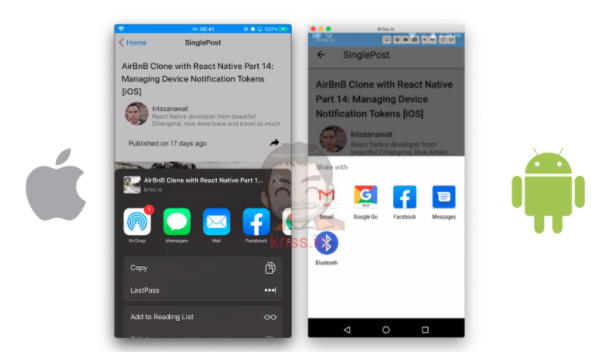
As we can see, there is a share button on the right side of the screen. Now, if we tap on the share icon, the share option modal will open as shown in the emulator screenshots below:

Share button result
Finally, we have successfully implemented the SinglePost screen along with preloaders and a Share button.
Bookmark with AsyncStorage
Here, we are going to learn how to implement the bookmark feature using async-storage to bookmark the posts so that we can easily access them on our Bookmark screen. The process is simple. We are going to save the post id to AsyncStorage from the SinglePost screen.
Installing AsyncStorage
Here, we are going to continue to setup async-storage package for storing the bookmarked posts and then fetching it in the Bookmark screen.
First, we need to install the package provided by the React Native community using the following command in our project terminal:
yarn add @react-native-community/async-storage
Setup on iOS
In iOS, we need to install cacao pod and re-run the app again using the following commands:
cd ios ;
pod install ;
cd .. ;
react-native run-ios --device "Kris101"
Setup on android
There is no need to do anything if the React native version is greater than 0.60. Talking about which our React Native version is greater than 0.60. But in the case of lower versions, we will need to run the react-native link command.
Now, we need to go to the SinglePost.js file and import the Asyncstorage component as shown in the code snippet below:
import AsyncStorage from '@react-native-community/async-storage';
Before storing the data ton AsyncStorage, we need to use local state data to handle the data as shown in the code snippet below:
const [bookmark, setbookmark] = useState(false);
Here, we are using bookmark as a state variable and setbookmark function in order to change the state of the state variable.
Saving the Bookmarked Post
In order to save the post, we need to create a function that receives post_id. Then, we need to start validating the data as shown in the code snippet below:
const saveBookMark = async post_id => {
       setbookmark(true);
       await AsyncStorage.getItem('bookmark').then(token => {
           const res = JSON.parse(token);
           if (res !== null) {
               let data = res.find(value => value === post_id);
               if (data == null) {
                   res.push(post_id);
                   AsyncStorage.setItem('bookmark', JSON.stringify(res));
                   alert('Your bookmark post');
               }
           } else {
               let bookmark = [];
               bookmark.push(post_id);
               AsyncStorage.setItem('bookmark', JSON.stringify(bookmark));
               alert('Your bookmark post');
           }
       });
   };
The coding implementation in the above code snippet is explained below:
- First, we set the local state to true.
- Next, we checked if the post exists.
- Since AsyncStorage stores data as plain text, we need to convert objects to a compatible format.
- Then, we checked if the post_id exists by using shorthand JS.
- If not, we use a push method to store data.
- If the initial state is null or empty, we will start by creating a blank array and save data accordingly.
Hence, our save operation is complete.
Removing the Bookmarked Post
In order to remove data from bookmark state array, we use the coding implementation similar to Save operation but replace find function with filter function as shown in the code snippet below:
const removeBookMark = async post_id => {
       setbookmark(false);
       const bookmark = await AsyncStorage.getItem('bookmark').then(token => {
           const res = JSON.parse(token);
           return res.filter(e => e !== post_id);
       });
       await AsyncStorage.setItem('bookmark', JSON.stringify(bookmark));
       alert('Your unbookmark post');
   };
Render the Bookmarked Status Icon
Here, we are going to set the bookmark status state when the screen loads. It will help us know if the post has already been bookmarked or not. For this, we need to use the code from the following code snippet:
const renderBookMark = async post_id => {
       await AsyncStorage.getItem('bookmark').then(token => {
           const res = JSON.parse(token);
           if (res != null) {
               let data = res.find(value => value === post_id);
               return data == null ? setbookmark(false) : setbookmark(true);
           }
       });
   };
Then, we use state to decide which button that we are going to show in the bookmark button icon display. It will either be a bookmarked icon or unbookmarked icon. For this, we need to use the code from the following code snippet:
right={props => {
        if (bookmark == true) {
             return (
              <TouchableOpacity
                    onPress={() => removeBookMark(post[0].id)}>
                       <MaterialCommunityIcons name="bookmark" size={30} />
                          </TouchableOpacity>
                       );
             } else {
              return (
                <TouchableOpacity onPress={() => saveBookMark(post[0].id)}>
                        <MaterialCommunityIcons
                            name="bookmark-outline"
                             size={30}
                         />
                       </TouchableOpacity>
                      );
                 }
       }}
To activate this post, we need to add the renderBookMark function to fetchPost function that is called every time the screen loads as shown in the code snippet below:
const fetchPost = async () => {
        //…./////other code/////…...
       setpost(post);
       setisLoading(false);
       renderBookMark(post_id);
   }
Hence, we will get the following result in our SinglePost screen:

Create a bookmark
Here, we can see that the bookmarked post icon status is dark and the post not bookmarked has a bookmarked icon outline only.
Conclusion
In this chapter, we learned how to fetch data from the server using the parameter from the Home Screen. Then, we got an insight into how to use different UI components from the react-native-paper package to display the server response data. We also got stepwise guidance on how to implement a functional share button using the Share component from the react-native package. Lastly, we implemented the Bookmark feature by making use of the async-storage package to store the bookmarked posts and also render out the bookmark icon based on it.
All code in this chapter is available on GitHub.
The post Build Real-World React Native App #5: Single Post Screen and Bookmark appeared first on Soshace.
There is no ads to display, Please add some
Related Posts
-
Build React Native WordPress App [Expo way] #7 : Single Post screen
This series intends to show how I build an app to serve content from my…
-
Build React Native WordPress App [Expo way] #9 : Saving bookmark
This series intends to show how I build an app to serve content from my…
-
React Native Plant App UI #17: Implementing Product Screen
This tutorial is the seventeenth part of our React Native Plant App tutorial series. In…
-
Build React Native WordPress App [Expo way] #10 : Remove and Render bookmark
Here, we are going to implement the removing of the bookmark from the articles.…
-
React Native Plant App UI #18: Description Section
This tutorial is the eighteenth part of our React Native Plant App tutorial series. In…
Recommend
About Joyk
Aggregate valuable and interesting links.
Joyk means Joy of geeK