
FreeType简易教程
source link: http://mingplusplus.com/tech/2014/09/13/freetype/
Go to the source link to view the article. You can view the picture content, updated content and better typesetting reading experience. If the link is broken, please click the button below to view the snapshot at that time.
最近接触了一下Freetype,投放了产品后对此库略懂了一二。犹豫了一下要不要写个教程,想想也没什么关系。虽然线上已经有不少的Freetype的教程了,但是他们都,太不友好(丑丑丑)了。于是,进入正题
为什么要Freetype?
FreeType是一个字形图glyph image产生工具,整个库的主要功能点集中在以下两点:
- 解析几乎是所有的字体格式,例如常见的
ttf,otf。 - 根据输入的单个Unicode返回该字的
glyph也就是字形图。
其不包括或者说支持并不完善的功能有:
- 处理字符串。
所以也就是说Freetype的基本功能就是把字变成图。最后怎么处理文字,还是由开发者来实现。
我要写什么
在这个教程里我会简单的讲一下如何使用该库来实现以下几个功能。
- 渲染一个句子:调整字色,字号,字间距(tracking)
Freetype的编译方法(Windows党退散吧)相当简单,仅仅三步:
./configure
make
make install
不过我个人比较喜爱用静态链接库,所以我的步骤是:
./configure && make
ar rcs output.a objs/*.o
那个output.a就是静态链接库了,随意用。
输出字图 (glyph)
这个是FreeType的核心功能。 基本上使用Freetype的步骤如下
初始化Freetype
extern "C"
{
#include <ft2build.h>
#include FT_FREETYPE_H
}
/* 省略X行 */
FT_Library library; // 声明了Lib
FT_Init_FreeType(&library); // 初始化 返回0为成功
根据字体初始化Face
FT_Face face;
// 在Mac OS上字体放在 /Library/Fonts
error = FT_New_Face( library,
        "/Library/Fonts/华文黑体.ttf",
        0,
        &face);
FT_Set_Pixel_Sizes(face, 0, 16); // 设立字体为16px
获得字图
在这步注意,如果想渲染非ascii的字,可以用wstring和wchar。
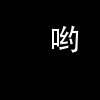
wchar c = "哟";
/*
* 这一步中实际上发生了几件事。
* FT先根据输入,获得Unicode然后获得对应的glyph id。
* 接着用glyph id渲染出了一张bitmap
*/
FT_Load_Char(face, c, FT_LOAD_RENDER);
FT_GlyphSlot slot = face->glyph; // 输出结果在 slot->bitmap
输出
其实核心就是访问bitmap中的像素,访问方法如下:
auto bitmap = &slot->bitmap;
int rows = bitmap->rows; // 获得字高
int cols = bitmap->width; // 获得字宽
slot->bitmap[i * cols + j]; // 获得第i行第j列像素值
访问的方法就这么简单,以下是一个简单的单字输出demo,使用了OpenCV的Mat。
/*
* 这里使用了OpenCV的cv::Mat作为输出
*/
Mat ret(100, 100, CV_8UC4, {255, 255, 255, 0});
/*
* 选定画的起点
*/
int pen_x = 50;
int pen_y = 50;
auto& bitmap = &slot->bitmap;
int rows = bitmap->rows; // 字宽
int cols = bitmap->width; // 字高
for (int i = 0; i < rows; i++) {
    for (int j = 0; j < cols; j++) {
        int ty = pen_y + i;
        int tx = pen_x + j;
        if (ty >= ret.cols || tx >= ret.rows ||
            ty < 0 || tx < 0)
            continue;
        /*
        * 填充
        */
        ret.at<Vec4b>(ty, tx)[3] =
            bitmap->buffer[i * cols + j];
    }
}
/* 输出成图片 */
imwrite("somepic.jpg", ret);
这样,你就得到了一张100*100的图片,在其中的[50, 50]处有一个哟字。

###渲染句子
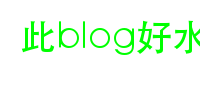
知道了之前的那些对于实际使用显然是不够的,这里再介绍一下如何渲染一个句子。这里只介绍如何渲染一个水平排布的句子。这里假设我们要渲染一个简单的句子:此blog好水(真的)。然后我们将解决几个问题:
字色
其实更改很简单,在之前的例子里,只要把初始话的Mat的默认颜色改了就好。因为FreeType返回的像素是Intensity,只要将其作为Alpha通道使用的话,就可以制作出各种颜色了。譬如:
// 这样渲染出的字就是纯绿, 其他的部分都是透明的
Mat ret(100, 100, CV_8UC4, {0, 255, 0, 0});
字号
调用FT_Set_Pixel_Sizes即可,不赘述。
字间距
这个是渲染一个句子的重点。这个关系到在渲染完一个字之后,笔的位置该如何移动。
FreeType的API为开发者提供了一个默认值,访问的方法是:face->glyph->advance.x; 也就是上文中的 slot->advance.x。
在这里需要注意的是,返回的advance单位是 1/64像素。因此使用时通常是
int advance = (slot->advance.x >> 6);
如果每一次渲染完一个字,再将pen_x += slot->advance.x。便可以渲染出一个正常的句子。
但是仅仅如此还不够,事实上advance是字宽和字间距的加和。而有时应用仅仅想控制字间距。那么如何获得真正的字间距呢?很简单,如下:
(slot->advance.x >> 6) - slot->bitmap.width;
Demo代码
// 略去之前的初始化代码
int error = FT_Set_Pixel_Sizes(face, 0, 36);
if (error) {
    log(logFATAL) << "yo";
}
Mat ret(100, 200, CV_8UC4, {0, 255, 0, 0});
int x = 20, y = 50; // Position of base line
const wstring s = L"此blog好水";
int len = s.length();
auto draw = [&ret] (auto* bitmap, int sx, int sy) {
    int rows = bitmap->rows;
    int cols = bitmap->width;
    for (int i = 0; i < rows; i++) {
        for (int j = 0; j < cols; j++) {
            int ty = sy + i;
            int tx = sx + j;
            if (ty >= ret.rows || tx >= ret.cols ||
                ty < 0 || tx < 0)
                continue;
            ret.at<Vec4b>(ty, tx)[3] =
                bitmap->buffer[i * cols + j];
        }
    }
};
for (int i = 0; i < len; i++) {
    error = FT_Load_Char( face, s[i], FT_LOAD_RENDER  );
    FT_GlyphSlot slot = face->glyph;
    draw(&slot->bitmap, slot->bitmap_left + x, y - slot->bitmap_top);
    x += (slot->advance.x >> 6);
}
imwrite("tmp/text.png", ret);
####结果

于是到现在为止一个简易的教程就结束了,如果将几部分都运用起来,一个简单的句子渲染程序就可以完成了。诸君加油吧~! Cheers!
Recommend
About Joyk
Aggregate valuable and interesting links.
Joyk means Joy of geeK