

Supercharge your Arm builds with Docker Build Cloud - Infrastructure Solutions b...
source link: https://community.arm.com/arm-community-blogs/b/infrastructure-solutions-blog/posts/supercharge-arm-builds-with-docker-build-cloud
Go to the source link to view the article. You can view the picture content, updated content and better typesetting reading experience. If the link is broken, please click the button below to view the snapshot at that time.
Supercharge your Arm builds with Docker Build Cloud: Efficiency meets performance
The rise of Arm-based devices across various computing environments, from edge to cloud, represents a significant shift in the technology landscape This provides developers with new opportunities to innovate. These Arm architectures, known for their efficiency and performance in power-constrained environments, are increasingly becoming the backbone of modern computing infrastructure. However, leveraging these architectures for application development comes with its own set of unique challenges.
On average, developers lose ~1 hour a day waiting for builds to finish. This can be a major productivity drain, and can also lead to frustration and delays. Traditional methods like emulation can be slow and cumbersome, while managing dedicated build farms adds complexity.
Enter Docker Build Cloud
Docker Build Cloud is a service that lets developers build their container images faster, both locally and in CI. Builds run on cloud infrastructure optimally dimensioned for your workloads, with no configuration required. The service uses a remote build cache, ensuring fast builds anywhere and for all team members. It solves the problem of slow build times by running builds locally and in the cloud. This means that developers can take advantage of the powerful hardware and resources that are available locally and in the cloud, which can significantly speed up the build process.
Docker Build Cloud represents a significant advancement for developers targeting Arm architectures. By addressing the critical pain points of slow build times and complex management requirements, Docker Build Cloud enables teams to focus more on innovation and less on the intricacies of the build process. With its ability to streamline builds, integrate into existing workflows, and specifically support Arm architectures, Docker Build Cloud is poised to be a valuable tool for developers looking to push the boundaries of what's possible in edge computing and cloud-native environments. Leveraging Amazon EC2 instances equipped with dedicated EBS volumes, Docker Build Cloud tailors its offerings to meet the needs of different customer segments, from individuals and small teams to larger organizations.
Additionally, Docker Build Cloud can be integrated with existing workflows, so developers do not have to change the way they work. Not only does it offer powerful features like multi-platform builds and remote caching, but it also boasts native Arm machines as part of its builder fleet. This translates to several significant advantages for development teams targeting Arm platforms.
Key Features of Docker Build Cloud
- Optimized Cloud Infrastructure: Docker Build Cloud runs builds on cloud infrastructure that is precisely dimensioned for different workloads. This optimization means that whether you're working on a small-scale project or a large, resource-intensive application, the infrastructure automatically adjusts to meet your needs without any manual configuration.
- Remote Build Cache: One of the most innovative features of Docker Build Cloud is its use of a remote build cache. This cache ensures that builds are fast not just for individual developers but across the entire team. By caching previously compiled dependencies and build steps, Docker Build Cloud drastically reduces build times, eliminating the need to recompile unchanged parts of the application.
- Seamless Integration: Docker Build Cloud is designed to integrate seamlessly into both local development environments and Continuous Integration (CI) pipelines. This means developers can use Docker Build Cloud without altering their existing workflows. The transition from local builds to cloud-powered builds requires no additional learning curve, making it accessible for teams of all sizes.
- No Configuration Hassles: Getting started with Docker Build Cloud doesn’t involve complex setup procedures or configuration. The service is designed to be as straightforward as possible, allowing developers to begin leveraging cloud-powered builds right away, focusing on their code rather than on infrastructure management.
- Accessibility for All Team Members: The shared cache feature of Docker Build Cloud is particularly beneficial for collaborative projects. It ensures that all team members have access to fast builds, regardless of their physical location or the specifications of their local development machines. This collective speed boost facilitates a more agile development process, enabling faster iteration and collaboration.
Getting Started with Docker Build Cloud and Arm
Ready to experience the power of Docker Build Cloud for your Arm builds? Well, getting started is easy:
Step 1. Login to https://build.docker.com
Feel free to use your own Docker Hub credentials to access your Hub organization.
Step 2. Ensure that your Docker Hub namespace ID is added to the right organization
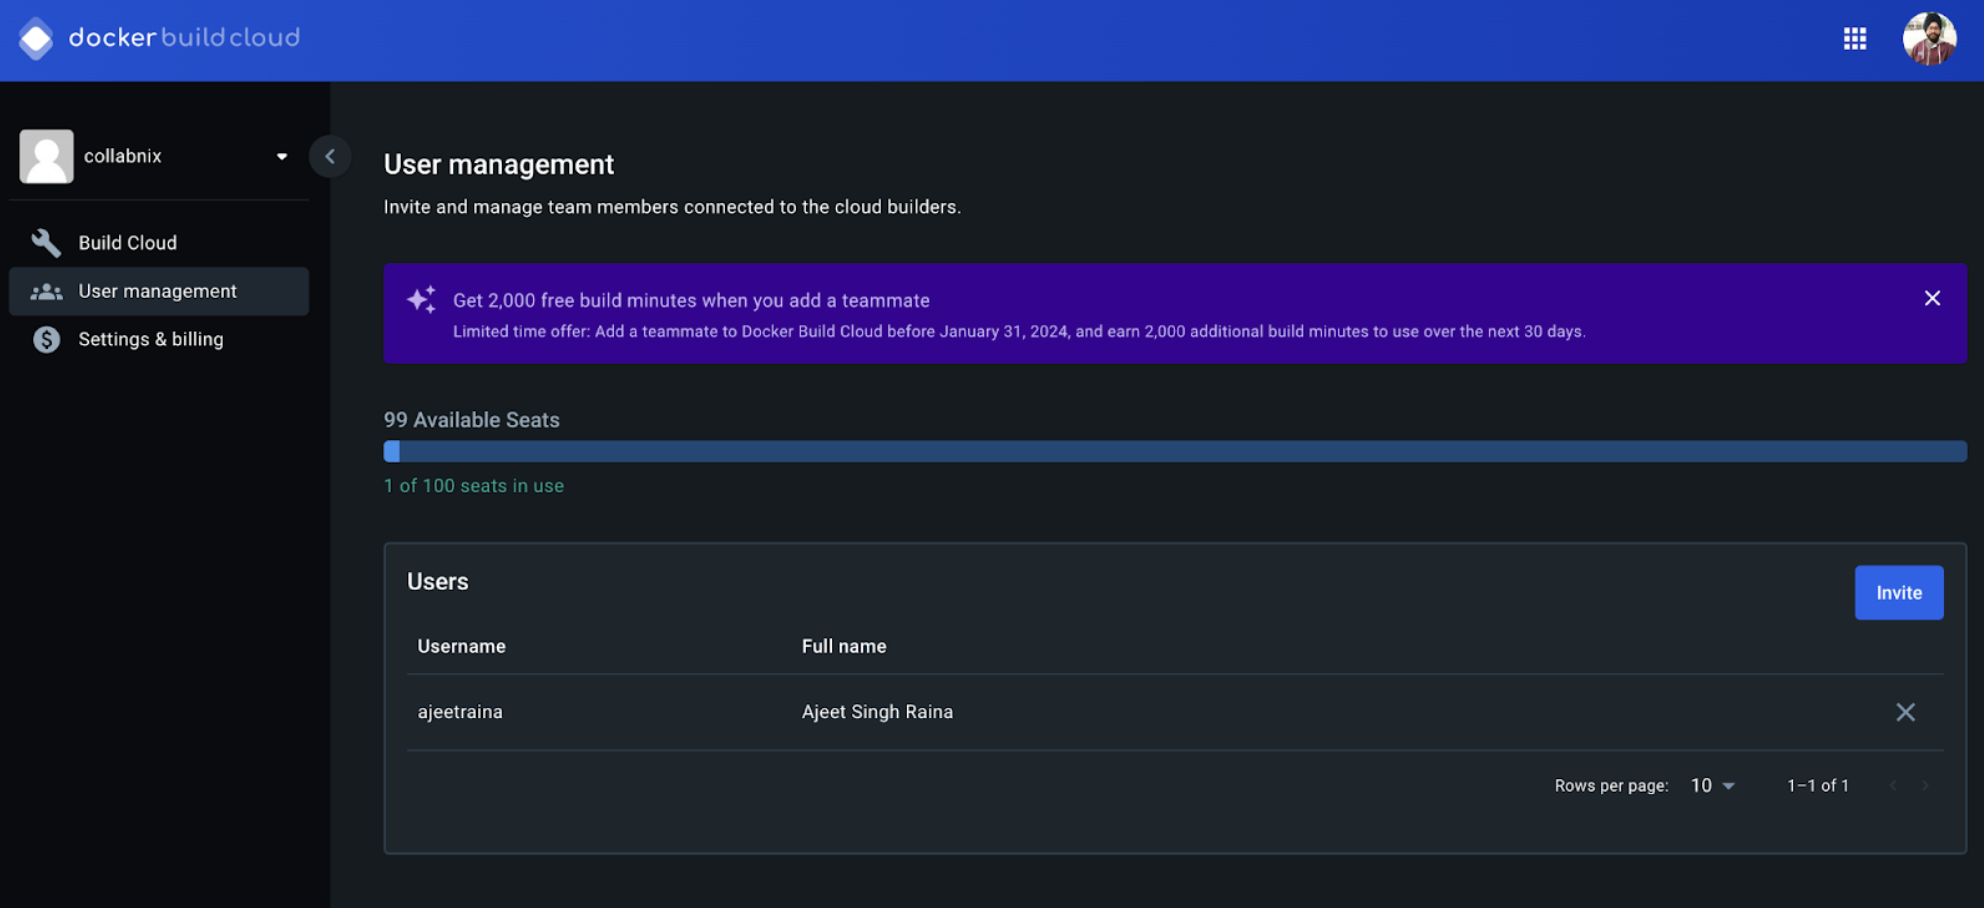
Step 3. Click “Create a New Builder”
For our demonstration, we have created a new builder called testing.
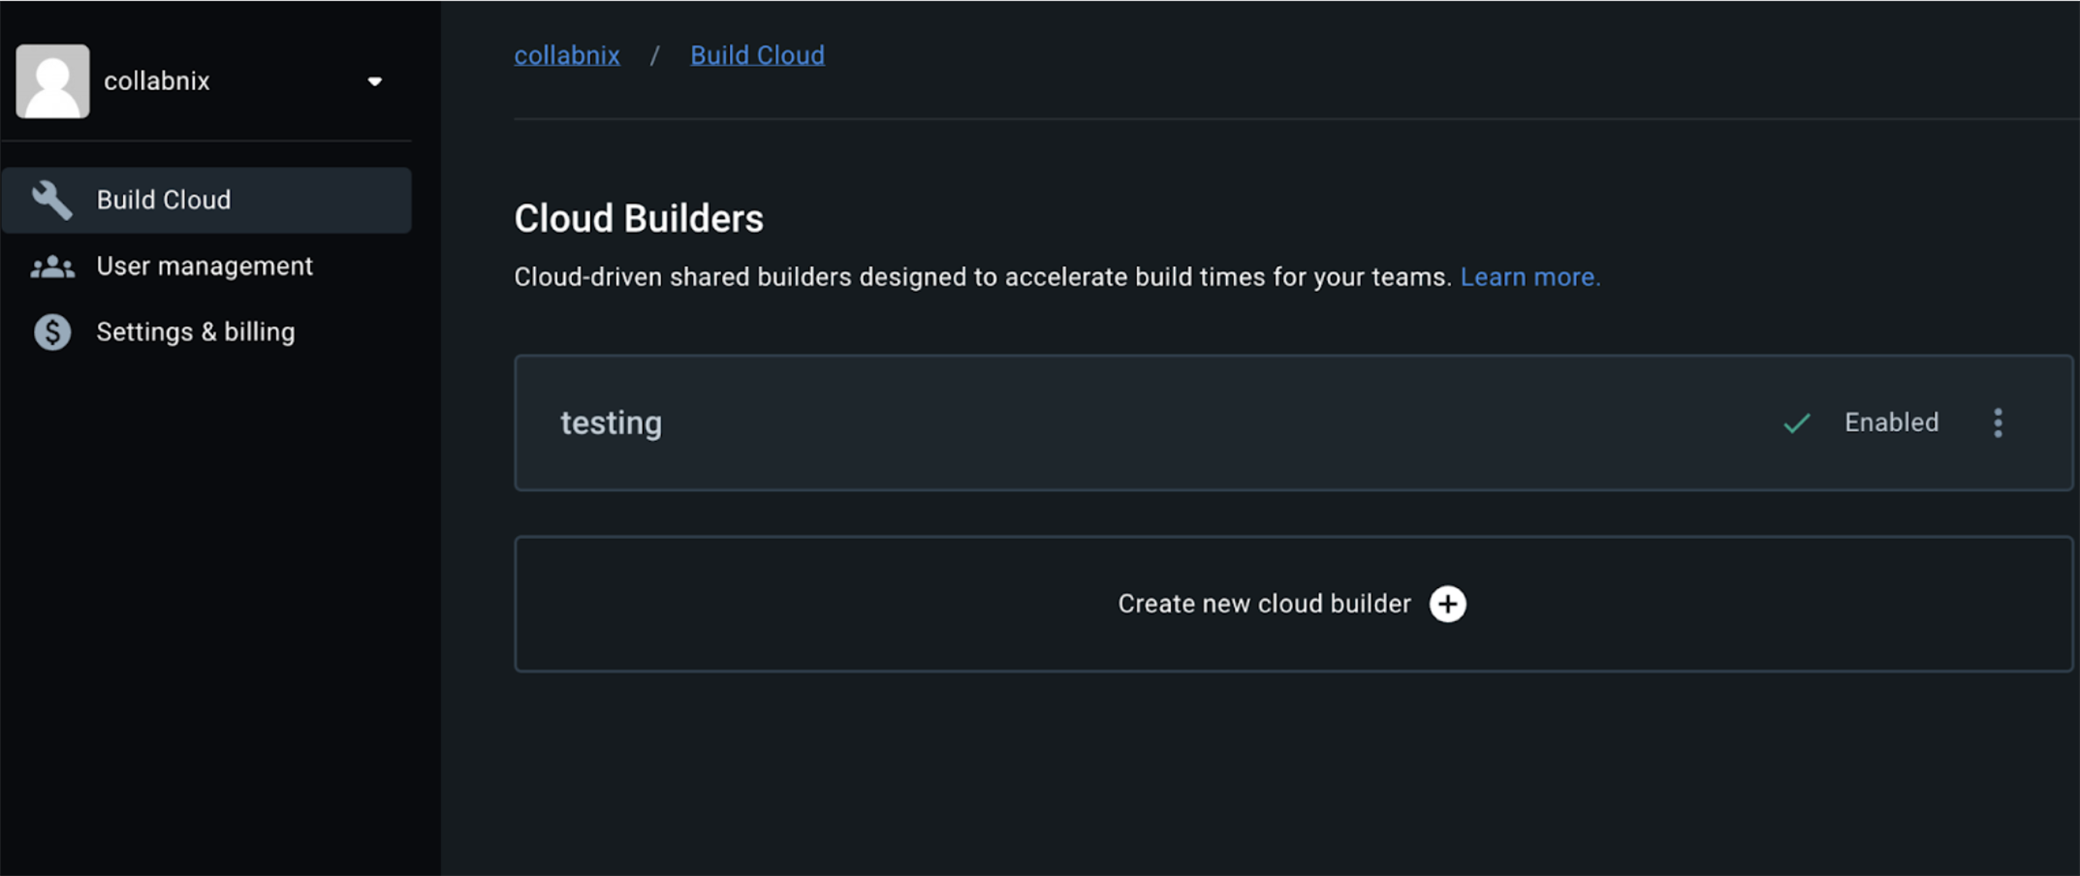
Step 4. Click the new Builder to open up the instructions
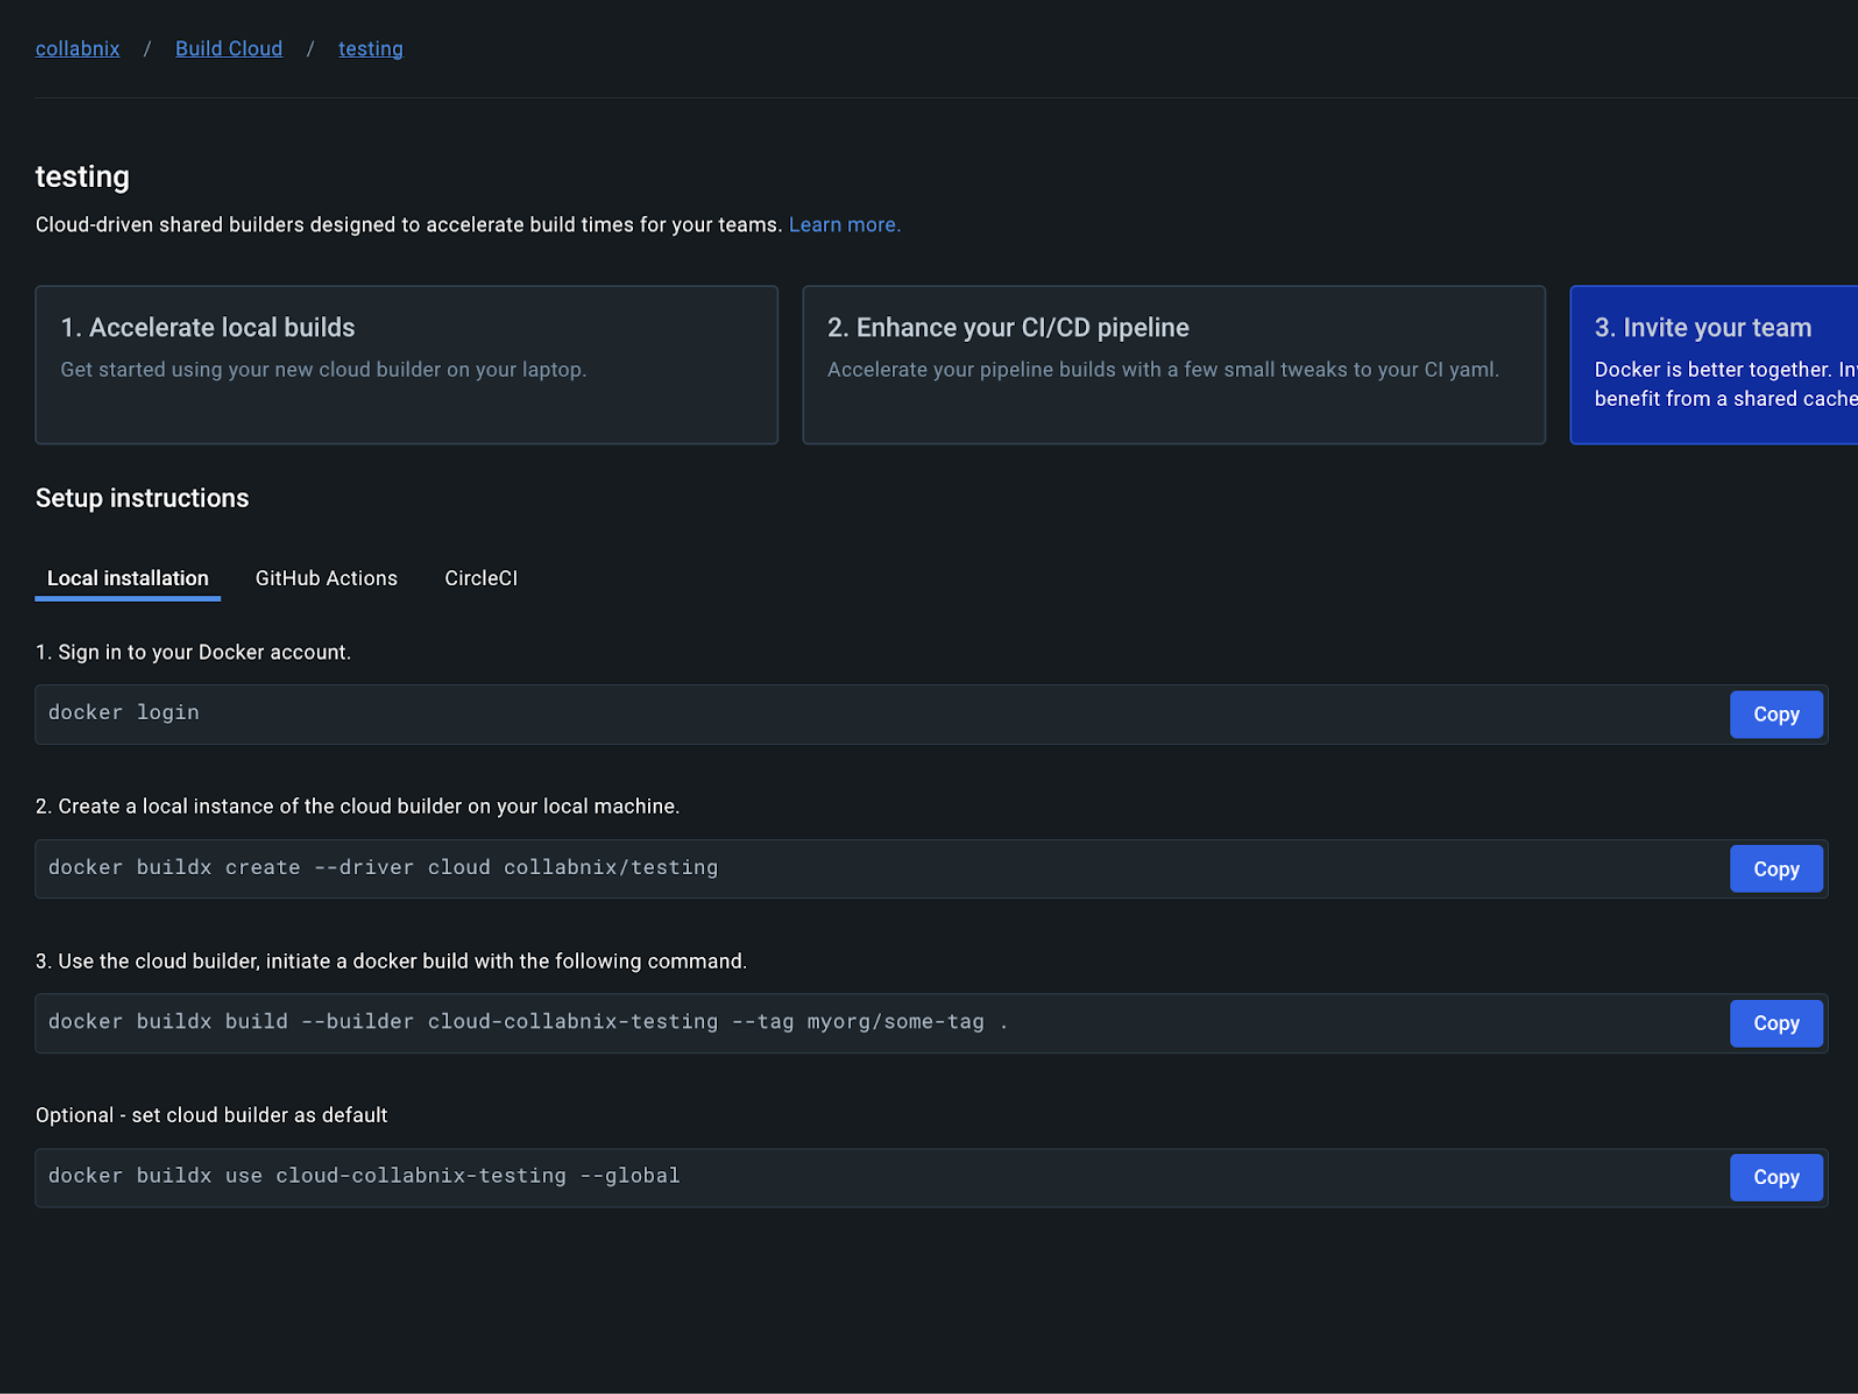
Step 5. Open up the terminal and sign-in with your Docker account
Please note that when authentication is required, you need to provide PAT (Personal Access Token) credentials instead of your password.
docker login
Step 6. Verifying the new Buildx driver for Docker Build Cloud
You can verify the buildx driver for Cloud using –-help in the latest release.
docker buildx create --help

Usage:  docker buildx create [OPTIONS] [CONTEXT|ENDPOINT]

Create a new builder instance

Options:
      --append                   Append a node to builder instead of changing it
      --bootstrap                Boot builder after creation
      --buildkitd-flags string   Flags for buildkitd daemon
      --config string            BuildKit config file
      --driver string            Driver to use (available: "cloud", "docker-container", "kubernetes", "remote")
      --driver-opt stringArray   Options for the driver
      --leave                    Remove a node from builder instead of changing it
      --name string              Builder instance name
      --node string              Create/modify node with given name
      --platform stringArray     Fixed platforms for current node
      --use                      Set the current builder instance
Step 7. Create a local instance of the cloud builder on your local machine
The following command is used to create a new Docker Buildx builder instance with specific settings, utilizing Docker's build cloud feature.
docker buildx create --driver cloud collabnix/testing cloud-collabnix-testing
As a result, you will see cloud-collabnix-testing as the output.
Step 8. Cloning a sample Python application
In order to demonstrate, let us consider a simple “Hello World” python script.
git clone https://github.com/dockersamples/docker-init-demos
cd docker-init-demos/python
The Python script creates a simple HTTP server that listens on port 8080 and responds to GET requests with a 200 OK status, sending a plain text content type header followed by a message that includes ASCII art of a whale symbolizing Docker and a "Hello from Docker!" greetings. It uses Python's built-in http.server module, defining a custom request handler class MyHandler that overrides the do_GET method to specify the server's response to GET requests. When executed, the script initializes the server, making it ready to serve requests continuously until it is manually stopped, allowing anyone to access the ASCII art message by visiting http://localhost:8080/ in a web browser.
from http.server import BaseHTTPRequestHandler, HTTPServer

class MyHandler(BaseHTTPRequestHandler):
    def do_GET(self):
        self.send_response(200)
        self.send_header('Content-type', 'text/plain')
        self.end_headers()
        self.wfile.write(b'''
          ##         .
    ## ## ##        ==
 ## ## ## ## ##    ===
/"""""""""""""""""\___/ ===
{                       /  ===-
\______ O           __/
 \    \         __/
  \____\_______/


Hello from Docker!
''')

def run():
    print('Starting server...')
    server_address = ('', 8080)
    httpd = HTTPServer(server_address, MyHandler)
    print('Server started!')
    httpd.serve_forever()

if __name__ == '__main__':
    run()
Step 9. Use the cloud builder, initiate a docker build with the following command
The following command uses Docker Buildx to build a Docker image with specific parameters. Docker Buildx is an extended build feature of Docker that provides support for building multi-architecture images, among other advanced features.
docker buildx build --builder cloud-collabnix-testing --tag collabnix/myapp .
The following command is used to build a Docker image from a Dockerfile in the current directory, tag the image, and use a specific builder instance for the build process. It's a powerful way to build Docker images, especially when dealing with complex builds or targeting multiple architectures.
The build process starts by connecting to the Docker build cloud service, leveraging the specified builder instance cloud-collabnix-testing. This allows for building the image in a cloud environment, which can provide more resources or specific architectures as needed.
docker buildx build --builder cloud-collabnix-testing --tag collabnix/myapp .
[+] Building 15.4s (12/12) FINISHED                                                                       cloud:cloud-collabnix-testing
 => [internal] connected to docker build cloud service                                                                             0.0s
 => [internal] load build definition from Dockerfile                                                                               0.8s
 => => transferring dockerfile: 162B                                                                                               0.8s
 => [internal] load metadata for docker.io/library/python:3.8-alpine                                                               1.8s
 => [auth] library/python:pull token for registry-1.docker.io                                                                      0.0s
 => [internal] load .dockerignore                                                                                                  0.8s
 => => transferring context: 704B                                                                                                  0.8s
 => [1/4] FROM docker.io/library/python:3.8-alpine@sha256:aeb77f60b4b197c265fc02b305753343da6155b065faa2e60671be83fc830d46         0.9s
 => => resolve docker.io/library/python:3.8-alpine@sha256:aeb77f60b4b197c265fc02b305753343da6155b065faa2e60671be83fc830d46         0.0s
 => => sha256:7d9ad5bef1ba2feda5813a1782ef3c5928c96a6e68a1f0ad0c5dd20261eb6132 242B / 242B                                         0.1s
 => => sha256:e853c0f38ea7ee895b324be2572635fb61172c5bb439c16909ff93c5626bf9e3 624.72kB / 624.72kB                                 0.1s
 => => sha256:eec00664afa31f69b26cc60ba44e42614a54b49d50e40788a58d4bc8c8d01c7d 2.85MB /
....                                                                                                           0.0s
 => exporting to image                                                                                                             7.1s
 => => exporting layers                                                                                                            0.1s
 => => exporting manifest sha256:39106056d11441d55923ad8d9e715052a97c909382521d549bf40ce56e316f9c                                  0.0s
 => => exporting config sha256:6523acd5efbc62da343d3e0d2755d599f95c162130e4be1a2a3bdbc7d4324387                                    0.0s
 => cloud pull                                                                                                                     6.7s
 => => pulling layer c30352492317 3.35MB / 3.35MB                                                                                  1.3s
 => => pulling layer e853c0f38ea7 624.72kB / 624.72kB                                                                              1.6s
 => => pulling layer 27a15cb4da4a 13.52MB / 13.52MB                                                                                4.9s
 => => pulling layer 7d9ad5bef1ba 242B / 242B                                                                                      4.9s
 => => pulling layer eec00664afa3 2.85MB / 2.85MB                                                                                  5.0s
 => => pulling layer 53334f970416 93B / 93B                                                                                        5.0s
 => => pulling layer 345cee3065f4 1.03kB / 1.03kB                                                                                  5.1s
 => => pulling layer 4f4fb700ef54 32B / 32B                                                                                        5.1s

View build details: docker-desktop://dashboard/build/cloud-collabnix-testing/linux-arm64/xok5kto13y8ut1gkehwt0yjl2
Step 10. Set cloud builder as default (Optional)
The following command is used for setting a Docker Buildx builder instance as the current builder for Docker commands. It specifically targets the builder named cloud-collabnix-testing and sets it as the default builder across all Docker contexts on your machine.
Note: You can also run docker buildx install which will enable you to run commands like docker build instead of docker buildx build.
docker buildx use cloud-collabnix-testing --global
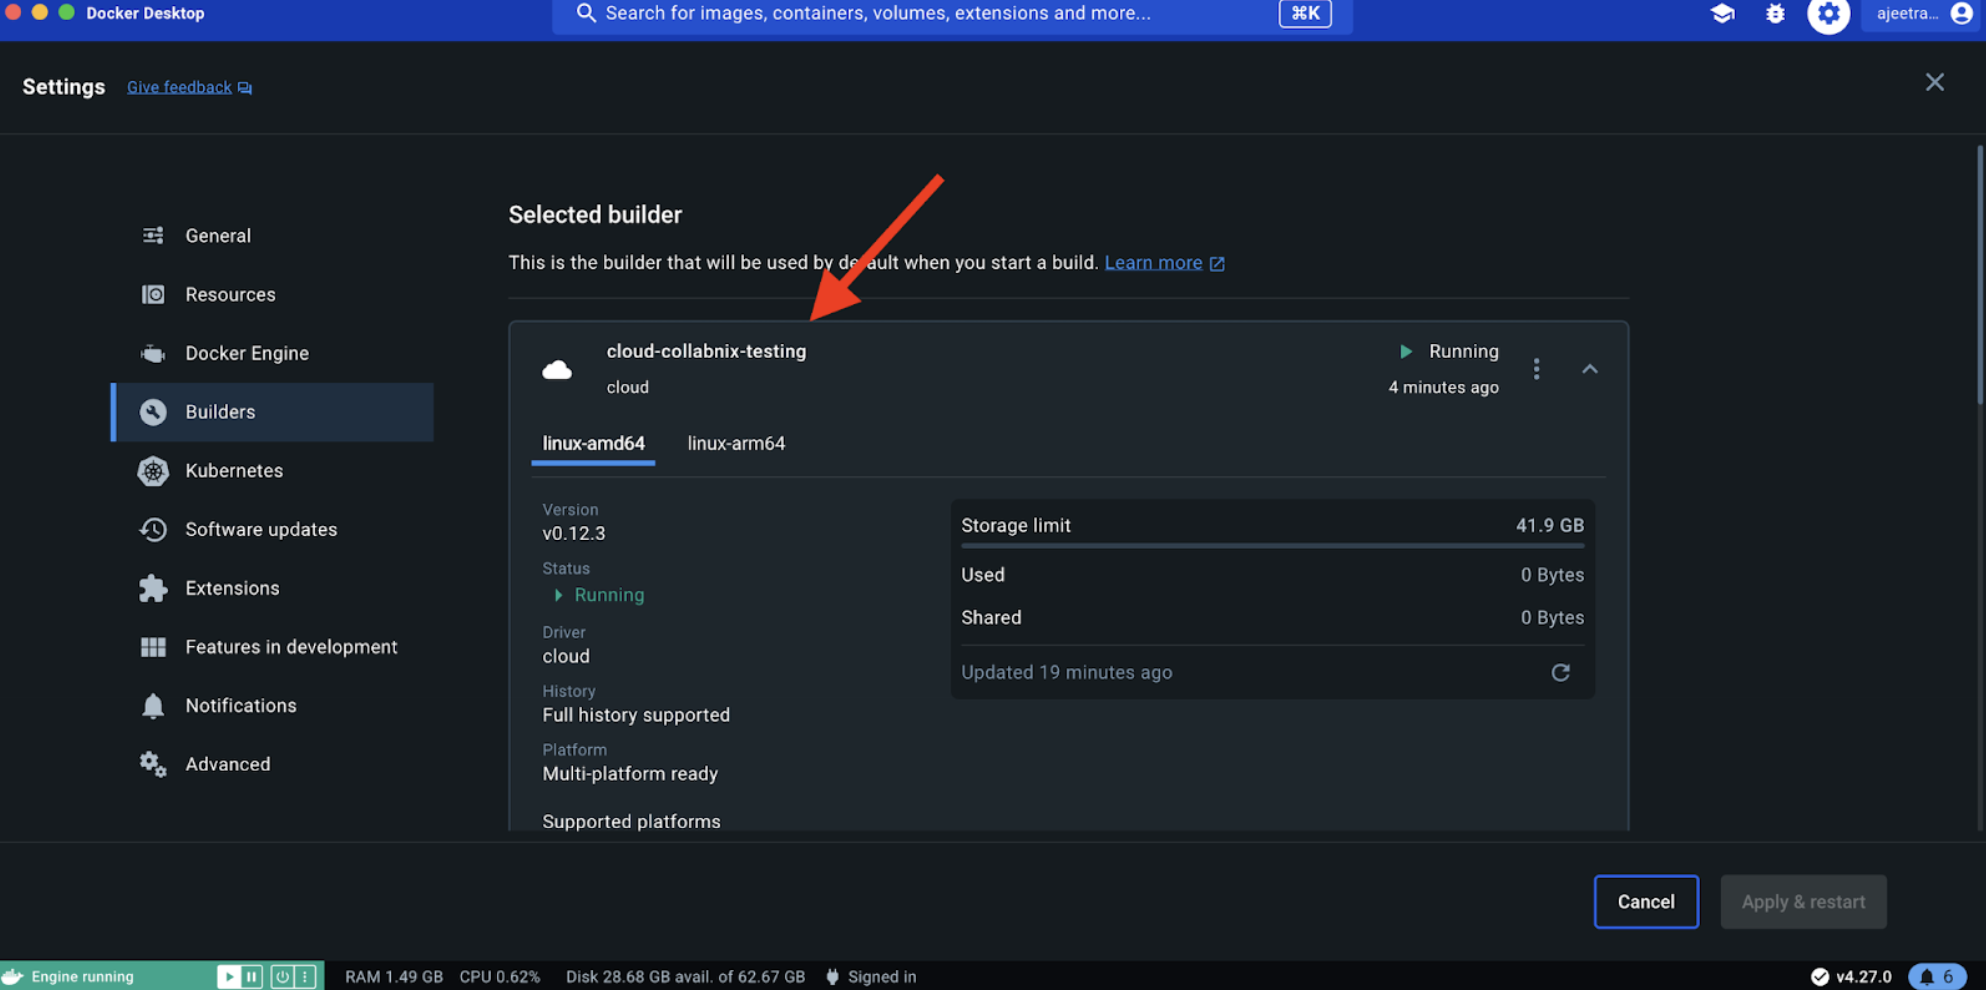
Step 11. Viewing the Builder on Docker Desktop
Open up Docker Desktop > Settings > Builders to view the available builder.
Step 12. Running Multi-platform Builds
In order to run multi-platform builds, you can run the following command specifying all of the platforms that you want to build as shown:
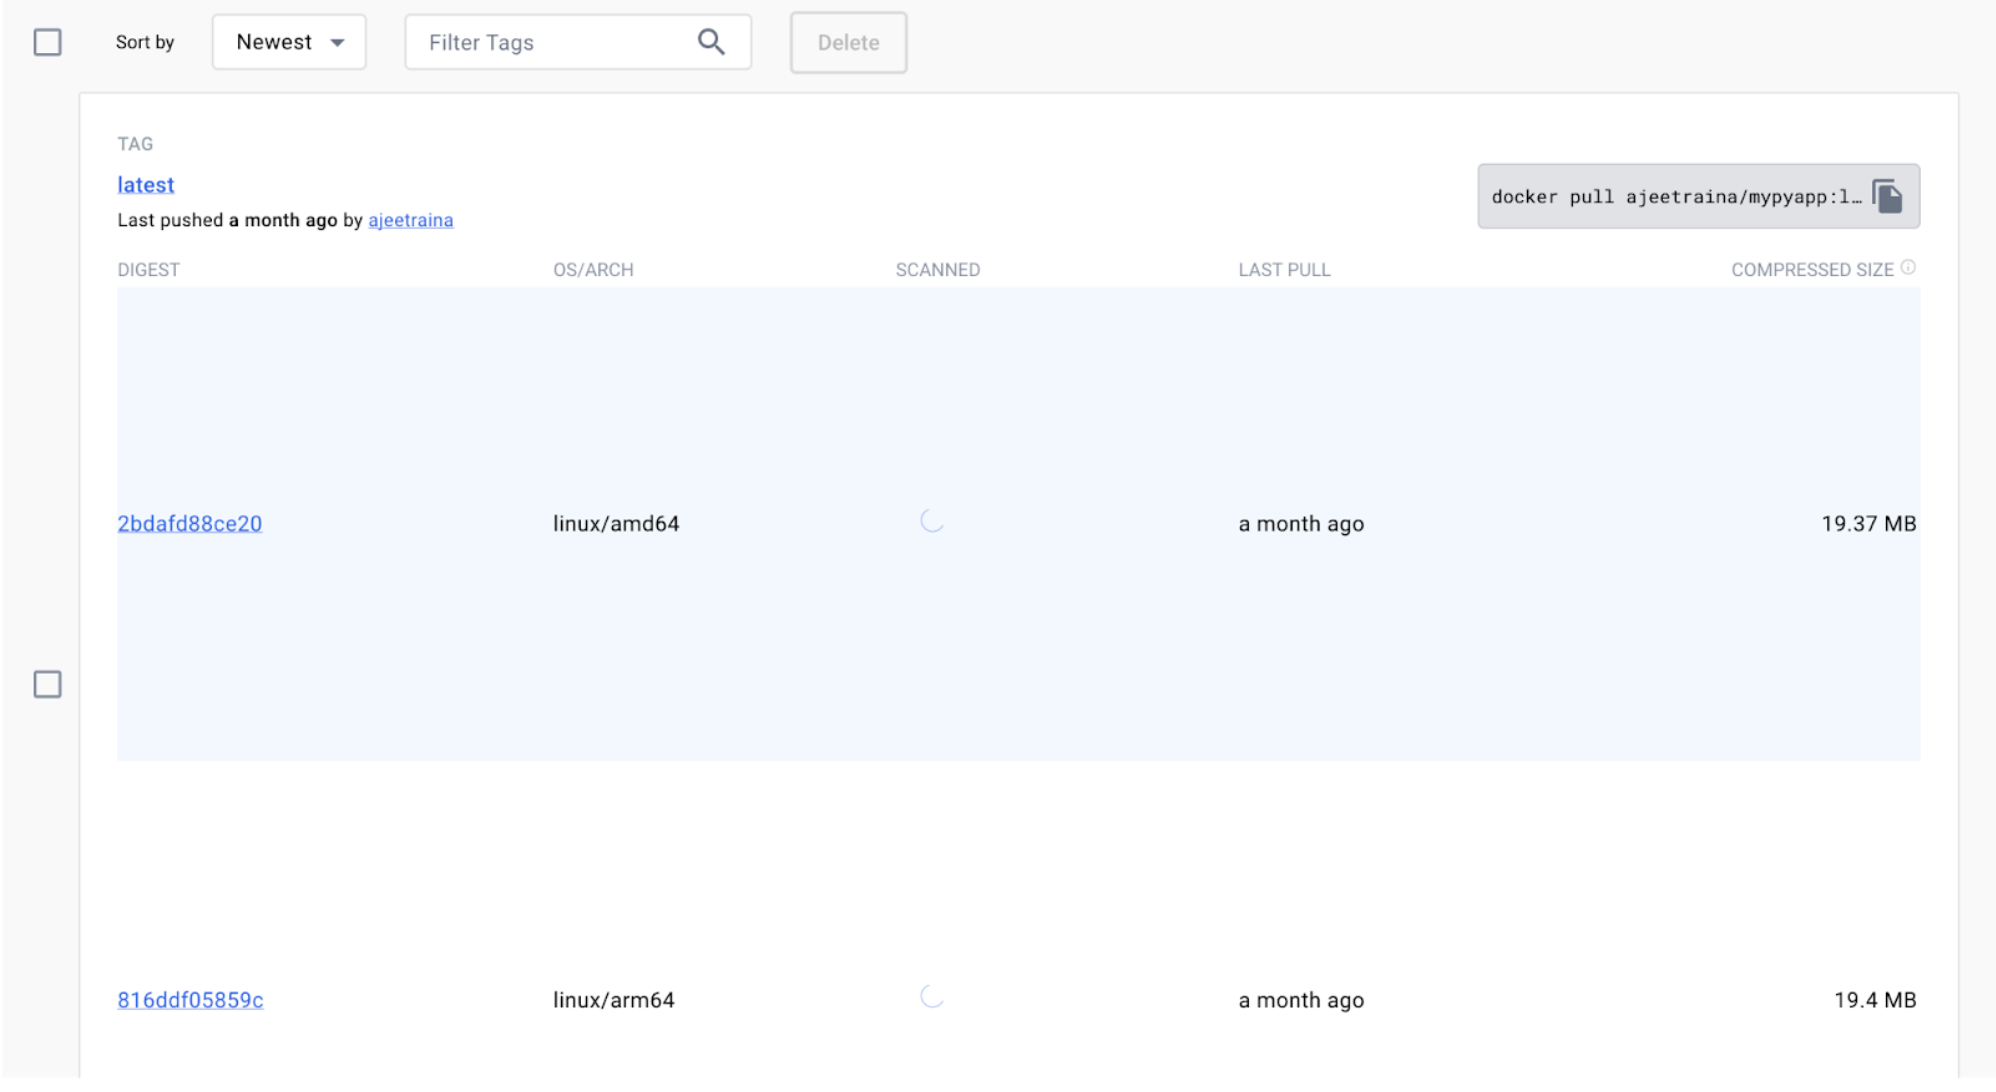
docker buildx build --platform linux/amd64,linux/arm64 -t ajeetraina/mypyapp --push .
Note: If you don't specify the platform, Docker Build Cloud automatically builds for the architecture matching your local environment.
By now, you should be able to find both amd64 as well as arm64 tagged Docker image in your Docker Hub repository.
Step 13. Unsetting Docker Build Cloud as the default builder
The command docker context use default is used to switch the current Docker context to the one named default. Docker contexts allow you to define and switch between different environments, including different Docker daemons, Kubernetes clusters, and other settings. Each context can specify a Docker daemon endpoint and other Docker runtime settings, making it easy to manage Docker operations across different environments from a single client.
docker context use default
In order to remove the cloud builder, you can run the following command:
docker buildx uninstall
Conclusion
Docker Build Cloud revolutionizes the building process for Arm-based applications by offering greater speed, efficiency, and simplicity. By addressing the core challenges of slow build times and management complexity, it enables developers to focus on innovation and development, pushing the boundaries of what's possible in edge computing and cloud-native environments. With Docker Build Cloud, supercharging your Arm builds becomes a reality, allowing you to fully harness the potential of Arm within your development pipeline.
Find more on Docker Build Cloud
Ajeet S Raina is a Developer Advocate at Docker and a Distinguished Arm Ambassador for the Arm Developer Program.
Recommend
About Joyk
Aggregate valuable and interesting links.
Joyk means Joy of geeK