

Building a social network app with Amplify Form Builder and Storage
source link: https://aws.amazon.com/blogs/mobile/building-a-social-network-app-with-amplify-form-builder-and-storage/
Go to the source link to view the article. You can view the picture content, updated content and better typesetting reading experience. If the link is broken, please click the button below to view the snapshot at that time.

Building a social network app with Amplify Form Builder and Storage
by Danny Banks and Wesley | on 27 JUL 2023 | in AWS Amplify, Front-End Web & Mobile, Technical How-to | Permalink | Comments | Share
For apps that are heavily image dependent, like social media apps, managing file upload and access is core to the app’s success. Integrating with all the services needed for cloud-based file management and access can be painful, but Amplify Studio can provide you with tools to integrate quickly and easily with AWS S3 storage.
In this post you will learn how to set up an Amplify project with Storage and Data, and use Amplify Studio’s Form Builder to build a basic social network feed app. Users can create posts with an image and those posts are shown in a feed.
Prerequisites
- You should have the Amplify CLI installed. The easiest way is to install it globally with npm or yarn:
npm i -g @aws-amplify/cli - An AWS account
Create an Amplify project
Go to the Amplify console and click New App > Build an app. We’ll use “amplify-formbuilder-storage,” but you can name your app whatever you like. After your app is setup, click on Launch Studio button.
For this project, we will need Authentication, Storage, and Data. Amplify Storage requires Authentication, so set that up first. Head to the Authentication tab and click Deploy. We’ll use the default configuration settings, but feel free to change the default settings. The deployment will take a minute or two to get everything set up.

Once that is done, head to the Storage tab. Check the checkboxes for “upload” and “view” for “signed in users” and “guest users” and click Create bucket to deploy that as well.

Finally, let’s set up a simple data model in the Data tab. Create a model called Post with body and image attributes that are strings and click Save and deploy.

Setup frontend code
We will use NextJS for this example, but this code will work with any other React bundler or meta-framework like Vite. Create a new NextJS project:
yarn create next-app amplify-formbuilder-storage
For this example I chose these options:
- Typescript: Yes
- ESLint: Yes
- Tailwind: No
- src/ directory: Yes
- app/ directory: No
- Default import alias
Open the newly created directory, amplify-formbuilder-storage, in your favorite IDE. Then add the dependencies needed
yarn add @aws-amplify/ui-react @aws-amplify/ui-react-storage aws-amplifyNow pull your Amplify project into your NextJS codebase. Head to Amplify Studio and copy the command for local setup instructions, which should be a command that looks like amplify pull --appId [app id] --envName [env name], and paste that into your terminal. That command will set up all the necessary files in your application to connect to your Amplify backend.

Configure Amplify
Add these imports to the top of the src/pages/_app.tsx:
import '@aws-amplify/ui-react/styles.css';
import { Amplify } from 'aws-amplify';
import awsconfig from '../aws-exports';Then after the imports, add this to configure Amplify:
Amplify.configure(awsconfig);Your src/pages/_app.tsx file should look like this now:
import '@aws-amplify/ui-react/styles.css'
import { Amplify } from 'aws-amplify'
import awsconfig from '../aws-exports'
import type { AppProps } from 'next/app'

Amplify.configure(awsconfig);

export default function App({ Component, pageProps }: AppProps) {
  return (
    <Component {...pageProps} />
  )
}Next, update the src/pages/_document.tsx to add the Inter font:
import { Html, Head, Main, NextScript } from 'next/document'

export default function Document() {
  return (
    <Html lang="en">
      <Head>
        <link
          rel="stylesheet"
          href="https://fonts.googleapis.com/css2?family=Inter:slnt,[email protected],100..900&display=swap"
        />
      </Head>
      <body>
        <Main />
        <NextScript />
      </body>
    </Html>
  )
}Finally, update the src/pages/index.tsx to use the PostCreateForm which Amplify generates for you automatically:
import PostCreateForm from '@/ui-components/PostCreateForm'

export default function Home() {
  return (
    <>
      <PostCreateForm />
    </>
  )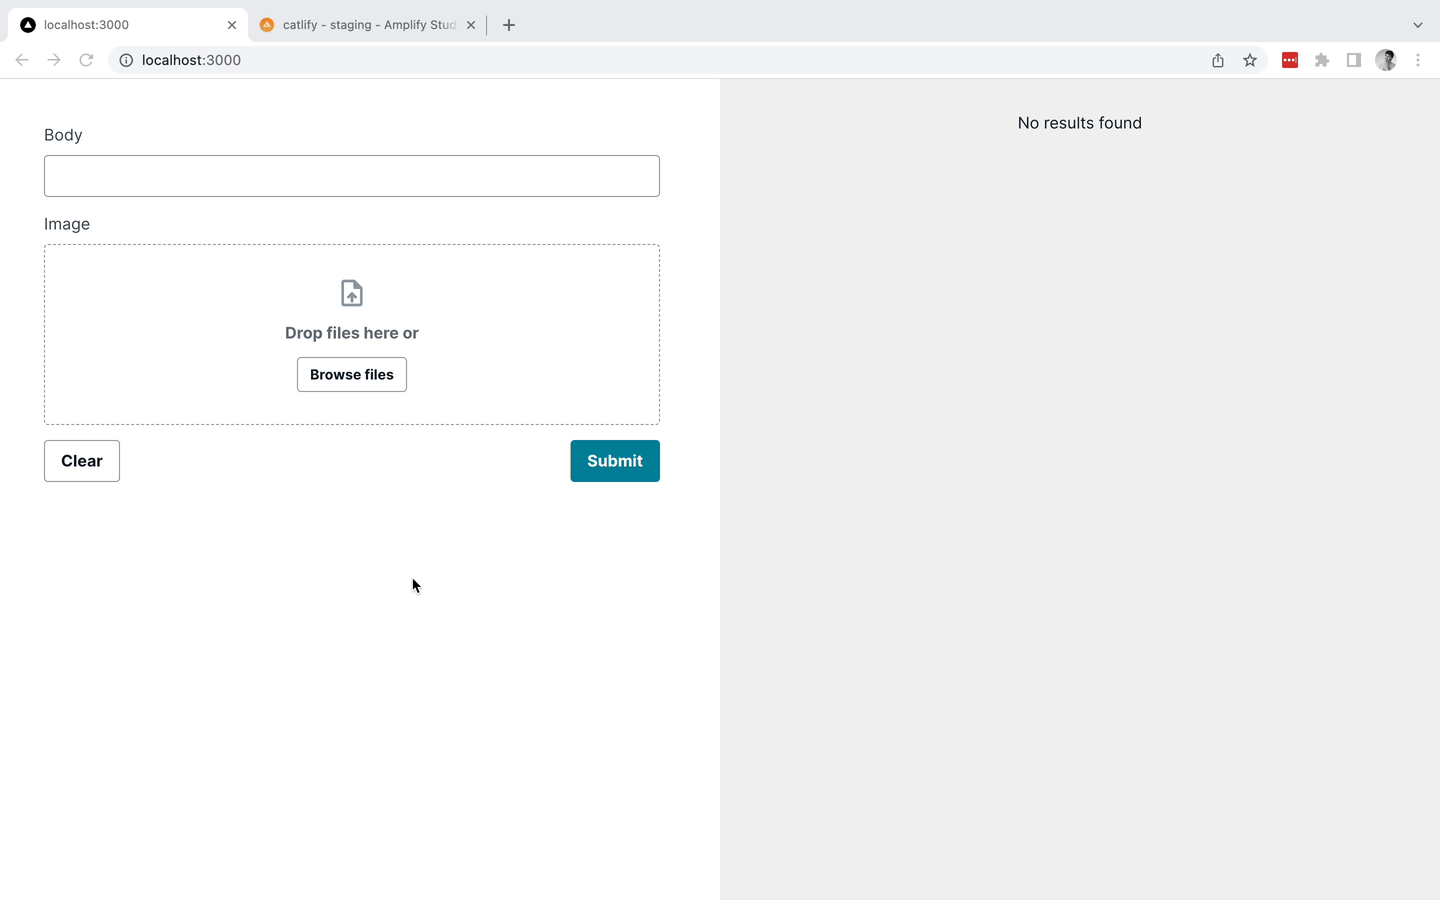
}With the NextJS dev server running your app should look like this:
Update the default form
All data models you create in Amplify Studio get default form components for creating and updating data. When you run amplify pull, Amplify Studio will generate React components for these forms in your project. Right now, the image attribute is just a plain text field and not an image uploader. Let’s fix that.
Open up Amplify Studio and edit the PostCreateForm that Amplify creates by default. Click on UI Library > PostCreateForm > Configure
Click on the image text field and change they type to a StorageField. Change the File level access to Public and change the Accepted file types to image/*.
Now go back to your IDE/terminal and run amplify pull from your project. This will pull down the updated PostCreateForm component. Once that is done, run yarn dev to start up the local development server again. You should now see the form with the StorageField that lets users upload an image to their post. You might be wondering, how do you make sure files uploaded don’t overwrite other files? The Storage field in Form Builder actually handles that for you automatically by using a hash of the file contents to create a unique filename!
Create a post list
To display new posts, we will use DataStore to render the posts as they come in. At the tope of the Home function in src/pages/index.tsx add a state variable with useState:
const [alert, setAlert] = React.useState<string>();Then add a useEffect hook to set up the DataStore subscription:
  React.useEffect(() => {
    const sub = DataStore.observeQuery(Post, Predicates.ALL, {
      sort: (item) => item.createdAt(SortDirection.DESCENDING)
    }).subscribe(snapshot => {
      const { items } = snapshot;
      setItems(items);
    });

    return () => { sub.unsubscribe() }
}, [])The items state will be updated whenever new posts get created. Now lets render the items state in a Collection. Replace the JSX in the return statement with this:
    <Flex direction="row" alignItems="flex-start" minHeight="100vh">
      <View flex="1" position="sticky" top="0" padding="large">
        <PostCreateForm />
      </View>
      <View
        flex="1"
        alignSelf="stretch"
        backgroundColor="background.tertiary"
        padding="xl"
      >
        <Collection
          type="list"
          direction="column"
          justifyContent="left"
          items={items}
        >
          {(item, index) => (
            <Card variation="elevated">
              <StorageImage accessLevel="public" imgKey={item.image ?? ''} alt="" />
              <Text>{item.body}</Text>
            </Card>
          )}
        </Collection>
      </View>
</Flex>StorageImage is a new connected component that renders images uploaded from Amplify. Now you should see a list of posts and new posts should show up automatically in the list.
You could also use Amplify Studio’s Figma sync to design the post card component in Figma and create a collection in Amplify Studio to display all the posts. You can read more about Figma sync and collections in the docs.
Extending the form in code
There are a few more tweaks we can make to the PostCreateForm in our React code to make it work a bit better. First, let’s add a message when a post is saved. Create another state variable:
const [alert, setAlert] = React.useState<string>();Then on the PostCreateForm add an onSuccess handler:
        <PostCreateForm onSuccess={() => {
          setAlert('Post saved!')
          setTimeout(() => {
            setAlert(undefined);
          }, 2000);
        }} />
{alert ? (<Alert variation="success">{alert}</Alert>) : null}This will show a success banner below the form when a post is saved. The last piece is to clear the file from the StorageManger when a post is saved. The StorageManager component comes with an imperative handle through a React ref to clear the files. You can learn more about refs in React in the React docs. Create a ref which we will add to the StorageManager component:
const ref = React.useRef<{ clearFiles: () => void }>(null);Next, attach that ref to the StorageManager component through a component override. All Amplify generated UI components (from Figma sync or FormBuilder) have an overrides prop which lets you override any prop of any nested component. You can place props, like ref directly on a nested component without having to decompose the component. Here we will add a ref to the StorageManger component and then call the clearFiles() imperative handle after the form has been submitted.
        <PostCreateForm overrides={{
          image: {
            ref
          }
        }} onSuccess={() => {
          ref?.current?.clearFiles()
          setAlert('Post saved!')
          setTimeout(() => {
            setAlert(undefined);
          }, 2000);
}} />Now your src/pages/index.tsx file should look like this:
import * as React from 'react';
import { Post } from '@/models';
import PostCreateForm from '@/ui-components/PostCreateForm';
import { DataStore, Predicates, SortDirection } from 'aws-amplify';
import {
  Alert,
  Card,
  Collection,
  Flex,
  Text,
  View,
} from '@aws-amplify/ui-react';
import { StorageImage } from '@aws-amplify/ui-react-storage';

export default function Home() {
  const [items, setItems] = React.useState<Array<Post>>([]);
  const [alert, setAlert] = React.useState<string>();
  const ref = React.useRef<{ clearFiles: () => void }>(null);

  React.useEffect(() => {
    const sub = DataStore.observeQuery(Post, Predicates.ALL, {
      sort: (item) => item.createdAt(SortDirection.DESCENDING),
    }).subscribe((snapshot) => {
      const { items } = snapshot;
      setItems(items);
    });

    return () => {
      sub.unsubscribe();
    };
  }, []);

  return (
    <Flex direction="row" alignItems="flex-start" minHeight="100vh">
      <View flex="1" position="sticky" top="0" padding="large">
        <PostCreateForm
          overrides={{
            image: {
              ref,
            },
          }}
          onSuccess={() => {
            setAlert('Post saved!');
            ref?.current?.clearFiles();
            setTimeout(() => {
              setAlert(undefined);
            }, 2000);
          }}
        />
        {alert ? <Alert variation="success">{alert}</Alert> : null}
      </View>
      <View
        flex="1"
        alignSelf="stretch"
        backgroundColor="background.tertiary"
        padding="xl"
      >
        <Collection
          type="list"
          direction="column"
          justifyContent="left"
          items={items}
        >
          {(item, index) => (
            <Card variation="elevated" key={index}>
              <StorageImage
                accessLevel="public"
                imgKey={item.image ?? ''}
                alt=""
              />
              <Text>{item.body}</Text>
            </Card>
          )}
        </Collection>
      </View>
    </Flex>
  );
}
If you want to grab all the code, it is available on Github: https://github.com/dbanksdesign/amplify-formbuilder-storage
Optional Next steps
Add authentication
Your Amplify project already has an authentication backend, you just need to add sign in/sign up pages. With the Authenticator component you can do that in 10 lines of code!
Customize the look and feel
All Amplify UI components can be styled with plain CSS or with a Theme object to match your brand.
Summary
In this post we created a NextJS app and added file uploading capabilities with the Amplify UI StorageManager component. To clean up your project, run amplify delete from the command line or delete the app from the AWS console.
</section
Recommend
About Joyk
Aggregate valuable and interesting links.
Joyk means Joy of geeK