

How to upload images to S3 from a react application
source link: https://dev.to/shadid12/how-to-upload-images-to-s3-in-a-react-application-4lm
Go to the source link to view the article. You can view the picture content, updated content and better typesetting reading experience. If the link is broken, please click the button below to view the snapshot at that time.


How to upload images to S3 from a react application
Caution:
_This post doesn't demonstrate best practices as many pointed out in the comment section. An updated version of this is in works. You can still read this to get the basic idea of how S3 works. _
This article demonstrates how you can upload images to Amazon S3 (a highly scalable cloud storage service from Amazon) from your react applications. The solution in this article doesn't use a react-specific library. Therefore you can adapt it to any other JavaScript framework.
Before you begin, make sure you have an AWS account.
Setting up a IAM for S3 in AWS
We have to set up a new IAM user and generate credentials. Our application will use these credentials to connect to AWS services.
Head over to IAM in your AWS console. Search for IAM in the the AWS console search panel and select IAM from the services menu.

Next, select add a new user.

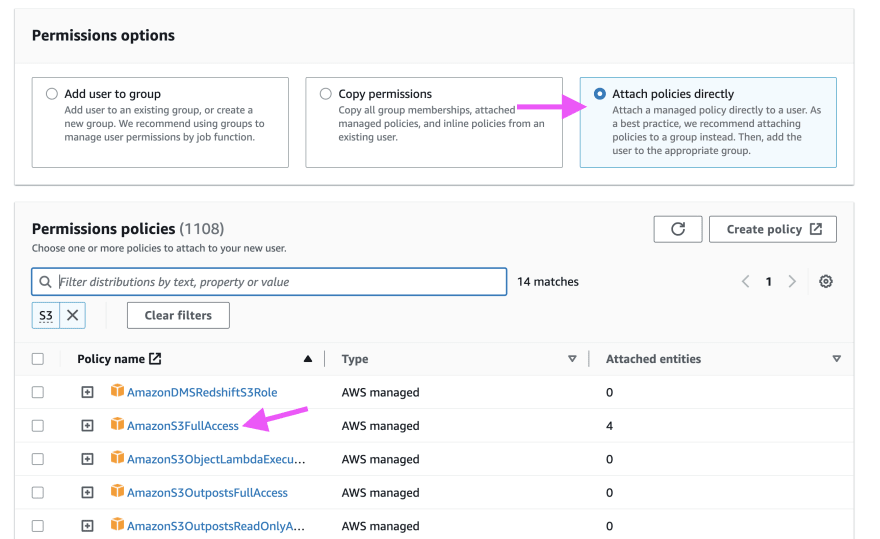
Give your user a name and select next. In the permission section select attach policies directly and select AmazonS3FullAccess. If you are familiar with AWS permission policies feel free to tweak it as per your requirements. For sake of simplicity I am going to select the AmazonS3FullAccess option.
Next, go to security credentials tab and select create access key to generate a new access key.

You will be provided with a security access key id and a secret. Save these values in a secure place as you will need them later.
Create a new S3 bucket
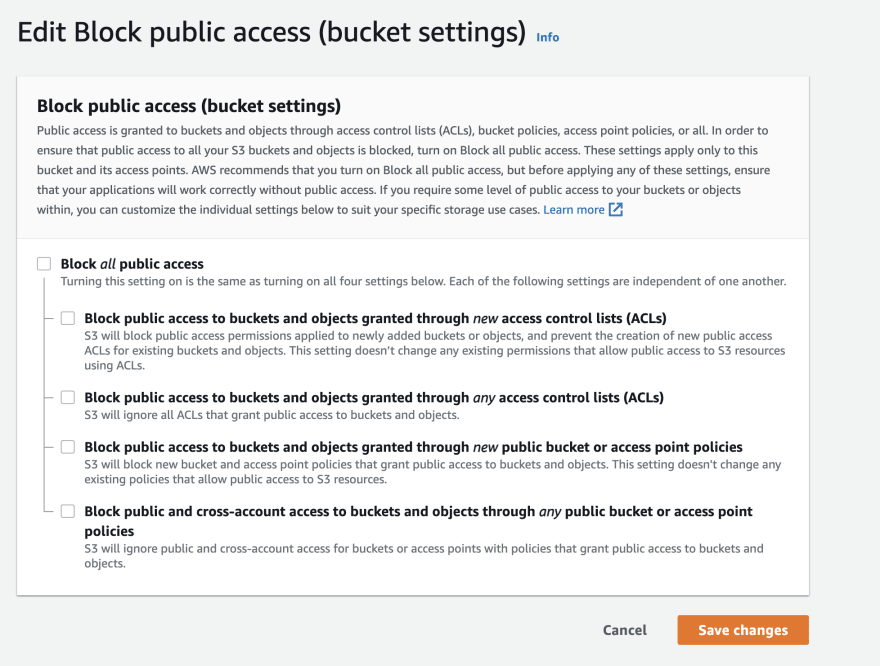
Next, create a new S3 bucket where you want to store the images uploaded by your react application. After you are done creating the bucket, select the bucket and navigate to the permissions tab.

Uncheck block public access options and save changes.
Next, select Edit Bucket policy and add the following policies.
{
    "Version": "2012-10-17",
    "Statement": [
        {
            "Effect": "Allow",
            "Principal": "*",
            "Action": [
                "s3:GetObject",
                "s3:PutObject"
            ],
            "Resource": [
                "arn:aws:s3:::<Your-Bucket-name>",
                "arn:aws:s3:::<Your-Bucket-name>/*"
            ]
        }
    ]
}
Next, select Edit Cross-origin resource sharing and add the following.
[
    {
        "AllowedHeaders": [
            "*"
        ],
        "AllowedMethods": [
            "PUT",
            "POST",
            "GET"
        ],
        "AllowedOrigins": [
            "*"
        ],
        "ExposeHeaders": [
            "ETag"
        ]
    }
]
Thant’s all the configuration you have to make in AWS console. Next let’s go ahead and write some code for our React application.
React code
First, install the aws-sdk library by running the following command.
`npm i aws-sdk --save`
Create a new component in your react application. Let's call this component ImageUploader . Import and configure the aws-sdk package as demonstrated in the following code.
import AWS from 'aws-sdk';
import { useState } from 'react';

AWS.config.update({
  accessKeyId: '<Your-Access-Key-Id>',
  secretAccessKey: '<Your-Secret-Key>',
  region: 'us-east-1',
  signatureVersion: 'v4',
});

export default function ImageUploader() {
  const s3 = new AWS.S3();
  return (
    <div >
      <h1>Test Image Upload</h1>
    </div>
  );
}
Next, create a new form to upload the picture.
import AWS from 'aws-sdk';
import { useState } from 'react';

AWS.config.update({
  accessKeyId: '<Your-Access-Key-Id>',
  secretAccessKey: '<Your-Secret-Key>',
  region: 'us-east-1',
  signatureVersion: 'v4',
});

export default function ImageUploader() {
  const s3 = new AWS.S3();
  const [imageUrl, setImageUrl] = useState(null);
  const [file, setFile] = useState(null);

  const handleFileSelect = (e) => {
    setFile(e.target.files[0]);
  }

  const uploadToS3 = (e) => {
    // TODO
  }

  return (
    <div >
      <h1>Test Image Upload</h1>
      <input type="file" onChange={handleFileSelect} />
      {file && (
        <div style={{ marginTop: '10px' }}>
          <button onClick={uploadToS3}>Upload</button>
        </div>
      )}
      {imageUrl && (
        <div style={{ marginTop: '10px' }}>
          <img src={imageUrl} alt="uploaded" />
        </div>
      )}
    </div>
  );
}
I would advice not to expose your AWS credentials in the front end for a production application. This article is more of a demonstration for beginners to show them how things work. In production use an api endpoint to upload the images.
On submit button click we initiate the upload function from AWS SDK.
const uploadToS3 = async () => {
    if (!file) {
      return;
    }
    const params = {
      Bucket: '<Your-Bucket-name>',
      Key: `${Date.now()}.${file.name}`,
      Body: file
    };
    const { Location } = await s3.upload(params).promise();
    setImageUrl(Location);
    console.log('uploading to s3', Location);
}
And that’s everything you need to do. The complete code for this component looks as follows.
import AWS from 'aws-sdk';
import { useState } from 'react';
AWS.config.update({
  accessKeyId: '<Access-Key-ID>',
  secretAccessKey: '<Access-Key-Secret>',
  region: 'us-east-1',
  signatureVersion: 'v4',
});

export default function ImageUploader() {
  const s3 = new AWS.S3();
  const [imageUrl, setImageUrl] = useState(null);
  const [file, setFile] = useState(null);

  const handleFileSelect = (e) => {
    setFile(e.target.files[0]);
  }
  const uploadToS3 = async () => {
    if (!file) {
      return;
    }
    const params = {
      Bucket: 'My-Bucket-Name',
      Key: `${Date.now()}.${file.name}`,
      Body: file
    };
    const { Location } = await s3.upload(params).promise();
    setImageUrl(Location);
    console.log('uploading to s3', Location);
  }
  return (
    <div style={{ marginTop: '150px' }}>
      <h1>Test Image Upload</h1>
      <input type="file" onChange={handleFileSelect} />
      {file && (
        <div style={{ marginTop: '10px' }}>
          <button onClick={uploadToS3}>Upload</button>
        </div>
      )}
      {imageUrl && (
        <div style={{ marginTop: '10px' }}>
          <img src={imageUrl} alt="uploaded" />
        </div>
      )}
    </div>
  );
}
Next, run your application and make sure that everything is working as expected.
And that's a wrap for this one. I hope this short tutorial gave you a brief idea of how to upload images to S3 storage from your react application. You can follow the same codebase to adapt this solution to any other JavaScript framework, vanilla javascript or Node.js.
Recommend
-
12
Resize and optimise images on upload with ActiveStorage has_many :codes Tips and walkthroughs on web technologies and digital life
-
9
-
8
-
13
PHP 7 - Upload Files & Images with Example Tutorials 12036 views 2 years ago PHP This is a step by step PHP 7 file uploading...
-
11
Upload Files and Images Using Blueimp jQuery PluginThis is another files and images upload tutorial using jQuery. I am using Blueimp jQuery Plugin to upload files into server folder using JavaScript...
-
4
How To Upload Images to the Cloud Using Node.js
-
9
How to Upload Multiple Files & Images in PHP 7 with MySql Example 10982 views 2 years ago PHP In this tutorial, we will learn...
-
13
Upload Single and Multiple Images with Preview in React with Example 40122 views 2 years ago React Today in this React imag...
-
7
How to Upload Images to Firebase from a React Native App If you're building a mobile or web application, you'll typically need some kind of hosting service to manage the application...
-
5
Blog / JavaScript / Node.js / How to Upload...
About Joyk
Aggregate valuable and interesting links.
Joyk means Joy of geeK