

How to upload multiple images with preview using Laravel and Vue
source link: https://dev.to/simodev/how-to-upload-multiple-images-with-preview-using-laravel-and-vue-282j
Go to the source link to view the article. You can view the picture content, updated content and better typesetting reading experience. If the link is broken, please click the button below to view the snapshot at that time.
How to upload multiple images with preview using Laravel and Vue
Image upload is one of the most popular features in modern web. But from all the components that can make up a form, the image upload component could be one of the most frustrating for a lot of developers since it demand a lot of effort and styling. And that's why I created Media-Upload package.
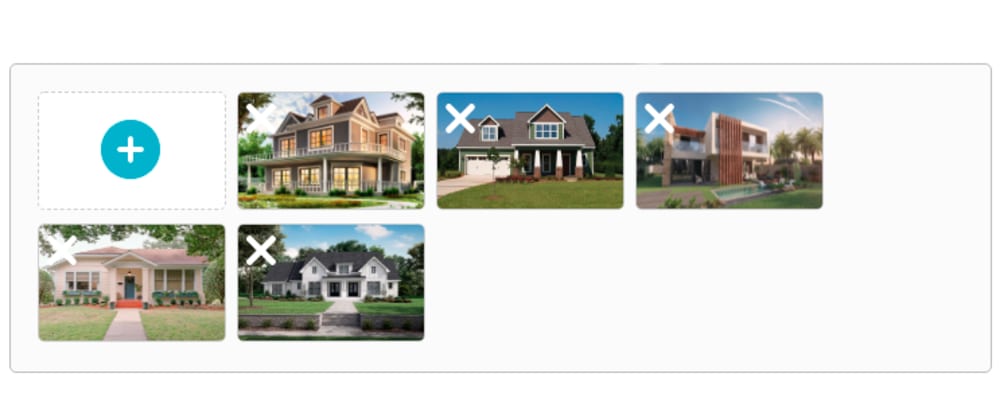
Media-Upload is an easy to setup Vue package for multiple images upload with preview that support the create and the update form, and it will handle the upload for you via ajax requests.
For this tutorial, we will create a simple form where you can also upload images using Laravel 8, Vue 3 and Bootstrap 5.
As you can see, media-upload preview the images instead of just an input file field.
Step 1: Backend Setup
First of all, let's stat with the backend by preparing the database.
we will need two tables, the posts table
Schema::create('posts', function (Blueprint $table) {
  $table->id();
  $table->string('title');
  $table->string('description');
  $table->timestamps();
});
Enter fullscreen mode
Exit fullscreen mode
and the images table
Schema::create('images', function (Blueprint $table) {
  $table->id();
  $table->foreignId('post_id')->constrained();
  $table->string('name');
  $table->timestamps();
});
Enter fullscreen mode
Exit fullscreen mode
and don't forget to setup your Models too.
Step 2: Media-Upload installation
You can install media-upload via npm:
$ npm install @s1modev/media-upload
Enter fullscreen mode
Exit fullscreen mode
or via yarn
$ yarn add @s1modev/media-upload
Enter fullscreen mode
Exit fullscreen mode
after the installation you can import it on your app.js file
require('./bootstrap');

import { createApp } from 'vue';

import { UploadMedia, UpdateMedia } from '@s1modev/media-upload';

let app=createApp({})

app.component('upload-media' , UploadMedia);
app.component('update-media' , UpdateMedia);

app.mount("#app")
Enter fullscreen mode
Exit fullscreen mode
Step 3: Create/Add form
In our create.blade.php we will create two inputs and use the <upload-media/> component
<form action="{{route('post.create')}}" method="post">
  @csrf
  <div class="form-group">
    <label for="">Title</label>
    <input type="text" name="title" class="form-control @error('title') is-invalid @enderror" value="{{old('title')}}
  </div>
  <div class="form-group mt-3">
    <label for="">Description</label>
    <textarea name="description" rows="4" class="form-control @error('title') is-invalid @enderror">{{old('description')}}</textarea>
  </div>
  <div class="mt-3">
    <label for="" class="m-0">Media</label>
      <div id="app">
        <upload-media
          server='/api/upload'
          error="@error('media'){{$message}}@enderror">
        </upload-media>
      </div>
    </div>
    <button class="btn btn-primary text-white mt-4">Submit</button>
</form>
Enter fullscreen mode
Exit fullscreen mode
Usage
Now we will need to add this line in our api.php
//upload image
Route::post('/upload', [ImageController::class, 'store'])->name('upload');
Enter fullscreen mode
Exit fullscreen mode
In the ImageController we will create a function store() that temporary stores the uploaded image in tmp\uploads.
public function store(Request $request){
  $path = public_path('tmp/uploads');

  if (!file_exists($path)) {
    mkdir($path, 0777, true);
  }

  $file = $request->file('image');

  $name = uniqid() . '_' . trim($file->getClientOriginalName());

  $file->move($path, $name);

  return ['name'=>$name];
}
Enter fullscreen mode
Exit fullscreen mode
store() function will give the uploaded image a unique name and stores it in tmp/upload, and will return the unique name to <upload-media /> component so it could continue its work.
Create Post Controller
Setting up the web.php
Route::get('/post/create', [PostController\Create::class, 'index']);
Route::post('/post/create', [PostController\Create::class, 'store'])->name('post.create');
Enter fullscreen mode
Exit fullscreen mode
And in our create controller PostController/Create.php this is how the store() function looks like
public function store(Request $request){

  $this->validate($request,[
    'title'=>'required',
    'description'=>'required',
    'media'=>'required',
  ]);

  $post = Post::create([
    'title'=>$request->title,
    'description'=>$request->description,
  ]);

  foreach($request->media as $image){
    $from = public_path('tmp/uploads/'.$image);
    $to = public_path('post_images/'.$image);

    File::move($from, $to);
    $post->images()->create([
      'name' => $image,
    ]);
  }

  $posts = Post::get();
  return redirect()->route('post.dashboard', ['posts'=>$posts]);
}
Enter fullscreen mode
Exit fullscreen mode
This code simply store the post and uses the unique images names to move the added images from the temporary location /tmp/uploads file to its final location /post_images.
Note that tmp/uploads and /post_images directories need to be created!
Step 4: Update/Edit form
In the update form update.blade.php we will need to use the second component <update-media/>
<form action="{{route('post.update', $post->id)}}" method="post">
  @csrf
    <div class="form-group">
      <label for="">Title</label>
      <input type="text" name="title" class="form-control" value="{{$post->title}}" required>
    </div>
    <div class="form-group mt-3">
      <label for="">Description</label>
      <textarea name="description" rows="4" class="form-control" required>{{$post->description}}</textarea>
    </div>
    <div class="mt-3" id="app">
      <update-media
        server='/api/upload'
        media_file_path='/post_images'
        media_server="/api/media/{{$post->id}}"
        error="@error('media'){{$message}}@enderror">
      </update-media>
    </div>
    <button class="btn btn-primary text-white mt-4">Save</button>
</form>
Enter fullscreen mode
Exit fullscreen mode
will need the saved images names to preview it, so don't forget to add this line in the api.php
//return post images
Route::post('/media/{post}', [ImageController::class, 'getImages'])->name('post.images');
Enter fullscreen mode
Exit fullscreen mode
and also we should add the getImages function in our ImageController
public function getImages(Post $post){
  $images = $post->images;
  return ['media'=>$images];
}
Enter fullscreen mode
Exit fullscreen mode
Update post controller
we will need to add this two line in our web.php
Route::get('/post/update/{post}',[PostController\Update::class, 'index']);
Route::post('/post/update/{post}',[PostController\Update::class, 'update'])->name('post.update');
Enter fullscreen mode
Exit fullscreen mode
And finally we will need an update() function in our PostController/Update.php
public function update(Post $post, Request $request){
  $this->validate($request,[
    'title'=>'required',
    'description'=>'required',
    'media'=>'required',
  ]);

  $post->update($request->all());

  if(isset($request->added_media)){
    foreach($request->added_media as $image){

      $from = public_path('tmp/uploads/'.$image);
      $to = public_path('post_images/'.$image);

      File::move($from, $to);
      $post->images()->create([
        'name' => $image,
      ]);
    }
  }

  if(isset($request->deleted_media)){
    foreach($request->deleted_media as $deleted_media){
      File::delete(public_path('post_images/'.$deleted_media));
      Image::where('name', $deleted_media)->delete();
    }
  }

  $posts = Post::get();
  return redirect()->route('post.dashboard', ['posts'=>$posts]);
}
Enter fullscreen mode
Exit fullscreen mode
this function basically add the added images and delete the deleted image.
You will find this project in this repository
Homework
In the situation when a user upload the images on the form but leave the form before the final submit, the temporary images are still stored on the server and won't get moved or deleted.
well it’s up to you how to deal with this situation, but I recommend you to schedule an artisan command using Laravel scheduling to cleanup all those images that have not been used.
Recommend
About Joyk
Aggregate valuable and interesting links.
Joyk means Joy of geeK