

How to Create a Figma-like Infinite Canvas in WebGL
source link: https://betterprogramming.pub/how-to-create-a-figma-like-infinite-canvas-in-webgl-8be94f65674f
Go to the source link to view the article. You can view the picture content, updated content and better typesetting reading experience. If the link is broken, please click the button below to view the snapshot at that time.
How to Create a Figma-like Infinite Canvas in WebGL
A primer on how to do a simple 2D camera projection to simulate an infinite canvas
Photo by Shubham Dhage on Unsplash
An infinite canvas is one of the most beautiful experiences you can give to users. One of the benefits of the internet is that we can create experiences that are impossible to attain in the real world. You can build 3D models in Blender as far and as wide as you like without any space constraints of the real world.
Infinite canvases are not a new invention, however. 3D tools have had them for a long time, and so have game engines and other creator tools. Our challenge, if we choose to accept it, is to merge the ideas that we need from these pre-existing tools and build our own simplified version of this.
Foundations
In order to do that, we need to first understand what 3D projection is. The idea behind an infinite canvas is that there is a world (where all objects are placed) and there is a camera (which is just a projection of the world). What the user sees is what the camera projects. And the user can move around the camera however they see fit. This way, the world can exist in seemingly infinite space and you could go to the negative and positive x-y axes till infinity. If you need to, you can constrain the camera to only show one region, but you could also allow unbounded exploration in your canvas if you like.
The way this is done for 3D projection is fascinating, but it might be overkill for us to implement projection matrices. Since we are modeling a 2D world in our Figma-like canvas, our math looks a lot simpler with just a few geometric concepts that we have to be kept in mind.
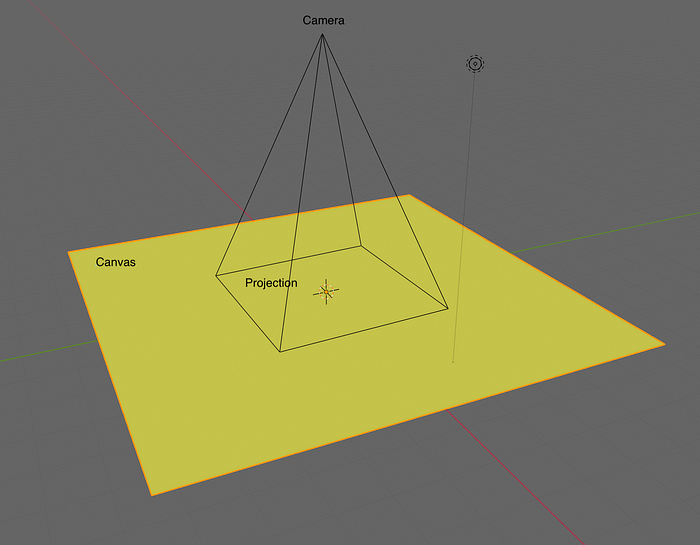
The camera’s projection of a region on the canvas
In our case, our camera is a point in the z axis and it is always pointed towards our x-y plane. We can control how much zoom is allowed by constraining the camera to only some z values. Our canvas can stretch to Infinity on the x and the y axes.
First, we need to find our initial projection. That means we need to find out where to place our camera initially. We only want to project enough of the canvas that can be painted on the browser. No point drawing more of the canvas when it will not be seen by the user. So we will be working with the aspect ratio of our browser screen.
In order to come up with our equations, let us try to paint a region of the canvas. We will start off with projecting the canvas from (0,0) to (screen width, screen height) in the x-y plane. Let’s try to figure out where to place our camera so we can see this region. The x and y coordinates of the camera are simple. We will place them in the middle of the projection, looking right down. So the x and y coordinate are (screen width / 2, screen height / 2).
In order to place the z coordinate of our camera, we need to set a constant, which will remain the same irrespective of the zoom or where the camera is positioned. That constant is the camera angle. We will keep it for 30 degrees, but we can experiment with different values of this as well.
Once we know our angle, it becomes possible for us to find the height of the camera. But before we do that, let us revise some simple geometrical concepts
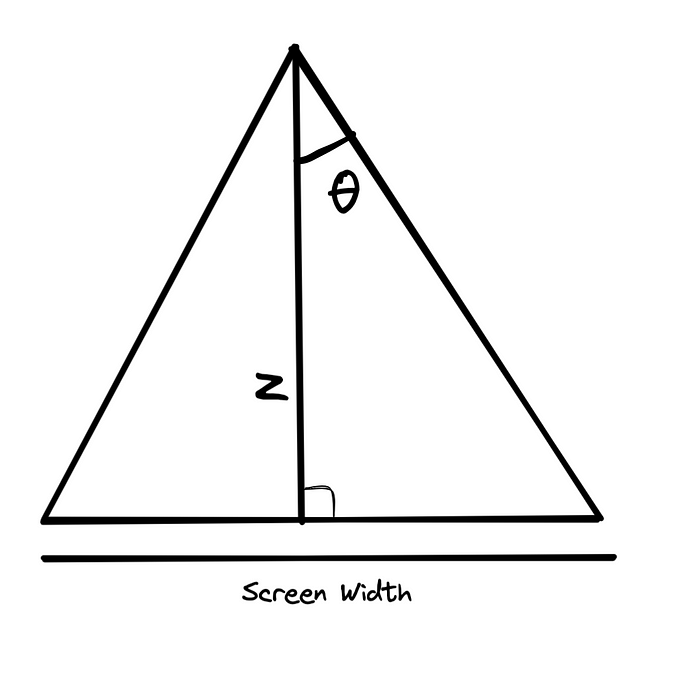
Diagram to calculate the height of the camera
tan θ is also called as law of tangent. The tangent formula for a right-angled triangle can be defined as the ratio of the opposite side of a triangle to the adjacent side.Tan(θ) = (ScreenWidth / 2) / z
z = ScreenWidth / (2 * Tan(θ))
Once we have this formula, we can place the camera. And anytime we move the camera, we can figure out the width of the projection rectangle that is visible using the formula above. Once you figure out the width, we can derive the height the aspect ratio of our browser screen. The reason we want to keep the same aspect ratio is that we don’t want to paint more than what the user can see.
Implementation
Now that we’ve learnt the main concepts behind the 2D projections for an Infinite Canvas, we can get down to the implementation stage. Before we get into the state management and logic, let us set up expectations of what we are building. We want to test out a few things-
- We should be to zoom in and out of a canvas and see more of the canvas
- We should be able to move the camera left and right and see different parts of the canvas
In order to test these things, this is the simplest Proof of Concept that we can make that will test all our conditions-
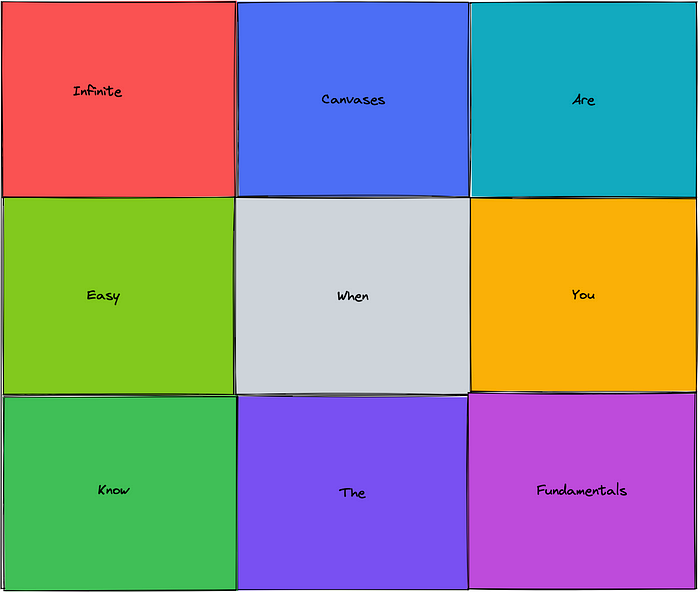
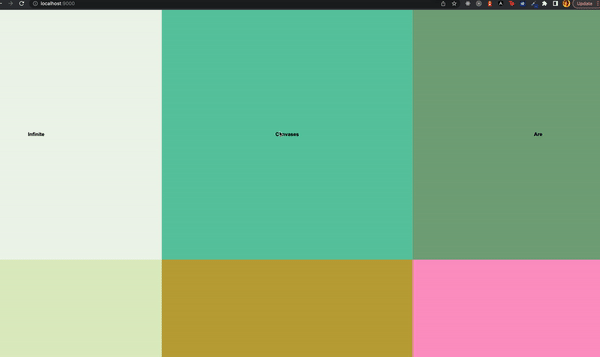
Expected output of our program. It is a grid of many colors with texts on each block
The idea is that we draw a bunch of blocks of different colors and different text in the middle of each block. We set the camera near the middle of the canvas initially, and then when we zoom and scroll, we can see our infinite canvas in action.
I will be using Pixi.js as our WebGL library to do the drawing, but the exact framework for drawing does not matter. The state management and the logic can be understood and implemented in any library and language. Once the foundations are laid, it can be used everywhere.
import { Application, Container, Graphics, Text } from "pixi.js";
// Listener that will host our zoom and strafe camera actions
const wheelListener = (e: Event) => {
  e.preventDefault();
  e.stopPropagation();
};
// Listener to keep track of our pointer. Used for accurate zoom
const pointerListener = (event: PointerEvent) => {
  CanvasStore.movePointer(event.offsetX, event.offsetY);
};
class App {
  // Draws blocks with texts in the middle of them
  private drawCanvas() {
    const container = new Container();
    const colors = [
      0xf1f7ed, 0x61c9a8, 0x7ca982, 0xe0eec6, 0xc2a83e, 0xff99c8, 0xfcf6bd,
      0x9c92a3, 0xc6b9cd,
    ];
    const texts = [
      "Infinite",
      "Canvases",
      "Are",
      "Easy",
      "When",
      "You",
      "Know",
      "The",
      "Fundamentals",
    ];
    const rectW = 500;
    const rectH = 500;
    for (let i = 0; i < 9; i++) {
      const block = new Container();
      const randomColor = colors[i];
      const bg = new Graphics();
      const leftOffset = (i % 3) * rectW;
      const topOffset = Math.floor(i / 3) * rectH;
      bg.beginFill(randomColor);
      bg.drawRect(leftOffset, topOffset, rectW, rectH);
      bg.endFill();
      block.addChild(bg);
      const textElement = new Text(texts[i], {
        fontSize: 10,
        fill: 0x000000,
        fontWeight: "700",
        wordWrap: false,
      });
      textElement.anchor.set(0.5);
      textElement.position.set(leftOffset + block.width / 2, topOffset + block.height / 2);
      block.addChild(textElement);
      container.addChild(block);
    }
    return container;
  }
  attach(root: HTMLElement) {
    const app = new Application({
      width: document.body.clientWidth,
      height: document.body.clientHeight,
      backgroundColor: 0xffffff,
      resolution: 2,
      antialias: true,
      autoDensity: true,
    });
    root.appendChild(app.view);
    const canvas = this.drawCanvas();
    app.stage.addChild(canvas);
    root.addEventListener("mousewheel", wheelListener, { passive: false });
    root.addEventListener("pointermove", pointerListener, {
      passive: true,
    });
  }
  detach(root: HTMLElement) {
    root.removeEventListener("mousewheel", wheelListener);
    root.removeEventListener("pointermove", pointerListener);
  }
}
// Loading and Unloading logic for our app
let _app: App | null;
window.onload = () => {
  _app = new App();
  _app.attach(document.body);
};
window.onbeforeunload = () => {
  if (_app) _app.detach(document.body);
};
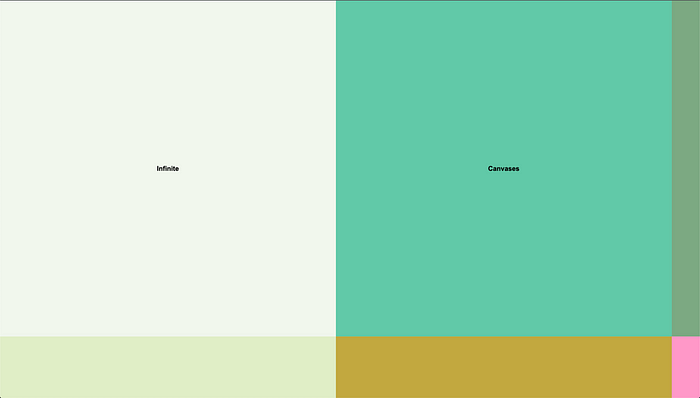
What our output looks like currently without projection and scroll/zoom
State Management
We have now drawn our canvas, but we are not able to appreciate it in all its glory. We can neither scroll nor zoom in. This is because we have not set up our camera, so let’s start with that. For now, we’ll keep a singleton called CanvasStore which holds our logic and camera state. We can move all this to better structures depending on the scale and needs of our application, but that is not required for this Proof of Concept.
interface CanvasState {
  pixelRatio: number; // our resolution for dip calculations
  container: {   //holds information related to our screen container
    width: number;
    height: number;
  };
  camera: {  //holds camera state
    x: number;
    y: number;
    z: number;
  };
}
export const getInitialCanvasState = (): CanvasState => {
  return {
    pixelRatio: window.devicePixelRatio || 1,
    container: {
      width: 0,
      height: 0,
    },
    camera: {
      x: 0,
      y: 0,
      z: 0,
    },
  };
};
const radians = (angle: number) => {
  return angle * (Math.PI / 180);
};
export const CAMERA_ANGLE = radians(30);
export const RECT_W = 500;
export const RECT_H = 500;
export default class CanvasStore {
  private static get data() {
    if (!canvasData) canvasData = {
    pixelRatio: window.devicePixelRatio || 1,
    pixelsPerFrame: 1,
    container: {
      width: 0,
      height: 0,
    },
    pointer: {
      x: 0,
      y: 0,
    },
    canvas: {
      width: 0,
      height: 0,
    },
    camera: {
      x: 0,
      y: 0,
      z: 0,
    },
  };
    return canvasData;
  }
static initialize(width: number, height: number) {
    const containerWidth = width;
    const containerHeight = height;
    canvasData = getInitialCanvasState();
    canvasData.pixelRatio = window.devicePixelRatio || 1;
    canvasData.container.width = containerWidth;
    canvasData.container.height = containerHeight;
    canvasData.camera.x = 1.5 * RECT_W;
    canvasData.camera.y = 1.5 * RECT_H;
    canvasData.camera.z = containerWidth / (2 * Math.tan(CAMERA_ANGLE));
  }
public static get screen() {
    const { x, y, z } = this.camera;
    const aspect = this.aspect;
    const angle = radians(30);
    return cameraToScreenCoordinates(x, y, z, angle, aspect);
  }
public static get camera() {
    return this.data.camera;
  }
public static get scale() {
    const { width: w, height: h } = CanvasStore.screen;
    const { width: cw, height: ch } = CanvasStore.container;
    return { x: cw / w, y: ch / h };
  }
One of the important concept in the code block above is the initialize method, which sets the up the following values-
- Store our
pixelRatiofor a density independent pixel calculations if needed - Stores the height and width of our canvas element on the browser (currently our whole document body, but can be of any size)
- Calculates and sets our initial camera position. It is in the middle of our 9 blocks. Each block has a dimension of
RECT_WxRECT_H. And we have laid out the formula for the height of the camera at the start of this post
The other important concept is this function cameraToScreenCoordinates, which we have not covered yet. The way this function works is that it takes the camera coordinates, the camera angle, the container aspect ratio, and returns to us the part of the Infinite Canvas that is visible to the user. So we can just display the rectangle specified by the return value of this function and the user will see what the camera sees.
export const cameraToScreenCoordinates = (
  x: number,
  y: number,
  z: number,
  cameraAngle: number,
  screenAspect: number
) => {
  const width = 2 * z * Math.tan(CAMERA_ANGLE);
  const height = width / screenAspect;
  const screenX = x - width / 2;
  const screenY = y - height / 2;
return { x: screenX, y: screenY, width, height };
};
Integrating the Camera Projection
Now that we’ve setup our logic and state, we need to wire it to our display code so that we see and draw only the camera projection that is to be shown to the user. The way we do this is that we have to rewrite our attachfunction that we had used above. It now looks like this:
attach(root: HTMLElement) {
    CanvasStore.initialize(
      document.body.clientWidth,
      document.body.clientHeight
    );
    const app = new Application({
      width: document.body.clientWidth,
      height: document.body.clientHeight,
      backgroundColor: 0xffffff,
      resolution: 2,
      antialias: true,
      autoDensity: true,
    });
    root.appendChild(app.view);
    const canvas = this.drawCanvas();
    app.stage.addChild(canvas);
    app.ticker.add(() => {
      const { x, y } = CanvasStore.screen;
      const scale = CanvasStore.scale;
      canvas.position.set(-scale.x * x, -scale.y * y);
      canvas.scale.set(scale.x, scale.y);
    });
    root.addEventListener("mousewheel", wheelListener, { passive: false });
    root.addEventListener("pointermove", pointerListener, {
      passive: true,
    });
  }
We have initialized our store at the start of the application, and every frame, we are repositioning our application to move the region mentioned by CanvasStore.screento (0,0) and (screen width, screen height).
So now, based on the scale and position, only the camera projection is visible to the user. We can also add a Mask to this to only draw the portion based on the screen size, but that is left as an exercise to the user.
Implementing Scroll and Zoom with Anchor Point
Now that we’ve set up our display and our state, we can dive into the most important and fun portion of this tutorial — making things move. The whole benefit of the Infinite Canvas is getting to mess around and move around everywhere. Let’s have a look at the scroll function that we will put in our CanvasStore:
public static moveCamera(mx: number, my: number) {
    const scrollFactor = 1.5;
    const deltaX = mx * scrollFactor;
    const deltaY = my * scrollFactor;
    const { x, y, z } = this.camera;
    this.data.camera.x += deltaX;
    this.data.camera.y += deltaY;
    // move pointer by the same amount
    this.movePointer(deltaY, deltaY);
  }
public static movePointer(deltaX: number, deltaY: number) {
    const scale = this.scale;
    const { x: left, y: top } = this.screen;
    this.data.pointer.x = left + deltaX / scale.x;
    this.data.pointer.y = top + deltaY / scale.y;
  }
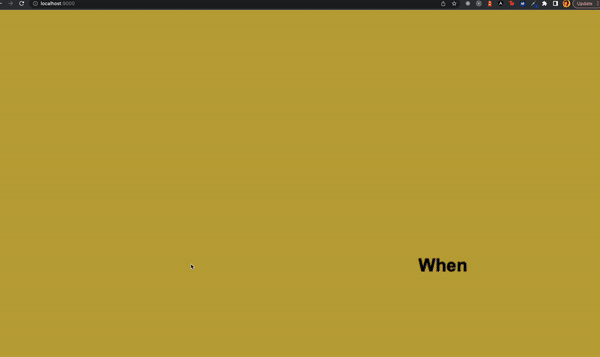
The logic in this is quite straightforward, we are moving the camera and the pointer based on the amount that was scrolled. We also have a scrollFactor so we can speed up or slow down the scroll behaviour. Why are we maintaining the pointer position? Well we will understand that when we get to implementing the next part — Scroll with Anchor Point. The best way to describe this behaviour is to show it
Targeted zoom towards the pointer position (at the text element)
In the zoom above, you can see that we detect the user’s pointer position and make sure to zoom into the place that their pointer rests on. The way we do this is we change the scale but also scroll the canvas a little bit so that the pointer still points to the same pixel it did before. Now that we’ve understood how that behaviour works, we can dive into the logic:
const scaleWithAnchorPoint = (
  anchorPointX: number,
  anchorPointY: number,
  cameraX1: number,
  cameraY1: number,
  scaleX1: number,
  scaleY1: number,
  scaleX2: number,
  scaleY2: number
) => {
  const cameraX2 =
    (anchorPointX * (scaleX2 - scaleX1) + scaleX1 * cameraX1) / scaleX2;
  const cameraY2 =
    (anchorPointY * (scaleY2 - scaleY1) + scaleY1 * cameraY1) / scaleY2;
return { x: cameraX2, y: cameraY2 };
};
public static zoomCamera(deltaX: number, deltaY: number) {
    // Normal zoom is quite slow, we want to scale the amount quite a bit
    const zoomScaleFactor = 10;
    const deltaAmount = zoomScaleFactor * Math.max(deltaY);
    const { x: oldX, y: oldY, z: oldZ } = this.camera;
    const oldScale = { ...this.scale };
const { width: containerWidth, height: containerHeight } = this.container;
    const { width, height } = cameraToScreenCoordinates(
      oldX,
      oldY,
      oldZ + deltaAmount,
      this.cameraAngle,
      this.aspect
    );
    const newScaleX = containerWidth / width;
    const newScaleY = containerHeight / height;
    const { x: newX, y: newY } = scaleWithAnchorPoint(
      this.pointer.x,
      this.pointer.y,
      oldX,
      oldY,
      oldScale.x,
      oldScale.y,
      newScaleX,
      newScaleY
    );
    const newZ = oldZ + deltaAmount;
    this.data.camera = {
      x: newX,
      y: newY,
      z: newZ,
    };
  }
We can now integrate this into our scroll wheel handler that we defined above:
const wheelListener = (e: Event) => {
  e.preventDefault();
  e.stopPropagation();
  const friction = 1;
  const event = e as WheelEvent;
  const deltaX = event.deltaX * friction;
  const deltaY = event.deltaY * friction;
  if (!event.ctrlKey) {
    CanvasStore.moveCamera(deltaX, deltaY);
  } else {
    CanvasStore.zoomCamera(deltaX, deltaY);
  }
};
With that done, we can finally look at the output of our infinite canvas. We start with the camera in the middle of the 5th block, we scroll, zoom out and zoom in a few times onto the text to show how it works together.
Conclusion
This was a primer on how to do a simple 2D camera projection to simulate an infinite canvas. The only thing remaining is placing things in the infinite canvas and this camera system should theoretically be able to hold and show any amount of content depending on the use case. I have always been fascinated by creator tools that have Canvas interfaces, and I am very curious to see what others come up.
If you liked this tutorial and want to see more of this, do like, share and comment, and maybe I’ll do some more complicated in-depth projects. Go forth, and build things.
Recommend
About Joyk
Aggregate valuable and interesting links.
Joyk means Joy of geeK