

在 Vue 中,使用 $attrs 构建高级组件
source link: https://www.fly63.com/article/detial/12175
Go to the source link to view the article. You can view the picture content, updated content and better typesetting reading experience. If the link is broken, please click the button below to view the snapshot at that time.
这节课,我们来看下 vue3 中的 $attrs 属性。首先,我们会介绍它的用途以及它的实现与 Vue2 有哪些不两同点,并通过事例来加深对它的理解。
真正理解了 $attrs 属性有助于我们构建易于使用和可扩展的高级组件
什么是 $attrs
对 $attrs 定义, Vue2 与 Vue3 是不一样的,这里我们主要来介绍 Vue3 的版本:
$attrs 对象包含了除组件所声明的 props 和 emits 之外的所有其他 attribute,例如 class,style,v-on 监听器等等。
$attrs 也可以被看作是一个安全网,它可以捕获任何我们没有在组件中声明的东西。我们考虑一个只有一个属性和事件处理程序的组件,如下所示:
<template>
  <h1 @click="$emit('custom', '改变标题')">{{ title }}</h1>
</template>
<script>
export default {
  name: 'Example',
  props: ['title'],
  emits: ['custom'],
}
</script>
如果在父组件中像下面这样实例化上面的组件:
<template>
  <div id="app">
    <SimpleEvent
      id="myId"
      class="myClass"
      >"cypress-testing"
      @blur="onBlur"
      title="测试$attrs"
      description="没有声明 props"
      @custom="onCustom"
    />
  </div>
</template>

<script setup>
import SimpleEvent from './components/Button.vue'

const onBlur = () => {
  // todo
}
const onCustom = () => {
  // todo
}

</script>
如果在组件中把 $attrs 打印出来,我们会得到如下内容:
{
  id: 'myId',
  class: 'myClass',
  '>'cypress-testing',
  description: '没有声明 props',
  onBlur: () => { // todo }
}
上面这些信息,感觉没啥用,其实不然,我们下面会介绍如何利用这些信息。
attrs V3 vs $attrs V2
这小节,我们来看下 Vue2 与 Vue3 中的 attrs 属性的区别,先来看张图:
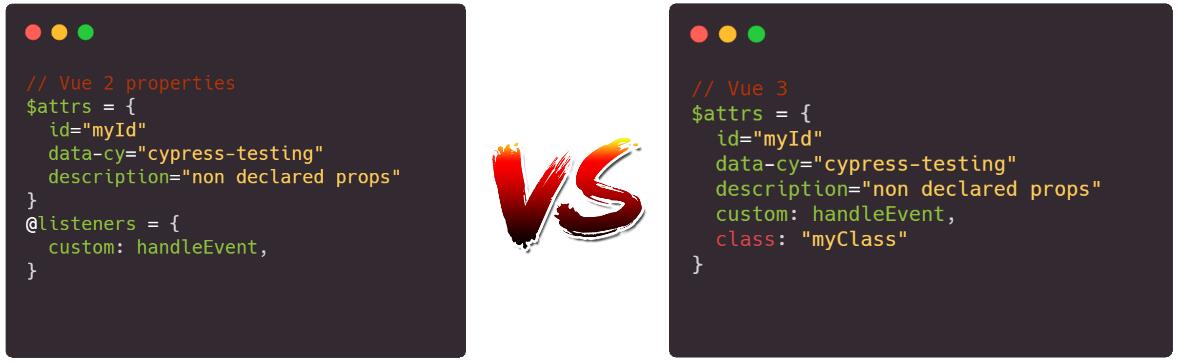
与 Vue2 的区别主要有:
- 自定义事件放在 @listerner 对象中
- 不包含 class 属性
而 Vue3 中的 attrs 对象包含了除组件所声明的 props 和 emits 之外的所有其他 attribute,这有利于我们方便使用这些属性。
下面我们来看些事例。
事例地址:https://stackblitz.com/edit/vue-slider-listener-example?file=src%2FApp.vue
首先我们创建一个 Slider 组件,内容如下所示:
<template>
  <input
    type="range"
    :value="modelValue"
    @input="$emit('update:modelValue', $event.target.value)"
    class="slider__input" />
</template>

<script>
export default {
  name: "Slider-1",
  props: {
    modelValue: [Number, String],
  }
};
</script>
<style lang="scss">
// 这里省略一堆样式,自行看事例
</style>上面代码我们创建一个 slider,还实现了一个双向绑定。然后可以像下面这样使用该组件:
<Slider-1 v-model="value" />添加一些属性
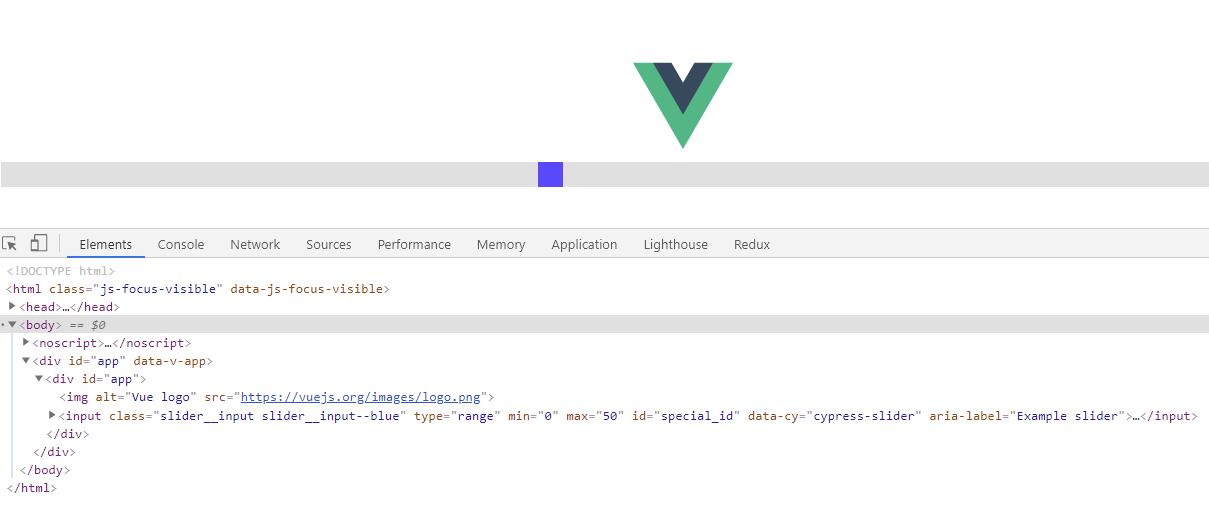
目前我们的 Slier 组件还很简单,不太符合实际情况。所以,我们添加几个属性(min, max, class, id, >@keydown 和 aria-label)。
  <Slider-1
      v-model="value"
      min="0"
      max="50"
      class="blue_slider"
      id="special_id"
      >"cypress-slider"
      @keydown="() => true"
      aria-label="Example slider"
    />
运行后,通过控制检查元素,我们可以看下,我们新加的属性都被添加到了 html 元素上了:
看到这里,大家可能有疑问了,既然所有的 "非属性/事件" 属性都已经自动应用于内部的HTML元素,为什么还要对 $attrs 做这么大的介绍?
添加标题和值
新增需求:作为一个滑块的使用者,用户希望能够看到一个标题,以及它在屏幕上显示的数字形式的值。
我们在调整一下 Slider 组件,内容如下:
// Slider-2.vue

<template>
  <div class="slider">
    <h1>{{ title }}</h1>
    <input
      type="range"
      :value="modelValue"
      @input="$emit('update:modelValue', $event.target.value)"
      class="slider__input" />
      <div>Value: {{ value }}</div>
  </div>
</template>

<script>
export default {
  name: "Slider-2",
  props: {
    modelValue: [Number, String]
    title: [String],
    value: [Number, String],
  }
};
</script>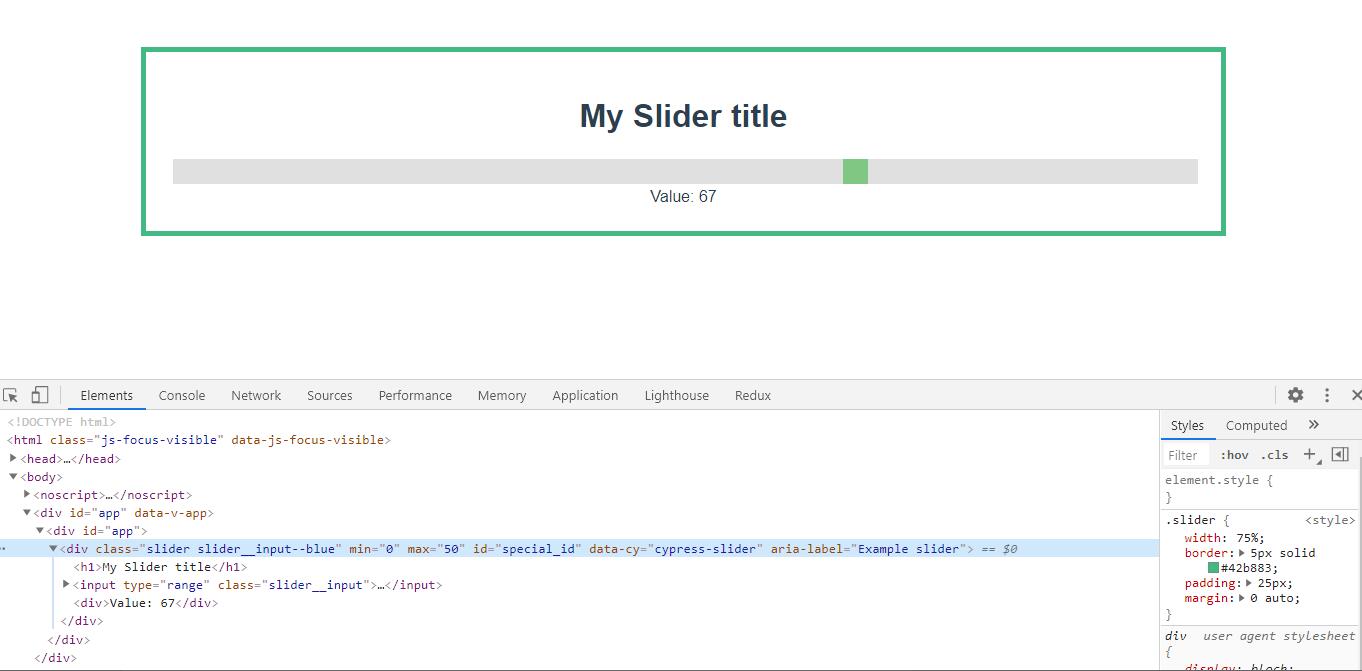
乍一看,好像没啥问题,但如果我们仔细观察,可以看到有些东西是不对的。
首先,Slider 不是蓝色的。第二,value 远远超过了50,最后,检查一下HTML,会看到我们所有的额外属性(min, max,>input 元素。
解决上述问题的最好方法是找到一种方法,将所有的属性、类、参数和事件直接 "应用" 到 input 字段上,而不需我们手动的一个个声明。这就是 $attrs 出场的地方。
$attrs 救场
在本文的开头,我们介绍了 $attrs。它是一个存放所有 "未声明"的属性和事件的地方,而这正是我们需要解决的问题。
要使用这个功能,我们只需将 $attrs 属性应用于一个或多个HTML元素,使用 v-bind 操作符。
<template>
  <div class="slider">
    <h1>{{ title }}</h1>
    <input
      type="range"
      v-bind="$attrs"
      :value="modelValue"
      @input="$emit('update:modelValue', $event.target.value)"
      class="slider__input" />
      <div>Value: {{ modelValue }}</div>
  </div>
</template>
在组件中,我们使用 attrs 充当桥梁,将所有的属性(类、属性、属性和自定义事件)复制到一个或多个元素上。 Slider 组件又回到了正常模式上了。
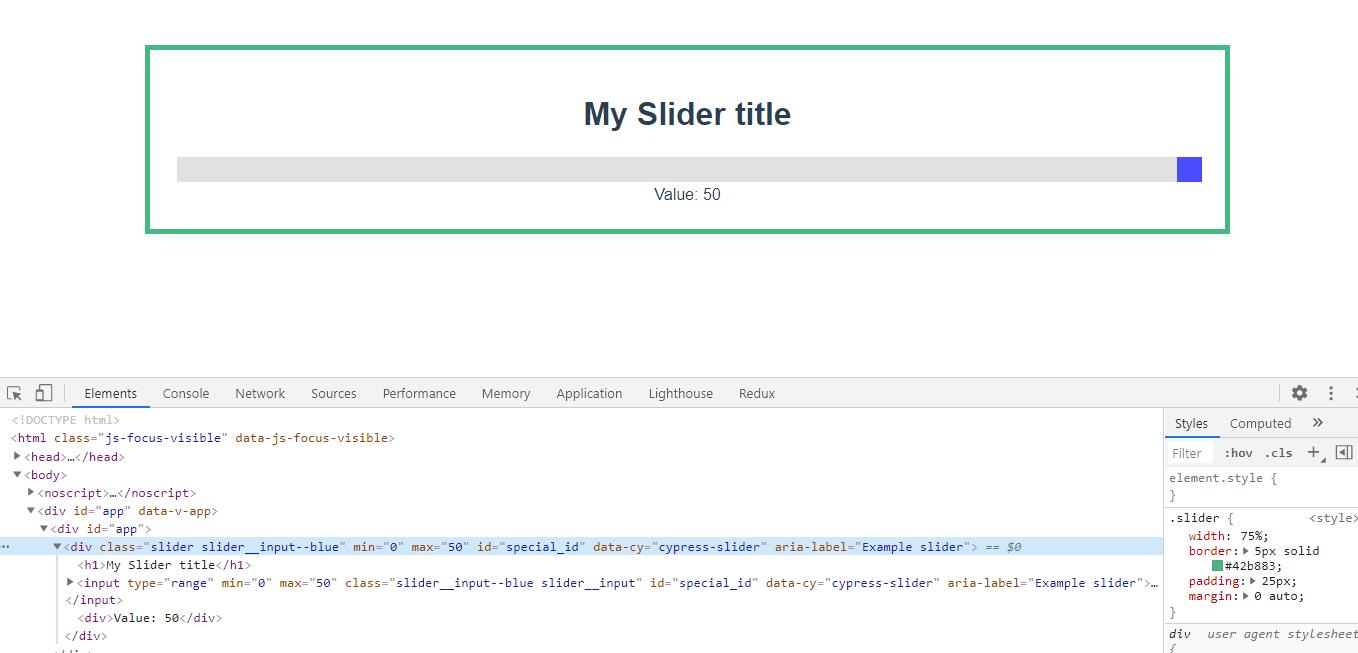
还有一个问题--我们添加的属性不仅被分配给了 input 元素上,也分配给了 root元素。
通常情况下,这可能对界面没啥影响,但有的属性确实会生产一些副作用,下面,我们来解决这个问题。
inheritAttrs: false
默认情况下,任何被传递给组件的额外参数都会自动应用于根元素(以及所有有 $attrs 绑定的元素)。
为了关闭这个功能,并控制哪些元素可接受这个额外的属性,我们可以使用一个名为 inheritAttrs 的标志,并将其设置为false。
经过这样的改变,我们的HTML就变得漂亮且干净了。所有的额外属性都只作用于 input 元素。
Recommend
About Joyk
Aggregate valuable and interesting links.
Joyk means Joy of geeK