

Implementing Real User Monitoring of Amplify Application using Amazon CloudWatch...
source link: https://aws.amazon.com/blogs/mobile/implementing-real-user-monitoring-of-amplify-application-using-amazon-cloudwatch-rum/
Go to the source link to view the article. You can view the picture content, updated content and better typesetting reading experience. If the link is broken, please click the button below to view the snapshot at that time.
Implementing Real User Monitoring of Amplify Application using Amazon CloudWatch RUM
by Ozioma Uzoegwu and Andrea Amorosi | on 02 AUG 2022 | in Amazon CloudWatch, AWS Amplify, Best Practices, Customer Solutions, Management & Governance, Technical How-to | Permalink | Share
When you launch a web application to users globally, you want to be able to monitor the experience of your end users as they interact with the application. The end users can access the application from different browsers, geographic locations, connectivity, and so forth, which can lead to varied user experiences.
During re:Invent 2021, AWS announced Amazon CloudWatch Real-User Monitoring (CloudWatch RUM) for web applications. The CloudWatch RUM service lets you collect, view, and analyze client-side data regarding your web application performance from actual user sessions in near real-time. Application Developers and DevOps engineers can use this data to quickly identify and debug client-side issues to optimize end-user experience. To get started, you simply generate a JavaScript snippet for your application by creating a CloudWatch RUM app monitor. This snippet is added to the header section in the HTML of your application. As users interact with your application, the CloudWatch RUM web client will collect and send data regarding the session to CloudWatch RUM for visualization and analysis.
In this post, we’ll explain how you can integrate CloudWatch RUM with the frontend of your application hosted on AWS Amplify, a set of tools and features to build full-stack applications on AWS. We’ll also cover how you can add CloudWatch RUM as a custom resource to your Amplify application and generate the parameters for the CloudWatch RUM JavaScript snippet using Amplify command hooks.
Overview
The diagram in Figure 1.0 illustrates the integration of Amazon CloudWatch RUM with the Amplify application. Amazon CloudWatch RUM can be created as a custom resource within the Amplify application using the Amplify CLI and AWS Cloud Development Kit (AWS CDK). To enable the CloudWatch RUM web client to send data to CloudWatch RUM, your application must have authorization, which can be set up using Amazon Cognito. As users interact with your application, navigation events, JavaScript and HTTP errors, and client-side performance metrics will be sent to Amazon CloudWatch RUM where the data can be viewed and analyzed.

Figure 1. Integrating Amazon CloudWatch RUM with Amplify hosted application
Implementation walkthrough
In this section, we’ll walk through the steps for integrating Amazon CloudWatch RUM to your Amplify application. We’ll be creating a sample React application and inserting the CloudWatch RUM script into the application to capture the user experience.
Prerequisites
- An AWS Account that you can use as the target to deploy the Amplify Application
- Amplify CLI, which can be setup following the instructions here
- A terminal and IDE from your local computer or any cloud-based environment, such as Cloud9
- (Optional) If using Cloud9, then consider resizing the Amazon Elastic Block Store (Amazon EBS) Volume to allow enough space for the project
Step 1 – Create sample react app and setup Amplify
Run the following commands from an empty folder to create a new react app and initialize a new Amplify project with the default settings.
> npx create-react-app amplify-cloudwatch-rum
> cd amplify-cloudwatch-rum
> amplify init
Now host the sample application in Amplify using the following commands. In this example, we’ll be using manual deployment. However, you also have an option for a Git based deployment.
> amplify add hosting
✔ Select the plugin module to execute · Hosting with Amplify Console (Managed hosting with custom domains, Continuous deployment)

? Choose a type Manual deployment

> amplify publish
Once the application is published, Amplify will generate a URL for the hosted application, which will be returned on the CLI with the format https://dev.xxxxxxxxxxxxxx.amplifyapp.com.
Step 2 – Update Amplify IAM roles
To give the application the required permissions to send data to CloudWatch RUM, we’ll run the following commands to override Amplify generated AWS Identity and Access Management (IAM) roles for authenticated and unauthenticated access to the Amplify backend.
> amplify override project
Successfully generated "override.ts" folder at /home/ec2-user/environment/amplify-cloudwatch-rum/amplify/backend/awscloudformation
✔ Do you want to edit override.ts file now? (Y/n) · no
Open the file amplify/backend/awscloudformation/override.ts that was generated with your favorite text editor and update it so that it looks like the following snippet. Here we’re giving the authenticated and unauthenticated roles the proper permissions to send user events to CloudWatch RUM.
Note that you must make sure to update the ARN to include the AWS Region and Account ID of your Amplify project, as well as the correct project’s name and environment.
import { AmplifyRootStackTemplate } from '@aws-amplify/cli-extensibility-helper';

export function override(resources: AmplifyRootStackTemplate) {
    // Give permissions to perform the rum:PutEvents action to the authenticated role
    // & change the name so we can reference it later
    const authRole = resources.authRole;
    authRole.roleName = 'amplify-amplifycloudwatchrum-authRole';
    const authRoleBasePolicies = Array.isArray(authRole.policies)
        ? authRole.policies
        : [authRole.policies];

    authRole.policies = [
        ...authRoleBasePolicies,
        {
            policyName: "cloudwatch-rum-put-events",
            policyDocument: {
                Version: "2012-10-17",
                Statement: [
                    {
                        Effect: "Allow",
                        // Replace AWS Region and Account ID (https://docs.aws.amazon.com/IAM/latest/UserGuide/console_account-alias.html)
                        // of your Amplify project, as well as the correct project’s name and environment.
                        Resource: "arn:aws:rum:[aws-region]:[aws-account-id]:appmonitor/app-monitor-[amplify-project-name]-[amplify-env]",
                        Action: ["rum:PutRumEvents"]
                    }
                ]
            }
        }
    ];

    // Give permissions to perform the rum:PutEvents action to the unauthenticated role
    // & change the name so we can reference it later
    const unauthRole = resources.unauthRole;
    unauthRole.roleName = 'amplify-amplifycloudwatchrum-unauthRole';
    const unauthRoleBasePolicies = Array.isArray(unauthRole.policies)
        ? unauthRole.policies
        : [unauthRole.policies];

    unauthRole.policies = [
        ...unauthRoleBasePolicies,
        {
            policyName: "cloudwatch-rum-put-events",
            policyDocument: {
                Version: "2012-10-17",
                Statement: [
                    {
                        Effect: "Allow",
                        // Replace AWS Region and Account ID (https://docs.aws.amazon.com/IAM/latest/UserGuide/console_account-alias.html)
                        // of your Amplify project, as well as the correct project’s name and environment.
                        Resource: "arn:aws:rum:[aws-region]:[aws-account-id]:appmonitor/app-monitor-[amplify-project-name]-[amplify-env]",
                        Action: ["rum:PutRumEvents"]
                    }
                ]
            }
        }
    ];
}
Then, deploy the updated IAM Roles by running amplify push -y in your terminal.
Step 3 – Setup CloudWatch RUM authorization
To enable the CloudWatch RUM web client to send data to CloudWatch RUM, we’ll create an Amazon Cognito identity pool which will be used for authorization. For details on other supported authorization sources, refer to the documentation here.
Run the following command and configure Amazon Cognito. CloudWatch RUM requires that the Amazon Cognito identity pool enables access to unauthenticated identities. To do this, we’ll be using the “Manual configuration” option.
> amplify add auth
Using service: Cognito, provided by: awscloudformation

 The current configured provider is Amazon Cognito.

Do you want to use the default authentication and security configuration? Manual configuration
Select the authentication/authorization services that you want to use: User Sign-Up, Sign-In, connected with AWS IAM controls (Enables per-user Storage features for images or other content, Analytics, and
Provide a friendly name for your resource that will be used to label this category in the project: amplifycloudwatchrumauth
Enter a name for your identity pool. testcustomd8162cfd_identitypool_d8162cfd
Allow unauthenticated logins? (Provides scoped down permissions that you can control via AWS IAM) Yes
Do you want to enable 3rd party authentication providers in your identity pool? No
Provide a name for your user pool: testcustomd8162cfd_userpool_d8162cfd
Warning: you will not be able to edit these selections.
How do you want users to be able to sign in? Email
Do you want to add User Pool Groups? No
Do you want to add an admin queries API? No
Multifactor authentication (MFA) user login options: OFF
Email based user registration/forgot password: Enabled (Requires per-user email entry at registration)
Specify an email verification subject: Your verification code
Specify an email verification message: Your verification code is {####}
Do you want to override the default password policy for this User Pool? No
Warning: you will not be able to edit these selections.
What attributes are required for signing up? Email
Specify the app's refresh token expiration period (in days): 30
Do you want to specify the user attributes this app can read and write? No
Do you want to enable any of the following capabilities? <Do not select any option>
Do you want to use an OAuth flow? No
Do you want to configure Lambda Triggers for Cognito? No

✅ Successfully added auth resource amplifycloudwatchrumauth locally

✅ Some next steps:
"amplify push" will build all your local backend resources and provision it in the cloud
"amplify publish" will build all your local backend and frontend resources (if you have hosting category added) and provision it in the cloud
Note the resource name amplifycloudwatchrumauth, as you’ll need it later. Then, push the changes to AWS with amplify push -y.
Step 4 – Create an AWS Lambda function
In the next step, we’ll be creating the CloudWatch RUM resource via AWS CDK. However, given that the CloudWatch RUM appMonitor identifier isn’t referenceable as a stack output, we’ll be using an AWS Lambda-backed CloudFormation custom resource to retrieve the appMonitor details.
Run the following command to create a new NodeJS Lambda function cfncustomfn with the Amplify CLI. Note the name that you’ll be referring to it in the next step.
> amplify add function
? Select which capability you want to add: Lambda function (serverless function)
? Provide an AWS Lambda function name: cfncustomfn
? Choose the runtime that you want to use: NodeJS
? Choose the function template that you want to use: Hello World
Available advanced settings:
- Resource access permissions
- Scheduled recurring invocation
- Lambda layers configuration
- Environment variables configuration
- Secret values configuration? Do you want to configure advanced settings? No
? Do you want to edit the local lambda function now? No
Successfully added resource cfncustomfn locally.Now that we’ve created a new Lambda function, let’s add a logger that lets us create structured logs. Having JSON structured log entries not only helps in searching, but also produces consistent logs containing enough context and data to ask arbitrary questions regarding the status of your system. We can take advantage of the logger from AWS Lambda Powertools for TypeScript.
Navigate in the newly created directory amplify/backend/function/cfncustomfn/src and run the following command to install it:
npm i @aws-lambda-powertools/logger
Next, create a module for the new function in a new file amplify/backend/function/cfncustomfn/src/cfn-response.js so that the module can send responses with the correct format to AWS CloudFormation. For details on this module and the format of the events and responses, refer to the CloudFormation documentation here.
Open the amplify/backend/function/cfncustomfn/src/cfn-response.js file that you’ve created with your favorite text editor, and update it with the cfn-response module.
var https = require("https");
var url = require("url");

exports.SUCCESS = "SUCCESS";
exports.FAILED = "FAILED";

exports.send = async (event, context, responseStatus, responseData, physicalResourceId, noEcho) => {

  var responseBody = JSON.stringify({
    Status: responseStatus,
    Reason: "See the details in CloudWatch Log Stream: " + context.logStreamName,
    PhysicalResourceId: physicalResourceId || context.logStreamName,
    StackId: event.StackId,
    RequestId: event.RequestId,
    LogicalResourceId: event.LogicalResourceId,
    NoEcho: noEcho || false,
    Data: responseData
  });

  var parsedUrl = new url.URL(event.ResponseURL);
  var options = {
    hostname: parsedUrl.hostname,
    port: 443,
    path: `${parsedUrl.pathname}${parsedUrl.search}`,
    method: "PUT",
    headers: {
      "content-type": "",
      "content-length": responseBody.length
    }
  };

  return new Promise((resolve, reject) => {
    var request = https.request(options, function (response) {
      resolve(response);
    });

    request.on("error", function (error) {
      reject(error);
    });

    request.write(responseBody);
    request.end();
  });
}
Next, open the amplify/backend/function/cfncustomfn/src/index.js file to create the handler of the Lambda function. As mentioned above, this function uses the RUM client from the aws-sdk to retrieve the information from the CloudWatch RUM appMonitor, and return them to CloudFormation.
const { Logger } = require('@aws-lambda-powertools/logger');
const response = require('./cfn-response');
const { RUM } = require('aws-sdk');

const MAX_RETRIES = 5;

const logger = new Logger({
    serviceName: 'appMonitorIdRetrieveService',
    logLevel: 'DEBUG'
});
const client = new RUM();

/**
 * @type {import('@types/aws-lambda').CloudFormationCustomResourceHandler}
 */
exports.handler = async (event, context) => {
    logger.debug('Event:', { event: event });

    if (event.RequestType === 'Delete') {
        logger.info('Delete');
        await response.send(event, context, response.SUCCESS, {}, 'CustomFunction');
    } else if (event.RequestType === 'Create' || event.RequestType === 'Update') {
        logger.info('Create/Update');

        if (!event.ResourceProperties.hasOwnProperty('projectName') ||
            !event.ResourceProperties.hasOwnProperty('envName')) {
            logger.error('Event not supported, no projectName or envName', { details: event });
            await response.send(event, context, response.FAILED, {}, 'CustomFunction');
        }

        let retryIdx = 1;
        let appMonitorId;
        while (!appMonitorId) {
            if (retryIdx === MAX_RETRIES) {
                logger.error('Reached max retry limit, appMonitor not found.');
                await response.send(event, context, response.FAILED, {}, 'CustomFunction');
            }

            try {
                const { projectName, envName } = event.ResourceProperties;
                const res = await client.getAppMonitor({
                    Name: `app-monitor-${projectName}-${envName}`
                }).promise();
                appMonitorId = res.AppMonitor.Id;
            } catch (err) {
                logger.error(err);
                const waitMs = 1000 * retryIdx;
                logger.info(`Trying again in ${waitMs}ms`);
                retryIdx++;
                // Basic back-off mechanism
                await new Promise(resolve => setTimeout(resolve, waitMs));
            }
        }

        try {
            const responseData = { AppMonitorId: appMonitorId };
            logger.debug('Response data', { details: responseData });
            await response.send(event, context, response.SUCCESS, responseData, 'CustomFunction');
        } catch (err) {
            logger.error(err);
            await response.send(event, context, response.FAILED, {}, 'CustomFunction');
        }
    } else {
        logger.error('Event not supported', { details: event });
        await response.send(event, context, response.FAILED, {}, 'CustomFunction');
    }
};
Finally, open the amplify/backend/function/cfncustomfn/custom-policies.json to set the IAM policy that allows the function to read the CloudWatch RUM appMonitor data.
Note that you must make sure to update the ARN to include the AWS Region and Account ID of your Amplify project, as well as the correct project’s name and environment.
[
  {
    "Action": [
      "rum:GetAppMonitor"
    ],
    "Resource": [
      "arn:aws:rum:[aws-region]:[aws-account-id]:appmonitor/app-monitor-[amplify-project-name]-${env}"
    ]
  }
]
Now, deploy the Lambda function by running amplify push -y in your terminal from the project root.
Step 5 – Create CloudWatch RUM resource
In this step, we’ll create the CloudWatch RUM resource as a custom resource within the Amplify application using the following commands. Specify CDK as the infrastructure as code tools to define the custom resource, and provide a friendly name for the resource, such as cloudwatchrum
> amplify add custom
✔ How do you want to define this custom resource? · AWS CDK
✔ Provide a name for your custom resource · cloudwatchrum
✅ Created skeleton CDK stack in amplify/backend/custom/cloudwatchrum directory
✔ Do you want to edit override.ts file now? (Y/n) · no
To provide the libraries required to create the CloudWatch RUM resource, update the amplify/backend/custom/cloudwatchrum/package.json file to add new dependencies as shown in the following:
{
  "name": "custom-resource",
  "version": "1.0.0",
  "description": "",
  "scripts": {
    "build": "tsc",
    "watch": "tsc -w",
    "test": "echo \"Error: no test specified\" && exit 1"
  },
  "dependencies": {
    "@aws-amplify/cli-extensibility-helper": "^2.0.0",
    "@aws-cdk/core": "~1.159.0",
    "@aws-cdk/aws-iam": "~1.159.0",
    "@aws-cdk/aws-rum": "~1.159.0"
  },
  "devDependencies": {
    "typescript": "^4.2.4"
  }
}
Navigate to the directory amplify-cloudwatch-rum/amplify/backend/custom/cloudwatchrum to install the dependency using the following command:
npm iOpen the amplify/backend/custom/cloudwatchrum/cdk-stack.ts file and add the following snippet to create the CloudWatch RUM resource. You must provide the following values:
- auth resource name (e.g
amplifycloudwatchrumauth) created from Step 2 - Lambda function name (e.g
cfncustomfn) created from Step 4 - domain of the Amplify app (e.g., dev.xxxxxxxxxxxxxx.amplifyapp.com) from Step 1
import * as cdk from '@aws-cdk/core';
import * as AmplifyHelpers from '@aws-amplify/cli-extensibility-helper';
import { AmplifyDependentResourcesAttributes } from '../../types/amplify-dependent-resources-ref';
import * as rum from '@aws-cdk/aws-rum';

export class cdkStack extends cdk.Stack {
  constructor(scope: cdk.Construct, id: string, props?: cdk.StackProps, amplifyResourceProps?: AmplifyHelpers.AmplifyResourceProps) {
    super(scope, id, props);
    /* Do not remove - Amplify CLI automatically injects the current deployment environment in this input parameter */
    new cdk.CfnParameter(this, 'env', {
      type: 'String',
      description: 'Current Amplify CLI env name',
    });
    /* AWS CDK code goes here - learn more: https://docs.aws.amazon.com/cdk/latest/guide/home.html */

    const amplifyProjectInfo = AmplifyHelpers.getProjectInfo();

    // Access other Amplify Resources
    const retVal: AmplifyDependentResourcesAttributes = AmplifyHelpers.addResourceDependency(this,
      amplifyResourceProps.category,
      amplifyResourceProps.resourceName,
      [
        // Change the name of resourceName below to your Amplify-created resource name
        { category: 'auth', resourceName: 'amplifycloudwatchrumauth' },
        { category: 'function', resourceName: 'cfncustomfn' }
      ]
    );
    // Change the name of resourceName below to your Amplify-created resource name
    const identityPoolId = cdk.Fn.ref(retVal.auth.amplifycloudwatchrumauth.IdentityPoolId);
    const guestRoleArn = `arn:aws:iam::${cdk.Stack.of(this).account}:role/amplify-amplifycloudwatchrum-unauthRole`;
    const myFunctionArn = cdk.Fn.ref(retVal.function.cfncustomfn.Arn);

    // Create a CloudWatch RUM appMonitor
    const appMonitor = new rum.CfnAppMonitor(this, `rum-app-monitor-${amplifyProjectInfo.projectName}-${amplifyProjectInfo.envName}`, {
      // Replace this with your app domain if you are using a FQDN
      domain: 'dev.d3sakkbawtnkcg.amplifyapp.com',
      name: `app-monitor-${amplifyProjectInfo.projectName}-${amplifyProjectInfo.envName}`,

      // the properties below are optional
      appMonitorConfiguration: {
        allowCookies: true,
        enableXRay: true,
        guestRoleArn: guestRoleArn,
        identityPoolId: identityPoolId,
        sessionSampleRate: 1,
        telemetries: ['errors', 'http', 'performance'],
      },
      cwLogEnabled: false
    });

    // Create an AWS Lambda-backed CloudFormation custom resource
    const customResource = new cdk.CustomResource(this, 'MyResource', {
      serviceToken: myFunctionArn,
      properties: {
        envName: amplifyProjectInfo.envName,
        projectName: amplifyProjectInfo.projectName,
      }
    });
    // Add explicit dependency to tell CloudFormation to wait for appMonitor to be created
    customResource.node.addDependency(appMonitor);

    // Add outputs so we can retrieve them using Amplify command hooks
    new cdk.CfnOutput(this, 'AppMonitorName', {
      value: `app-monitor-${amplifyProjectInfo.projectName}-${amplifyProjectInfo.envName}`,
    });

    new cdk.CfnOutput(this, 'AppMonitorId', {
      value: customResource.getAtt('AppMonitorId').toString(),
    });

    new cdk.CfnOutput(this, 'GuestRoleArn', {
      value: guestRoleArn,
    });

    new cdk.CfnOutput(this, 'IdentityPoolId', {
      value: identityPoolId,
    });
  }
}
Finally, consider running amplify build while in the project’s root folder to verify that the AWS CDK template is synthesized correctly.
Step 6 – Add CloudWatch RUM script to every page of the application
You can simply copy the script configuration from the CloudWatch RUM console and paste it within the header of every page of your application, as explained in the documentation here. However, to automate part of this process, we’ll be using Amplify CLI command hooks. Given that the CloudWatch RUM appMonitor identifier isn’t referenceable as an output post creation of the CloudWatch RUM resource, we’ll be using the post-push command hook for the following:
- retrieve the appMonitor details including the identifier, Amazon Cognito Identity Pool, and IAM Guest role,
- print these values to the terminal so that you can easily copy and use them in your app.
Create a file at amplify/hooks/post-push.js and update the file with the following code snippet:
const fs = require('fs');
const path = require('path');
const parameters = JSON.parse(fs.readFileSync(0, { encoding: 'utf8' }));

const amplifyMetaFile = JSON.parse(fs.readFileSync(path.join(
  parameters.data.amplify.environment.projectPath,
  'amplify',
  'backend',
  'amplify-meta.json'
)));

const { custom, providers } = amplifyMetaFile;
// Change the name of resourceName below to your Amplify-created resource name if different
const { cloudwatchrum } = custom;

console.log('Copy/paste these values in public/index.html with CloudWatch RUM code snippet below');

console.log(`appMonitorId ${cloudwatchrum.output.AppMonitorId}`);
console.log(`appMonitorGuestRoleArn ${cloudwatchrum.output.GuestRoleArn}`);
console.log(`appMonitoridentityPoolId ${cloudwatchrum.output.IdentityPoolId}`);
console.log(`awsRegion ${providers.awscloudformation.Region}`);
Now run amplify push -y to deploy all of the remaining resources to your AWS account post deployment. Then, Amplify will call the post-push.js file that was created above and print some values that you must input in the public/index.html file to include the CloudWatch RUM script in the <head> section of the page.
Note these values, and then open the public/index.html file. Next, paste the contents of the following code snippet in the <head> tag of the document, and make sure to replace all of the values with the ones that were output from the script.
<script>
 (function (n, i, v, r, s, c, x, z) {
  x = window.AwsRumClient = { q: [], n: n, i: i, v: v, r: r, c: c };
  window[n] = function (c, p) { x.q.push({ c: c, p: p }); };
  z = document.createElement('script');
  z.async = true; z.src = s;
  document.head.insertBefore(z, document.head.getElementsByTagName('script')[0]);
 })(
  'cwr',
  '[appMonitorId]', // Replace this with appMonitorId
  '1.0.0',
  '[awsRegion]', // Replace this with awsRegion
  'https://client.rum.us-east-1.amazonaws.com/1.2.1/cwr.js',
 {
    sessionSampleRate: 1,
    guestRoleArn: "[appMonitorGuestRoleArn]", // Replace this with appMonitorGuestRoleArn
    identityPoolId: "[appMonitoridentityPoolId]",  // Replace this with appMonitoridentityPoolId
    endpoint: "https://dataplane.rum.[awsRegion].amazonaws.com", // Replace this with awsRegion
    telemetries: ["performance", "errors", "http"],
    allowCookies: true,
    enableXRay: true
 });
</script>
Then, run amplify publish -y to update the changes on the application hosted in Amplify.
Testing
- Navigate to the sample application URL and validate that the CloudWatch RUM configuration script is added to the page by viewing the web page source code.
- Refresh the page numerous times, or access the sample application via different browsers to send data to CloudWatch RUM.
- Validate that user event data is sent to CloudWatch RUM by navigating to the console. You should be able to see the CloudWatch RUM overview page as shown in the following figure with details such as Page loads, Average page load speed, and others explained here.
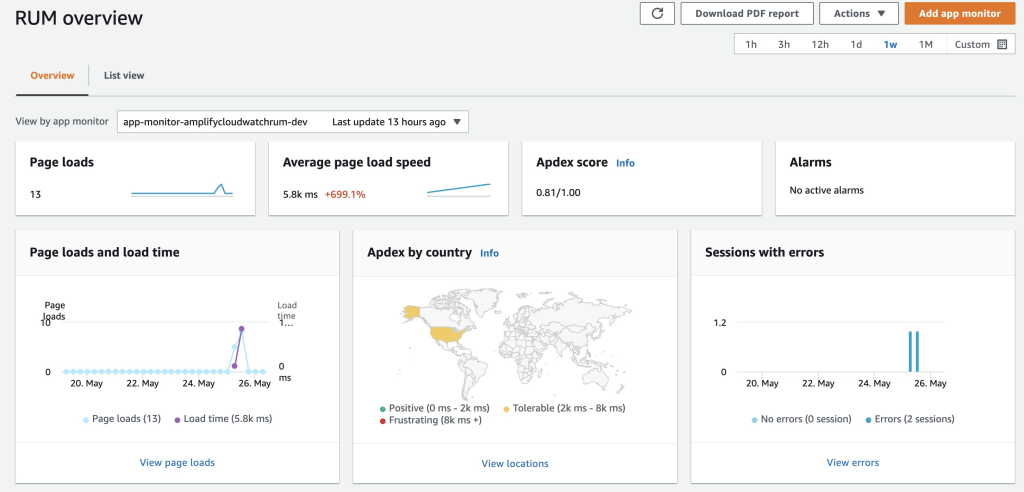
Figure 2. Screenshot of the AWS CloudWatch RUM console that shows an overview of the telemetry generated by an application
Clean Up
Leaving resources in your AWS account will incur some costs, so make sure to delete what has been deployed in this walkthrough by running the command amplify delete
Conclusion
In this post, we’ve shown how you can implement client-side monitoring with CloudWatch RUM for your Amplify application by using the functionality provided by the Amplify CLI. You can create Amazon CloudWatch RUM resources using custom resources and generate the parameters for the CloudWatch RUM configuration script using Amplify command hooks.
To learn more about Amazon CloudWatch RUM and Amplify, refer to the documentations here and here.
You can also refer to the accompanying GitHub repository, which contains the sample react application created from the walkthrough above, as well as instructions for how to deploy the sample in your AWS account.
Authors:
Ozioma Uzoegwu
Ozioma is a Solutions Architect at Amazon Web Services. In his role, he helps customers of all sizes to transform and modernise on AWS cloud platform by providing architectural guidance and best practices. Ozioma has many years of experience with web development, architecture, cloud and IT management. Prior to joining AWS, Ozioma worked with an AWS Advanced Consulting Partner as the Lead Architect for the AWS Practice. He is passionate about software development with a keen interest in building modern applications using serverless technologies.
Andrea Amorosi
Andrea is a Partner Solutions Architect at Amazon Web Services based out of sunny Barcelona, Spain. When he’s not helping AWS Partners he is either working on Open Source projects like AWS Lambda Powertools, or diving deep into geospatial use cases and frontend web development.
Recommend
About Joyk
Aggregate valuable and interesting links.
Joyk means Joy of geeK