

Golang CRON 库 Crontab 的使用与设计
source link: https://pandaychen.github.io/2021/10/05/A-GOLANG-CRONTAB-V3-BASIC-INTRO/
Go to the source link to view the article. You can view the picture content, updated content and better typesetting reading experience. If the link is broken, please click the button below to view the snapshot at that time.
0x00 前言
cron 是一个用于管理定时任务的库(单机),基于 Golang 实现 Linux 中 crontab 的功能
0x01 使用
Linux 的 crontab
crontab 基本格式:
# 文件格式說明
# ┌──分钟(0 - 59)
# │  ┌──小时(0 - 23)
# │  │  ┌──日(1 - 31)
# │  │  │  ┌─月(1 - 12)
# │  │  │  │  ┌─星期(0 - 6,表示从周日到周六)
# │  │  │  │  │
# *  *  *  *  * 被执行的命令
用法极丰富,V3 版本也支持标准的 crontab 格式,具体用法细节可以参考 此文:
func main() {
    job := cron.New(
        cron.WithSeconds(), // 添加秒级别支持,默认支持最小粒度为分钟(如需秒级精度则必须设置)
    )
    // 每秒钟执行一次
    job.AddFunc("* * * * * *", func() {
        fmt.Printf("task run: %v\n", time.Now())
    })
    job.Run()   // 启动
}
其他典型的用法还有如下:
type cronJobDemo int

func (c cronJobDemo) Run() {
        fmt.Println("5s func trigger")
        return
}

func main() {
    c := cron.New(
            cron.WithSeconds(),
    )
    c.AddFunc("0 * * * *", func() { fmt.Println("Every hour on the half hour") })
    c.AddFunc("30 3-6,20-23 * * *", func() { fmt.Println(".. in the range 3-6am, 8-11pm") })
    c.AddFunc("CRON_TZ=Asia/Tokyo 30 04 * * *", func() { fmt.Println("Runs at 04:30 Tokyo time every day") })
    c.AddFunc("@every 5m", func() { fmt.Println("every 5m, start 5m fron now") }) // 容易理解的格式
    // 通过 AddJob 注册
    var cJob cronJobDemo
    c.AddJob("@every 5s", cJob)
    c.Start()
    // c.Stop()

    select {}
}
0x02 代码分析
核心数据结构
对于 cron 库的整体逻辑,最关键的两个数据结构就是 Entry 和 Cron
1、Job:抽象一个定时任务,cron 调度一个 Job,就去执行 Job 的 Run() 方法
type Job interface {
    Run()
}
FuncJob:FuncJob 实际就是一个 func() 类型,实现了 Run() 方法:
type FuncJob func()
func (f FuncJob) Run() {
    f()
}
在实际应用中,我们需要对 Job 结构做一些扩展,于是就有了 JobWrapper,使用修饰器机制加工 Job(传入一个 Job,返回一个 Job),有点像 gin 中间件,包装器可以在执行实际的 Job 前后添加一些逻辑,然后使用一个 Chain 将这些 JobWrapper 组合到一起。
比如给 Job 添加这样一些属性:
- 在
Job回调方法中捕获panic异常 - 如果
Job上次运行还未结束,推迟本次执行 - 如果
Job上次运行还未结束,跳过本次执行 - 记录每个
Job的执行情况
type JobWrapper func(Job) Job

type Chain struct {
  wrappers []JobWrapper
}

func NewChain(c ...JobWrapper) Chain {
  return Chain{c}
}
2、Chain 结构 Chain 是 JobWrapper 的数组,调用 Chain 对象的 Then(j Job) 方法应用这些 JobWrapper,返回最终的 Job:
type Chain struct {
  wrappers []JobWrapper
}

func NewChain(c ...JobWrapper) Chain {
  return Chain{c}
}

func (c Chain) Then(j Job) Job {
  for i := range c.wrappers {
      // 注意:应用 JobWrapper 的顺序
    j = c.wrappers[len(c.wrappers)-i-1](j)
  }
  return j
}
3、Schedule:描述一个 job 如何循环执行的抽象,需要实现Next方法,此方法返回任务下次被调度的时间
// Schedule describes a job's duty cycle.
type Schedule interface {
	// Next returns the next activation time, later than the given time.
	// Next is invoked initially, and then each time the job is run.
	Next(time.Time) time.Time
}
Scheduler 的实例化结构有:
4、Entry 结构:抽象了一个 job
每当使用 AddJob 注册一个定时调用策略,就会为该策略生成唯一的 Entry,Entry 里会存储被执行的时间、需要被调度执行的实体 Job
type Entry struct {
    ID EntryID          // job id,可以通过该 id 来删除 job
    Schedule Schedule   // 用于计算 job 下次的执行时间
    Next time.Time      // job 下次执行时间
    Prev time.Time      // job 上次执行时间,没执行过为 0
    WrappedJob Job      // 修饰器加工过的 job
    Job Job             // 未经修饰的 job,可以理解为 AddFunc 的第二个参数
}
5、Cron结构:
关于 Cron 结构,有一些细节,entries 为何设计为一个指针 slice?
// Cron keeps track of any number of entries, invoking the associated func as
// specified by the schedule. It may be started, stopped, and the entries may
// be inspected while running.
type Cron struct {
    entries   []*Entry          // 所有 Job 集合
    chain     Chain             // 装饰器链
    stop      chan struct{}     // 停止信号
    add       chan *Entry       // 用于异步增加 Entry
    remove    chan EntryID      //  用于异步删除 Entry
    snapshot  chan chan []Entry
    running   bool              // 是否正在运行
    logger    Logger
    runningMu sync.Mutex        // 运行时锁
    location  *time.Location    // 时区相关
    parser    Parser            // Cron 解析器
    nextID    EntryID
    jobWaiter sync.WaitGroup    // 并发控制,正在运行的 Job
}
entries 成员
刚才说到 entries 为何设计为指针 slice,原因在于 cron 核心逻辑中,每次循环开始时都会对 Cron.entries 进行排序,排序字段依赖于每个 Entry 结构的 Next 成员,排序依赖于下面的原则:
- 按照触发时间正向排序,越先触发的越靠前
IsZero的任务向后面排- 由于可能存在相同周期的任务 Job,所以排序是不稳定的
// byTime is a wrapper for sorting the entry array by time
// (with zero time at the end).
type byTime []*Entry

func (s byTime) Len() int      { return len(s) }
func (s byTime) Swap(i, j int) { s[i], s[j] = s[j], s[i] }
func (s byTime) Less(i, j int) bool {
	// Two zero times should return false.
	// Otherwise, zero is "greater" than any other time.
	// (To sort it at the end of the list.)
	if s[i].Next.IsZero() {
		return false
	}
	if s[j].Next.IsZero() {
		return true
	}
    // 排序的原则,s[i] 比 s[j] 先触发
	return s[i].Next.Before(s[j].Next)
}
0x03 内置 JobWrapper 介绍
Recover:捕捉 panic,避免进程异常退出
此 wrapper 比较好理解,在执行内层的 Job 逻辑前,添加 recover() 调用。如果 Job.Run() 执行过程中有 panic。这里的 recover() 会捕获到,输出调用堆栈
// cron.go
func Recover(logger Logger) JobWrapper {
  return func(j Job) Job {
    return FuncJob(func() {
      defer func() {
        if r := recover(); r != nil {
          const size = 64 << 10
          buf := make([]byte, size)
          buf = buf[:runtime.Stack(buf, false)]
          err, ok := r.(error)
          if !ok {
            err = fmt.Errorf("%v", r)
          }
          logger.Error(err, "panic", "stack", "...\n"+string(buf))
        }
      }()
      j.Run()
    })
  }
}
DelayIfStillRunning
实现了已有任务运行推迟的逻辑。核心是通过一个(任务共用的)互斥锁 sync.Mutex,每次执行任务前获取锁,执行结束之后释放锁。所以在上一个任务结束前,下一个任务获取锁会阻塞,从而保证的任务的串行执行。
// chain.go
func DelayIfStillRunning(logger Logger) JobWrapper {
  return func(j Job) Job {
    var mu sync.Mutex
    return FuncJob(func() {
      start := time.Now()
      // 下一个任务阻塞等待获取锁
      mu.Lock()
      defer mu.Unlock()
      if dur := time.Since(start); dur > time.Minute {
        logger.Info("delay", "duration", dur)
      }
      j.Run()
    })
  }
}
SkipIfStillRunning
和 DelayIfStillRunning 机制不一样,该方法是跳过执行,通过无缓冲 channel 机制实现。执行任务时,从通道中取值,如果成功,执行,否则跳过。执行完成之后再向通道中发送一个值,确保下一个任务能执行。初始发送一个值到通道中,保证第一个任务的执行。
func SkipIfStillRunning(logger Logger) JobWrapper {
  return func(j Job) Job {
    // 定义一个无缓冲 channel
    var ch = make(chan struct{}, 1)
    ch <- struct{}{}
    return FuncJob(func() {
      select {
      case v := <-ch:
        j.Run()
        ch <- v
      default:
        logger.Info("skip")
      }
    })
  }
}
0x04 核心方法分析
AddJob 方法
AddJob 方法通过两种方法将任务节点 entry 添加到 Cron.entries 中:
- 初始化时,直接
append - 运行状态下,通过 channel 方式异步添加,避免加锁
// AddJob adds a Job to the Cron to be run on the given schedule.
// The spec is parsed using the time zone of this Cron instance as the default.
// An opaque ID is returned that can be used to later remove it.
func (c *Cron) AddJob(spec string, cmd Job) (EntryID, error) {
	schedule, err := c.parser.Parse(spec)
	if err != nil {
		return 0, err
	}
	return c.Schedule(schedule, cmd), nil
}

// Schedule adds a Job to the Cron to be run on the given schedule.
// The job is wrapped with the configured Chain.
func (c *Cron) Schedule(schedule Schedule, cmd Job) EntryID {
	c.runningMu.Lock()
	defer c.runningMu.Unlock()
	c.nextID++
	entry := &Entry{
		ID:         c.nextID,
		Schedule:   schedule,
		WrappedJob: c.chain.Then(cmd),
		Job:        cmd,
	}
	if !c.running {
        // 直接加
		c.entries = append(c.entries, entry)
	} else {
        // 异步
		c.add <- entry
	}
	return entry.ID
}
run 方法
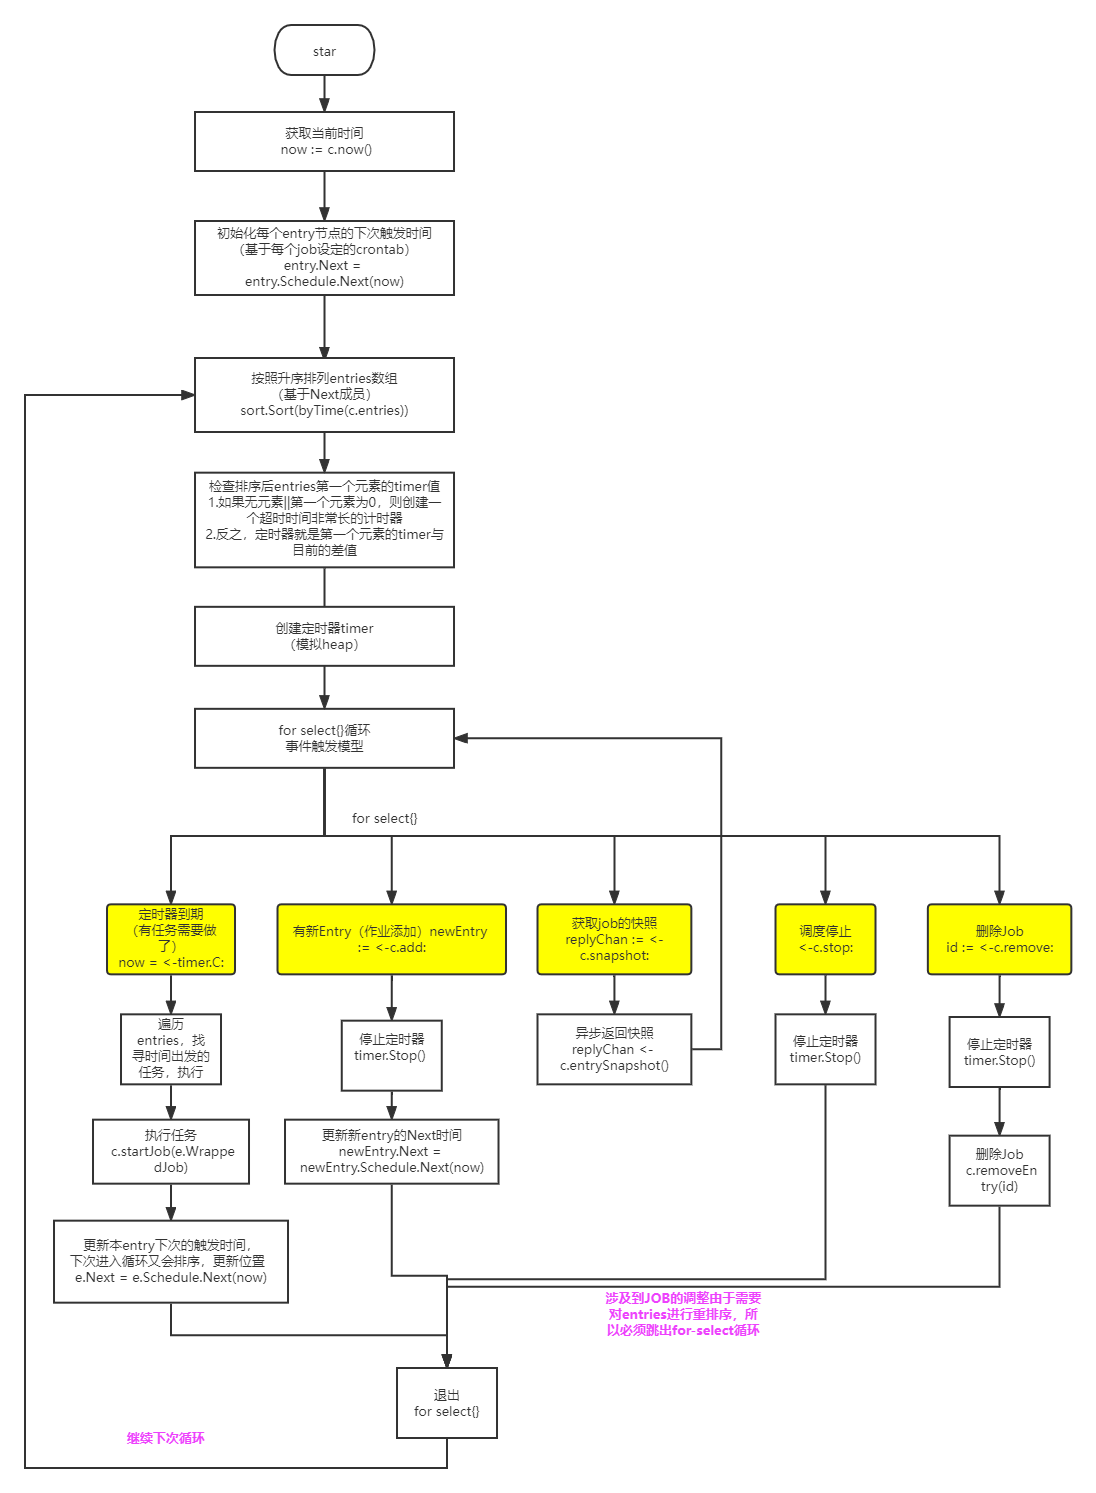
cron 的核心 run() 方法的实现如下,这个是很经典的 for-select 异步处理模型,避免的对 entries 加锁,非常值得借鉴。其核心有如下几点:
- 一个定时任务(集)的实现,内部采用排序数组,取数组首位元素的时间作为
timer触发时间(感觉可以优化为最小堆?)- 每个
entry都包含了该entry下一次执行的绝对时间,本轮执行完成后立即计算下一轮时间,等待下次循环时排序更新 - 每次循环开始对
cron.entries按下次执行时间升序排序,只需要对第一个entry启动定时器即可 - 定时器事件触发时,轮询
cron.entries里需要执行的entries直到第一个不满足条件的,由于数组是升序,后面无需再遍历 - 同时,第一个定时器处理结束开启下次定时器时,也只需要更新执行过的
cron.entries的Next(下次执行时间),不需要更新所有的cron.entries
- 每个
Cron内部数据结构的维护,采用channel实现无锁机制,缺点是可能会有误差(ms级),不过在此项目是能够容忍的,以Job异步添加为例(运行中添加entry,走异步方式,有duration的延迟):- 某个
Job之间的delta差,可能多出了duration的延迟,可以容忍 - 定时器实现里,会扫描所有当前时间之前的
cron.entries来执行,增加了容错
- 某个
func (c *Cron) run() {
    c.logger.Info("start")

    // 初始化,计算每个 Job 下次的执行时间
    now := c.now()
    for _, entry := range c.entries {
        entry.Next = entry.Schedule.Next(now)
        c.logger.Info("schedule", "now", now, "entry", entry.ID, "next", entry.Next)
    }

    // 在 dead loop,进行任务调度
    for {
        // 根据下一次的执行时间,对所有 Job 排序
        sort.Sort(byTime(c.entries))

        // 计时器,用于没有任务可调度时的阻塞操作
        var timer *time.Timer
        if len(c.entries) == 0 || c.entries[0].Next.IsZero() {
            // 无任务可调度,设置计时器到一个很大的值,把下面的 for 阻塞住
            timer = time.NewTimer(100000 * time.Hour)
        } else {
            // 有任务可调度了,计时器根据第一个可调度任务的下次执行时间设置
            // 排过序,所以第一个肯定是最先被执行的
            timer = time.NewTimer(c.entries[0].Next.Sub(now))
        }

        for {
            select {
            // 有 Job 到了执行时间
            case now = <-timer.C:
                now = now.In(c.location)
                c.logger.Info("wake", "now", now)
                // 检查所有 Job,执行到时的任务
                for _, e := range c.entries {
                    // 可能存在相同时间出发的任务
                    if e.Next.After(now) || e.Next.IsZero() {
                        // 后面都不需要遍历了!
                        break
                    }
                    // 执行 Job 的 func()
                    c.startJob(e.WrappedJob)

                    // 保存上次执行时间
                    e.Prev = e.Next
                    // 设置 Job 下次的执行时间
                    e.Next = e.Schedule.Next(now)
                    c.logger.Info("run", "now", now, "entry", e.ID, "next", e.Next)
                }

            // 添加新 Job
            case newEntry := <-c.add:
                timer.Stop()        // 必须注意,这里停止定时器,避免内存泄漏!
                now = c.now()
                newEntry.Next = newEntry.Schedule.Next(now)
                c.entries = append(c.entries, newEntry)
                c.logger.Info("added", "now", now, "entry", newEntry.ID, "next", newEntry.Next)

            // 获取所有 Job 的快照
            case replyChan := <-c.snapshot:
                replyChan <- c.entrySnapshot()
                continue

            // 停止调度
            case <-c.stop:
                timer.Stop()
                c.logger.Info("stop")
                return

            // 根据 entryId 删除一个 Job
            case id := <-c.remove:
                timer.Stop()
                now = c.now()
                c.removeEntry(id)
                c.logger.Info("removed", "entry", id)
            }

            break
        }
    }
}
上述的代码的核心流程如下图:
0x05 小结
本文分析了基于 Golang 实现的单机定时任务库。
0x06 参考
Related Issues not found
Please contact @pandaychen to initialize the comment
Recommend
About Joyk
Aggregate valuable and interesting links.
Joyk means Joy of geeK