

How do I add DreamPress to a new domain? – DreamHost Knowledge Base
source link: https://help.dreamhost.com/hc/en-us/articles/214583258-How-do-I-add-DreamPress-to-a-new-domain-
Go to the source link to view the article. You can view the picture content, updated content and better typesetting reading experience. If the link is broken, please click the button below to view the snapshot at that time.

How do I add DreamPress to a new domain?
Overview
The following describes how to add DreamPress to a new domain at DreamHost. If you already have an existing WordPress One-Click Install and wish to upgrade, view the following article instead:
Installing DreamPress
- Navigate to the Managed WordPress page.
The main DreamPress page appears:

- Click the Get Started button.
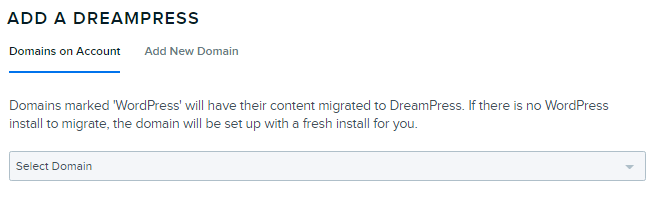
The 'Add a DreamPress' page opens where you can choose which domain to use:
- Select one of the following:
DreamPress cannot be added to dreamhosters.com subdomains.
- Domains on Account — Select a DreamHost-hosted domain from the drop-down list. Choose this option if you wish to add DreamPress to a domain that you already have in your DreamHost panel.
- Add New Domain — If you wish to set up a domain that is not yet hosted at DreamHost, there are two options:
 Add your existing domain not hosted on DreamHost
— Enter a domain name not hosted a DreamHost. Click the button when finished.
 Use a temporary domain to stage your site first — Enter a staging name, which creates a new staging website ending in .dream.press. For example, if your site was example.com, create a new DreamPress site called example.dream.press. This is a separate and free subdomain you can use to create your DreamPress site before you decide on the final domain name.
When finished selecting a domain, scroll to the Term section:

- Select either 'Annually' or 'Monthly' payment plan.
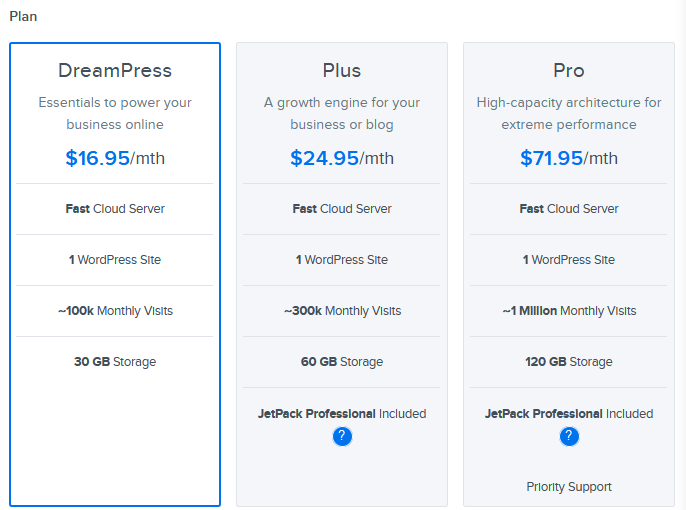
Scroll to the Plan section, which shows you the various DreamPress features and pricing plans (DreamPress, Plus, and Pro). If you select Plus, you are also prompted to select a 'Disk Size' (either 60 GB or 80 GB):
- Select a plan type.
Your selections are summarized within the 'Your Purchase' box on the right:
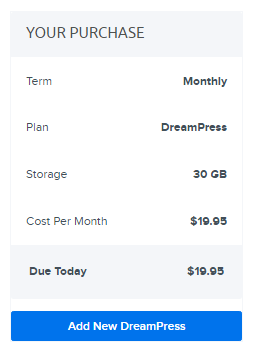
- When finished, click the Add New DreamPress button.
After you add DreamPress, a success message displays on your dashboard page confirming that DreamPress is added to your domain.
Viewing your DreamPress plan
Once you have at least one domain on DreamPress, view the following article for instructions on how to view your plan details:
See also
Did this article answer your questions?
Recommend
-
10
Creating a DreamPress temporary domain Overview If you have a WordPress site hosted at another provider, you won't change your
-
10
DreamPress non-profit discount Overview The following information applies to DreamPress plans only. For more information on DreamHost's non-profit program for Shared Hosting...
-
7
Overview DreamHost offers Cloudflare plans on any hosting plan. You can find more information in the Cloudflare overview article. However,...
-
11
How to sign up for a DreamPress account Overview This article describes how to sign up for a new DreamPress hosting plan. This article is for new customers who wish to open an acco...
-
9
Overview This article explains how to view the current DreamPress plan you're using. Viewing your plan Once you have at least one domain on DreamPress, navigate to the
-
15
DreamPress plans and pricing Overview DreamPress offers several types of payment plans depending on your needs. Payment cycle — Select either an annual pre-...
-
12
How do I upgrade a WordPress site to DreamPress? Overview You can easily transfer any domain to DreamPress that is currently using WordPress as a
-
7
Changing the name of a DreamPress domain Overview This article explains how to change the name of your DreamPress site to a different domain name. These instructions can be used fo...
-
8
Creating and restoring backups for DreamPress Overview DreamHost automatically creates a daily backup of your site, and you can also create an additional manual backup once per day...
-
8
Changing a DreamPress plan Overview Using the DreamHost panel, you can make changes to your DreamPress plan to take advantage of additional features. This article desc...
About Joyk
Aggregate valuable and interesting links.
Joyk means Joy of geeK