

Creating a DreamPress temporary domain – DreamHost Knowledge Base
source link: https://help.dreamhost.com/hc/en-us/articles/115002837508-Creating-a-DreamPress-temporary-domain
Go to the source link to view the article. You can view the picture content, updated content and better typesetting reading experience. If the link is broken, please click the button below to view the snapshot at that time.

Creating a DreamPress temporary domain
Overview
If you have a WordPress site hosted at another provider, you won't change your DNS at the other hosting company until your DreamPress site is completely configured at DreamHost. Otherwise, your site will go down when you update the DNS.
To help you test your site before switching DNS, you can now use a 'dream.press' subdomain to create your site at DreamHost. Then when you're ready, you can easily switch your DNS to DreamHost to have it hosted on DreamPress.
The following describes how to create a temporary DreamPress domain at DreamHost for your WordPress site hosted at another company.
Why use a dream.press subdomain?
Creating a dream.press subdomain allows you to migrate your entire website and ensure it's functioning properly before you make it live at DreamHost . You can then update the DNS to point to DreamHost, which avoids any downtime when changing your DNS.
Creating a dream.press subdomain
Navigate to the Managed WordPress page.
- Click the Add DreamPress button to add a DreamPress site.
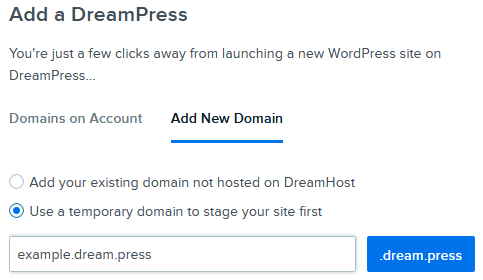
- Click the Add New Domain tab, and then select the Use a temporary domain to stage your site first option.
- Enter a temporary dream.press domain name. For example, if your current site is example.com, you create a site called example.dream.press (though you can name it anything you wish).
After you click the .dream.press button, the following confirmation appears:

Scroll down the page to review the terms and various DreamPress plans.
- Select either 'Annually' or 'Monthly' payment plan.
Choose a DreamPress plan, based on the features and pricing you need (DreamPress, Plus, and Pro). If you select Plus, you are also prompted to select a 'Disk Size' (either 60 GB or 80 GB).
- Review the details in the 'Your Purchase' box, and then click Add New DreamPress button.
The following appears in your panel after you click the Add New DreamPress button:
- A confirmation message, followed by further instructions sent to your email address
- The main DreamPress page in your panel shows the new temporary domain you just created as "Pending" while it's configured. You must wait until the setup completes and 'Pending' no longer appears on the DreamPress page in your panel before proceeding.
- After the temporary domain is set up on DreamPress, migrate your site content from your current hosting company to this new domain at DreamHost. You can also import an existing WordPress site into this temporary DreamPress site.
- After you've migrated all site content, test the example.dream.press site to confirm it works as intended.
- If you're migrating from another hosting company, add your current site (example.com) to the Manage Domains page as 'DNS Only'.
DO NOT add hosting for your real domain. If you do, you will not be able to migrate your temporary site.
- When you're ready, change your temporary domain to your live site.
You can now migrate your own WordPress site to DreamHost for free, using the DreamHost Automated Migration Plugin. The plugin can be used on any DreamHost account with an active hosting plan. See the following article for more details:
If you are having trouble migrating your website from another host, or just don't have the time, DreamHost currently offers a service that takes care of that for you. You can find more information in the DreamHost Website migration services article.
See also
Did this article answer your questions?
Recommend
-
9
DreamPress non-profit discount Overview The following information applies to DreamPress plans only. For more information on DreamHost's non-profit program for Shared Hosting...
-
7
Overview DreamHost offers Cloudflare plans on any hosting plan. You can find more information in the Cloudflare overview article. However,...
-
9
How do I add DreamPress to a new domain? Overview The following describes how to add DreamPress to a new domain at DreamHost. If you already have an existing
-
10
How to sign up for a DreamPress account Overview This article describes how to sign up for a new DreamPress hosting plan. This article is for new customers who wish to open an acco...
-
9
Overview This article explains how to view the current DreamPress plan you're using. Viewing your plan Once you have at least one domain on DreamPress, navigate to the
-
14
DreamPress plans and pricing Overview DreamPress offers several types of payment plans depending on your needs. Payment cycle — Select either an annual pre-...
-
12
How do I upgrade a WordPress site to DreamPress? Overview You can easily transfer any domain to DreamPress that is currently using WordPress as a
-
7
Changing the name of a DreamPress domain Overview This article explains how to change the name of your DreamPress site to a different domain name. These instructions can be used fo...
-
7
Creating and restoring backups for DreamPress Overview DreamHost automatically creates a daily backup of your site, and you can also create an additional manual backup once per day...
-
8
Changing a DreamPress plan Overview Using the DreamHost panel, you can make changes to your DreamPress plan to take advantage of additional features. This article desc...
About Joyk
Aggregate valuable and interesting links.
Joyk means Joy of geeK