

基于 ShardingSphere5.x 实现 mysql 数据分表分片
source link: https://my.oschina.net/nimo10050/blog/5036849
Go to the source link to view the article. You can view the picture content, updated content and better typesetting reading experience. If the link is broken, please click the button below to view the snapshot at that time.
-
本文会基于
Springboot + mybatis + shardingsphere + mysql5.6 + druid进行实战讲解 -
本文的实战内容为分表、以及数据分片, 不涉及分库, 读写分离之类的
-
本文不会介绍
shardingsphere的历史、概念以及分库分表的相关理论 -
本文采用的
shardingsphere版本是 5.0.0-alpha, 具体见 pom 文件 -
本文涉及的源码请参考 码云地址
-
如果看 官方文档 时, 请选对版本 !!!
我们有一张逻辑用户表 user_info, 我们把它水平拆分成 user_info0 和 user_info1 两张物理表 当我们往用户表插数据时, 数据会按照一定的规则(根据id取模), 写入到其中一张 user_info 表中.
1. 数据库表
create database miaosha;

DROP TABLE IF EXISTS `user_info0`;
CREATE TABLE `user_info0` (
  `id` bigint(20) NOT NULL AUTO_INCREMENT,
  `user_label` varchar(32) COLLATE utf8_bin DEFAULT NULL,
  `username` varchar(64) COLLATE utf8_bin DEFAULT NULL,
  `email` varchar(64) COLLATE utf8_bin DEFAULT NULL,
  `phone` varchar(64) COLLATE utf8_bin DEFAULT NULL,
  `password` varchar(128) COLLATE utf8_bin NOT NULL,
  `active` tinyint(4) NOT NULL DEFAULT '1',
   PRIMARY KEY (`id`)
) ENGINE=InnoDB AUTO_INCREMENT=7 DEFAULT CHARSET=utf8 COLLATE=utf8_bin;


DROP TABLE IF EXISTS `user_info1`;
CREATE TABLE `user_info1` (
  `id` bigint(20) NOT NULL AUTO_INCREMENT,
  `user_label` varchar(32) COLLATE utf8_bin DEFAULT NULL,
  `username` varchar(64) COLLATE utf8_bin DEFAULT NULL,
  `email` varchar(64) COLLATE utf8_bin DEFAULT NULL,
  `phone` varchar(64) COLLATE utf8_bin DEFAULT NULL,
  `password` varchar(128) COLLATE utf8_bin NOT NULL,
  `active` tinyint(4) NOT NULL DEFAULT '1',
  PRIMARY KEY (`id`)
) ENGINE=InnoDB AUTO_INCREMENT=6 DEFAULT CHARSET=utf8 COLLATE=utf8_bin;
2. pom 依赖
<?xml version="1.0" encoding="UTF-8"?>
<project xmlns="http://maven.apache.org/POM/4.0.0" xmlns:xsi="http://www.w3.org/2001/XMLSchema-instance"
         xsi:schemaLocation="http://maven.apache.org/POM/4.0.0 https://maven.apache.org/xsd/maven-4.0.0.xsd">
    <modelVersion>4.0.0</modelVersion>
    <parent>
        <groupId>org.springframework.boot</groupId>
        <artifactId>spring-boot-starter-parent</artifactId>
        <version>2.3.2.RELEASE</version>
        <relativePath/>
    </parent>
    <groupId>com.nimo</groupId>
    <artifactId>shardingsphere-demo</artifactId>
    <version>0.0.1-SNAPSHOT</version>
    <name>shardingsphere-demo</name>

    <properties>
        <java.version>1.8</java.version>
    </properties>

    <dependencies>
        <dependency>
            <groupId>org.springframework.boot</groupId>
            <artifactId>spring-boot-starter-web</artifactId>
        </dependency>

        <dependency>
            <groupId>org.mybatis.spring.boot</groupId>
            <artifactId>mybatis-spring-boot-starter</artifactId>
            <version>2.1.4</version>
        </dependency>

        <dependency>
            <groupId>mysql</groupId>
            <artifactId>mysql-connector-java</artifactId>
            <scope>runtime</scope>
        </dependency>

        <dependency>
            <groupId>org.projectlombok</groupId>
            <artifactId>lombok</artifactId>
            <optional>true</optional>
        </dependency>

        <dependency>
            <groupId>org.springframework.boot</groupId>
            <artifactId>spring-boot-starter-test</artifactId>
            <scope>test</scope>
        </dependency>

        <!-- shardingsphere -->
        <dependency>
            <groupId>org.apache.shardingsphere</groupId>
            <artifactId>shardingsphere-jdbc-core-spring-boot-starter</artifactId>
            <version>5.0.0-alpha</version>
        </dependency>

        <!-- 阿里数据源 -->
        <dependency>
            <groupId>com.alibaba</groupId>
            <artifactId>druid</artifactId>
            <version>1.2.3</version>
        </dependency>

    </dependencies>

    <build>
        <plugins>
            <plugin>
                <groupId>org.springframework.boot</groupId>
                <artifactId>spring-boot-maven-plugin</artifactId>
                <configuration>
                    <excludes>
                        <exclude>
                            <groupId>org.projectlombok</groupId>
                            <artifactId>lombok</artifactId>
                        </exclude>
                    </excludes>
                </configuration>
            </plugin>
        </plugins>
    </build>

</project>
3. application.yml
再次强调下, 本文采用的 shardingsphere 版本是 5.0.0-alpha. 不同版本配置会有差异.
填写配置文件时,一定要小心, 坑死了; 不信你不配置 com.alibaba.druid.pool.DruidDataSource试试,
或者你用默认的数据源替换试试 om.zaxxer.hikari.HikariDataSource
server:
port: 8777
spring:
shardingsphere:
props:
sql-show: true
datasource:
names: ds0
# 注意这里的数据源配置用的是 druid
common:
type: com.alibaba.druid.pool.DruidDataSource
ds0:
url: jdbc:mysql://127.0.0.1:3306/miaosha?useUnicode=true&characterEncoding=utf-8&useSSL=false&serverTimezone=GMT%2b8
username: root
password: '123456'
driver-class-name: com.mysql.cj.jdbc.Driver
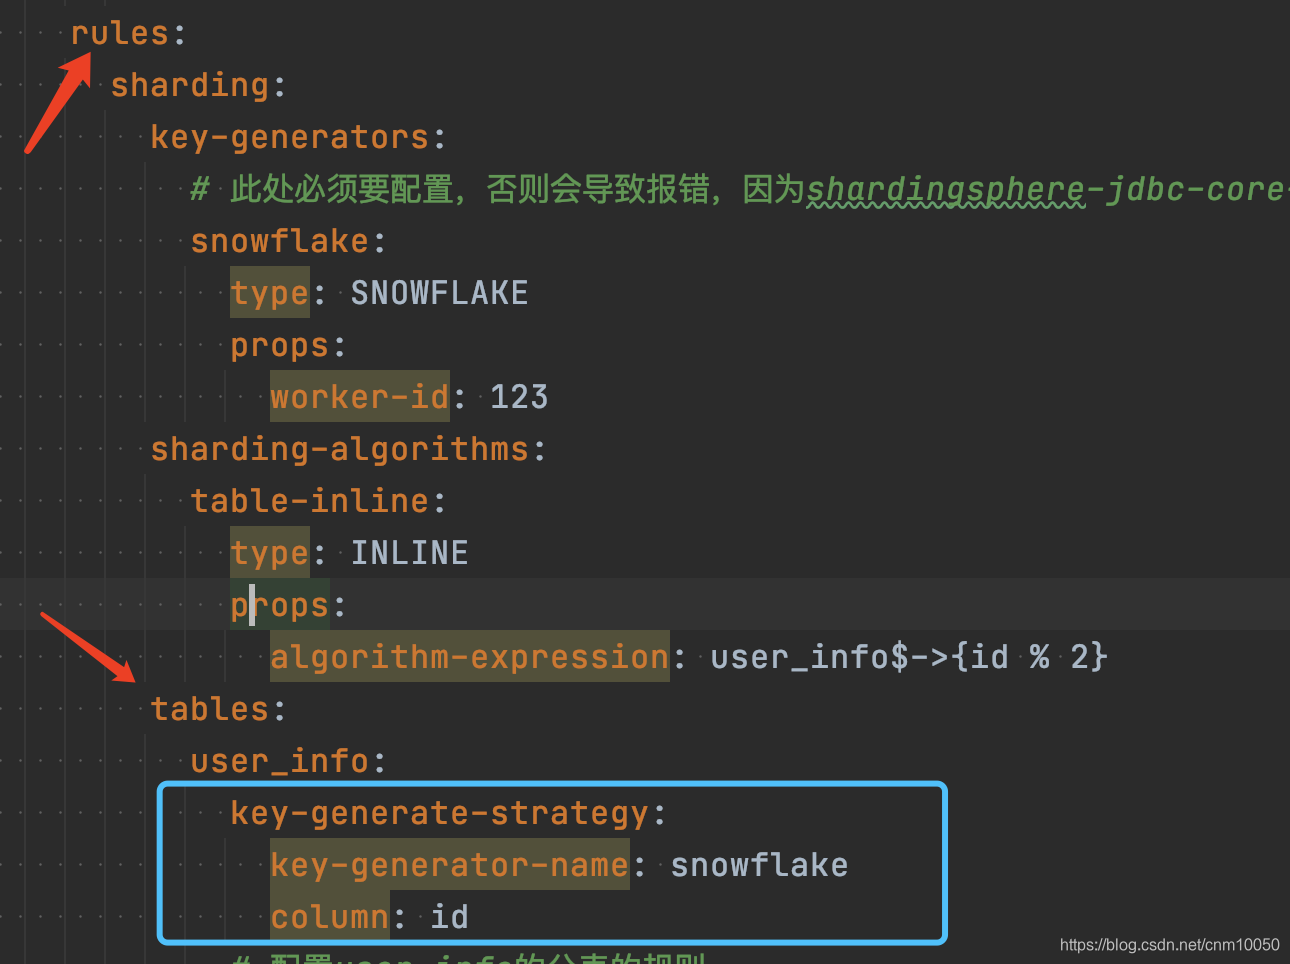
rules:
sharding:
key-generators:
# 此处必须要配置,否则会导致报错,因为shardingsphere-jdbc-core-spring-boot-starter需要加载此项配置,官网的demo例子有错
snowflake:
type: SNOWFLAKE
props:
worker-id: 123
sharding-algorithms:
table-inline:
type: INLINE
props:
# 不要漏掉 $ 或 ->
algorithm-expression: user_info$->{id % 2}
tables:
user_info:
# 配置 user_info 的分表的规则
actual-data-nodes: ds0.user_info$->{0..1}
table-strategy:
standard:
sharding-column: id
sharding-algorithm-name: table-inline
enabled: true
mybatis:
typeAliasesPackage: com.nimo.shardingspheredemo.entity
mapperLocations: classpath:mapper/*.xml
4. 主要代码
// sql
<insert id="addUser" parameterType="com.nimo.shardingdemo.entity.UserInfo">
   insert into user_info(id, username, password) values (#{id}, #{username}, #{password})
</insert>

 // 新增一个用户信息
@PostMapping("userinfo")
public Object addUserInfo(@RequestBody UserInfo userInfo) {
   return userInfoMapper.addUser(userInfo);
}
5. 测试命令
curl -X POST --location "http://localhost:8777/userinfo" \
    -H "Content-Type: application/json" \
    -d "{
          \"id\": 18,
          \"username\": \"wangbadan\",
          \"password\": \"123456\"
        }"
我们创建表时设置的 主键id 是自增的, 理论上是不用传的, 但是我们往表中插数据, 是根据 主键id 取模 来决定具体往哪张表中插的. 所以这个主键 id 此时必须得有.
另外, 如果我们的服务有多个, 那么这个 id 如何生成?
首先把 sql 改写为如下方式:
// sql
<insert id="addUser" parameterType="com.nimo.shardingdemo.entity.UserInfo">
   insert into user_info(username, password)
    values ( #{username}, #{password})
</insert>
然后在原有配置的基础上, 追加如下配置信息(通过雪花算法生成id)
spring:
  shardingsphere:
    rules:
      sharding:
        tables:
          user_info:
            key-generate-strategy:
              key-generator-name: snowflake
              column: id
测试
curl -X POST --location "http://localhost:8777/userinfo" \
    -H "Content-Type: application/json" \
    -d "{
          \"username\": \"wangbadan\",
          \"password\": \"123456\"
        }"
本文强调的是 分表, 分片 的实战 demo 配置, 后面会逐渐更新 分库、读写分离 的实战 demo, 跟之前的 Spring Secutiry 的实战教程一样, 讲究循序渐进.
Recommend
About Joyk
Aggregate valuable and interesting links.
Joyk means Joy of geeK