

How to Setup the Spring Cloud Config Server With Git
source link: https://dzone.com/articles/how-to-setup-the-spring-cloud-configuration-server-with-git
Go to the source link to view the article. You can view the picture content, updated content and better typesetting reading experience. If the link is broken, please click the button below to view the snapshot at that time.
How to Setup the Spring Cloud Config Server With Git
Spring cloud config server helps to manage all the application-specific properties from a single location without affecting the running microservices.
Join the DZone community and get the full member experience.
Join For FreeCompanies are slowly adopting microservice over monolithic architecture to scale applications. Compared to monolithic, microservice architecture breaks applications into small, manageable services, i.e., microservices. That means one monolithic application can be converted to many microservices, and these services are developed and deployed independently. These services collaborate with each other to fulfill business objectives. Each microservice manages their own application-specific properties file, i.e., application.properties. In most situations, multiple microservices and their multiple instances run together to fulfill the business needs. Any update in the properties file may require the redeployment and restart of services. Consider a situation where property updates need to be done on hundreds of services and their instance. This may require a considerable amount of downtime.
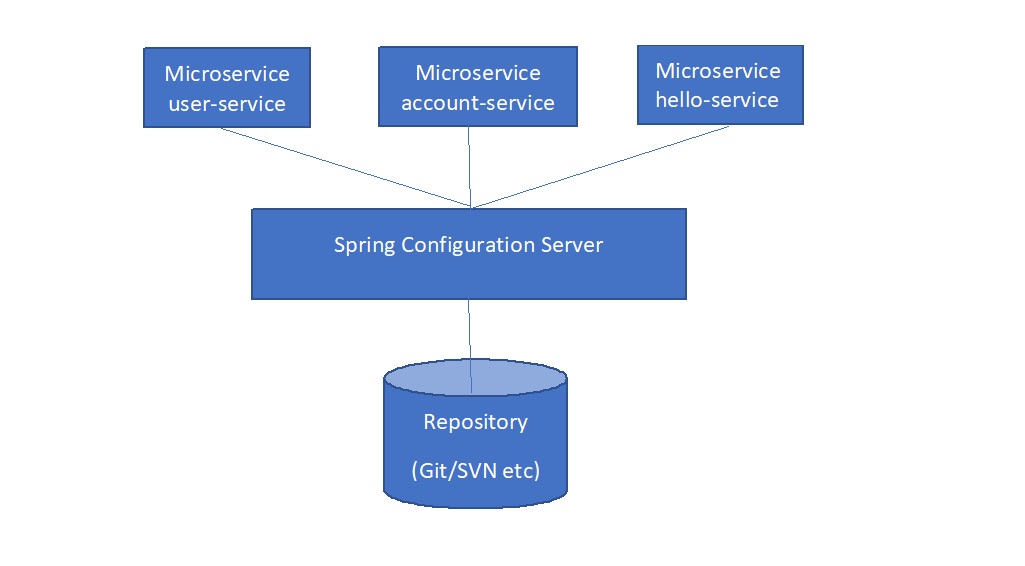
To solve this problem, Spring Boot has provided a Spring configuration server. This will manage all service's properties files from a single point at runtime.
Advantage of Spring Cloud Config Server
- A centralized application that manages all the application related configuration properties and their versions.
- If there is any property change, only the centralized repository will be updated, and all the related services will receive the updated property changes without the microservice application redeploy or restart, i.e., application properties can be updated at runtime without redeploying or restarting microservices.
- Client-Server communication architecture, i.e., Spring Boot provides both client and server-specific components. Server manages all properties from the repository, while microservices act as a client to the server to consume properties.
- Secure access to the repository with encryption of the sensitive data.
- Support to properties associated with multiple environments like development, staging, UAT, and production.
This tutorial is helpful to develop a complete working example for a good understanding of concepts like:
1. Repository (Store configuration).
2. Cloud config server (Read configuration from repository).
3. Cloud config client (Read configuration via Cloud Config Server).
4. Update configuration and trigger refresh event.
This tutorial will cover points 1 and 2. Another tutorial will follow to cover points 3 and 4. Let’s follow the tutorials with the basic assumption that Java8, Maven, and Eclipse are installed.
Prerequisites
Configure Repository
1. Install Git from https://git-scm.com/downloads if not available on your machine. Git can be easily checked with the following command.
2. Create a folder, e.g., config-properties, where configuration files are to be kept. Add a property file, e.g., hello-service.properties with the following property:
x
message=Hello world - this message is from config server
3. Instead of application.properties, name of the file kept as the client service name. Here the name of the client service name is hello-service. So file name is taken as hello-service.properties.
xxxxxxxxxx
spring.application.name=hello-config-server
server.port=8888
spring.cloud.config.server.git.uri=file:///d:/config-properties
4. Now, initialize Git in the configuration folder with the help of the following commands. These commands will help to commit the properties files in the Git repository:
x
$> cd config-properties
$> git init
$> git add .
$> git commit -m 'Initial Release'$> git init
$> git add .
$> git commit -m 'Initial Release'
5. Let's add a few more files considering the various other environments like development and UAT. Add and commit these files also to the repository (Refer to above step).
xxxxxxxxxx
message=Hello world - this message is from config server
hello-service-development.properties
message=Hello world - this message is from development
hello-service-uat.properties
xxxxxxxxxx
message=Hello world - this message is from UAT
6. The local Git repository is created and used for development/testing purposes. For production deployment, the Repository can be more secure and kept at a remote location on Github, Bitbucket, Gitlab, AWS Code commit, etc.
Cloud Config Server Setup
1. Create a Spring Starter Project with a name likeHelloConfigServer. Select spring version 2.3.7 (Do not select 2.4.1 as it's having an issue in showing properties files) with dependencies like Config Server and DevTools (used for easy redeployment).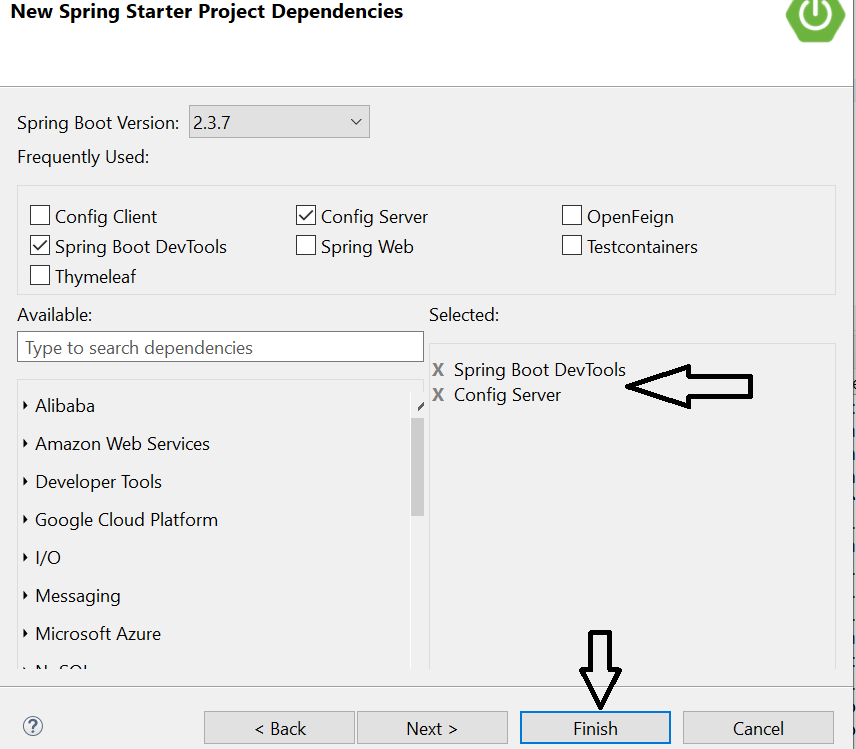
2. Once the project is created, go to the application.properties file available inside the resource folder and add the following in the file:
xxxxxxxxxx
spring.application.name=hello-config-server
server.port=8888
spring.cloud.config.server.git.uri=file:///d:/config-properties
4. For remote repository, sample GitHub configuration will look like as below:
x
spring.cloud.config.server.git.uri=https://github.com/abcd/springboot
spring.cloud.config.server.git.uri.username=test
spring.cloud.config.server.git.uri.password=test
5. Now open the main application file, i.e., HelloConfigServerApplication.java, and add @EnableConfigServer annotation to make it Config Server. Final java file will look as below
xxxxxxxxxx
package com.hello.example;
import org.springframework.boot.SpringApplication;
import org.springframework.boot.autoconfigure.SpringBootApplication;
import org.springframework.cloud.config.server.EnableConfigServer;
@EnableConfigServer
@SpringBootApplication
public class HelloConfigServerApplication {
public static void main(String[] args) {
SpringApplication.run(HelloConfigServerApplication.class, args);
}
}
7. If the following response is received, then all configurations are OK, i.e., Config Server is fetching default property from Git repository.
x
{
"name": "hello-service",
"profiles": [
"default"
],
"label": null,
"version": "3da88aa3c6103cc7f2b383a3ee5d5dad5e6e870c",
"state": null,
"propertySources": [
{
"name": "file:///d:/config-properties/hello-service.properties",
"source": {
"message": "Hello world - this message is from config server"
}
}
]
}
To access the development environment file, Kindly use the following URL: http://localhost:8888/hello-service/development.
Conclusion
Now we are able to create a configuration server that can access the Git repository and provide access to configuration files.
Source code related to this tutorial is available at Github.
Recommend
About Joyk
Aggregate valuable and interesting links.
Joyk means Joy of geeK