

Introduction to Robot Operation System (ROS)
source link: https://dzone.com/articles/ros-robotic-operation-systems
Go to the source link to view the article. You can view the picture content, updated content and better typesetting reading experience. If the link is broken, please click the button below to view the snapshot at that time.
Robotics Operation System? Where to start from?
Have you ever wondered how robots, which are mechanical objects, are operated? How do the physical is controlled by the virtual? Well, there are several software middleware libraries in the market that provide frameworks for running and managing robotic systems. The term Robot can be obscure, so to clarify: a robot can be a small device like Raspberry Pi, a more complex one like a drone, or another sophisticated multi-sensor mechanical robot.
What's the benefit of using a middleware?
The main benefit is the standardization of interacting with the robot; thus, it alleviates the burden of developing a tailored set of commands for each robot type. It also provides the necessary level of abstraction for working with robots. Designing, operating, and maintaining the application become easier using the toolset of such middleware.
This benefit becomes substantial when your system is composed of multiple components or requires coordination between multiple robots.
One of the most popular robotics middleware is ROS (Robot Operating System); this article focuses on ROS foundations, setting up ROS environment, and running a sample application.
What Is ROS (Robot Operating System)?
ROS is a framework to develop, build, and deploy software for robotics; its name may be misleading since it's not a classic operating system but a meta-OS. ROS aims to be a plug-and-play framework for communicating with robots or devices. You don't have to worry about the robot's hardware since ROS provides a unified interface to activate the robot's hardware. So, the software becomes the focus instead of interfacing with specific hardware API.
ROS becomes an industry-standard; the days it was used only at the academy are over. It is a cross-product platform and a mature framework; with the rise of its next-generation (ROS2) it is more robust.
ROS provides essential functions for developing robot application software that includes data reception, scheduling, error handling, and more. ROS also has a huge supporting community that creates a valuable ecosystem, with extensive documentation, utilities, and tools.
This framework is officially supported on Linux (Ubuntu, Debian), but can be installed on other popular operation systems, like Windows OS, Mac OS, and even mobile devices (Android, iOS).
ROS framework is supported by C++ and Python, but older versions have ROS implementation in Java (not supported in all ROS distributions). Besides operating robots via code, ROS has a vast CLI API, so you can review the application's status, its messages, and even send commands without changing a single line of code.
ROS Distributions
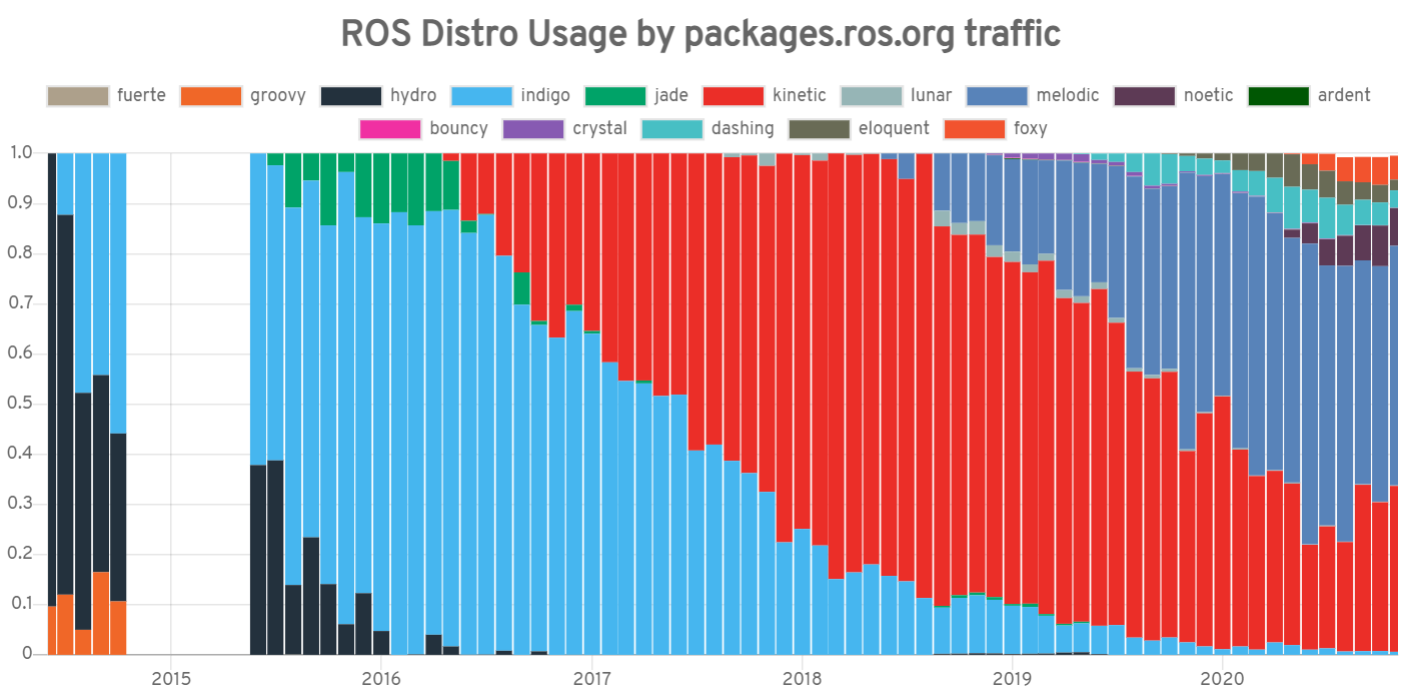
Many distributions of ROS were released throughout the years, whilst ROS continues to grow and involve (see its packages' usage). ROS community declares in advance the End of Life (EOL) for each version, which should be a consideration whether to use this version or not. Currently, the majority of the distributions is based on the first generation of ROS (aka ROS1).
ROS framework was originally founded based on these principles:
- A single robot
- No real-time requirements
- Excellent network connectivity (either wired or close-proximity high-bandwidth wireless)
- Mostly for academia and research usages
As you can see, these principles are outdated and do not meet the contemporary use cases and do not align with new technologies; that is the motivation for RO2.
ROS Limitations and the Transition to ROS2
Although this article does not delve into ROS2 implementation, it's worth mentioning the future of ROS. To recap, ROS challenges are:
- Not designed for multi-robot communication; there are solutions to support such systems, but they are not officially an out-of-the-box capability. One had to design and build them based on ROS platform.
- ROS does not support real-time communication, it is based on TCP and UDP; all processes have the same priorities, which can cause a problem in some cases, for example, processes that handle obstacles while the robot is moving should have priority.
- ROS requires a reliable network; the nodes have to communicate with each other, which consumes bandwidth. In the case of an unstable network, the application can face challenges.
- ROS master is a single point of failure (will be described in details at the next chapter).
To alleviate these pain-points, and to cope with the changes in the industry, RO2 has arisen.
ROS2 presents some major improvements:
- No longer relying on a master node. A Data Distribution Service (DDS) handles the communication between the nodes. Furthermore, there's no rely on custom protocols to communicate (RSOTCP, ROSUDP). The DDS uses standard peer-to-peer communication protocols.
- Supporting multiple robots use cases.
- Designed to give priorities for services.
The ROS team has decided to build ROS2 as a parallel framework to ROS rather than enhancing the current ROS's libraries (read more about ROS2 and the considerations behind its crafting). So, ROS2 is developed from scratch.
You can read more about ROS2 concepts here.
ROS Foundations
ROS Architecture
A ROS-based application is composed of nodes; each node is a process that runs in a computer. The nodes must register themselves into the ROS master node, which is the core that runs the application. Therefore, the master node must run first. The master is used for administration; a node must register itself before it can be active. The node sends its info to the master first, and then it can communicate with other nodes (see Communication patterns in the next chapter).
The interprocess communication is based on ROS implementations of TCP or UDP protocol. Once the nodes' communication is established, the master node has finished its part; the nodes communicate independently. However, if the communication is broken, it can be resumed only if the master node is alive. This topology creates a single point of failure if the master is down or inaccessible.
Communication Infrastructure
ROS has an extensive library that allows communication between nodes. This communication between based on messages, which is the data that is transferred between nodes. In some scenarios, multiple nodes can receive the same data from the sender.
ROS is flexible in terms of the programming language; nodes written in different languages can communicate as long as the message structure and data are valid.
There are three main communication approaches:
- Publisher-Subscriber
- Request-Response
- Action-based communication
ROS Publisher-Subscriber
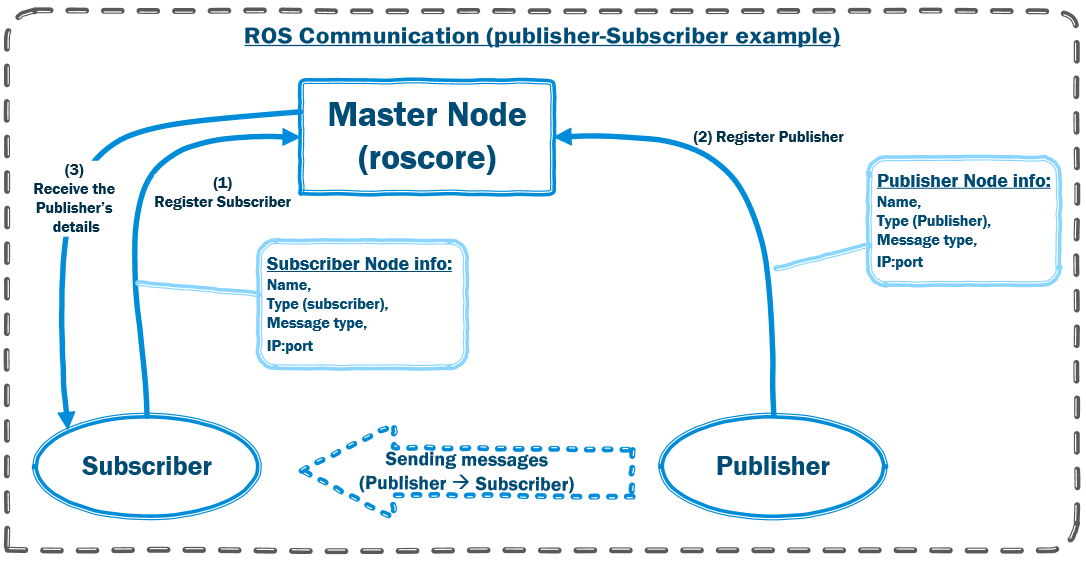
This communication pattern is the most common. It is similar to a service bus communication pattern. There is a node that functions as a publisher and posts messages into a channel (topic in ROS terminology); other nodes can subscribe to this channel. The communication is one-way: the publisher transmits data to whoever is subscribed to its channels. The publisher and the subscriber are not aware of each other; it is a decoupled communication pattern.
The master node functions as a DNS server. Once the master node is up, other nodes can send their details to register. Each node provides the same set of information to the master node: name, publisher or subscriber, name of the channel, message type, and port. If there is a match between the publisher and the subscribers' topics, the master node gives the publisher's information to the subscribers.
That initiates a three-way handshake between the subscriber and the publisher:
- The subscriber sends a connection request to the publisher.
- The publisher responses to the connection request
- The connection is established.
From this point onwards, the communication between the subscriber and the publisher is direct, without involving the master node; this is a unidirectional data stream, from the publisher to the subscribers.
One example of a publish-subscribe scenario is a node that transmits data from a camera (or any other kind of sensor). Every node that wishes to consume this data subscribes to the channel of the camera. This channel is called a topic.
The ROS topic can be likened as a service-bus to exchange messages; ROS node can publish or subscribe messages on many topics. The relationship can be 1-to-1 (one publisher and one subscriber), or one-to-many (one publisher, many subscribers), or many-to-many (many publishers nd many subscribers to the same topic).
ROS Services
In this approach, a node functions as a service that provides functionality. Another node is a client that consumes its services; unlike the Publisher-Subscriber approach, this is synchronous, two-way communication. The client initiates a request, the service executes it, and the communication ends (until the next time).
One consideration for using the Request-Response approach is synchronization. This is a blocking communication; the client awaits for a response before moving on with its tasks. Therefore, it is useful for short and quick actions.
The registration process starts the same as in the Publisher-Subscriber pattern, but it happens only once when the communication happens; this communication is disconnected after the request and response are over. It is a one-time stateless interaction; therefore, if the master node has to be active when the client and the server communicates.
There can be only one service (and more than one client), as opposed to Publisher-Subscriber pattern in which there can be many publishers for the same topic.
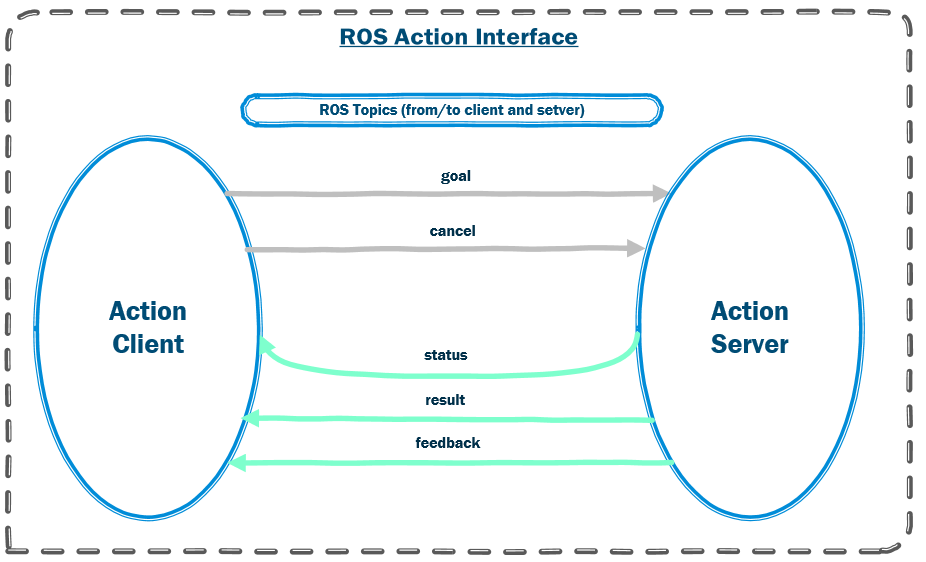
ROS Actions
This is an enhancement of the Client-Server communication. It is two-way communication, but instead of communicating synchronously, the client sends a request and immediately returns (without waiting for a response); the response arrives asynchronously after the work is completed.
This approach is suitable for long-running cases when producing a response requires a long time.
The node that implements an Action Server provides the functionality, whereas the node that uses Action Client consumes the functionality. The client and the server uses topics to communicate; for example, cancel the request, get the status, get the result, etc. For more information, read about ROSActionLib, which is the package that provides tools for this communication pattern.
ROS Messages
ROS strives to define standard messages for common usages. Therefore, ROS has an extensive set of libraries that cover many robot functionalities, for example:
- Geometry libraries
- Diagnostic (to obtain the state of the robot)
- Sensing and recognition (laser, motion sensors, etc.)
- Navigation (course planning, position, position based on a map)
- Manipulation (based on changing variables on the ground)
- ... and more
Messages are transmitted or received, but can also be stored and reused if needed. ROS has a special tool that can record messages. With that, it's possible to replicate or repeat the same scenarios once again; that's a useful feature when experimenting or rerunning tests (read more about rosbag tool).
ROS messages are represented in the following format: <ROS-package-name>/<ROS-message>; for example, std_msg/String. ROS messages can be found under the path /opt/ros/<ROS-Distribution>/share. For instance:

You can also see the structure of a ROS message by running the command
rosmsg show <ROS-message>.
ROS framework allows the creation of custom messages composed of primitive types or more complicated data structures and arrays besides the out-of-the-box messages.
Messages are the basic data that transfers between nodes in all types of communications. In a Publisher-Subscriber pattern, there is one type of message: the publisher sends a message that the client expects to receive. The Client-Server pattern is different; there is one type of message for the request, and another response type. In the Actions pattern, the message types are per topic.
So, after we understood ROS fundamental theory and its building blocks, let's continue to the practical part: installing ROS and launching ROS application.
Installing ROS
What Version to Use?
ROS Melodic and Noetic are the last two versions of ROS1. ROS Melodic will end in 2023 and ROS Noetic in 2025. These distributions are tied to Ubunto versions and Python versions:
Melodic Noetic- Ubuntu 18.04
- Python2
- Ubuntu 20.04
- Python3
Therefore, if there are no OS constraints, it's better to use the Noetic version. Anyway, the ROS commands are the same for both distributions. If you're a beginner, it doesn't really matter what version to choose (ROS Melodic, Noetic, or ROS2) since ROS core concepts are the same in all of these versions. For more advanced usages, the decision of which version to choose is more crucial.
Installing ROS and Additional Tools
ROS documentation is very detailed and quite straight forward to follow (Noetic installation, Melodic installation), so I won't delve on that (I also installed ROS on Windows10, but that was just for fun).
ROS basic installation doesn't include any GUI tools, but two GUI tools may be useful for future use (rqt and rviz); rqt is a framework that implements the various GUI tools in the form of plugins, and rviz is a 3D visualization tool for ROS.
These tools can be installed separately using the rosdep tool, which is a command-line tool for installing system dependencies. You may get an error if rosdep is not installed (see below).
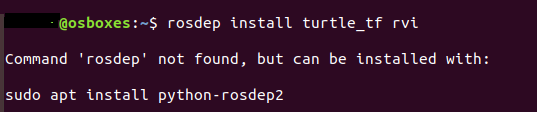
Run the command below to install it:
xxxxxxxxxx
$ sudo apt-get install python-rosdep
# after installation
$ suod rosdep init
$ rosdep update
# now you can install ROS tutorials
$ sudo apt-get install ros-melodic-geometry-tutorials
$ rosdep install turtle_tf rviz
$ rosmake turtle_tf rviz
For the next steps, ROS's basic installation is enough; the GUI tools can be used for more advanced applications.
ROS on Docker
Using ROS on Docker is a perfect solution if you want to keep your machine clean or choose to use ROS distributions that are not supported on your hosting OS. ROS has some Docker predefined images on DockerHub. After downloading, you can create a Dockerfile and run ROS commands. To keep this article concise and focused, I chose not to delve into this area.
Create a new ROS Workspace
I have an Ubuntu 18.x machine, so I used ROS Melodic, but the same commands and configurations are valid for ROS Noetic.
ROS setup is located under /opt/ros/melodic path. This folder includes the setup.bash file that defines the ROS workspace. Every time you run ROS command, you need to source this file by running the command source /opt/ros/melodic/setup.bash . To make it easier, it can be defined in the .bashrc file:
xxxxxxxxxx
$ cd ~
# open and edit the bashrc file to define the 'source' command
$ gedit .bashrc
Add the following line to the .bashrc file:
source /opt/ros/melodic/setup.bash
Now, upon opening a new terminal, this command will run automatically and ROS commands can run seamlessly. To ensure it works, run the command roscd, which should direct to the directory /opt/ros/melodic.
It's recommended to create your own workspace rather than using the default one. The new workspace can be created with catkintool; this is the official ROS build tool (catkin replaced rosbuild). You can find building workspaces among catkin's capabilities, along with allowing distribution of packages, cross-compiling support, and portability.
catkin is installed by default, but if it wasn't, please follow the instructions on how to install catkin.
Let's create a new folder and define it as our new workspace (in the example below, the workspace name is ros-ws):
x
# navigate to your root directory, under which the package will be created
$ cd /home/<user-name>/my-code
# create a parent directory and a 'src' directory underneath
$ mkdir -p ros-ws/src
# navigate into the new created directory
$ cd ros-ws
# compile and build the new workspace
$ catkin_make
Besides the src directory (that should host the source code), the catkin_make command created two more spaces: devel and build. The devel space is where the built targets are located before being installed; the build space holds cache information and other intermediate files that CMake invokes to build the catkin packages in the source space. You can read more about catkin workspaces here.
To set this environment as the default one, we need to repeat the previous step of editing the .bashrc file. This time, the path is to the devel directory of the newly created workspace. This is how the configuration on my environment:
source /home/<user-name>/my-code/ros-ws/devel/setup.bash.
This definition is enforced once opening a new terminal; you can test it by running the command roscd.
ROS Application Hierarchy
ROS application can be composed of one or more packages; these packages are created in a workspace (like we have created before). Each package is composed of source files and configuration files (package.xml and CMakeLists.txt).
A package is a collection of nodes that can communicate with each other using the communication types mentioned above (Publisher-Subscriber, Client-Server, or Action). A package is a logical separation; a node from one package can interact with a node from another package (via the same topic, for example).
A node is the minimal processing unit; it interacts with other nodes to form an operation. So eventually, nodes are combined into a graph, which can be visualized with an external tool (see in the next chapter).
When planning the structure of the application, it is recommended to adhere to the following guidelines:
- Use nodes to reduce the code complexity; encapsulate all the relevant functionality in the node's code, but do not load unnecessary complexity that can be placed in other libraries.
- Plan a fault-tolerant node for internal errors and for other nodes' faulty behaviour.
- Choose the node's programming language based on the required capabilities; one node can differ from the others.
Now we're ready to move on with the coding example.
Let's Play with a ROS Test Application
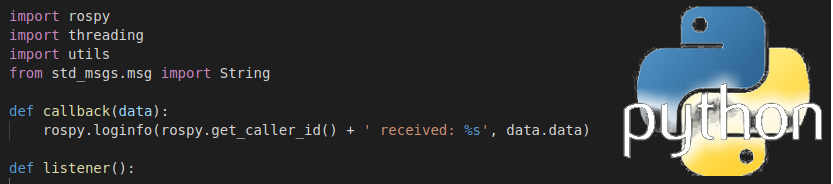
I prepared a test application to exemplify a simple Publisher-Subscriber application, so you don't have to create a package from scratch. You can find it on GitHub (https://github.com/liorksh/ros). This is a package that simulates two nodes, a publisher and a subscriber. The name of the package is chatwithme. Follow the script below and install it on your Ubuntu machine:
xxxxxxxxxx
# navigate to the workspase (/devel)
$ roscd
# go up to the workspace root
$ cd ..
# get the source code from GitHub
$ git clone https://github.com/liorksh/ros
# move the package to the src directory
$ mv ./ros/chatwithme ./src
# remove the leftovers from Github (to keep a clean environment)
$ rm -f -r ./ros
# build the new package
$ catkin_make
# make the python file as executable
$ sudo chmod +x ./src/chatwithme/src/talker.py
$ sudo chmod +x ./src/chatwithme/src/listener.py
Here is an example of running the first commands:

After running the catkin_make and the chmod commands, we're ready to go. The chatwithme package is installed and ready to run.
First, load the master node(roscore). Only one instance of the master node can be running; otherwise, when trying to load another master node one, the system generates an error:

Open two new terminals; in one run the talker node, and in the second run the listener node:
rosrun chatwithme talker.py
rosrun chatwithme listener.py
[if you receive the error: "Couldn’t find executable named talker.py", run the chmod command to grant executable permissions for the python scripts; it should fix the problem].
Once the two nodes are running, the result should be similar to the output below:
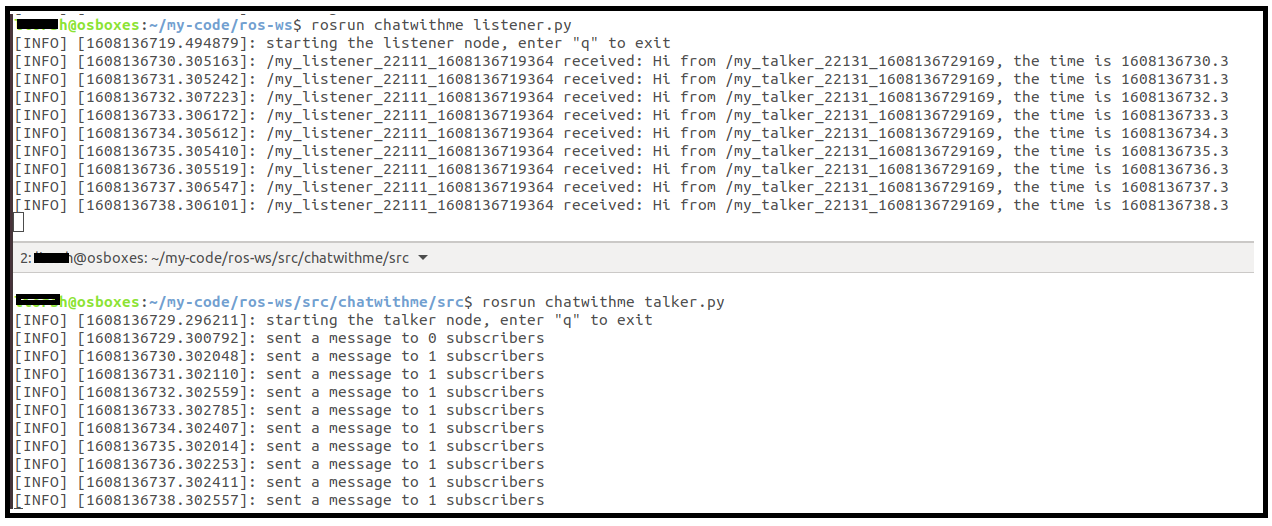
In this example, the publisher sends messages through a topic named chatwithme; the subscriber receives the messages through the same topic.
Run some ROS commands to see the theory in practice:
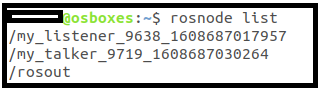
rosnode list- displays the active nodes.
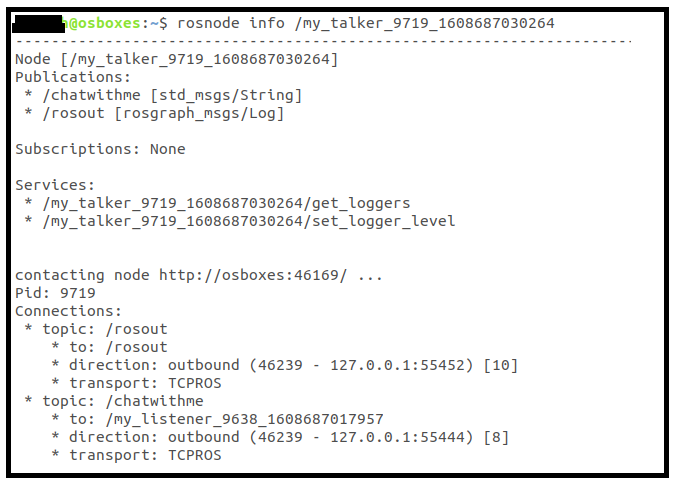
rosnode info <talker-node-name>-
returns various information: the topics the node interacts with, the active subscriptions/publications, the messages type in each topic (in this example it is std_msgs/String), communication details (protocol, IP, port).
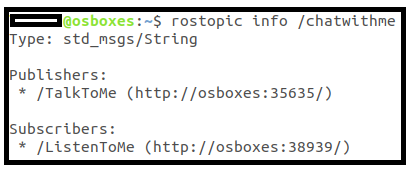
rostopic info /chatwithme- displays the topic's message type, the active publishers and the subscribers.
rostopic echo /chatwithme
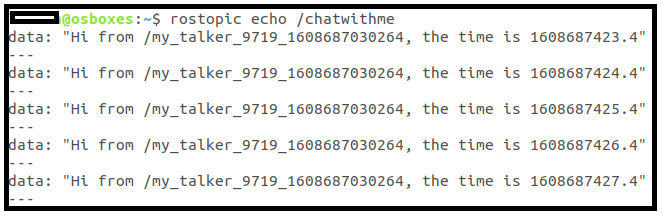
- Displays the std_msgs/String structure:

- Change the name of the node:
The node's name is generated upon creation; the prefix is /my_listener or /my_talker, and then a random number(it's set in the source code). But, you can set the name of the node upon creation:
xxxxxxxxxx
$ rosrun chatwithme listener.py __name:=<my-name>
This change is equivalent to the roslaunch configuration:
<node name="my-listener-node-name" pkg="chatwithme" type="listener.py" output="screen" />
You can see the new node name when you run the rosnode list command.

- You can close the master node, and see the communication is still alive.
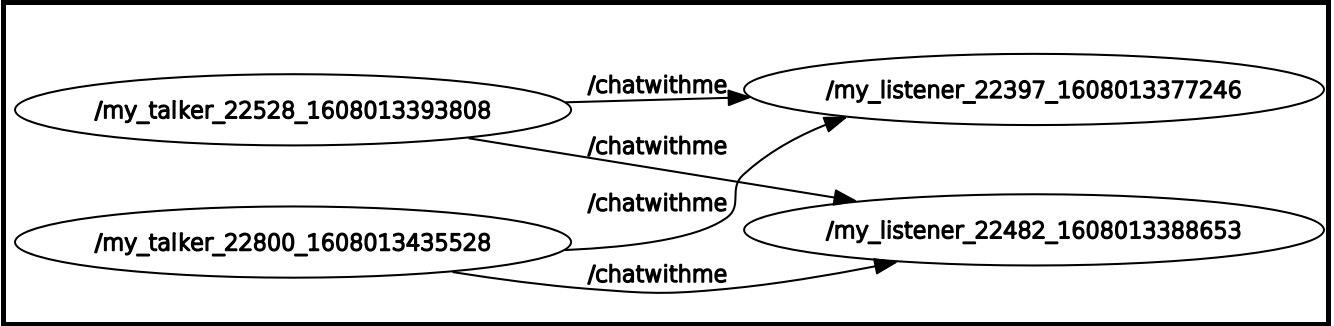
- You can run more than one publisher and more listeners. To view the communication graph, run the command
rqt_graph. See an optional outcome (two publishers, two subscribers):
I encourage you to play with this application and run more ROS commands (see below). This exploration will give you a deeper look.
ROS Commands
Here are some basic ROS commands; you can run the chatwithme nodesand play with these commands:
echo $ROS_DISTRO- returns the latest ROS distribution that is installed on the machineroscore- runs the master node; without running this command, the other nodes won't be able to communicate.rospack list- retrieves a list of packages on the machinerosrun- runs a ROS packageroslaunch- manages the start and stop of ROS nodes based on .launch files as argumentsrosnode- communicates with active nodesrosnode list- lists all the active nodesrosnode ping- checks if a node is accessiblerosnode info <node-name>- prints the node's info
rostopic- prints information about the nodes' topicsrostopic list- prints a list of all active topicsrostopic echo <topic-name>- prints all the messages that are published on this topicrostopic info <topic-name>- prints the information pertains to the requested topic
rosmsgrosmsg list- presents all the messages and their respective packagerosmsg show <ROS-message>- displays the structure of the messagerosmsg package <package-name>- lists all the messages in the given package
rqt_graph- presents the running nodes and the relations between coveredrosservicerosservice list- lists all the active servicesrosservice info <service-name>- displays the information of the given service.
The Turtlesim Application
Turtlesim is a useful application to explore the ROS framework peripheral commands and tools. It has an extensive tutorial; you can play with its topic (see Understanding Topics tutorial) and send commands to its running nodes.
Wrapping up
So, glad you could make it to the end! We covered ROS building blocks (master node, nodes), the three main ROS communication patterns, how to install ROS and create a workspace, run ROS application with two nodes (publisher and subscriber), and review some basic ROS commands to examine and monitor the application.
I hope you find this article useful.
Keep on coding!
- Lior
Recommend
About Joyk
Aggregate valuable and interesting links.
Joyk means Joy of geeK