

Jupyter notebook on AWS EC2 Instance
source link: https://towardsdatascience.com/jupyter-notebook-on-aws-ec2-instance-f869f5aa4848
Go to the source link to view the article. You can view the picture content, updated content and better typesetting reading experience. If the link is broken, please click the button below to view the snapshot at that time.
Jupyter notebook on AWS EC2 Instance
A great mix of ubiquitous cloud and usability of Jupyter
Jupyter is the most used development tool by data science and machine learning professionals. Considering most of the data science and machine learning projects involve working with data on the cloud, it makes sense to use the Jupyter notebook on the cloud. The flexibility of Jupyter on a ubiquitous cloud instance is a win-win combination.
In this article, I will take you through the steps to install and run a Jupyter notebook from a Linux instance on AWS EC2 instance.
Prerequisite Tools
I am assuming that you already have an AWS EC2 instance and know how to access it through Putty.
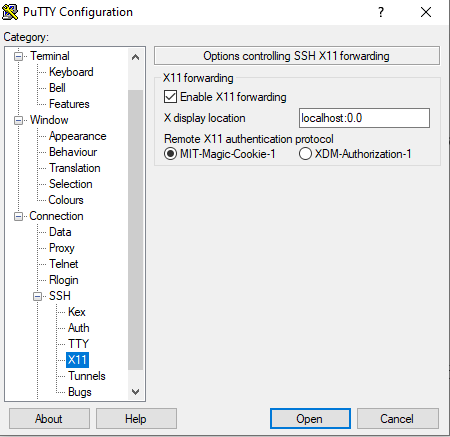
Make sure you have configured X11 forwarding in Putty.

Xming: For launching the Jupyter notebook on AWS instance and accessing it on your computer, you will also need the Xming tool. Xming can be downloaded from the below link
After downloading and installing Xming you should see two icons Xming and XLaunch on your computer. Click on Xming and it will launch the Xming server.
Click on XLaunch and go through the below screen.
This is the first screen you will see. No action required, click on Next.

No changes required on this screen. Click on the Next button.

No changes required on this screen. Click on the Next button.

No changes required on this screen. Click on the Finish button.

Xming is good to go.
Anaconda: Instead of installing Python and Jupyter separately in AWS instance, I suggest to install Anaconda. I am using a Redhat Linux machine on AWS EC2. By default, it doesn’t come with the Anaconda repository. So, the first step is getting Anaconda through the wget command.
a. First, check if wget is installed in your instance. If not, run install it through yum install as shown below.
sudo yum install wget

b. Chek if bzip2 is installed. If not, install it through yum
sudo yum install bzip2

c. Check if firefox installed. If not, install it through yum
sudo yum install firefox
d. Check if xorg-x11 drivers are installed. If not, install it through yum
sudo yum install xorg-x11*
e. Open /etc/ssh/ssh_config file and make sure the ForwardX11 option is uncommented and set as yes.

f. Download Anaconda3 through wget
sudo wget http://repo.continuum.io/archive/Anaconda3-4.3.0-Linux-x86_64.sh

This will create file Anaconda3–4.3.0-Linux-x86_64.sh in the directory.
g. Run the below command to install Anaconda 3.
bash Anaconda3-4.3.0-Linux-x86_64.sh

Click on Enter and go through terms and conditions. Once you get the below message write yes.

Mention the location where you want to install anaconda3

Wait for Anaconda3 installation to finish.

h. Add Anacond3 binary and DISPLAY variable in bashrc file. I am using vi editor, you can use nano or something else.
sudo vi ~/.bashrc
Add below in this file
export PATH=/u01/anaconda3/bin:$PATH
export DISPLAY=localhost:10.0
i. Close the instance and re-login through Putty.
j. Make sure Xming and XLaunch are on. Xming icon should show in task view.
k. Let’s confirm it got successfully installed. Check the versions of Anaconda, Python, and Jupyter.

Congratulations! You have completed the required setups and ready to launch the Jupyter notebook.
Launch Jupyter Notebook
Run the below command to launch the jupyter notebook
jupyter notebook

Jupyter notebook will open on Mozilla Browser in the X11 window.

Congratulations! Now you know how to launch a Jupyter notebook on AWS EC2 instance!
I and my students have gone through these steps several times and have been able to successfully run the Jupyter notebook on AWS instance. Nevertheless, if you encounter any issue at any step please feel free to write and I will respond promptly.
Looking forward to your feedback.
Recommend
About Joyk
Aggregate valuable and interesting links.
Joyk means Joy of geeK