

Spark
source link: https://towardsdatascience.com/spark-71d0bc25a9ba
Go to the source link to view the article. You can view the picture content, updated content and better typesetting reading experience. If the link is broken, please click the button below to view the snapshot at that time.
Spark
From understanding core concepts to developing a well-functioning Spark application on AWS Instance!
Shilpa, a rookie data scientist, was in love with her first job with a budding startup: an AI-based Fintech innovation hub. While the startup started with the traditional single machine, vertical expansion, infrastructure, it soon realized that the volume and velocity of data it deals with needs a Big Data solution. While HADOOP was a good choice for data storage, Spark, with its in-memory computation capability and real-time data streaming became the obvious choice as a data execution engine.
Shilpa had a steep learning curve to conquer. While she understands data and is a Python expert, Spark is new to her and she has little time to master the jungle of knowledge available in bits and pieces on the internet: Big data, Hadoop Distributed File System (HDFS), Spark, Spark Context, Driver, Executor, Python, Java Virtual Machine (JVM), Compute Cluster, Yet Another Resource Negotiator (YARN).
If you are in a similar situation or just wondering what is Spark and what all the fuss about it; you reached a suitable article. In this article, I endeavor to explain:
- Core concepts
- Step-by-step instructions on Spark installation
- Operating Spark
- Python & Spark (PySpark) application development prerequisites
- Application development
Core Concepts
I have noticed that whenever I talk about Spark the first thing that comes to listeners' minds how similar or different it is from Big Data and Hadoop. So, let’s first understand how Spark is different from Hadoop.
Spark is not Hadoop
A common misconception is that Apache Spark is just a component of Hadoop.
Hadoop is an open-source software framework for efficiently storing large datasets in the Hadoop Distributed File System (HDFS) on a computer cluster and processing it through big data processors like YARN.
Hadoop has two core components:
- Storage: Hadoop Distributed File System (HDFS) stores data on multiple computers through the master node (name node) and slave nodes (data node) architecture.
- Processing: Map Reduce is a processing framework in Hadoop. It processes data in smaller datasets in batch mode through a Job Tracker on the master node and Task Tracker on the data nodes.
Apache Hadoop processes datasets in batch mode only and it lacks stream processing in real-time. To fill this gap, Apache has introduced Spark (actually, Spark was developed by UC Berkley Amplab): a lightning-fast in-memory real-time data streaming framework.
Spark is also an open-source, in-memory computation and data processing framework offered by Apache.
Core components:
- Storage: Spark does not have its own storage system like HDFS in Hadoop. It needs Hadoop HDFS for storing data on cluster computers.
- Processing: Spark brings data to memory and can do near real-time data streaming. Parallel and in-memory data processing makes Spark much faster than data processing in Hadoop.
HDFS is a common factor between Hadoop and Spark. Spark can be considered as a powerful alternative to Map Reduce. In addition to faster data processing and real-time streaming, Spark has several other rich functionality features like support to different languages i.e. Python, R, SQL, with rich framework libraries for Data Analytics and Machine Learning.
Another common factor between Hadoop and Spark is the Java Virtual Machine (JVM).
Spark & Java Virtual Machine
Java Virtual Machine (JVM) can be considered as middleware between Java-based applications like Spark and operating systems where it is running. As Hadoop and Spark are written mostly in Java, it can not work without JVM on the computer where it is running.
Spark is written in Scala and runs in Java Virtual Machine (JVM). Spark can run in local mode on a single computer or in clustered environments; however, JVM must be installed on every node.
Mode of Operation
Spark can run in Local Mode on a single machine or in Cluster-Mode on different machines connected to distributed computing.
Local Mode is ideal for learning Spark installation and application development. All you need is your laptop or an instance on the computing cloud, like AWS EC2.
Cluster Mode follows the traditional big data architecture of Master Node, Worke Node, and Resouce Manager.
Like Hadoop, Spark follows the Master-Worker architecture of one master process (called Driver) and multiple worker processes (called Executors).
The Driver maintains metadata and other necessary information of Spark application and takes care-of distributing and monitoring work across Executors. The Executor nodes execute the code assigned to it by Driver and report back status to Executor.
The below picture shows Spark Cluster-Mode architecture

Spark supports built-in Standalone cluster manager as well as HADOOP YARN, Apache Mesos, and Kubernetes cluster managers.
Installation
In this article, I take you through the steps of installing Spark in Local mode on an AWS EC2 instance.
I am using a Red Hat Linux instance on Amazon Web Service (AWS) EC2 instance for this.
Let’s go through the steps:
- Create an AWS EC2 instance.
- Edit Inbound rule in Security Group
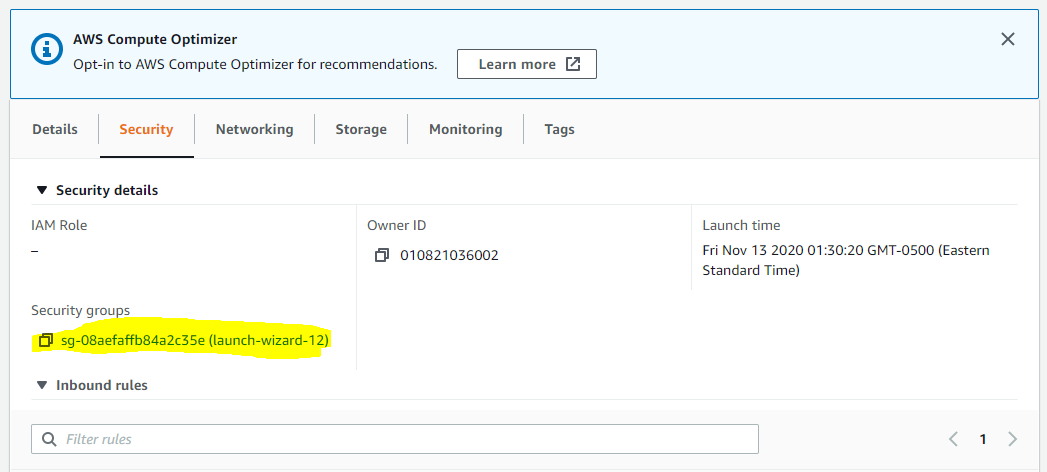
Spark shell application UI will start on port 4040. Let’s ensure that the Security group assigned to the AWS EC2 instance provides access to this port from any computer.
a. Open AWS EC2 instance, go to the Security tab and click on the Security group's name.
b. Click on Edit inbound rules
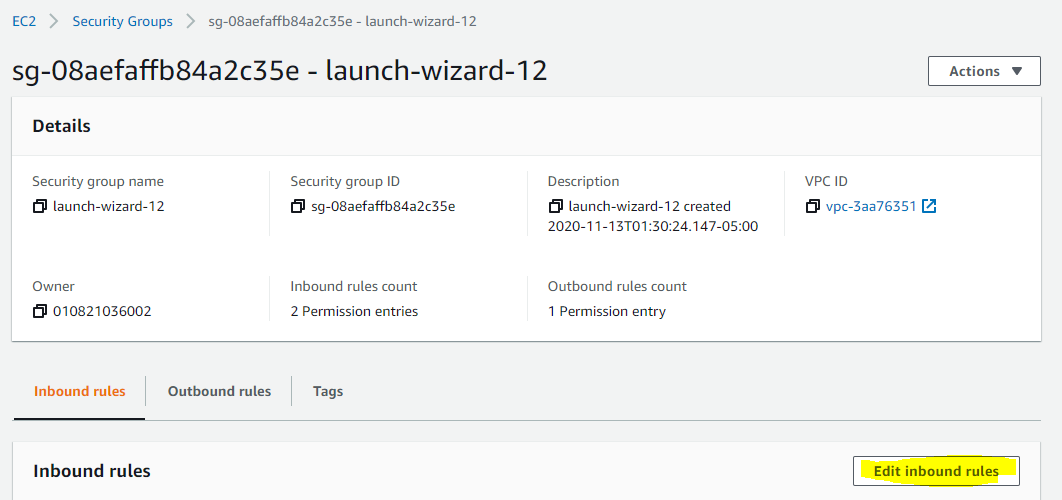
c. Add port 4040 to the rule. Although I am allowing 0.0.0.0/0, which means any computer over the internet, in real life project, you will allow access to your instance through this port only to specific IP addresses.

So far so good. Access the instance through putty and go through the following steps for installing Spark.
3. Start the instance through Putty and perform the below steps for installing Spark
a. First, check if wget is installed in your instance. If not, install it through yum install as shown below.
sudo yum install wget

b. Check if bzip2 is installed. If not, install it through yum
sudo yum install bzip2

c. Download spark files from Apache website through wget
sudo wget https://apache.claz.org/spark/spark-3.0.1/spark-3.0.1-bin-hadoop3.2.tgz

d. Untar the file
tar -xvf spark-3.0.1-bin-hadoop3.2.tgz

e. Move the file to /usr/local directory and create a soft link
sudo mv spark-3.0.1-bin-hadoop3.2 /usr/local
sudo ln -s /usr/local/spark-3.0.1-bin-hadoop3.2 /home/ec2-user/spark

f. Assign SPARK_HOME environment variable into the .bashrc file.
export SPARK_HOME=/home/ec2-user/spark
export PATH=$SPARK_HOME/bin:$PATH

g. Source the environment variables
source ~/.bashrc
echo $SPARK_HOME

h. Confirm java version installed.
java --version

i. If java is not installed, install at least JDK 8. It can be installed the yum
sudo yum install java-1.8.0-openjdk-develjava --version

j. Assign JAVA_HOME environment variable into .bashrc file.

k. Source environment variables and confirm JAVA_HOME returns the path to jdk folder.

Congratulations!! Installation is done and it’s time to start Spark in local mode. Note that, complete installation happened on only one computer. There is no cluster.
Operation
Now that the Spark installation is finished, let’s start a Spark session.
a. To start Spark, enter command spark-shell
spark-shell

b. Open a browser and enter the below address. Replace <public IP address> with the public IP address of your AWS EC2 instance.
http://<public IP address>:4040/jobs/
Environment tab


Jobs tab shows details of jobs running on Executors

You can also get start Spark Session details with the below Scala command.
sc.getConf.getAll.foreach(x=>println(x._1+": "+x._2))

Following are the details from each
- spark.home: Folder where the Spark is installed.
- spark.app.id: In this case, the Spark Shell is an application and this is the id assigned to it.
- spark. executor.id: This indicates the worker node where the executor is running. As this is a Local mode installation it says driver, indicating Spark context (driver, i.e. master) and executor running on the same node.
- spark.driver.host: Machine where Spark Context (driver) is installed.
- spark.driver.port: Port on which the Spark driver is listening.
- spar. master: local[*] indicates master is running in Local Mode and using as many logical cores as much available on the machine.
- spark.submit.deployMode: Spark context starts when the Spark application runs spark.submit command. This can happen on a local client where the application is running or on a cluster node. Here, the client indicates the spark.submit was submitted on the local machine where the application is launched.
Python & Spark
If you have reached so far in the document, please accept my gratitude for your dedication to learn Spark.
Spark supports Python language. This combination of Spark and Python is also referred to as PySpark. I love Python and will use it for developing applications on Spark.
Python Installation
I am going to install Anaconda, which has Python as well as Jupyter.
a. Download the latest version of Anaconda through wget.
sudo wget http://repo.continuum.io/archive/Anaconda3-4.3.0-Linux-x86_64.sh

b. You will get a .sh file. Run the below command to install Anaconda 3.
bash Anaconda3-4.3.0-Linux-x86_64.sh
Click on Enter and go through terms and conditions. Once you get the below message write yes.

Mention the location where you want to install anaconda3

c. Once Anaconda installation is finished, check Python and Jupyter version


Jupyter Configuration
For running Jupyter on AWS EC2 instance, you need to create a Jupyter configuration file.
a. Run the below command to create the Jupyter configuration file.
jupyter notebook --generate-config
This command will create a jupyter_notebook_config.py file.

b. Open the jupyter_notebook_config.py file and add the below lines at the top of the file.
c=get_config()
c.NotebookApp.ip='*'
c.NotebookApp.open_browser=False
c.NotebookApp.port=8888

c. Make sure to allow connection to port 8888 in the AWS security group inbound list.

d. Now you are ready to launch the jupyter notebook.
jupyter notebook

Take the HTTP URL mentioned and replace localhost with Public DNS or Public IP of your AWS EC2 instance.

Put this URL on any browser and Jupyter will launch.

Congratulations! you got Spark running, Python installed and Jupyter configured and running.
Next, we will connect Jupyter with Spark. If you open the folder where you installed Spark, you will find python as a directory there.

Connecting Pyspark with Juypter means adding the below lines to your bashrc file. This will setup the pyspark driver.
export PYSPARK_DRIVER_PYTHON=jupyter
export PYSPARK_DRIVER_PYTHON_OPTS='notebook'
Once this is set up, you can start the pyspark jupyter notebook just by entering the command pyspark.

Congratulations!! You have successfully installed Spark, Python, and Jupyter and now you are ready to create an application and run it on Spark.
Application Development
Welcome to this section of the article. Now you are all set to create a Spark application.
Before we start developing the PySpark application, let’s understand how data is stored in Spark. Spark uses Resilient Distributed Datasets (RDD), which is a logical collection of data partitioned across machines. We are going to use Python to create Spark RDD.
While Spark provides PySpark Dataframe and Spark SQL as a mode of interaction with Spark RDD and you will hardly directly work on RDD, it’s good to get a feel of it to understand what happens under the hood when you run Spark Data Frame or Spark SQL.
Launch your Jupyter notebook through the pyspark command and open Jupter notebook in a browser as explained above.
Enter the following snippet of code to import libraries (pyspark, NumPy). Stop and running Spark context and run a new Spark context. It creates a regular array of words.
Output:
['Hello,', 'this', 'is', 'my', 'first', 'Spark', 'program']
Now, it’s time to create an RDD with this list and understand how it stores the data in different partition.
Output:
pyspark.rdd.RDD
Very good, RDD is created. Now, if you want to know how RDD has stored data in different partitions, run the below command
RDD1.glom().collect()
Output:
[['Hello,', 'this', 'is'], ['my', 'first', 'Spark', 'program']]
This was a very small hands-on experience on how Spark RDD works.
However, in a real-life project, you will mostly use PySpark Dataframe or PySpark SQL for application.
Please refer to my article on PySpark explaining how to use PySpark Dataframe and PySpark SQL. Article goes through
Article use the Pima Indian Diabetes Database and develops a Machine Learning model to predict the probability of a patient having diabetes based on variables like BMI, insulin level, age, etc.
Conclusion
I hope this article helped you understand Spark from scratch and gave you enough insight to start exploring and doing things on your own. Sorry, it was a big article, but I didn’t want to miss any important steps.
Any questions, I am just a message away.
Recommend
About Joyk
Aggregate valuable and interesting links.
Joyk means Joy of geeK