

iOS MVVM Tutorial: Refactoring from MVC [FREE]
source link: https://www.raywenderlich.com/6733535-ios-mvvm-tutorial-refactoring-from-mvc
Go to the source link to view the article. You can view the picture content, updated content and better typesetting reading experience. If the link is broken, please click the button below to view the snapshot at that time.
Model-View-ViewModel (MVVM) is a design pattern that’s gained traction in the iOS development community in recent years. It involves a new concept called a view model . In iOS apps, a view model is a companion object to a view controller.

As shown above, the MVVM pattern consists of three layers:
- Model : App data that the app operates on.
- View : The user interface’s visual elements. In iOS, the view controller is inseparable from the concept of the view.
- ViewModel : Updates the model from view inputs and updates views from model outputs.
MVVM offers some advantages over Model-View-Controller , or MVC , which is the de facto approach in iOS:
- Reduced complexity : MVVM makes the view controller simpler by moving a lot of business logic out of it.
- Expressive : The view model better expresses the business logic for the view.
- Testability : A view model is much easier to test than a view controller. You end up testing business logic without having to worry about view implementations.
In this tutorial, you’ll refactor a weather app by changing its architecture from from MVC to MVVM. First you’ll move all the weather and location related logic from the view controller into the view model. Then, you’ll write unit tests for the view model to see how you can easily integrate testing into your new view model.
By the end of this tutorial, your app should allow you to select any location by name and view a weather summary of that location.
Getting Started
Start by downloading the project materials using the Download Materials button at the top or bottom of this tutorial. Then, open the begin project.
The app fetches the latest weather information from darksky.net and presents a summary of the current weather.
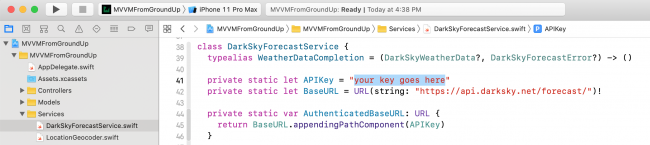
To use the Dark Sky API, you need to register for a free API key. The app won’t work until you add your own Dark Sky API key. Go to https://darksky.net/dev/register to register for your key.
After you get your API key, return to Xcode.
Under Services , open DarkSkyForecastService.swift . Then replace the value for APIKey with your new key.
Build and run.

You should see the weather for McGaheysville, VA and today’s date.
Introducing MVVM Roles and Responsibilities
Before diving into refactoring, it’s essential you understand what the view model and view controller do in the MVVM pattern.
The view controller is only responsible for altering views and passing view inputs to the view model. Consequently, you’ll remove any other logic from the view controller and move it to the view model.
In contrast, the view model is responsible for the following:
- Model inputs : Taking view inputs and updating the model.
- Model outputs : Passing model outputs to the view controller.
- Formatting : Formatting model data for display by the view controller.
Becoming Familiar With the Existing App Structure
Note : This section is an optional review of the app structure. If you’re already comfortable with MVC view controllers and want to get started on refactoring, you can skip ahead to Data Binding Using Box .
Familiarize yourself with the app in its current MVC design. First, open Project navigator as shown here:

Under Controllers , you’ll find WeatherViewController.swift . This is the view controller you’ll refactor to remove any use of model and service types.
Under Models
, you’ll find two different model objects: DarkSkyWeatherData
and Location
. DarkSkyWeatherData
is a struct that represents the data returned by the Dark Sky API. Location
is a simplified struct for location data Apple’s CLLocation
service returns.
Services
contains DarkSkyForecastService.swift
and LocationGeocoder.swift
. As the name indicates, DarkSkyForecastService
fetches the weather data from the Dark Sky API. LocationGeocoder
turns a string into a Location
.
Storyboards contains LaunchScreen and Weather storyboards.
Utilities and View Models are both empty. You’ll create files for these groups during the refactor.
WeatherViewController
When refactoring, you’ll primarily focus on WeatherViewController
. To understand WeatherViewController
, start by examining its private properties.
// 1
private let geocoder = LocationGeocoder()
// 2
private let defaultAddress = "McGaheysville, VA"
// 3
private let dateFormatter: DateFormatter = {
  let dateFormatter = DateFormatter()
  dateFormatter.dateFormat = "EEEE, MMM d"
  return dateFormatter
}()
// 4
private let tempFormatter: NumberFormatter = {
  let tempFormatter = NumberFormatter()
  tempFormatter.numberStyle = .none
  return tempFormatter
}()
-
geocodertakes aStringinput such as Washington DC and converts it to a latitude and longitude that it sends to the weather service. -
defaultAddresssets a default address. -
DateFormatterformats the date display. -
Finally,
NumberFormatterhelps present the temperature as an integer value.
Now, look at viewDidLoad()
:
override func viewDidLoad() {
  geocoder.geocode(addressString: defaultAddress) { [weak self] locations in
    guard
      let self = self,
      let location = locations.first
      else {
        return
      }
    self.cityLabel.text = location.name
    self.fetchWeatherForLocation(location)
  }
}
viewDidLoad()
calls geocoder
to convert defaultAddress
into a Location
. The callback uses the return location to fill in cityLabel
‘s text. Then, it passes location
into fetchWeatherForLocation(_:)
.
The last part of WeatherViewController
is fetchWeatherForLocation(_:)
.
func fetchWeatherForLocation(_ location: Location) {
  //1
  DarkSkyForecastService.weatherDataForLocation(
    latitude: location.latitude,
    longitude: location.longitude) { [weak self] (weatherData, error) in
    //2
    guard
      let self = self,
      let weatherData = weatherData
      else {
        return
      }
    self.dateLabel.text =
      self.dateFormatter.string(from: weatherData.currently.time)
    self.currentIcon.image = UIImage(named: weatherData.currently.icon)
    let temp = self.tempFormatter.string(
      from: weatherData.currently.temperature as NSNumber) ?? ""
    self.currentSummaryLabel.text =
      "\(weatherData.currently.summary) - \(temp)℉"
    self.forecastSummary.text = "\nSummary: \(weatherData.daily.summary)"
  }
}
This method only does two things:
- Calls the weather service and passes it the location’s latitude and longitude.
- Updates the views with the weather data provided by the weather service callback.
Now that you have a solid understanding of the existing app structure, it’s time to start refactoring.
Data Binding Using Box
In MVVM, you need a way to bind view model outputs to the views. To do that, you need a utility that provides a simple mechanism for binding views to output values from the view model. There are several ways to do such bindings:
- Key-Value Observing or KVO : A mechanism for using key paths to observe a property and get notifications when that property changes.
- Functional Reactive Programming or FRP : A paradigm for processing events and data as streams. Apple’s new Combine framework is its approach to FRP. RxSwift and ReactiveSwift are two popular frameworks for FRP.
- Delegation : Using delegate methods to pass notifications when values change.
- Boxing : Using property observers to notify observers that a value has changed.
In this tutorial, you’ll make use of boxing. For simple apps, a custom implementation of boxing will be more than enough.
Under Utilities , create a new Swift file. Name it Box . Then, add the following code to the file:
final class Box<T> {
  //1
  typealias Listener = (T) -> Void
  var listener: Listener?
  //2
  var value: T {
    didSet {
      listener?(value)
    }
  }
  //3
  init(_ value: T) {
    self.value = value
  }
  //4
  func bind(listener: Listener?) {
    self.listener = listener
    listener?(value)
  }
}
Here’s what the code above does:
-
Each
Boxcan have aListenerthatBoxnotifies when the value changes. -
Boxhas a generic type value. ThedidSetproperty observer detects any changes and notifiesListenerof any value update. -
The initializer sets
Box‘s initial value. -
When a
Listenercallsbind(listener:)onBox, it becomesListenerand immediately gets notified of theBox‘s current value.
Creating WeatherViewModel
Now that you’ve set up a mechanism for doing data binding between the view and view model, you can start to build your actual view model. In MVVM, the view controller doesn’t call any services or manipulate any model types. That responsibility falls exclusively to the view model.
You’ll start your refactor by moving code related to the geocoder and Dark Sky service from WeatherViewController
into the WeatherViewModel
. Then, you’ll bind views to the view model properties in WeatherViewController
.
First, under View Models , create a new Swift file named WeatherViewModel . Then, add the following code:
// 1
import UIKit.UIImage
// 2
public class WeatherViewModel {
}
Here’s the code breakdown:
-
First, add an import for
UIKit.UIImage. No otherUIKittypes need to be permitted in the view model. A general rule of thumb is to never importUIKitin your view models. -
Then, set
WeatherViewModel‘s class modifier topublic. You make it public in order for it to be accessible for testing.
Now, open WeatherViewController.swift . Add the following property:
private let viewModel = WeatherViewModel()
Here you initialize the view model inside the controller.
Next, you’ll move WeatherViewController
‘s LocationGeocoder
logic to WeatherViewModel
. The app won’t compile again until you complete all the following steps:
-
First cut
defaultAddressout ofWeatherViewControllerand paste it intoWeatherViewModel. Then, add a static modifier to the property. -
Next, cut
geocoderout of theWeatherViewControllerand paste it into theWeatherViewModel.
In WeatherViewModel
, add a new property:
let locationName = Box("Loading...")
The code above will make the app display “Loading…” on launch till a location has been fetched.
Next, add the following method into WeatherViewModel
:
func changeLocation(to newLocation: String) {
  locationName.value = "Loading..."
  geocoder.geocode(addressString: newLocation) { [weak self] locations in
    guard let self = self else { return }
    if let location = locations.first {
      self.locationName.value = location.name
      self.fetchWeatherForLocation(location)
      return
    }
  }
}
This code changes locationName.value
to “Loading…”
prior to fetching via geocoder
. When geocoder
completes the lookup, you’ll update the location name and fetch the weather information for the location.
Replace WeatherViewController.viewDidLoad()
with the code below:
override func viewDidLoad() {
  viewModel.locationName.bind { [weak self] locationName in
    self?.cityLabel.text = locationName
  }
}
This code binds cityLabel.text
to viewModel.locationName
.
Next, inside WeatherViewController.swift
delete fetchWeatherForLocation(_:)
.
Since you still need a way to fetch weather data for a location, add a refactored fetchWeatherForLocation(_:)
in WeatherViewModel.swift
:
private func fetchWeatherForLocation(_ location: Location) {
  DarkSkyForecastService.weatherDataForLocation(
    latitude: location.latitude,
    longitude: location.longitude) { [weak self] (weatherData, error) in
      guard
        let self = self,
        let weatherData = weatherData
        else {
          return
        }
  }
}
The callback does nothing for now, but you’ll complete this method in the next section.
Finally, add an initializer to WeatherViewModel
:
init() {
  changeLocation(to: Self.defaultAddress)
}
The view model starts by setting the location to the default address.
Phew! That was a lot of refactoring. You’ve just moved all service and geocoder logic from the view controller to the view model. Notice how the view controller shrunk significantly while also becoming much simpler.
To see your changes in action, change the value of defaultAddress
to your current location.
Build and run.

See that the city name now displays your current location. But the weather and date are not correct. The app is displaying the example information from the storyboard.
You’ll fix that next.
Formatting Data in MVVM
In MVVM, the view controller is only responsible for views. The view model is always responsible for formatting data from service and model types to present in the views.
In your next refactor, you’ll move the data formatting out of WeatherViewController
and into WeatherViewModel
. While you’re at it, you’ll add all the remaining data bindings so the weather data updates upon a change in location.
Start by addressing the date formatting. First, cut dateFormatter
from WeatherViewController
. Paste the property into WeatherViewModel
.
Next, in WeatherViewModel
, add the following below locationName
:
let date = Box(" ")
It’s initially a blank string and updates when the weather data arrives from the Dark Sky API.
Now, add the following inside WeatherViewModel.fetchWeatherForLocation(_:)
right before the end of the API fetch closure:
self.date.value = self.dateFormatter.string(from: weatherData.currently.time)
The code above updates date
whenever the weather data arrives.
Finally, paste in the following code to the end of WeatherViewController.viewDidLoad()
:
viewModel.date.bind { [weak self] date in
  self?.dateLabel.text = date
}
Build and run.

Now the date reflects today’s date rather than Nov 13 as in the storyboard. You’re making progress!
Time to finish the refactor. Follow these final steps to finish the data bindings needed for the remaining weather fields.
First, cut tempFormatter
from WeatherViewController
. Paste the property into WeatherViewModel
.
Then, add the following code for the remaining bindable properties into WeatherViewModel
:
let icon: Box<UIImage?> = Box(nil)  //no image initially
let summary = Box(" ")
let forecastSummary = Box(" ")
Now, add the following code to the end of WeatherViewController.viewDidLoad()
:
viewModel.icon.bind { [weak self] image in
  self?.currentIcon.image = image
}

viewModel.summary.bind { [weak self] summary in
  self?.currentSummaryLabel.text = summary
}

viewModel.forecastSummary.bind { [weak self] forecast in
  self?.forecastSummary.text = forecast
}
Here you have created bindings for the icon image, the weather summary and forecast summary. Whenever the values inside the boxes change, the view controller will automatically be informed.
Next, it’s time to actually change the values inside these Box
objects. In WeatherViewModel.swift
, add the following code to the end of completion closure in fetchWeatherForLocation(_:)
:
self.icon.value = UIImage(named: weatherData.currently.icon)
let temp = self.tempFormatter
  .string(from: weatherData.currently.temperature as NSNumber) ?? ""
self.summary.value = "\(weatherData.currently.summary) - \(temp)℉"
self.forecastSummary.value = "\nSummary: \(weatherData.daily.summary)"
This code formats the different weather items for the view to present them.
Finally, add the following code to the end of changeLocation(to:)
and before the end of the API fetch closure:
self.locationName.value = "Not found"
self.date.value = ""
self.icon.value = nil
self.summary.value = ""
self.forecastSummary.value = ""
This code makes sure no weather data is shown if no location is returned from the geocode call.
Build and run.

All of the weather information now updates for your defaultAddress
. If you’ve used your current location, then look out the window and confirm that the data is correct. :] Next, you’ll see how MVVM can extend an app’s functionality.
Adding Functionality in MVVM
So far, you can check the weather for your default location. But what if you want to know the weather somewhere else? You can use MVVM to add a button to check the weather at other locations.
You may have noticed the location symbol ➤ in the upper left corner. It’s a button that doesn’t work, yet. Next, you’ll hook that to an alert that prompts for a new location and then fetches the weather for that new location.
First, open Weather.storyboard . Then, open WeatherViewController.swift in the assistant editor.
Next, control-drag Change Location Button
to the end of WeatherViewController
. Name the method promptForLocation
.

Now add the following code to promptForLocation(_:)
:
//1
let alert = UIAlertController(
  title: "Choose location",
  message: nil,
  preferredStyle: .alert)
alert.addTextField()
//2
let submitAction = UIAlertAction(
  title: "Submit",
  style: .default) { [unowned alert, weak self] _ in
    guard let newLocation = alert.textFields?.first?.text else { return }
    self?.viewModel.changeLocation(to: newLocation)
}
alert.addAction(submitAction)
//3
present(alert, animated: true)
Here’s a breakdown of this method:
-
Create a
UIAlertControllerwith a text field. -
Add an action button for Submit
. The action passes the new location string to
viewModel.changeLocation(to:). -
Present the
alert.
Build and run.

Put in some different locations. You can try Paris, France or Paris, Texas. You can even put in some nonsense such as ggggg to see how the app responds.
Take a moment to reflect on how little code was needed in the view controller to add this new functionality. A single call to the view model triggers the flow for updating the weather data for the location. Smart, right?
Next, you’ll learn how to use MVVM to create unit tests.
Unit Testing With MVVM
One of MVVM’s big advantages is how much easier it makes creating automated tests.
To test a view controller with MVC, you must use UIKit
to instantiate the view controller. Then, you have to search through the view hierarchy to trigger actions and verify results.
With MVVM, you write more conventional tests. You may still need to wait for some asynchronous events, but most things are easy to trigger and verify.
To see how much simpler MVVM makes testing a view model, you’ll create a test that makes WeatherViewModel
change the location and then confirms that locationName
binding updates to the expected location.
First, under the MVVMFromMVCTests group, create a new Unit Test Case Class file named WeatherViewModelTests .
You must import the app for texting. Immediately below import XCTest
, add the following:
@testable import Grados
Now, add the following method to WeatherViewModelTests
:
func testChangeLocationUpdatesLocationName() {
  // 1
  let expectation = self.expectation(
    description: "Find location using geocoder")
  // 2
  let viewModel = WeatherViewModel()
  // 3
  viewModel.locationName.bind {
    if $0.caseInsensitiveCompare("Richmond, VA") == .orderedSame {
      expectation.fulfill()
    }
  }
  // 4
  DispatchQueue.main.asyncAfter(deadline: .now() + 2) {
    viewModel.changeLocation(to: "Richmond, VA")
  }
  // 5
  waitForExpectations(timeout: 8, handler: nil)
}
Here’s an explanation of the new test:
-
The
locationNamebinding is asynchronous. Use anexpectationto wait for the asynchronous event. -
Create an instance of
viewModelto test. -
Bind to
locationNameand only fulfill the expectation if the value matches the expected result. Ignore any location name values such as “Loading…” or the default address. Only the expected result should fulfill the test expectation. -
Begin the test by changing the location. It’s important to wait a few seconds before making the change so that any pending geocoding activity completes first. When the app launches, it triggers a
geocoderlookup.When it creates the test instance of the view model, it also triggers a
geocoderlookup. Waiting a few seconds allows those other lookups to complete before triggering the test lookup.Apple’s documentation explicitly warns that
CLLocationcan throw an error if the rate of requests is too high. - Wait for up to eight seconds for the expectation to fulfill. The test only succeeds if the expected result arrives before the timeout.
Click the diamond next to testChangeLocationUpdatesLocationName()
to run the test. When the test passes, the diamond will turn to a green checkmark.
From here, you can follow this example to create tests that confirm the other values for WeatherViewModel
. Ideally, you would inject a mock weather service to remove the dependency on darksky.net for the tests.
Reviewing The Refactoring to MVVM
Good job getting this far! As you look back over the changes, you can see some of the benefits of MVVM that resulted from the refactoring:
-
Reduced complexity
:
WeatherViewControlleris now much simpler. -
Specialized
:
WeatherViewControllerno longer depends on any model types and only focuses on the view. -
Separated
:
WeatherViewControlleronly interacts with theWeatherViewModelby sending inputs, such aschangeLocation(to:), or binding to its outputs. -
Expressive
:
WeatherViewModelseparates the business logic from the low level view logic. -
Maintainable
: It’s simple to add a new feature with minimal modification to the
WeatherViewController. -
Testable
: The
WeatherViewModelis relatively easy to test.
However, there are some trade-offs to MVVM that you should consider:
- Extra type : MVVM introduces an extra view model type to the structure of the app.
-
Binding mechanism
: It requires some means of data binding, in this case the
Boxtype. - Boilerplate : You need some extra boilerplate to implement MVVM.
- Memory : You must be conscious of memory management and memory retain cycles when introducing the view model into the mix.
Where to Go From Here?
You can download the completed version of the project using the Download Materials button at the top or bottom of this tutorial.
MVVM has become a core competency for professional iOS developers. In many professional settings, you should be familiar with MVVM and be able to implement it. This is especially true given Apple’s introduction of the Combine framework, which enables reactive programming.
The Design Patterns By Tutorials book is a great source for more on the MVVM pattern.
If you want to learn more about the Combine framework and how to implement MVVM using Combine, check out this tutorial onMVVM with Combine or the Combine: Asynchronous Programming With Swift book.
For more on Key-Value Observing, check out What’s New in Foundation: Key-Value Observing .
I hope you’ve enjoyed this tutorial. If you have any questions or comments, please join the forum discussion below!
Recommend
About Joyk
Aggregate valuable and interesting links.
Joyk means Joy of geeK