

4 Ways To Manage State In React in 2024
source link: https://blog.bitsrc.io/ways-to-manage-state-in-react-in-2024-6a22a5f5974e
Go to the source link to view the article. You can view the picture content, updated content and better typesetting reading experience. If the link is broken, please click the button below to view the snapshot at that time.
4 Ways To Manage State In React in 2024
Explore the Context API, Redux, React Query and MobX for 2024.

If you’re working with React, you’ve definitely worked with state. In fact, I’d guarantee that if you open up a React component of yours, you’d at least see one implementation of useState.
State is needed to manage dynamic pieces of your component. But, sometimes, your state doesn’t just exist in one component, but rather in a tree of components.
For example, if you had a theme of Light or Dark, you’d need to convey to all of your components the current theme that you’re on so that you can update the color theme accordingly.
One approach is to pass the theme as a prop to all of your components, but this can lead to prop drilling. For instance, some components might not leverage your theme. So in such cases, you need to come up with intuitive approaches on managing state that makes your code more cleaner and scalable.
Therefore, this article will compare four popular state management approaches in React: Context API, Redux, React Query, and MobX and will aim to assess it under the following criteria:
- Simplicity: How easy is it to set up and use the option?
- Performance: How well does the option optimize the rendering and fetching of data?
- Scalability: How well does the option handle complex and large-scale applications?
- Compatibility: How well does the option work with other React features or libraries?
Context API
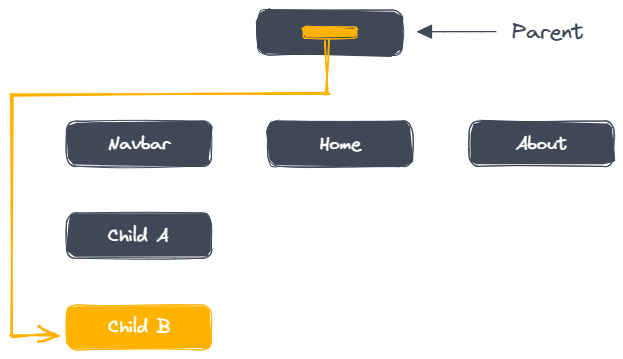
Context API is a built-in State Management technique in React that lets you create and consume global data across your component tree without having to pass props down manually.
It is simple to use and does not require any external dependencies, but it may not be suitable for complex state management scenarios, as it does not provide any performance optimizations, caching, or data fetching capabilities.
With React Context, you have two things:
- A Consumer: This lets you access the state for a selected set of Child components.
- A Provider: This lets you create and manage your context and holds the state that is passed around your component tree.
- Native to React and does not add any extra complexity or bundle size to your application.
- Easy to set up and use, as you only need to create a context object, a provider component, and a consumer component or hook.
- Can be combined with other state management techniques, such as useState, useReducer, or custom hooks, to handle different types of data.
- May not be suitable for complex state management scenarios, as it does not provide any performance optimizations, caching, or data fetching capabilities. You may need additional hooks or custom logic to handle these aspects.
- May be difficult to debug or test, as the context data is not easily accessible from the devtools or the component tree.
But, if you’re interested in adopting the Context API, here’s a simple implementation:
// ThemeContext.tsx
import React, { createContext, useContext, useState, ReactNode } from 'react';

// Define the type for our context state
type Theme = 'light' | 'dark';

// Define the type for our context, including the theme and setTheme function
interface ThemeContextType {
  theme: Theme;
  setTheme: (theme: Theme) => void;
}

// Create the context with a default value
const ThemeContext = createContext<ThemeContextType | undefined>(undefined);

// Define the type for the provider's props, including children
interface ThemeProviderProps {
  children: ReactNode;
}

// Create the ThemeProvider component
export const ThemeProvider: React.FC<ThemeProviderProps> = ({ children }) => {
  const [theme, setTheme] = useState<Theme>('light'); // Default theme is light

// Value to be passed to the provider
  const value = { theme, setTheme };

return <ThemeContext.Provider value={value}>{children}</ThemeContext.Provider>;
};

// Custom hook to use the theme context
export const useTheme = (): ThemeContextType => {
  const context = useContext(ThemeContext);
  if (!context) {
    throw new Error('useTheme must be used within a ThemeProvider');
  }
  return context;
};
If you look at the implementation, a Theme Context is first defined with the theme. Next a provider is created that accepts a set of Children.
Note: These children will be able to access the state passed from Theme Context as it’s wrapped in the provider.
Finally, you can use the theme in your app by wrapping the provider. In this case, I’ve wrapped the theme for the “App” component meaning that any React component rendered will be able to use the Theme.
// App.tsx or index.tsx
import React from 'react';
import ReactDOM from 'react-dom';
import { ThemeProvider } from './ThemeContext'; // Adjust the path as necessary
import App from './App'; // Your main App component

ReactDOM.render(
  <ThemeProvider>
    <App />
  </ThemeProvider>,
  document.getElementById('root')
);
Redux
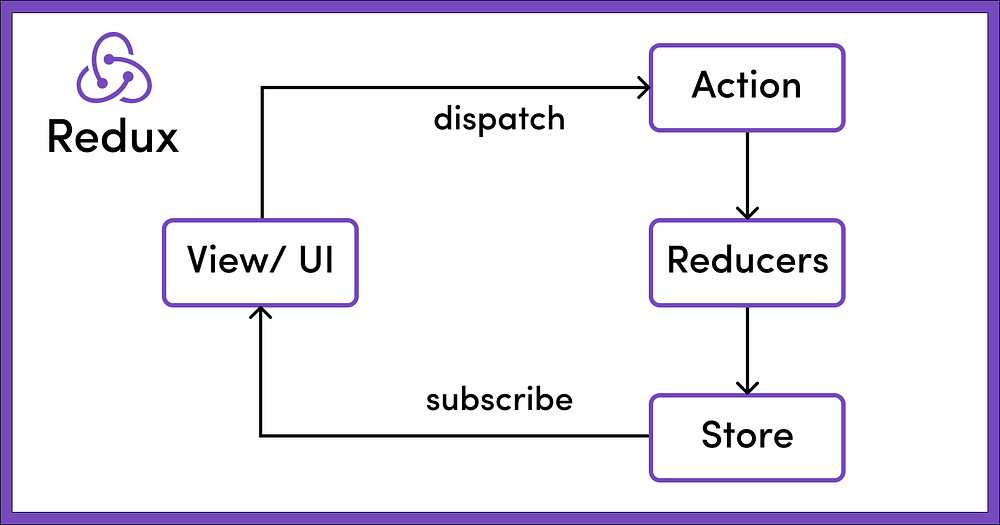
Redux is an industry standard state management library that leverages the flux architecture to create an immutable data store.
It adopts a technique where your data is stored in a single store and your app will rely on the store to get the data (as a single source of truth). It also has powerful devtools support, time-travel debugging, and a rich ecosystem of middleware and utilities, but it also comes with a lot of boilerplate code, a steep learning curve, and a verbose syntax.
- Provides predictable and consistent state management, as the state is always derived from the previous state and the dispatched action, following a pure function called a reducer.
- Enables easy debugging and testing, as the state and the actions are serializable and can be inspected and manipulated using the devtools or the Redux Toolkit.
- Facilitates scalability and maintainability, as the state is centralized and modularized, and the logic is separated from the UI components.
- Comes with a lot of boilerplate code, a steep learning curve, and a verbose syntax. You may need to use additional libraries such as Redux Toolkit, Saga, Thunk, Reselect, or Immer to simplify and enhance your Redux experience.
- May introduce performance issues, as the state is stored in a single object, which can grow large and complex over time, and may cause unnecessary re-rendering of components if not optimized properly.
- May not be the best choice for simple or local state management, as it adds extra complexity and overhead to your application, and may not leverage some of the React features or best practices, such as hooks, functional components, or immutability.
If you’re keen on leveraging React Redux for your project, you’d need four things:
- Actions: JavaScript objects that represent an intention to change the state of the application and are the only way to get data into the store.
- Dispatchers: Function that is available on the Redux store and is used to dispatch actions. When an action is dispatched, Redux passes the action to the reducer to compute the new state.
- Reducers: Pure functions that take the current state and an action as arguments and return the next state of the application.
- Store: The state is the single source of truth where all your app data resides in.
If you’re keen on implementing Redux, here’s a simple implementation:
// ThemeToggleRedux.tsx
import React from 'react';
import { createStore } from 'redux';
import { Provider, useSelector, useDispatch, TypedUseSelectorHook } from 'react-redux';

// Define action types
const SET_THEME = 'SET_THEME';

// Define action creators
const setTheme = (theme: 'light' | 'dark') => ({
  type: SET_THEME,
  payload: theme,
});

// Define the initial state type
interface ThemeState {
  theme: 'light' | 'dark';
}

// Initial state
const initialState: ThemeState = {
  theme: 'light',
};

// Reducer
const themeReducer = (state = initialState, action: { type: string; payload: 'light' | 'dark' }) => {
  switch (action.type) {
    case SET_THEME:
      return { ...state, theme: action.payload };
    default:
      return state;
  }
};

// Create store
const store = createStore(themeReducer);

// Typed useSelector hook
const useTypedSelector: TypedUseSelectorHook<ThemeState> = useSelector;

// ThemeToggleComponent
const ThemeToggleComponent: React.FC = () => {
  const theme = useTypedSelector((state) => state.theme);
  const dispatch = useDispatch();

return (
    <div>
      <p>Current theme is {theme}.</p>
      <button onClick={() => dispatch(setTheme(theme === 'light' ? 'dark' : 'light'))}>
        Toggle Theme
      </button>
    </div>
  );
};

// App Component with Redux Provider
const AppWithRedux: React.FC = () => (
  <Provider store={store}>
    <ThemeToggleComponent />
  </Provider>
);

export default AppWithRedux;
React Query
React Query is a newer addition that focuses on managing the state of your server-side data, such as fetching, caching, synchronizing, and updating.
It provides a set of custom hooks that allow you to query and mutate your data easily while handling loading, error, and stale states. It also offers features such as background fetching, pagination, optimistic updates, and automatic refetching, but it does not handle your local or UI state, so you may need to use another solution for that aspect.
- Simplifies and optimizes the data fetching process, as it abstracts away the logic of fetching, caching, and updating the data, and provides a consistent and declarative API for querying and mutating the data.
- Improves the user experience and performance, as it automatically caches the data and refetches it when needed, avoiding unnecessary requests and displaying the latest data to the user.
- Integrates well with other state management libraries, such as Redux or Context API, as it only handles the server-side data, and leaves the local or UI state to other solutions.
- Does not handle your local or UI state, so you may need to use another solution for that aspect.
- May not be compatible with some of the older browsers or environments, as it relies on some of the modern JavaScript features, such as async/await, fetch, or AbortController.
If you’re keen on leveraging React Query, here’s a simple implementation:
First, you’ll need to set up React Query. It doesn’t require a lot of boilerplate to get started. All you need to do is wrap yourcomponent tree with QueryClientProvider and to create a QueryClient instance.
// App.tsx
import React from 'react';
import { QueryClient, QueryClientProvider } from 'react-query';
import ExampleComponent from './ExampleComponent'; // This will be our component using React Query

// Create a client
const queryClient = new QueryClient();

export default function App() {
  return (
    <QueryClientProvider client={queryClient}>
      <ExampleComponent />
    </QueryClientProvider>
  );
}
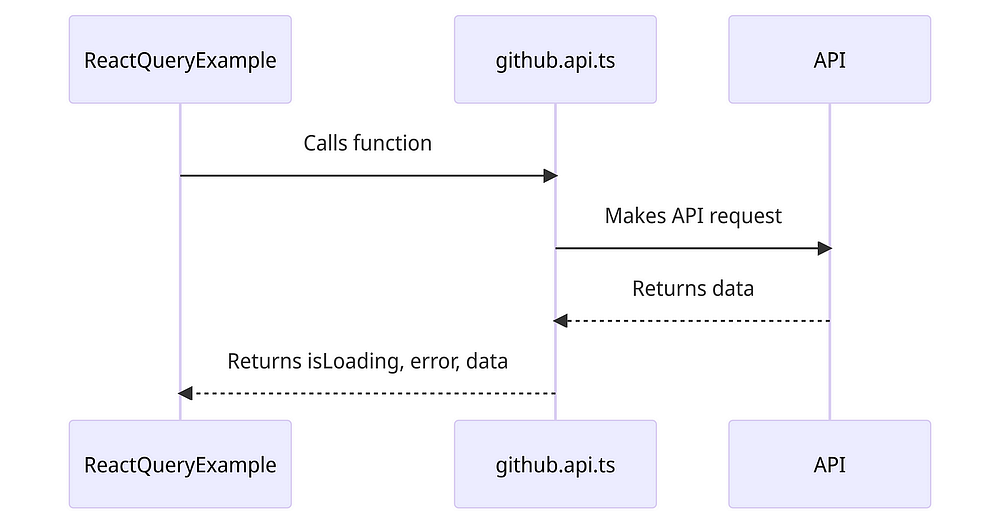
Next, let’s use React Query in a component to fetch data from an API. We’ll use the useQuery hook for this purpose. This hook is used to fetch, cache, and update data in your React components.
For demonstration, let’s assume we have an API endpoint https://api.example.com/data that returns some data we want to display.
// ExampleComponent.tsx
import React from 'react';
import { useQuery } from 'react-query';

// Dummy function to fetch data from an API
const fetchData = async () => {
  const response = await fetch('https://api.example.com/data');
  if (!response.ok) {
    throw new Error('Network response was not ok');
  }
  return response.json();
};

export default function ExampleComponent() {
  // Use the useQuery hook to fetch data
  const { data, error, isLoading } = useQuery('dataKey', fetchData);

if (isLoading) return <div>Loading...</div>;
  if (error instanceof Error) return <div>An error occurred: {error.message}</div>;

return (
    <div>
      <h1>Data</h1>
      {/* Render your data here */}
      <pre>{JSON.stringify(data, null, 2)}</pre>
    </div>
  );
}
Three things happen here:
QueryClientandQueryClientProvider: These are used to set up the React Query environment. TheQueryClientis responsible for managing queries and mutations, whileQueryClientProvidermakes the React Query functionality available to any nested components.useQueryHook: This hook is used to fetch data in a component. It requires a unique key for each query (to cache and manage the data) and a function that returns a promise that resolves to the data.- Fetching and Rendering Data: The
useQueryhook provides several state variables such as data, isLoading, and error, which can be used to handle the UI state based on the data fetching status.
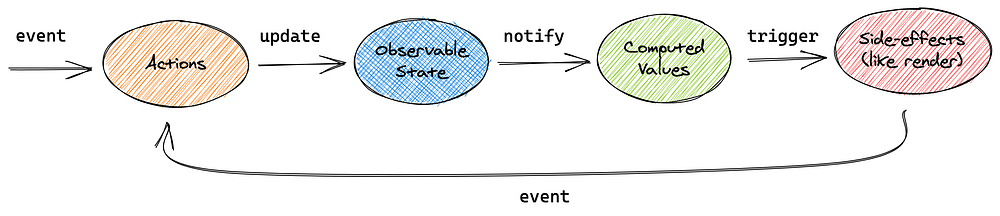
MobX is a library that leverages the power of observables and proxies to create reactive and mutable data sources that can be directly written to or read from.
It automatically tracks and updates your UI components when the data changes, without requiring any explicit actions or reducers. It also supports TypeScript, automatic type inference, and devtools integration, but it may not be compatible with some of the React features or best practices, such as hooks, functional components, or immutability.
- Provides a simple and intuitive state management, as the state is just plain JavaScript objects, arrays, or primitives, which can be mutated directly, and the UI components are just functions or classes, which can access the state directly.
- Enables high performance and minimal re-rendering, as it only updates the components that depend on the changed data, using a fine-grained dependency tracking system and a batched update mechanism.
- Facilitates rapid development and prototyping, as it does not require any boilerplate code, complex setup, or strict rules, and allows you to write less code and focus more on the logic and the UI.
- Some of the React features or best practices, such as hooks, functional components, or immutability, may not work well with MobX. Also, some of the linting or testing tools may have issues with MobX, as it uses some of the advanced JavaScript features, such as decorators, proxies, or generators.
- It may cause bugs or unexpected behaviors, as the state can be mutated from anywhere and the UI components can be updated at any time. Also, MobX may make it hard to debug or test, as the state and the UI are not easily distinguishable or inspectable.
To use MobX, you’ll need to follow these steps:
- Define a Store: Create a class that represents your store, including observable properties and actions to modify those properties.
- Create a Store Instance: Instantiate your store so it can be provided to the React component tree.
- Use the Store in React Components: Utilize the MobX observer function to make your React components reactive to store changes.
Here’s a simple implementation of a Theme implementation using MobX:
// ThemeToggleMobX.tsx
import React from 'react';
import { makeAutoObservable } from 'mobx';
import { observer } from 'mobx-react-lite';

// Step 1: Define the Store
class ThemeStore {
  theme: 'light' | 'dark' = 'light'; // Initial theme

constructor() {
    makeAutoObservable(this);
  }

// Action to toggle the theme
  toggleTheme = () => {
    this.theme = this.theme === 'light' ? 'dark' : 'light';
  };
}

// Step 2: Create an instance of the store
const themeStore = new ThemeStore();

// Step 3: Define a React component that uses the store
const ThemeToggleComponent: React.FC = observer(() => {
  return (
    <div>
      <p>Current theme is {themeStore.theme}.</p>
      <button onClick={themeStore.toggleTheme}>Toggle Theme</button>
    </div>
  );
});

// App Component
const AppWithMobX: React.FC = () => (
  <div>
    <ThemeToggleComponent />
  </div>
);

export default AppWithMobX;
Three things happen here:
- MobX Store (ThemeStore): This class holds the theme observable property and a toggleTheme action. The makeAutoObservable call automatically marks all properties as observable and actions as actions, making the state management simple and efficient.
- Observer Component (ThemeToggleComponent): This component is wrapped with the observer function from mobx-react-lite. It automatically re-renders when observed data changes, in this case, the theme property. Thus, when the theme is toggled, the component updates to reflect the current theme.
- Usage: The AppWithMobX component simply renders the ThemeToggleComponent. Since the ThemeToggleComponent is observed, it responds reactively to changes in the MobX store.
Conclusion
As you can see, each of these state management options in React has its own strengths and weaknesses, and you may need to consider factors such as your project size, complexity, requirements, preferences, and learning curve when choosing one.
You may also want to experiment with combinations or alternatives to find the best fit for your use case.
I hope this article was helpful and informative.
Recommend
About Joyk
Aggregate valuable and interesting links.
Joyk means Joy of geeK