

Getting Started with an Angular App in 2024
source link: https://blog.bitsrc.io/angular-in-2024-217a5d66c380
Go to the source link to view the article. You can view the picture content, updated content and better typesetting reading experience. If the link is broken, please click the button below to view the snapshot at that time.
Getting Started with an Angular App in 2024
Build better Angular apps in 2024
If you’ve build production apps with Angular, chances are that you’ve run into performance issues with the Angular compiler. Let me ask you a simple question:
Have you ever made a change in your Angular app in development and waited for a long time for the compilation to take place?
If you’re working on a small project, you might not face performance issues like this. But, I’ve worked on an Angular project that uses hundreds of components, and even with Lazy Loading and Module Splitting, it causes slow load times in production and drastically impact user experience.
So, thats where this article comes into the picture. We’re going to walk through a modern approach to Angular development that focuses on shifting away from building giant monoliths, and focus on building composable Angular apps that are much easier to maintain.
Pst, if you want to check out the code, here’s the Bit Scope.
Let’s Build an Angular App with Bit
If you’re unfamiliar with Bit, it’s a build system that lets you design, develop, build, and version your components in isolated environments.
It lets you build apps as independent components where Bit keeps track of the usages of the components across your tree and leverages its CI Server — Ripple CI, to propagate changes to the component tree.
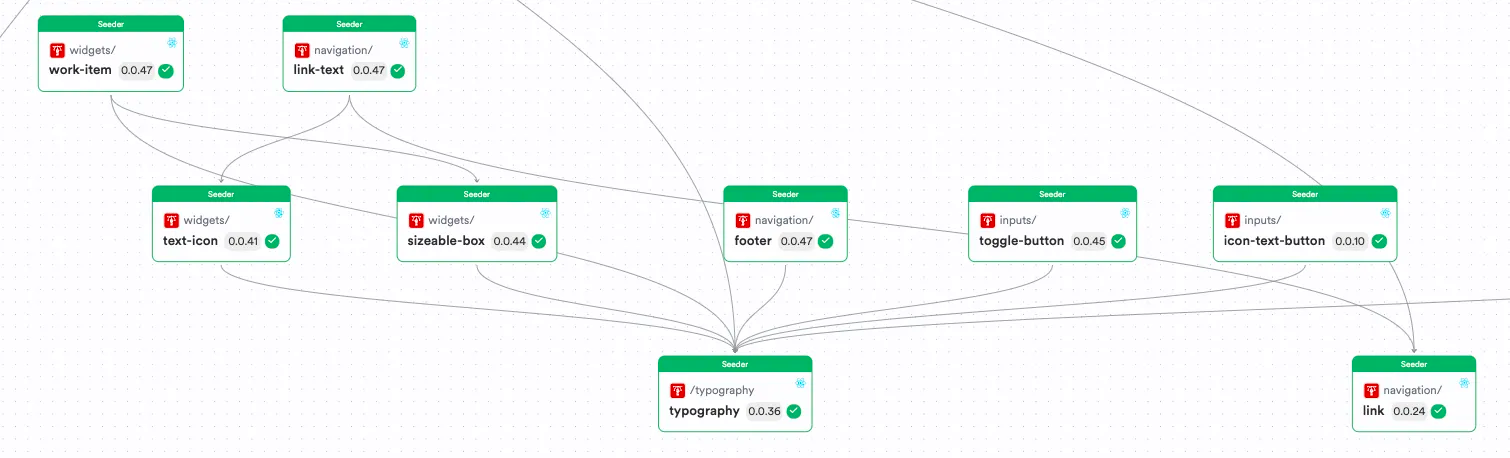
If you take a look at this sample component tree, you can notice that the Typography component is being used across the design system. Additionally, there are more components that leverage other components, but in different implementations.
So, in a nutshell, we are making our components composable and pluggable in any nature. This is true in all front-end components.
Additionally, if you make a change to a component in this tree, you’ll want to make sure that all the components that depend on this single component get updated right?
For example, if I introduced a new variant in the Typography component, would you want your IconTextButton to know that a change was made automatically?
Bit leverages Ripple CI and understands the changes in the tree and will automatically update the changes and ensure the components run on the latest version!
Pretty cool, isn’t it?
Let’s get our hands dirty and deploy an Angular app using Bit on Netlify!
Step 01 — Pre-requisites
First, you’ll need to install the Bit CLI using the command:
npx @teambit/bvm install
Next, you’ll need to verify that the CLI has been installed successfully by running the command:
bit --version
If you have installed Bit correctly, you should see the screenshot below.

Next, you will need an account on Bit Cloud to host your composable app.
Step 02 — Creating an Angular Workspace
Next, you’ll have to create a Bit workspace to help build composable Vue.js components we can reuse across applications!
To do so, run the command:
bit new hello-world-angular my-hello-world-angular --env teambit.community/starters/hello-world-angular --default-scope lakinduhewa.angular
Tip: Make sure to replace lakinduhewa.angular with your Bit Username and Scope.
If you’ve executed the command successfully, you should see the output:
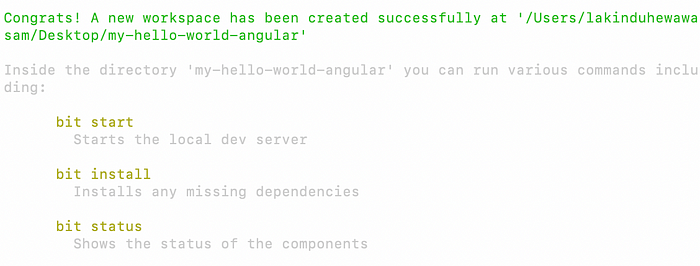
Next, go ahead and launch your dev server with the command:
bit start
You should see the output on localhost:3000:
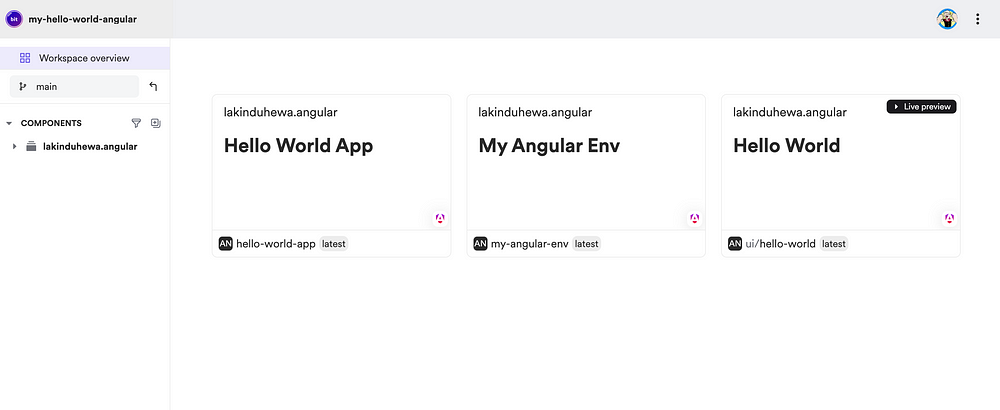
You should see three components generated for you:
- Hello World App: This is an Angular App Component. It is a container that lets you run your components outside of your Bit Server, and is a deployable unit.
- Angular Environment: This is a development environment that holds all the dependencies, linting and build configurations that we will need when we build an independent Bit Component. Simply put, you don’t need an
angular.jsonanymore. Everything is controlled by your environment. - Hello World Component: This is a sample Bit creates for us.
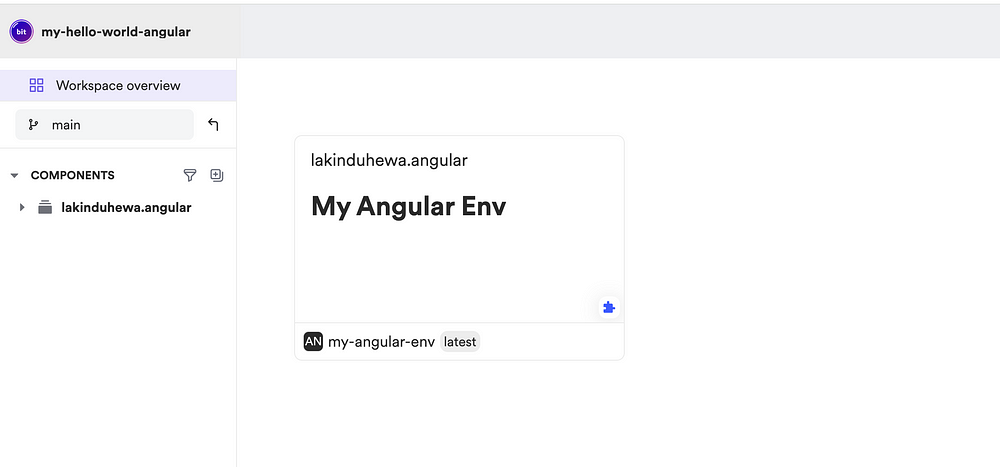
Let’s clean the workspace and get rid of the App and the Dummy Component using the command:
bit remove ui/hello-world && bit remove hello-world-app
You should see the output below:
Step 03 — Creating a Sample Angular App with Bit
Let’s create a deployed app in Angular. Let’s build a sample blog app that renders a list of articles. So, we’d need three things:
- A Deployable Angular app that serves the article list.
- An entity that holds the Article data shape
- A Node.js util function that returns a list of blogs.
Building an Article Entity Component
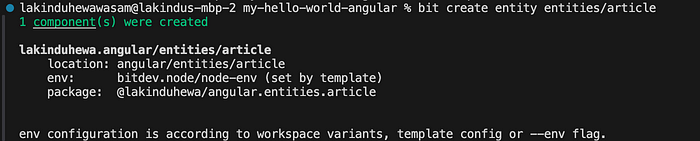
Let’s first create an entity component. To do so, run the command:
bit create entity entities/article
If you run into an error, make sure you add the line —
"bitdev.node/node-env"to yourteambit.generator/generatorentry in your workspace.jsonc.
After running the command, you should see the output:
Afterward, open up your article.ts and update it as shown below:
export type PlainArticle = {
  title: string;
  description: string
}

export class Article {
  private constructor(
    /**
     * title of the article instance
     */
    readonly title: string,

/**
     * description of the article
     */
    readonly description: string
  ) { }

/**
   * serialize a Article into
   * a serializable object.
   */
  toObject() {
    return {
      title: this.title,
      description: this.description,
    };
  }

/**
   * create a Article object from a
   * plain object.
   */
  static from(plainArticle: PlainArticle) {
    return new Article(
      plainArticle.title,
      plainArticle.description
    );
  }
}
As you can see, Bit offers highly maintainable entity component. You can include validation logic for your entity inside the from function where you can throw errors if fields like the title is missing.
Apart from that, you can define unit tests for your entity. Open your article.spec.ts and include the code:
import { Article } from './article.js';
const title = 'Sample Title';
const description = 'Sample Description';
it('has should create an article', () => {
const article = Article.from({ title, description });
expect(article.title).toBe(title);
expect(article.description).toBe(description);
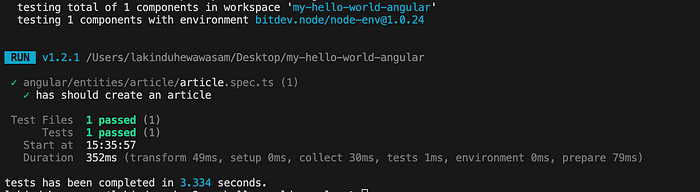
});As you can see, we’ve written a unit test to make sure the Article object is initialized with correct data. To confirm, let’s execute the tests using the command:
bit test
Your tests should pass as shown below:
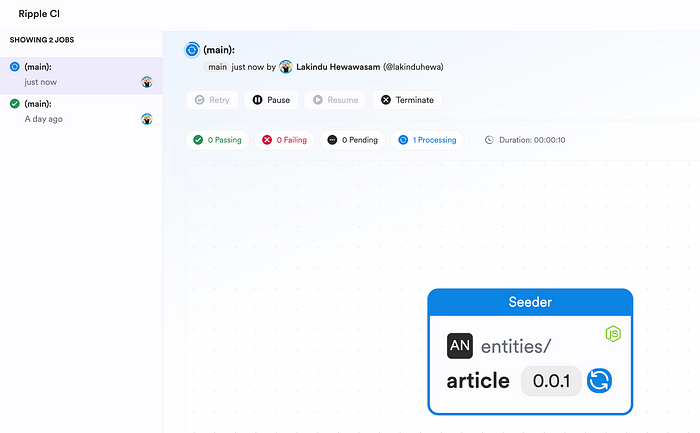
Next, let’s ship this off to Bit Cloud using the commands:
bit tag && bit export
This will trigger a Ripple Build to build the component:
Creating a Node.js Function To Fetch Articles
Next, let’s create a mock function that returns a set of articles. To do so, let’s create a Node.js Function component using the command:
bit create module backend/get-articles
You should see the output:

Next, open up get-articles.ts and update it as follows:
import { Article } from "@lakinduhewa/angular.entities.article";
const articles: Article[] = [
Article.from({ description: 'Sample Description 01', title: 'Sample Title 01' }),
Article.from({ description: 'Sample Description 02', title: 'Sample Title 02' }),
Article.from({ description: 'Sample Description 03', title: 'Sample Title 03' }),
Article.from({ description: 'Sample Description 04', title: 'Sample Title 04' }),
Article.from({ description: 'Sample Description 05', title: 'Sample Title 05' }),
Article.from({ description: 'Sample Description 06', title: 'Sample Title 06' }),
]
/**
* returns a list of articles
*/
export function getArticles(): Article[] {
return articles;
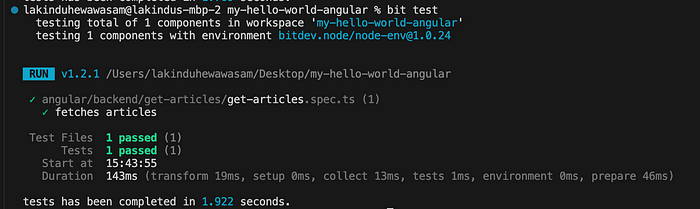
}As you can see we’re using the Entity we created and we’re returning a list of mock articles. Let’s test this by updating its test file:
import { getArticles } from './get-articles.js';

it('fetches articles', () => {
  expect(getArticles().length).toBeGreaterThan(0);
});
After running the tests, you should see your module working:
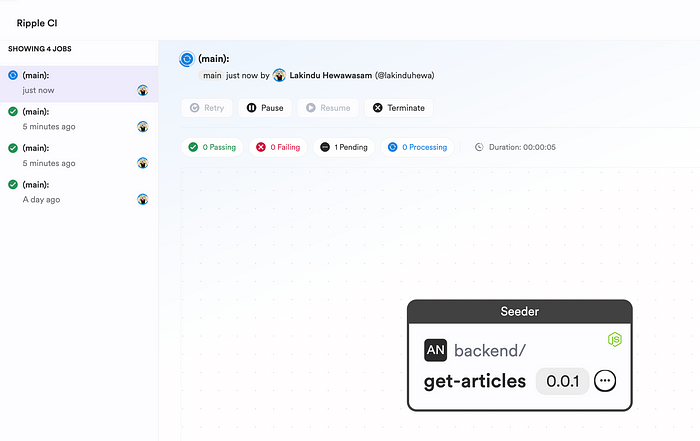
Next, ship it off to Bit Cloud. You should see your Ripple Build:
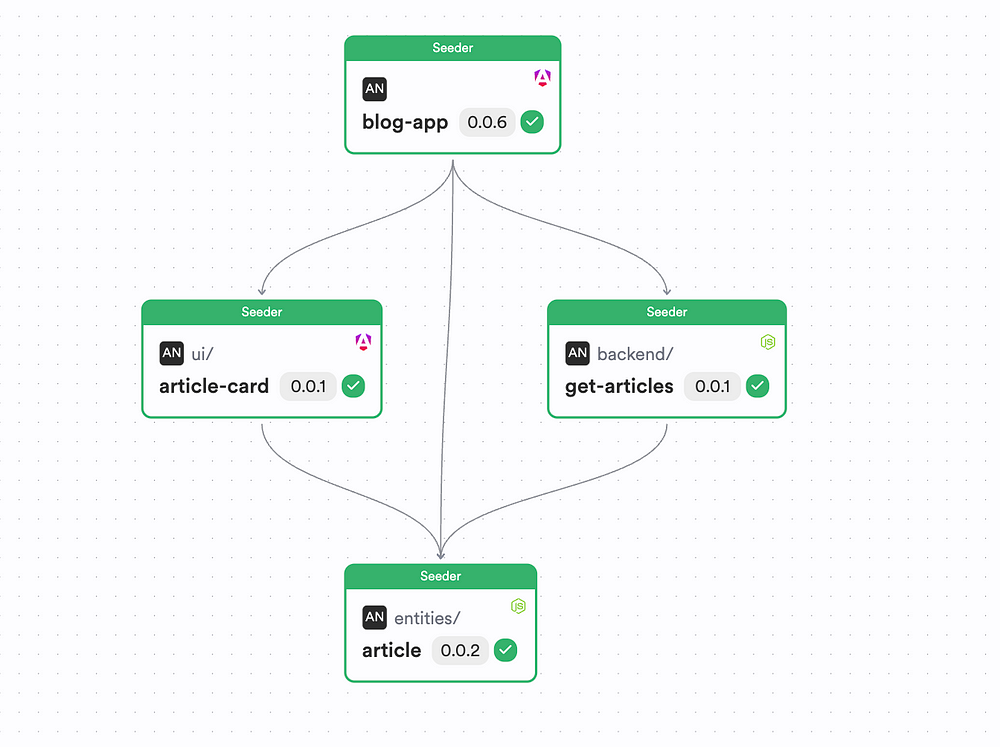
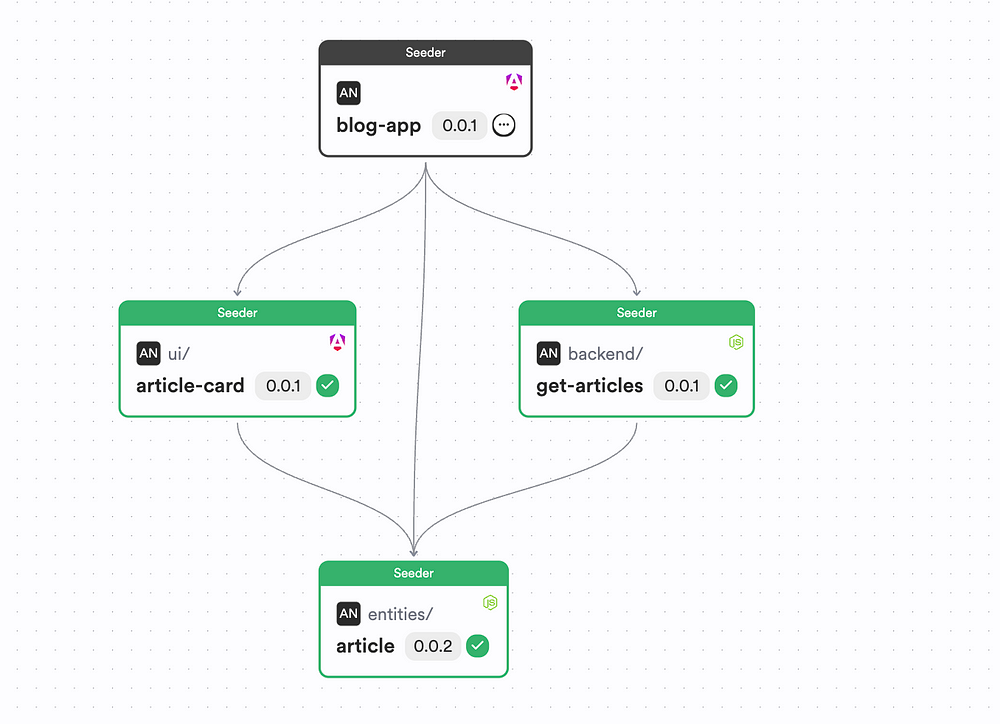
If you inspect your component tree, you can see the following:
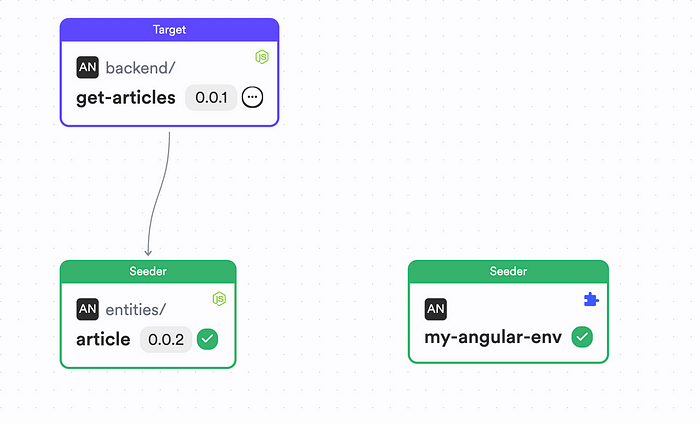
You can see that the Module we created depends on the Entity.
Creating an Article UI Component
Next, let’s create a simple UI component that can be used to render an article. To do so, create an Angular component using the command:
bit create ng-standalone ui/article-card
This will create an Angular Component and will display the output:

Open your article-card.component.ts and include the code:
import { Component, Input } from '@angular/core';
import { CommonModule } from '@angular/common';
import { Article } from '@lakinduhewa/angular.entities.article';

@Component({
  selector: 'article-card',
  standalone: true,
  imports: [CommonModule],
  template: `
    <div class="card">
      <h2>{{ article.title }}</h2>
      <p>{{ article.description }}</p>
    </div>
`,
  styleUrls: ['./article-card.component.scss']
})
export class ArticleCardComponent {
  @Input() article!: Article;
  constructor() { }
}
Next, update your CSS:
:host {
font-size: inherit;
}
.card {
box-shadow: 0 4px 8px 0 rgba(0, 0, 0, 0.2);
transition: 0.3s;
border-radius: 5px; /* 5px rounded corners */
padding: 16px;
margin: 16px 0;
background-color: white; /* Light theme card background */
}
.card:hover {
box-shadow: 0 8px 16px 0 rgba(0, 0, 0, 0.2); /* Hover effect */
}
h2 {
margin-top: 0;
color: #333; /* Dark grey color for the title */
}
p {
color: #666; /* Lighter grey color for the description */
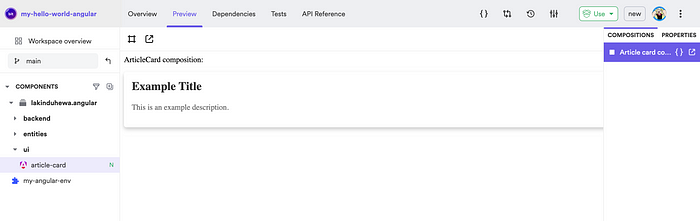
}Afterward, you can define a simple composition for your composition. This lets users see how your component will look like. To do so, open up your article-card.composition.ts and include the following:
import { Component } from '@angular/core';
import { ArticleCardComponent } from './article-card.component';
import { Article, PlainArticle } from '@lakinduhewa/angular.entities.article';


@Component({
  standalone: true,
  selector: 'article-card-composition-cmp',
  imports: [ArticleCardComponent],
  template: `ArticleCard composition: <article-card
   [article]="articleInstance"
  />`
})

export class ArticleCardCompositionComponent {
  articleInstance: Article;

constructor() {
    const plainArticle: PlainArticle = {
      title: 'Example Title',
      description: 'This is an example description.',
    };
    this.articleInstance = Article.from(plainArticle);
  }
}
Afterward, you can head back to your Bit server and see the output:
Creating an Angular App
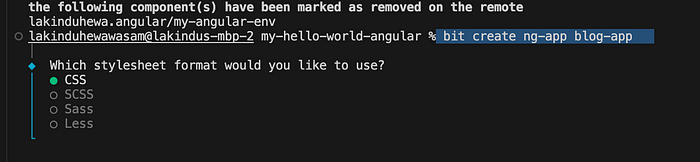
Now, all thats left is to create an Angular app. Create an app using the command:
bit create ng-app blog-app
This will launch a wizard:
Proceed by giving these configurations:

Finally, you should see the output:
Next, open up your app.component.ts and let's use the ArticleCard and the Mock Util we created:
import { Component } from '@angular/core';
import { CommonModule } from '@angular/common';
import { RouterOutlet } from '@angular/router';
import { getArticles } from '@lakinduhewa/angular.backend.get-articles';
import { ArticleCardComponent } from '@lakinduhewa/angular.ui.article-card';
import { Article } from '@lakinduhewa/angular.entities.article';

@Component({
  selector: 'app-root',
  standalone: true,
  imports: [CommonModule, RouterOutlet, ArticleCardComponent],
  templateUrl: './app.component.html',
  styleUrls: ['./app.component.scss']
})
export class AppComponent {
  articles: Article[]
  title = 'blog-app';

constructor() {
    this.articles = getArticles();
  }
}
We’re initializing the Articles in the App component. Next, open up your app.component.html and let's render the list:
<div>
  <article-card *ngFor="let article of articles" [article]="article" />
</div>

<router-outlet />
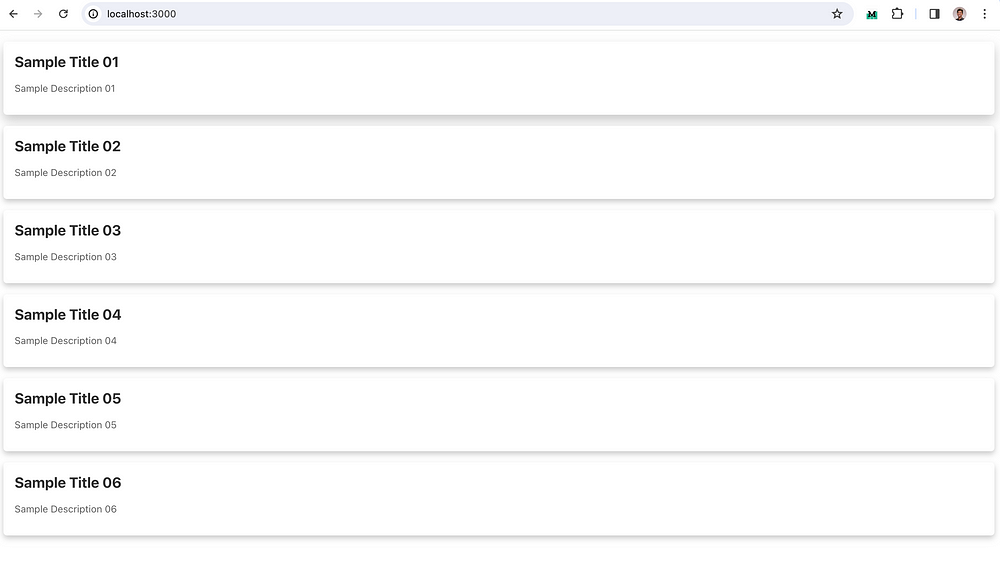
We’re using the article card and we’re iterating over the articles we initialized article using the ngFor directive. Next, let's launch the app outside the Bit Server using the command:
bit run blog-app
You should see the output below:
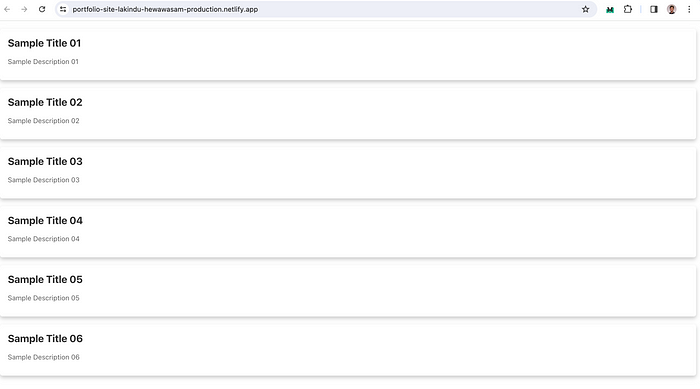
And that’s it! You build an Angular app with independent components. Go ahead and ship this to Bit Cloud.
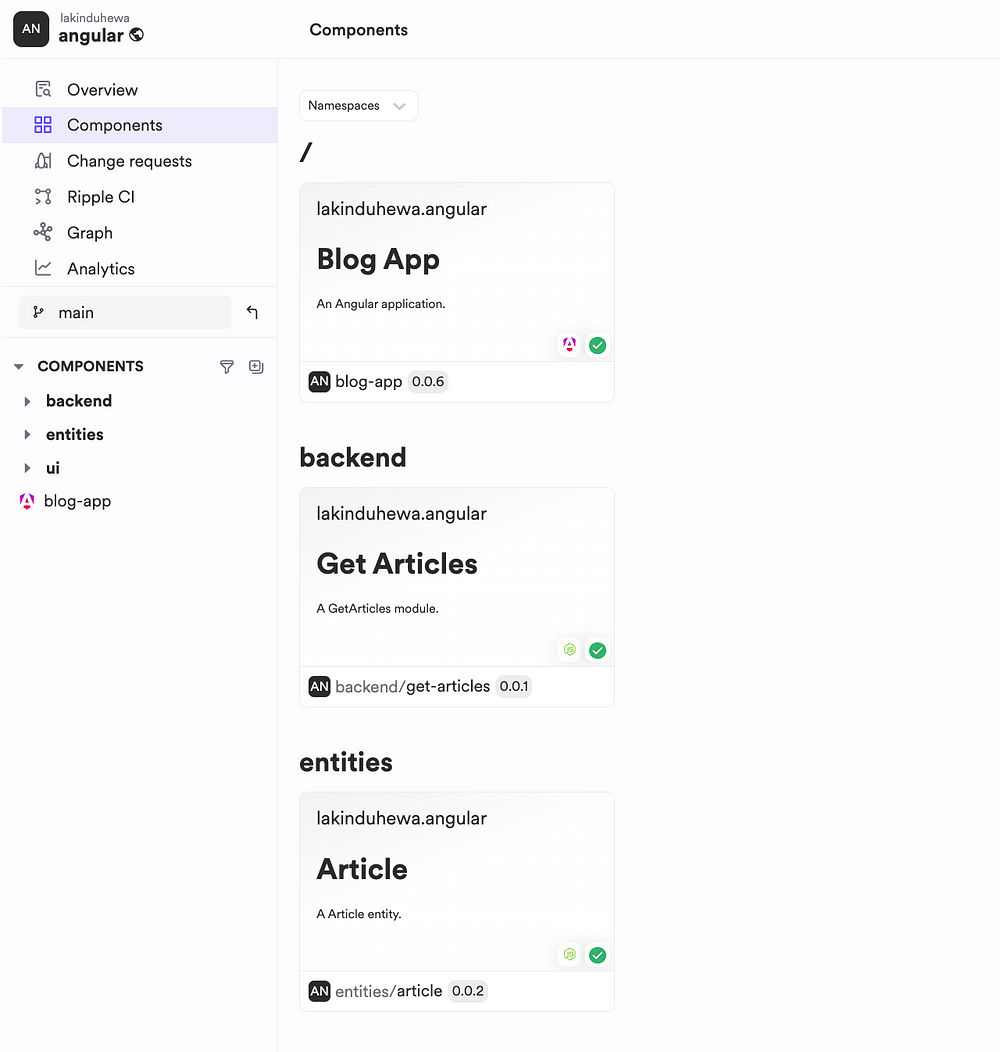
Finally, your tree should look like this:
Step 04 — Deploying an Angular app
Let’s deploy the app onto Netlify. Bit offers deployer components that we can directly hook onto our component. Bit then uses it’s CI Server — Ripple CI to perform the incremental updates to the app to automatically deploy it to Netlify.
So, let’s install the deployer using the command:
bit install @teambit/cloud-providers.deployers.netlify
Next, open your plugin file — blog-app.bit-app.ts and configure the deployer as shown below:
import { NetlifyOptions, Netlify } from '@teambit/cloud-providers.deployers.netlify';


const netlify: NetlifyOptions = {
  accessToken: "<<AUTH-TOKEN>>",
  productionSiteName: 'my-awesome-site',
  stagingSiteName: 'my-awesome-staging-site',
  team: '<<YOUR-TEAM-NAME>>',
};

export const BlogAppOptions: AngularAppOptions = {
  /**
   * Name of the app in Bit CLI.
   */
  name: 'blog-app',

/**
   * Angular options for `bit build`
   */
  angularBuildOptions: angularOptions,

/**
   * Angular options for `bit run`
   */
  angularServeOptions: angularOptions,

/**
   * Env-specific options depending on the version of Angular used.
   */
  ngEnvOptions,

/**
    * Folder containing the main file of your application
    */
  sourceRoot: './src',

deploy: Netlify.deploy(netlify),
};
And that’s it! Now, all you have to do is export your App component onto Bit Cloud and Ripple CI will deploy your app.
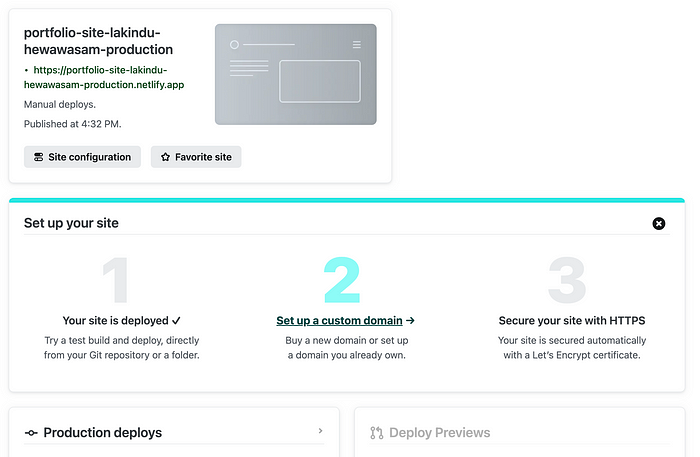
You can visit your Netlify console to see the app:
Pst, check out the app we worked on here.
Wrapping Up
And that’s it! You no longer have to be chained to a gaint frontend monolith. Instead, you can start building apps like Lego through composable patterns and tools like Bit.
If you want the full code, check it out on my Bit Scope.
I hope you found this article helpful.
Thank you for reading.
Learn More
Recommend
About Joyk
Aggregate valuable and interesting links.
Joyk means Joy of geeK