

.NET Excel导出方法及其常见问题详解 - umeall
source link: http://www.cnblogs.com/umeall/p/7600487.html
Go to the source link to view the article. You can view the picture content, updated content and better typesetting reading experience. If the link is broken, please click the button below to view the snapshot at that time.
.NET Excel导出方法及其常见问题详解
摘要:.NET Excel导出方法及其常见问题详解。
一、Excel导出的实现方法
在.net 程序开发中,对于Excel文件的导出我们一共有三种导出方式:
- 利用文件输出流进行读写操作
这种方式的导出方法是比较简单就可以实现的,我们实际上是针对类似于html中table表格的输出
a.针对想要的Excel合并样式写一个table标签代码
 1 <table border="1">
 2     <thead>
 3         <tr>
 4             <th style="background-color:yellow" colspan="7" align="center">物料汇总单</th>
 5         </tr>
 6         <tr>
 7             <th style="background-color:yellow">物料码</th>
 8             <th style="background-color:yellow">物料名称</th>
 9             <th style="background-color:yellow">型号</th>
10             <th style="background-color:yellow">单位</th>
11             <th style="background-color:yellow">数量</th>
12             <th style="background-color:yellow">备注</th>
13             <th style="background-color:yellow">排序</th>
14         </tr>
15     </thead>
16     <tbody>
17         <tr>
18             <th>{0}</th>
19             <th>{0}</th>
20             <th>{0}</th>
21             <th>{0}</th>
22             <th>{0}</th>
23             <th>{0}</th>
24             <th>{0}</th>
25         </tr>
26     </tbody>
27 </table>
table的border属性可以控制展现为Excel文件时是否显示网格线,一般如果不设置为border="1"时,导出的文件是不会生成网格线的,实际上table的各种属性和样式最终在生成为Excel文件时,都大致会以相同的格式展现出来,也就是说我们只要设计好table的样式就行,不用考虑其它的问题了。
而对于表头中的颜色设置:
1        <tr>
2             <th style="background-color:yellow">物料码</th>
3             <th style="background-color:yellow">物料名称</th>
4             <th style="background-color:yellow">型号</th>
5             <th style="background-color:yellow">单位</th>
6             <th style="background-color:yellow">数量</th>
7             <th style="background-color:yellow">备注</th>
8             <th style="background-color:yellow">排序</th>
9         </tr>
有不少人会疑惑:为什么不在<tr>设置background-color不是更方便?
1        <tr style="background-color:yellow">
2             <th>物料码</th>
3             <th>物料名称</th>
4             <th>型号</th>
5             <th>单位</th>
6             <th>数量</th>
7             <th>备注</th>
8             <th>排序</th>
9         </tr>
这样做的确省了不少事,但是这样做当转化为Excel文件时效果就不是很相同了。
我们理想中的效果:
但实际上会展示为:
转化为Excel文件时并未在固定的列数设置背景颜色,而是整行都被设置为黄色。针对其他的细节我们可以慢慢的去尝试,去调整。
此时我们先要针对现有的table标签进行数据填充:
 1             ber.Append("<table border=\"1\">");
 2             ber.Append("<thead>");
 3             ber.Append("<tr><th  style=\"background-color:yellow\" colspan=\"7\" align=\"center\">物料汇总单</th></tr>");
 4
 5             ber.Append("<tr>");
 6
 7             ber.Append("<th style=\"background-color:yellow\">物料码</th>");
 8             ber.Append("<th style=\"background-color:yellow\">物料名称</th>");
 9             ber.Append("<th style=\"background-color:yellow\">型号</th>");
10             ber.Append("<th style=\"background-color:yellow\">单位</th>");
11             ber.Append("<th style=\"background-color:yellow\">数量</th>");
12             ber.Append("<th style=\"background-color:yellow\">备注</th>");
13             ber.Append("<th style=\"background-color:yellow\">排序</th>");
14
15             ber.Append("</tr>");
16             ber.Append("</thead>");
17
18             ber.Append("<tbody>");
19             foreach (ExcelTMaterial item in all_models)
20             {
21                 ber.Append("<tr>");
22                 ber.AppendFormat("<th>{0}</th>", item.mt_code);
23                 ber.AppendFormat("<th>{0}</th>", item.mt_name);
24                 ber.AppendFormat("<th>{0}</th>", item.mt_model);
25                 ber.AppendFormat("<th>{0}</th>", item.mt_unit);
26                 ber.AppendFormat("<th>{0}</th>", item.count);
27                 ber.AppendFormat("<th>{0}</th>", item.mt_remake);
28                 ber.AppendFormat("<th>{0}</th>", item.mt_sort);
29                 ber.Append("</tr>");
30             }
31
32
33             ber.Append("</tbody>");
34             ber.Append("</table>");
我们将数据填充完毕以后获得到的将是字符串文本,然后我们则通过以下方法导出Excel文件
1)通用输出流方法
        /// <summary>
        /// 输入HTTP头,然后把指定的流输出到指定的文件名,然后指定文件类型
        /// </summary>
        /// <param name="OutType">输出类型</param>
        /// <param name="FileName">文件名称</param>
        /// <param name="ExcelContent">内容</param>
        public void ExportToExcel(string OutType, string FileName, string dataSource)
        {
            lock (this)
            {
                System.Web.HttpContext.Current.Response.Charset = "UTF-8";
                System.Web.HttpContext.Current.Response.ContentEncoding = System.Text.Encoding.UTF8;
                System.Web.HttpContext.Current.Response.AppendHeader("Content-Disposition", "attachment;filename=" + HttpUtility.UrlEncode(FileName, System.Text.Encoding.UTF8).ToString());
                System.Web.HttpContext.Current.Response.ContentType = OutType;
                System.IO.StringWriter tw = new System.IO.StringWriter();
                System.Web.HttpContext.Current.Response.Output.Write(dataSource);
                System.Web.HttpContext.Current.Response.Flush();
                System.Web.HttpContext.Current.Response.End();
            }
        }
2)调用方法获取Excel文件下载
1             string data =GetMySourceStr();
2             ExportToExcel("application/ms-excel", "导出Excel文件.xls", data);
这里要注意参数:
string OutType:application/ms-excel输出方式;
string FileName:指定文件的名称+.xls,后缀我们最好不要更改,默认.xls即可;
string dataSource:拼接好的数据源字符串;
此时整体下来我们便可以完成简单的Excel表格导出功能了。
注:在某种特殊情况下,文档数据会存在丢失现象,如:文件传送给他人计算机,为避免这种情况只能采取导出后将内容Copy到新建的Excel文件中,因此此方法不推荐使用!(2019-01-28注)
2、第三方插件进行Excel导出
网上推荐使用:NPOI导出。以下是百度百科的介绍:
        NPOI是指构建在POI 3.x版本之上的一个程序,NPOI可以在没有安装Office的情况下对Word或Excel文档进行读写操作。
        POI是一个开源的Java读写Excel、WORD等微软OLE2组件文档的项目。
可以看出NPOI的优势在于独立性,不依赖于Office去完成一系列操作,针对Java和C#都可以使用;其官方网址:NPOI官方网站,由于暂时还未采用第三方插件进行导出,暂不对此进行介绍。而对于B\S端我个人更推荐使用此方法,因为它的一些基本操作以及相关的依赖,NPOI对于格式和生成的速度都是有一定优势的。
(2019-01-28新增)
去年中旬开始,针对业务调整,发现微软提供的microsoft.office.interop.excel.dll使用上虽然很方便,但是对于部署上真是一言难尽,比如之前的服务器账号注销、速度等问题,因此后续调整便采用NPOI。
对于NPOI的使用十分的简单且方便
1)我们需要安装或引用NPOI依赖包
2)创建Book、Sheet、Row、Cell,NPOI在创建这些对象上很直观明了,操作起来和写文章一样
| 类及接口 | 说明 |
| NPOI.HSSF.UserModel.HSSFWorkbook | 创建Excek文件对象 |
| NPOI.SS.UserModel.ISheet | Excel中的工作簿 |
| NPOI.SS.UserModel.IRow | Excel工作部中的行 |
| NPOI.SS.UserModel.ICell | Excel工作部中的单元格 |
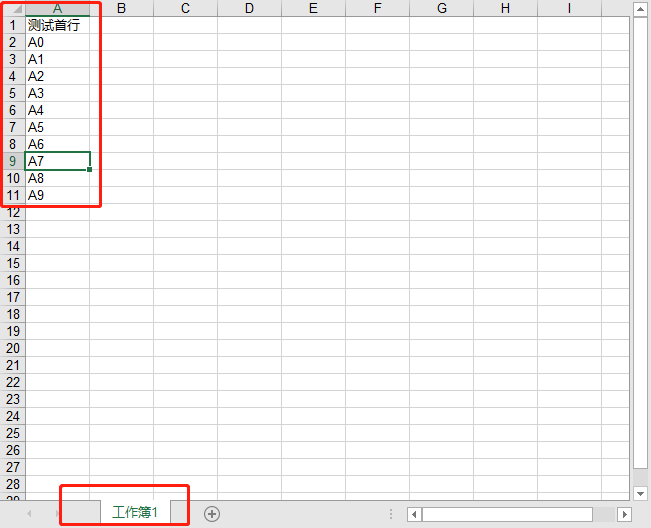
对于创建Excel文件及简单填充数据很简单(简单的测试方法,Copy即可使用):
        public void G()
        {
            //创建Excel文件的对象
            HSSFWorkbook book = new HSSFWorkbook();
            //添加一个sheet
            ISheet sheet = book.CreateSheet($"工作簿1");

            //行下标记录
            int rowIndex = 0;
            //创建首行
            IRow row0 = sheet.CreateRow(rowIndex++);
            //创建单元格
            ICell cell0 = row0.CreateCell(0);
            //设置单元格内容
            cell0.SetCellValue("测试首行");

            //创建多行
            for (int i = 0; i < 10; i++)
            {
                var row = sheet.CreateRow(rowIndex++);

                //连写创建单元格并设置单元格内容 (一般这样写更好点)
                row.CreateCell(0).SetCellValue("A"+i.ToString());
            }

           using (FileStream st = new FileStream(AppDomain.CurrentDomain.BaseDirectory+ "test.xls", FileMode.OpenOrCreate))
            {
                book.Write(st);
            }
        }
打开生成的文件如下图:
2)多工作簿实现
我们只需要简单改一改就可以实现,Book是固定唯一的,此时我们针对Sheet动态实现即可,一般可能是手动去创建,我们使用简单循环实现一下吧
        public void G()
        {
            //创建Excel文件的对象
            HSSFWorkbook book = new HSSFWorkbook();
            //添加一个sheet
            for (int index = 0; index < 3; index++)
            {
                ISheet sheet = book.CreateSheet($"工作簿{(index + 1)}");

                //行下标记录
                int rowIndex = 0;
                //创建首行
                IRow row0 = sheet.CreateRow(rowIndex++);
                //创建单元格
                ICell cell0 = row0.CreateCell(0);
                //设置单元格内容
                cell0.SetCellValue("测试首行");

                //创建多行
                for (int i = 0; i < 10; i++)
                {
                    var row = sheet.CreateRow(rowIndex++);

                    //连写创建单元格并设置单元格内容 (一般这样写更好点)
                    row.CreateCell(0).SetCellValue("A" + i.ToString());
                }
            }

           using (FileStream st = new FileStream(AppDomain.CurrentDomain.BaseDirectory+ "test.xls", FileMode.OpenOrCreate))
            {
                book.Write(st);
            }
        }
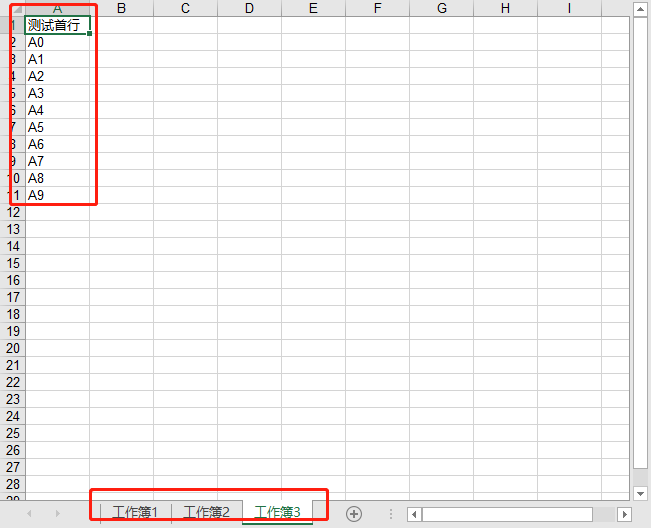
从以上可以看出,NPOI对于Excel导出很是实用,对于NPOI其他功能暂时还没使用到,因此不做评价。
注:因为工作中开始使用Java做服务,而Java提供了更为的Excel、Word、Pdf等文件的处理,因此后续考虑吧文件处理交给java服务程序去完成,.Net做核心功能业务。
3、微软提供的microsoft.office.interop.excel.dll
microsoft.office.interop.excel.dll是针对COM+的包装,它便于在托管代码中使用,依赖本地安装的Office软件。如果本地未安装Office则此方法不适合操作Excel以及其他相关如:
这些都是微软其Office产品提供的插件,唯一的缺点则是依赖性,我们在本地开发需要安装Office,部署在服务器也是需要安装Office,在B\S端的响应速度不是太好。
1)DLL引用
Microsoft.Office.Interop.Excel.dll、Microsoft.Office.core.dll
2)引用方式
Microsoft.Office.Interop.Excel.dll:
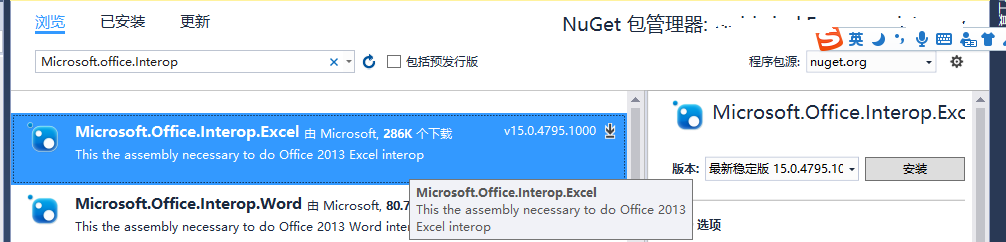
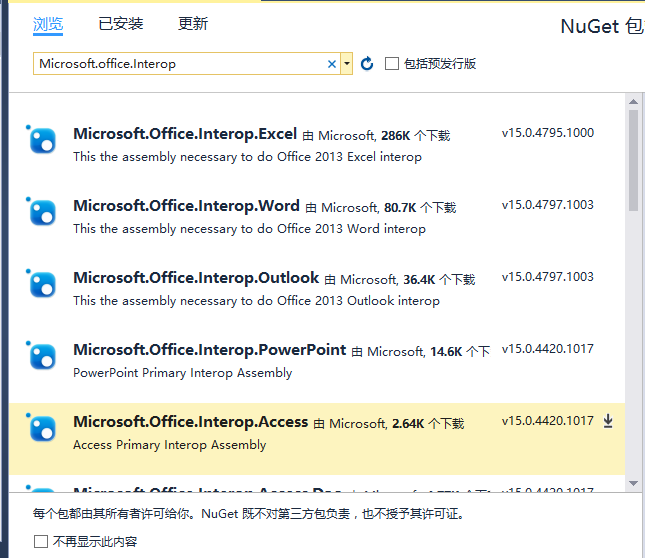
通过NuGet包管理器进行安装,要与本地Office版本相对应。
Microsoft.Office.core.dll:
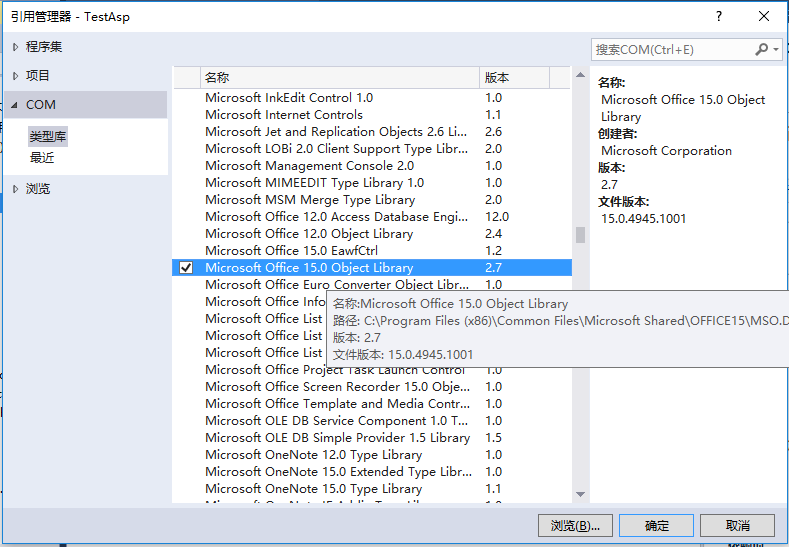
通过项目的右键>添加引用>COM>类型库 --查找-->Microsoft Office 15.0 Object Library(此处针对Office2013,其它版本可以查找相应的Microsoft Office xx.0 Object Library)。
3)使用方法
a.引入命名空间
我们可以直接引入一下命名空间:
using Microsoft.Office.Interop.Excel;
也可以这样引入:
using OfcExcel = Microsoft.Office.Interop.Excel;
这样做主要是针对较长方法的简写。
b.方法的实现
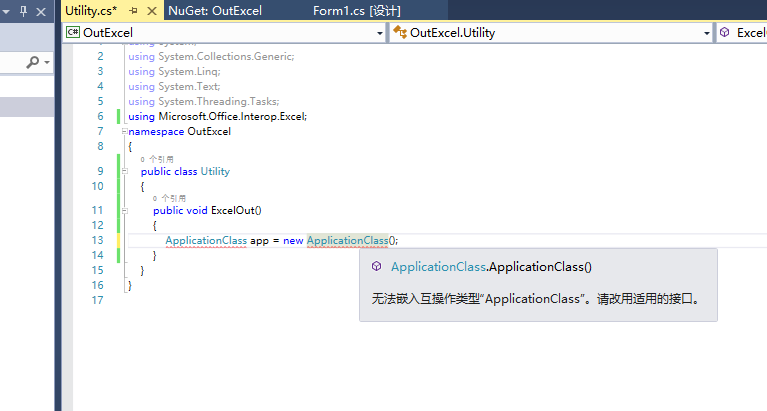
我们首先创建一个ApplicationClass对象,但是发现似乎提示了一个错误,第一次使用的时候发现代码并没用什么问题,后来查阅了一些文档和教程我们只需要做一下操作便可以解决:
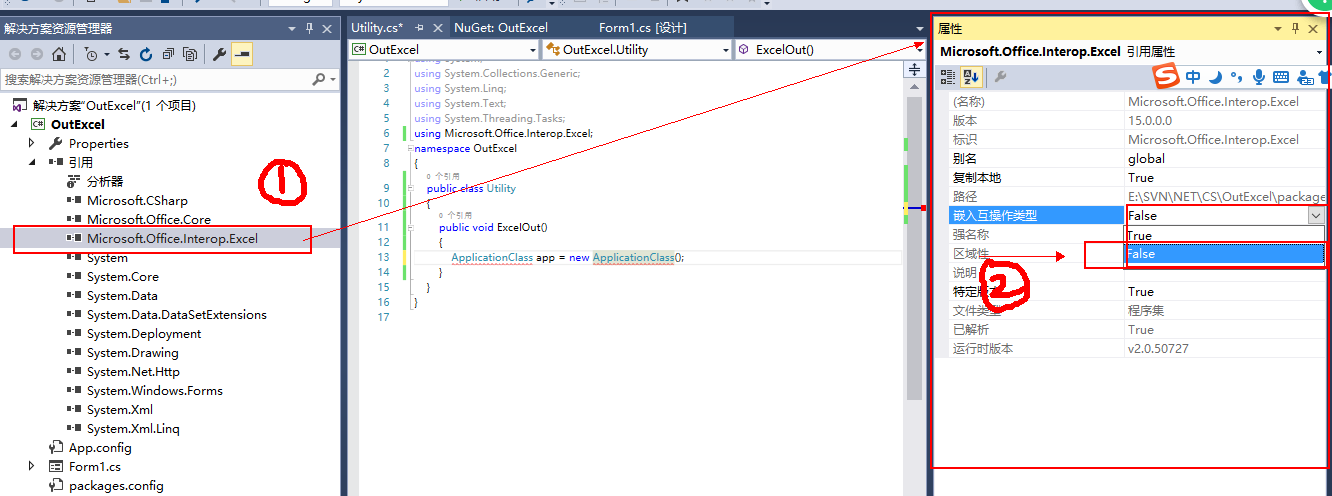
在引用中找到Microsoft.Office.Interop.Excel查看属性->嵌入互操作类型由True改为False即可。
再编写以下代码:
1 using System;
2 using System.Collections.Generic;
3 using System.Linq;
4 using System.Text;
5 using System.Threading.Tasks;
6 using Microsoft.Office.Interop.Excel;
7 using System.Drawing;
8 using System.IO;
9
10 namespace OutExcel
11 {
12 public class Utility
13 {
14 public static void ExcelOut()
15 {
16
17 ApplicationClass app = new ApplicationClass();
18
19 /*针对Excel 对象及工作簿单元格操作*/
20 Workbook workbook_1 = (Workbook)app.Workbooks.Add(true);//添加workbook
21 Worksheet worksheet_1 = (Worksheet)workbook_1.Worksheets[1];//选择第一个,即默认的工作簿
22 Range sheet_cells = worksheet_1.Cells;//工作簿单元格
23
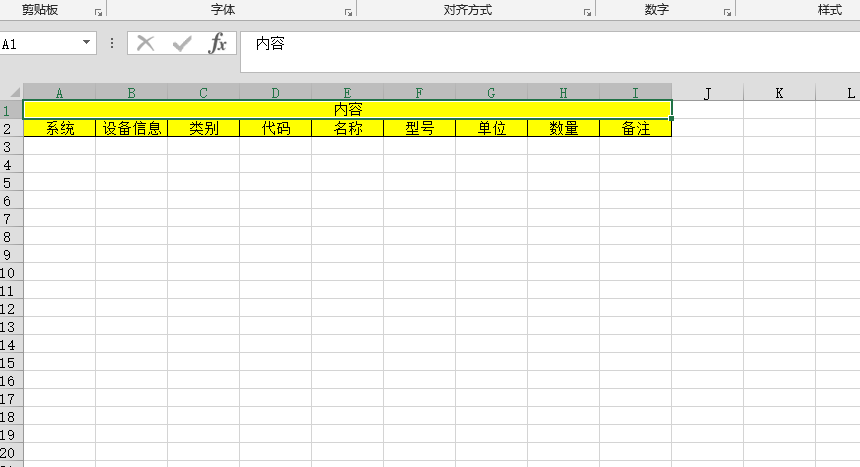
24 string[] columns = new string[] { "系统", "设备信息", "类别", "代码", "名称", "型号", "单位", "数量", "备注" };//列数
25 int row = 1;//默认行数
26 Range rg = sheet_cells.Range[app.Cells[row, 1], app.Cells[row, columns.Length]];//选择光标-----选择第一行 1 到10列
27 rg.Merge(false);//合并单元格
28 rg.Value2 = "内容";//设置选中单元格内容
29 row++;//下移一行
30
31
32 for (int index = 0; index < columns.Length; index++)
33 {
34 sheet_cells[row, index + 1] = columns[index];//设置列标题内容
35 }
36
37 rg = sheet_cells.Range[app.Cells[1, 1], app.Cells[row, columns.Length]];//选择标题头
38
39 /*针对选中单元格样式设置*/
40 rg.Borders.LineStyle = XlLineStyle.xlContinuous;
41 rg.HorizontalAlignment = XlHAlign.xlHAlignCenter;
42 rg.VerticalAlignment = XlHAlign.xlHAlignCenter;
43 rg.Interior.Color = Color.Yellow;
44
45 string path_ = AppDomain.CurrentDomain.BaseDirectory.ToString()+ "excel导出.xlsx";
46 if (File.Exists(path_))
47 {
48 File.Delete(path_);
49 }
50 try
51 {
52 workbook_1.SaveAs(path_, Type.Missing, Type.Missing, Type.Missing, Type.Missing, Type.Missing
, XlSaveAsAccessMode.xlNoChange, 1, false, Type.Missing, Type.Missing, Type.Missing);
53
54 }
55 catch (Exception ex)
56 {
57 path_ = null;
58 }
59 finally
60 {
61 workbook_1.Close(true, path_, Type.Missing);
62 workbook_1 = null;
63 }
64 }
65 }
66 }
以上代码只是参考示例基础操作,你可以使用过程中对常用方法进行封装。
C\S端再调用此方法时会在Debug目录下生成:
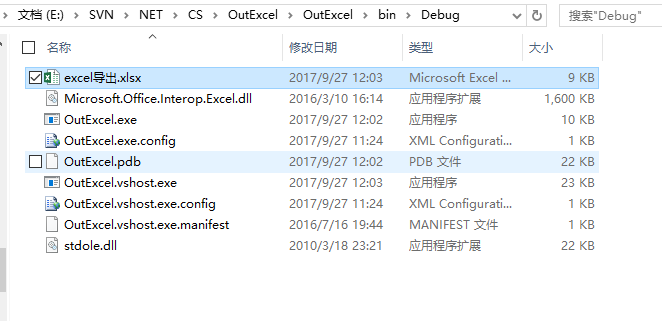
B\S生成则在根目录下,我们可以指定自己存放的路径。
生成结果:
此时针对Microsoft.Office.Interop.Excel.dll操作基本完成,而针对它的操作方法可以查阅相关文档即可实现。对于B\S调用出现的问题可以参考下面的方法解决。
二、提示的错误信息
1、导出Excel提示信息错误
检索 COM 类工厂中 CLSID 为 {00024500-0000-0000-C000-000000000046} 的组件失败,原因是出现以下错误: 8000401a 因为配置标识不正确,系统无法开始服务器进程。请检查用户名和密码。 (异常来自 HRESULT:0x8000401A)。
1)问题表现
服务器断开连接,导出功能报错即以上错误。服务器登陆,导出正常。
账号的登陆与断开,表现为账户所属权限问题。
3)解决过程
参照着网上的一些教程总结,得出一下方法:
a.设置DCOM
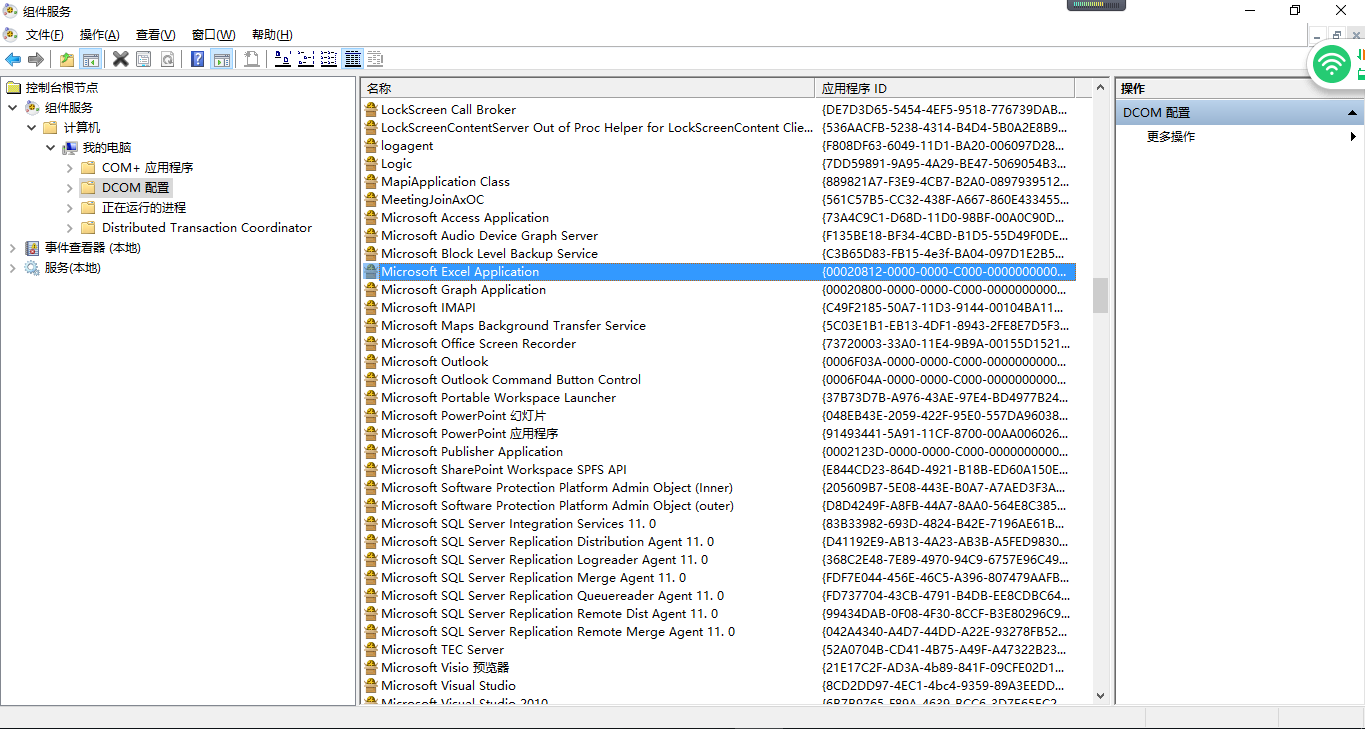
win+r键,输入:dcomcnfg.exe 调出=》组件服务
选择 组件服务>计算机>我的电脑>DCOM 配置 --查找-->Microsoft Excel Application
右键>属性>安全,设置如下
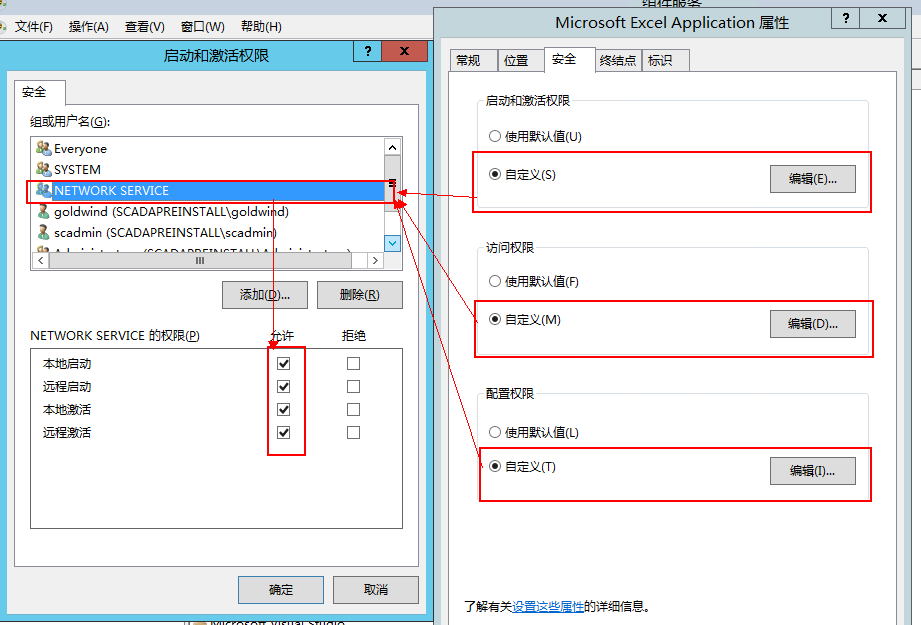
标识设置:
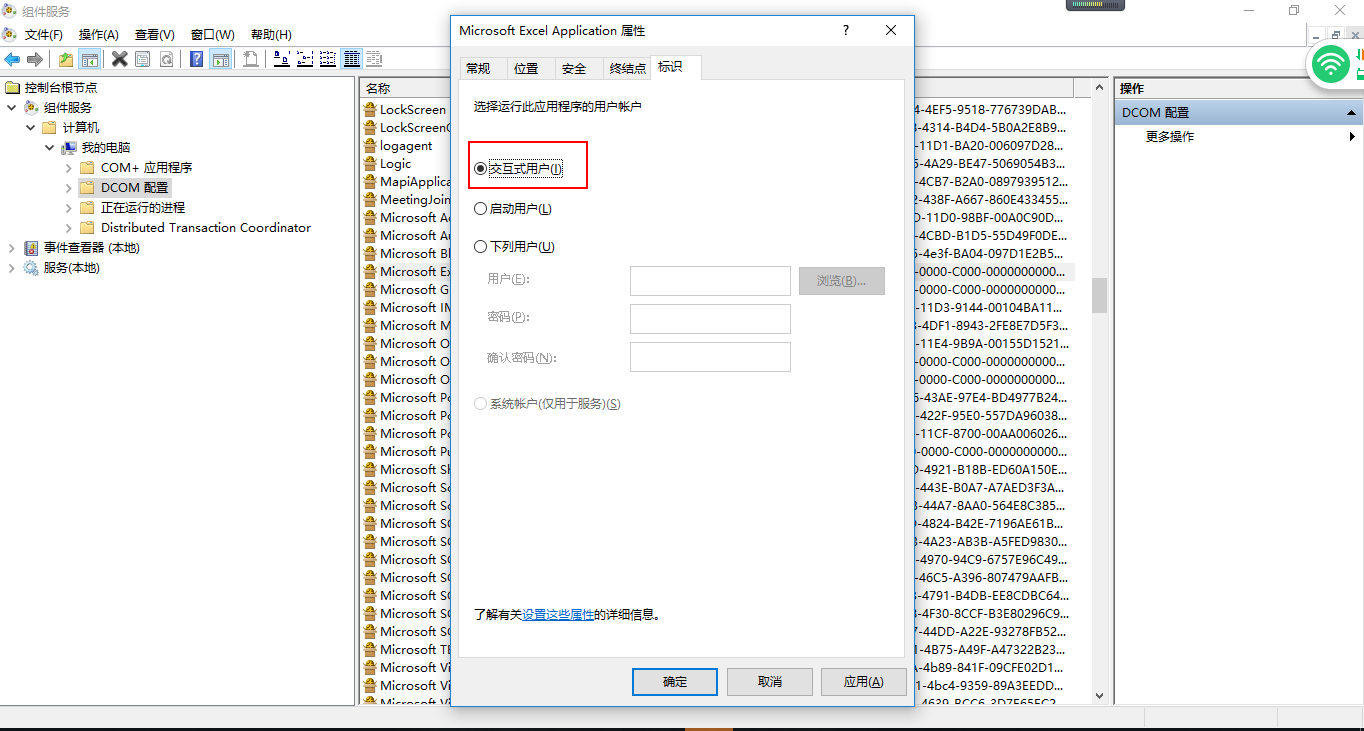
如果此时还是报错,则可以考虑设置 标识 为 下列用户 即指定一个用户:
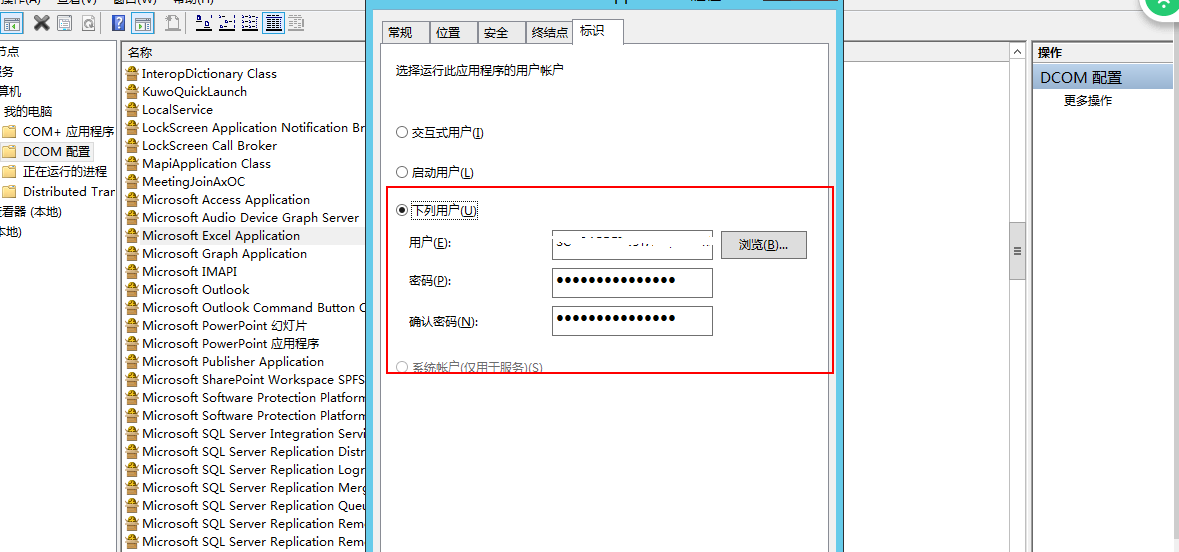
保存配置在关闭,断开服务器连接,导出Excel不在报8000401A错误。
问题0x8000401A 参考文献:http://blog.csdn.net/caobingyi/article/details/5175281
Recommend
About Joyk
Aggregate valuable and interesting links.
Joyk means Joy of geeK