

RxWX使用教程
source link: http://yalishizhude.github.io/2017/12/16/intro2rxwx/?amp%3Butm_medium=referral
Go to the source link to view the article. You can view the picture content, updated content and better typesetting reading experience. If the link is broken, please click the button below to view the snapshot at that time.
之前写过一个开源项目RxWX,将RxJS移植到微信小程序(以下简称”小程序“)中。
RxWX项目地址和介绍:https://github.com/yalishizhude/RxWX
关于RxJS的介绍,读者可以去看官方说明或者关注公众号“Web学习社”的后续文章介绍,这篇文章主要讲解RxWX的几个使用场景。
微信小程序SDK版本:1.7.0
微信开发者工具版本:1.01
演示项目下载地址:
https://github.com/yalishizhude/RxWX/tree/master/example
Get started
按照RxWX说明,把Rx.js和RxWX.js文件放入到utils目录下。
其中Rx.js是可运行在小程序中的Rx.js模块,RxWX.js是利用Rx.js对小程序API进行的封装,封装后API函数将返回Observable对象,属性值不变。
使用时必须引入该文件,比如
import rxwx from '../../utils/RxWX.js'
同步API与异步API
// 原写法 let result = wx.removeStorageSync('xx') console.log(result) } catch(e) { console.error('小程序API发现错误')// 使用RxWXimport rxwx from '../../utils/RxWX.js'rxwx.removeStorageSync('xx') .catch((e) => console.error('RxWX发现错误')) .subscribe((resp) => console.log(resp))看上去好像没太大区别。别着急,接着我们来继续看看异步API的调用~
// 原写法wx.removeStorage({ key: 'xx', success: function(res) { console.log(res) error: function(e) { console.error('小程序API发现错误')// 引用RxWX,rxwx具有wx的所有函数和值,但是调用函数返回的是Observable对象import rxwx from '../../utils/RxWX.js'rxwx.removeStorage({key: 'xx'}) .catch((e) => console.error('RxWX发现错误')) .subscribe((resp) => console.log(resp))在调用同步时RxWX没有太大优势,但在调用异步API的时候以流的方式来处理结果和异常,显然优于回调。
而且代码内容和同步调用方式相比并无变化(只修改了函数名和入参)。
这种统一的操作方式可以让开发者更好的关注业务逻辑,而不需要去分辨API到底是异步还是同步,执行结果到底是在回调中获取还是返回值获取。
这种处理方式是不是让你想起点什么?欢迎留言讨论~
登录后获取用户信息。
// 调用小程序原生APIwx.login({ success(res) { wx.getUserInfo({ success(res) { console.log(res.userInfo) fail(e) { console.error(e) fail(e) { console.error(e)// 调用RxWXimport rxwx from '../../utils/RxWX.js'rxwx.login() .switchMap(() => rxwx.getUserInfo()) .catch(e => console.error(e)) .subscribe(res => console.log(res.userInfo))原生写法很容易坠入回调地狱,而利用RxWx的代码直观易读。
同时获取用户信息和系统信息后进行操作。
// 调用小程序APIlet getUser = new Promise((success, fail) => { wx.getUserInfo({ success,let getSystem = new Promise((success, fail) => { wx.getSystemInfo({ success,Promise.all([getUser, getSystem]).then((resp) => console.log(resp), e => console.error(e))// 调用RxWXimport rxwx, {Rx} from '../../utils/RxWX.js'Rx.Observable.zip(rxwx.getUserInfo(), rxwx.getSystemInfo()) .catch(e => console.error(e)) .subscribe(resp => console.log(resp))在wepy中使用
应微信读者John的要求,特意补充了这一部分示例。
wepy是一个比较火的小程序框架,采用预编译的方式,让开发者可以用Vuejs风格的组件化方式开发小程序,同时还支持Node.js模块。
官网地址:https://tencent.github.io/wepy/
- 安装RxWX
npm i -S rxjs-wx
当然我更推荐你使用yarn
yarn add rxjs-wx
import rxwx from 'rxjs-wx'
- 使用rxwx
wepy版本:1.6.0
用wepy new命令初始化项目之后,我们以app.wpy和index.wpy两个文件代码为例,改成用RxWX实现。
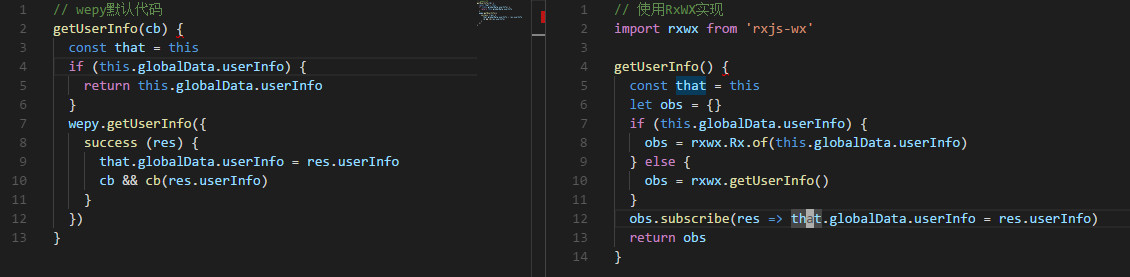
首先是根组件src/app.wpy中的getUserInfo函数。
默认代码用到了wepy封装的小程序APIgetUserInfo和回调函数。
如果我们引入RxWX的话不再需要从wepy调用小程序API了,默认引入RxWX模块,带有小程序API,Rx属性下带有RxJS函数。
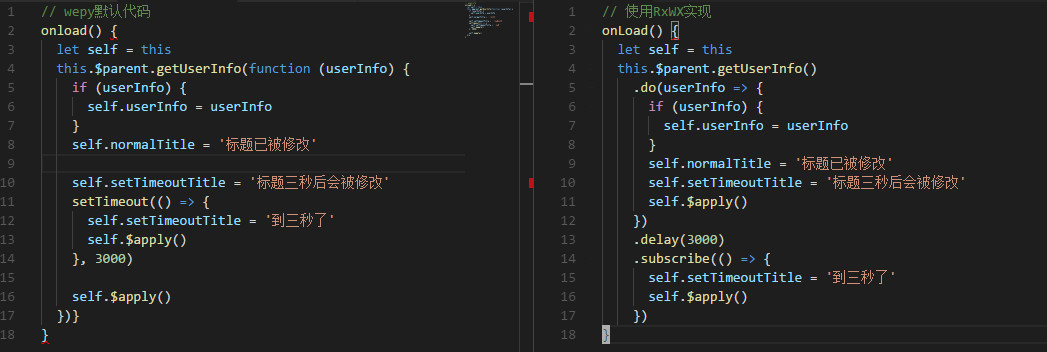
然后修改src/pages/index.wpy中的onLoad函数。
我们可以直接采用RxJS的流式写法并使用操作符。
代码目录:https://github.com/yalishizhude/RxWX/tree/master/example4wepy
一部由众多技术专家推荐, 帮你成为具有全面能力和全局视野工程师的进阶利器—— 《了不起的JavaScript工程师》出版了! 点击下方链接即刻踏上进阶之路!
Recommend
About Joyk
Aggregate valuable and interesting links.
Joyk means Joy of geeK