
How to Change UPI ID in Google Pay
source link: https://www.geeksforgeeks.org/how-to-change-upi-id-in-google-pay/
Go to the source link to view the article. You can view the picture content, updated content and better typesetting reading experience. If the link is broken, please click the button below to view the snapshot at that time.
How to Change UPI ID in Google Pay
In today’s digital world, Google Pay has become a popular platform for hassle-free online transactions in India. It utilizes Unified Payments Interface (UPI) IDs for seamless and secure money transfers. However, there might be situations where you need to change your UPI ID associated with your Google Pay account. This guide will walk you through the process of changing your UPI ID in Google Pay, ensuring you stay up-to-date with the latest information
You can achieve this by modifying your UPI ID linked to your bank account. Here are the steps involved, categorized by the specific bank you’re associated with:
How to Change your UPI ID in Google Pay
Here are the rephrased steps to Add your UPI ID to Google Pay:
Step 1: Launch the Google Pay app
.webp)
Install Google Pay
Step 2: Go to your profile section

Step 3: Click on Bank Account
Step 4: Choose your bank from the options provided

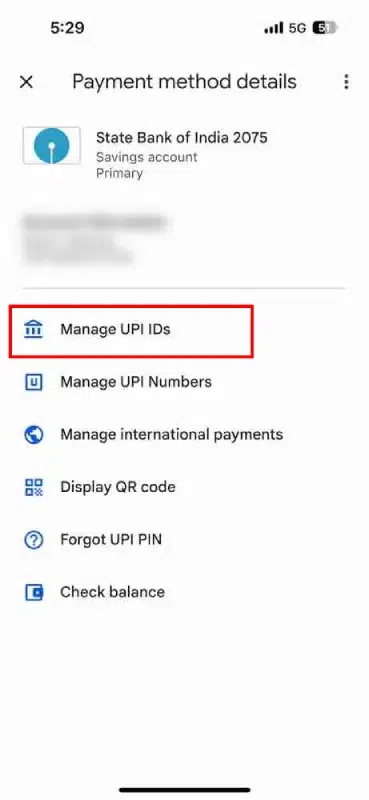
Step 5: Click on Manage UPI IDs

Step 6: Choose other banks from the options and Click on the Small plus button

Step 7: UPI ID Succesfully Added

Optionally, delete the older ID if desired.

How to Change UPI ID in Google Pay (Based on Your Bank)
Important Note: It’s crucial to understand that changing your UPI ID directly within Google Pay is not currently possible.
However, you can achieve this by modifying your UPI ID linked to your bank account. Here are the steps involved, categorized by the specific bank you’re associated with:
State Bank of India (SBI):
Step 1: Visit the official SBI Yono SBI app or internet banking portal.
Step 2: Log in to your account using your credentials.
Step 3: Navigate to the “Manage UPI” section.
Step 4: Locate the “Delete UPI” option and follow the on-screen instructions to remove your existing UPI ID.
Step 5: Once deleted, proceed to create a new UPI ID by selecting the “Create UPI” option and following the provided steps.
Other Banks:
Most banks offer similar options to manage your UPI ID through their mobile banking apps or Internet banking portals.
Step 1: Locate the “UPI” section or related settings within your bank’s app or portal.
Step 2: Search for options like “Manage UPI,” “Delete UPI,” or “Create UPI.”
Follow the specific instructions provided by your bank to remove your existing UPI ID and create a new one.
After Updating Your Bank’s UPI ID
Step 1: Open the Google Pay app on your device.
Step 2: Tap on your profile picture located in the top right corner.
Step 3: Select “Payment methods” from the menu.
Step 4: Choose the bank account associated with the updated UPI ID.
You might see a notification informing you that your UPI ID has changed. If not, try refreshing the app or restarting your device.
How to Create a New UPI ID in Google Pay
While Google Pay currently doesn’t offer the functionality to directly create a new UPI ID within its app, you can achieve this by modifying your UPI ID linked to your bank account. Here’s a breakdown of the process:
Access your bank’s mobile banking app or internet banking portal.
Step 1: Log in using your credentials.
Step 2: Locate the section related to “UPI” management. This might be labeled as “Manage UPI,” “UPI Settings,” or something similar.
Step 3: Look for options like “Create UPI” or “Add UPI.”
Follow the on-screen instructions provided by your bank to create a new UPI ID. This typically involves choosing a desired username and setting up a UPI PIN.
Tips and Tricks
Contact your bank’s customer support if you encounter any difficulties or require specific guidance during the process.
Changing your UPI ID might affect existing auto-payments or recurring transactions linked to your previous ID. Update the new UPI ID with relevant merchants or service providers to avoid disruptions.
How do I change my UPI ID for Google Pay?
Step 1: Open the Google Pay app.
Step 2: Click on your profile photo.
Step 3: Click on ‘Payment Methods’.
Step 4: Select the bank account whose UPI ID you wish to change.
How do I remove an extra UPI ID from Google Pay?
Step 1: Log into the GooglePay app on your mobile phone.
Step 2: Tap on the profile picture icon on the top right corner of your home screen.
Step 3: Tap on ‘Bank Account’ which opens up a list of all your connect bank accounts on Google Pay.
Step 4: Select the bank account for which you wish to deactivate UPI IDs
Can I change bank account in UPI?
If you want to utilize a different bank account for UPI Lite payments, you can deactivate UPI Lite and then reactivate it with your alternative bank account.
Here's a complete roadmap for you to become a developer: Learn DSA -> Master Frontend/Backend/Full Stack -> Build Projects -> Keep Applying to Jobs
And why go anywhere else when our DSA to Development: Coding Guide helps you do this in a single program! Apply now to our DSA to Development Program and our counsellors will connect with you for further guidance & support.
Recommend
About Joyk
Aggregate valuable and interesting links.
Joyk means Joy of geeK
