

Building an End-To-End App In Under 5 Minutes
source link: https://blog.bitsrc.io/reactjs-graphql-api-end-to-end-bcd8a6234ba6
Go to the source link to view the article. You can view the picture content, updated content and better typesetting reading experience. If the link is broken, please click the button below to view the snapshot at that time.
Building an End-To-End App In Under 5 Minutes
Building An End-To-End App Using React, GraphQL and TypeScript in Under 5 Minutes
If you were building an end-to-end app, what would you do?
You’d likely be using:
- Create React App to create your React app
- NPM Projects to build your Express API.
- Creating Entities that you duplicate across your frontend and backend app for entity sharing.
Apart from this, you’d have to do more stuff:
- Set up a design system such as MUI or Tailwind to style your React app
- Create reusable components such as headers, nav bars for your app.
- Set up TypeScript and Linters.
- Create a test framework to write and execute your unit tests.
In a nutshell, this process is quite lengthy and time-consuming. You have to put in a huge effort before you start to develop the idea you want to get out.
So, by the time you get this up and running, someone might’ve already beat you to your own idea.
This is where you have to be efficient. So, that’s exactly where this article fits in. Let’s take a look at how we can build a complete end-to-end app in under 5 minutes!
Pst, if you want to check out the code directly, here’s the Bit Scope ->
Building The End-To-End App
To do so, we’re going to be playing with independent components and build a composable app.
Simply put, we’re going to build our app loosely coupled and make sure that our app components are reusable across different projects.
By doing so, we can save time for all future projects! And we’re going to leverage Bit to do this.
Bit is a next-generation build system for composable software. It lets you build independent Bit components that allow you to design, develop, build, test and version your component in an isolated space.
This means that you don’t need to work on an entire project to work on one component. You can retrieve the component you wish to update and push it back to the Bit Cloud.
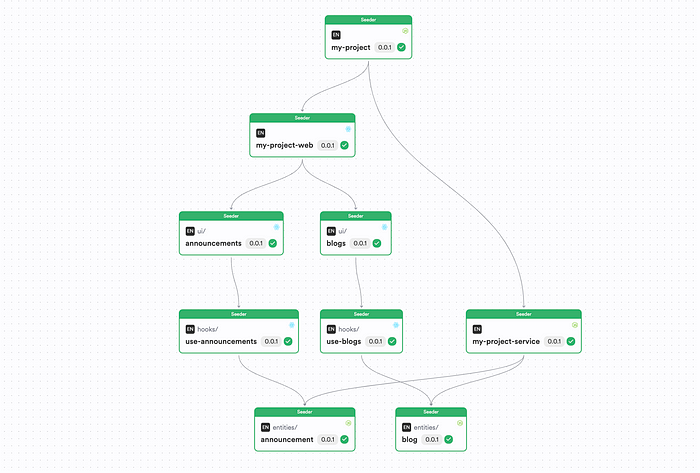
Bit then uses its CI Server — Ripple CI to build your component tree and propagate changes up your tree to ensure that all components use the latest version and remain up to date.
For example, consider the component tree shown above. You can see that every component has a different version, meaning that they aren’t updated at the same time. Ripple CI propagates changes to each independent component across the tree to make sure everything remains up to date.
Pretty cool, isn’t it? You can take this one step further and create entity components that you can share across your app.
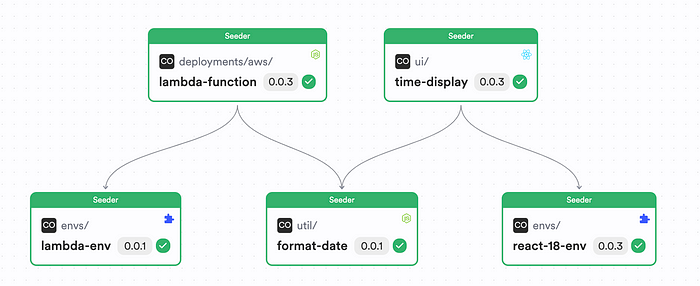
For example, here’s another component tree that showcases utility features like format-date being used across backend (AWS Lambda) and frontend (React) environments.
It’s pretty nice to see that you’re able to build one version of your utilities and use it without even publishing an NPM package!
Well, enough said. Let’s build an end-to-end with Bit in under 5 minutes.
Step 01 — Pre-requisites
let’s first install Bit. Use Bit’s version manager (BVMM) to install Bit globally:
# install bit
npx @teambit/bvm install
Next, to verify your installation, run the command:
bit --version
If you’ve installed Bit correctly, you’ll see the output:

Step 02 — Bootstrapping an end-to-end app
Next, let’s bootstrap an app that we can use to start working on with no effort.
Lucky for us, Bit has already made “starters” for us that we can use to kick off a fully-functional end-to-end project.
So, in this article, let’s leverage a starter to kick off the end-to-end app:
Open up a terminal, and run the command below:
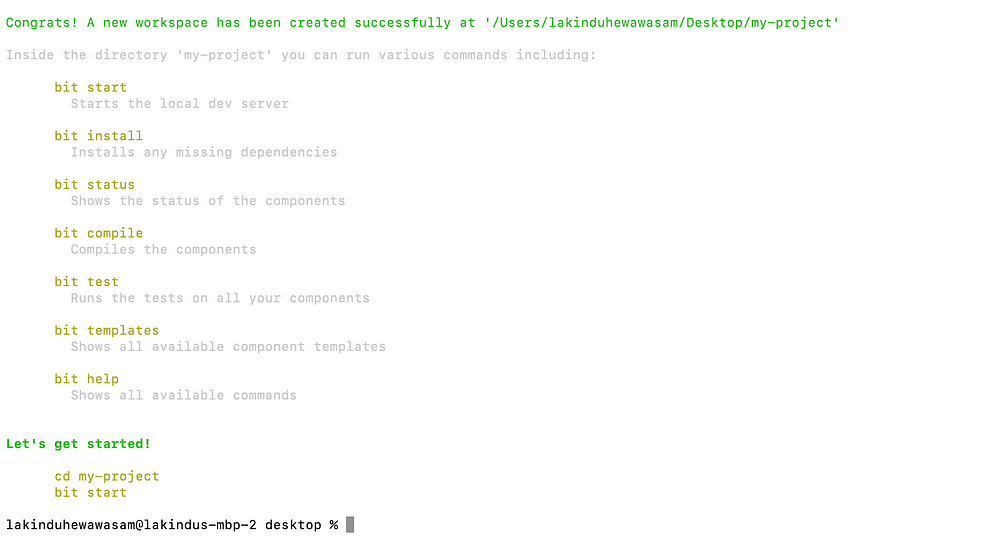
bit new react my-project --env bitdev.react/react-env --default-scope dummyorg.end-to-end
Tip: Make sure you create an account on Bit Cloud and a Scope and replace the
dummyorg.end-to-endwith your Bit username and Scope name.
If you’ve run the command successfully, you should see the output below:
Next, let’s launch the Bit server to see the starter. To do so, navigate to your project directory and run the command:
bit start
You should see your dev server output:
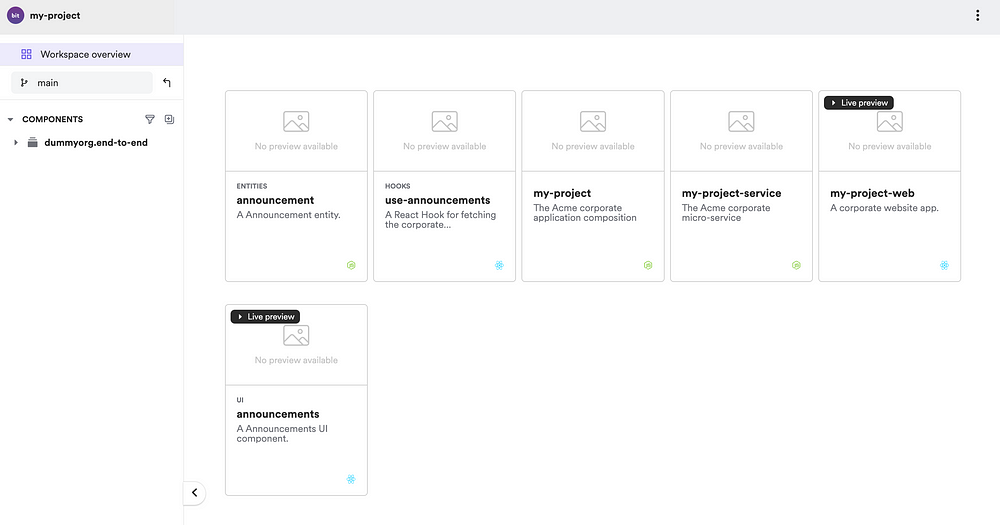
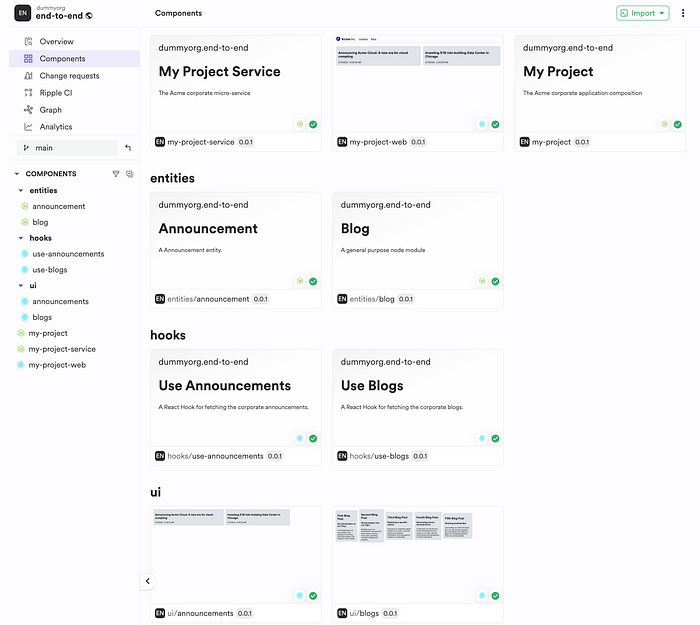
Out of the box, you should a React and a GraphQL app along with the following components:
- acme-corporate is your platform composition. Composing the backend service and the frontend app.
- corporate-website is a React web application for your project.
- corporate-service is a backend service for Acme corporate.
- ui/announcements is a UI component for displaying recent announcements.
- hooks/use-announcements is React hook for retrieve announcement from the backend.
- entities/announcement is an entity to describe the announcement data object.
If you go ahead an open your my-project-service.graphql.ts, you should see the query resolvers:
// imports...

export type ServerSchema = {
  typeDefs: DocumentNode,
  resolvers: GraphQLResolverMap
}

export function myProjectServiceSchema(myProjectService: MyProjectService): ServerSchema {
  const typeDefs = gql`#graphql

type Announcement {
    title: String
    date: String
  }

# The "Query" type is special: it lists all of the available queries that
  # clients can execute, along with the return type for each. In this
  # case, the "users" query returns an array of zero or more Users (defined above).
  type Query {
    listAnnouncements: [Announcement]
    listBlogs: [Blog]
  }
`;

const resolvers = {
    Query: {
      listAnnouncements: async () => {
        const announcements = await myProjectService.listAnnouncements();

return announcements.map((announcement) => {
          return announcement.toObject();
        });
      },
    },
  };

return {
    typeDefs,
    resolvers
  };
}
We initially have a single query — listAnnouncements that communicates with the project service and lists the announcements. This is an async operation, so you can hook this up to a database, but for now, it only fetches a set of mock announcements:
import { mockAnnouncements } from "@dummyorg/end-to-end.entities.announcement";

/**
 * corporate service
 */
export class MyProjectService {
  /**
   * say hello.
   */
  async listAnnouncements() {
    return mockAnnouncements();
  }

/**
   * create a new instance of a corporate service.
   */
  static from() {
    return new MyProjectService();
  }
}
To fetch the mock announcements, it communicates with the announcement entity to grab the list of mock data that it has created for the entity:
import { Announcement } from "./announcement.js";
export function mockAnnouncements() {
return [
Announcement.from({
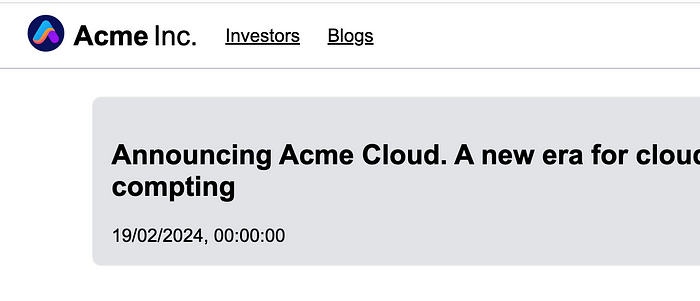
title: 'Announcing Acme Cloud. A new era for cloud compting',
date: new Date().toLocaleDateString()
}),
Announcement.from({
title: 'Investing $1B into building Data Center in Chicago',
date: new Date().toLocaleDateString()
})
];
}By doing so, the GraphQL API is created. It is then invoked by the useAnnouncement hook in the React app:
import { useQuery, gql } from '@apollo/client';
import { useIsMock } from '@acme/acme.testing.mock-provider';
import { Announcement, mockAnnouncements } from '@dummyorg/end-to-end.entities.announcement';

// define a graphql query
export const LIST_ANNOUNCEMENTS = gql`
  query LIST_ANNOUNCEMENTS {
    listAnnouncements {
      title
      date
    }
  }
`;

/**
 * fetch list of announcements.
 */
export function useAnnouncements(): undefined|null|Announcement[] {
  const results = useQuery(LIST_ANNOUNCEMENTS);
  const isMock = useIsMock();
  if (isMock) return mockAnnouncements();

if (!results.data || results.loading) return undefined;
  if (!results?.data?.listAnnouncements) return null;

return results.data.listAnnouncements.map((announcement) => {
    return Announcement.from(announcement);
  });
}
As you can see, it is invoking the listAnnouncement query that was initially defined through the useQuery API offered by Apollo.
And, that’s essentially a starting point that you can use to build extend your app.
Step 03: Building a custom feature
Now that we know how things work, let’s create a simple feature for our app. Let’s add a Blogs API that we can use to fetch a list of Blogs.
To do so, we’ll need the following:
- A Blog entity
- A set of mock data for blogs
- A GraphQL query to fetch the blogs
- A React hook to invoke the GraphQL API
- A React component to display the blogs.
All of this can be created in under 5 minutes
Let’s get cracking and build the end-to-end feature:
Creating the Blog Entity
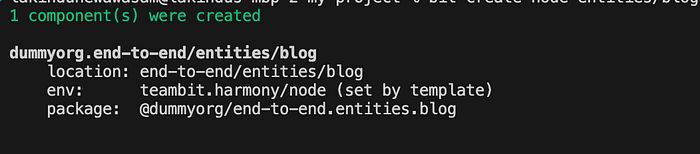
Let’s create a Node component to create the Blog Entity using the command:
bit create node entities/blog
You’ll see the output below:
Next, open the blog.ts file and update your entity by including the code:
export type PlainBlog = {
  /**
   * title of the blog
   */
  title: string;

/**
   * subtitle of the blog
   */
  subtitle: string

/**
   * outline of the blog
   */
  outline: string
}

export class Blog {
  constructor(
    /**
     * title of the blog
     */
    readonly title: string,

/**
     * subtitle of the blog
     */
    readonly subtitle: string,

/**
     * outline of the blog
     */
    readonly outline: string
  ) { }

/**
   * serialize a Blog into
   * a serializable object.
   */
  toObject() {
    return {
      title: this.title,
      subtitle: this.subtitle,
      outline: this.outline
    };
  }

/**
   * create a Blog object from a
   * plain object.
   */
  static from(plainBlog: PlainBlog) {
    return new Blog(
      plainBlog.title,
      plainBlog.subtitle,
      plainBlog.outline
    );
  }
}
As you can see, we’re managing a Blog entity here. You’re free to create your validations for Blog creation inside this entity component.
For example, you could set up a validation that says a Blog title cannot exceed 15 characters.
Next, let’s add some mock data to this by creating a file blog.mock.ts and by including the following:
import { Blog, PlainBlog } from "./blog.js";
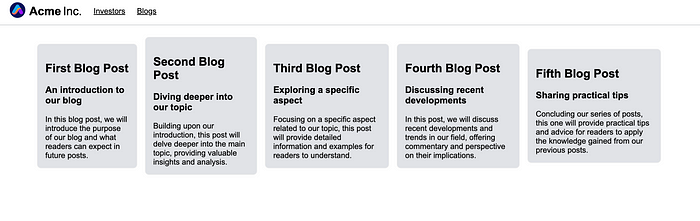
const plainBlogs: PlainBlog[] = [
{
title: "First Blog Post",
subtitle: "An introduction to our blog",
outline: "In this blog post, we will introduce the purpose of our blog and what readers can expect in future posts."
},
{
title: "Second Blog Post",
subtitle: "Diving deeper into our topic",
outline: "Building upon our introduction, this post will delve deeper into the main topic, providing valuable insights and analysis."
},
{
title: "Third Blog Post",
subtitle: "Exploring a specific aspect",
outline: "Focusing on a specific aspect related to our topic, this post will provide detailed information and examples for readers to understand."
},
{
title: "Fourth Blog Post",
subtitle: "Discussing recent developments",
outline: "In this post, we will discuss recent developments and trends in our field, offering commentary and perspective on their implications."
},
{
title: "Fifth Blog Post",
subtitle: "Sharing practical tips",
outline: "Concluding our series of posts, this one will provide practical tips and advice for readers to apply the knowledge gained from our previous posts."
}
];
export function mockBlogs() {
return plainBlogs.map((plainBlog: PlainBlog) => Blog.from(plainBlog));
}By doing so, we’re able to return the Mock data through our GraphQL API.
Creating the GraphQL Query
Next, let’s create a query to list all blogs. To do so, let’s update the my-project-service.graphql.ts with this new addition:
export function myProjectServiceSchema(myProjectService: MyProjectService): ServerSchema {
  const typeDefs = gql`#graphql

type Announcement {
    title: String
    date: String
  }

type Blog {
    title: String
    outline: String
    subtitle: String
  }

# The "Query" type is special: it lists all of the available queries that
  # clients can execute, along with the return type for each. In this
  # case, the "users" query returns an array of zero or more Users (defined above).
  type Query {
    listAnnouncements: [Announcement]
    listBlogs: [Blog]
  }
`;

const resolvers = {
    Query: {
      listAnnouncements: async () => {
        const announcements = await myProjectService.listAnnouncements();

return announcements.map((announcement) => {
          return announcement.toObject();
        });
      },

listBlogs: async () => {
        const blogs = await myProjectService.listBlogs();

return blogs.map((blog) => {
          return blog.toObject();
        });
      },
    },
  };

return {
    typeDefs,
    resolvers
  };
}
As you can see, we’ve created a new GraphQL type to support the Blog definition and we’ve also created the query — listBlogs by adding an implementation - myProjectService.listBlogs().
Therefore, open up your myProjectService and update it with this new function:
import { mockAnnouncements } from "@dummyorg/end-to-end.entities.announcement";
import { mockBlogs } from "@dummyorg/end-to-end.entities.blog";

/**
 * corporate service
 */
export class MyProjectService {
  /**
   * say hello.
   */
  async listAnnouncements() {
    return mockAnnouncements();
  }

/**
  * return blogs.
  */
  async listBlogs() {
    return mockBlogs();
  }

/**
   * create a new instance of a corporate service.
   */
  static from() {
    return new MyProjectService();
  }
}
As you can see we’re now leveraging the mockBlogs function we created earlier to return the list of sample data.
Well, that’s our backend!
Creating the React component
Now, let’s create the frontend part of this. Let’s first create a React hook to invoke the API:
bit create react-hook hooks/use-blogs
After you’ve created your hook, open up your use-blogs.ts and update it as follows:
import { useQuery, gql } from '@apollo/client';
import { useIsMock } from '@acme/acme.testing.mock-provider';
import { Blog, mockBlogs } from '@dummyorg/end-to-end.entities.blog';

// define a graphql query
export const LIST_BLOGS = gql`
  query LIST_BLOGS {
    listBlogs {
      title
      subtitle
      outline
    }
  }
`;

/**
 * fetch list of blogs.
 */
export function useBlogs(): undefined | null | Blog[] {
  const results = useQuery(LIST_BLOGS);
  const isMock = useIsMock();
  if (isMock) return mockBlogs();

if (!results.data || results.loading) return undefined;
  if (!results?.data?.listBlogs) return null;

return results.data.listBlogs.map((blog) => {
    return Blog.from(blog);
  });
}
As you can see, our React hook now communicates with the GraphQL API to fetch the blogs. Next, let’s create a React component that leverages the hook to fetch the data. To do so, create the component using the command:
bit create react ui/blogs
Next, open up your blogs.tsx and update it as follows:
import React from 'react';
import type { ReactNode } from 'react';
import classNames from 'classnames';
import { Heading } from '@bitdesign/sparks.typography.heading';
import { Text } from '@bitdesign/sparks.typography.text';
import { useBlogs } from '@dummyorg/end-to-end.hooks.use-blogs';
import { Flex } from '@bitdesign/sparks.layout.flex';
import { Card } from '@acme/design.content.card';
import styles from './blogs.module.scss';

export type BlogProps = {
  /**
   * children for the blogs
   */
  children?: ReactNode;

/**
   * blogs to use
   */
  className?: string;
};

export function Blogs({ className }: BlogProps) {
  const blogs = useBlogs();
  if (!blogs) return null;

return (
    <Flex className={classNames(styles.blog, className)}>
      {blogs.map((blog, key) => {
        return (
          <Card key={key}>
            <Heading level={2}>{blog.title}</Heading>
            <Heading level={3}>{blog.subtitle}</Heading>
            <Text>{blog.outline}</Text>
          </Card>
        );
      })}
    </Flex>
  );
}
Next, create a file blogs.module.scss and add the following CSS definition to style the components:
// learn more: https://bit.dev/docs/design/styling
.blog {
  max-width: 1280px;
  margin: auto;
  padding: var(--spacing-triple);
  gap: var(--spacing-double);
}
We’re leveraging Bit’s design system to make our life easier. But if you’d like to, you can set up other design systems like MUI.
And, that’s essentially it! We now have a full end to end implementation ready to go. Let’s test this out by launching our app.
To do so, run the command:
bit run my-project
You should see the servers spin up, as shown below:

Next, launch your frontend app to see the output:

Next, let’s hook the Blogs route to our app component by updating the my-project-web/my-project-web.tsx file as follows:
import { Routes, Route } from 'react-router-dom';
import { NavigationProvider, Link } from '@bitdesign/sparks.navigation.link';
import { Header } from '@bitdesign/sparks.layout.header';
import { Logo } from '@bitdesign/sparks.content.logo';
import { AcmeTheme } from '@acme/design.acme-theme';
import { Announcements } from '@dummyorg/end-to-end.ui.announcements';
import { Blogs } from '@dummyorg/end-to-end.ui.blogs';

export function MyProjectWeb() {
  return (
    <AcmeTheme>
      <NavigationProvider>
        <Header logo={<Logo src='https://static.bit.dev/extensions-icons/acme.svg' name='Acme' slogan='Inc.' />}>
          <Link href='/'>Investors</Link>
          <Link href='/blogs'>Blogs</Link>
        </Header>
        <Routes>
          <Route path="/" element={<Announcements />} />
          <Route path="/blogs" element={<Blogs />} />
        </Routes>
      </NavigationProvider>
    </AcmeTheme>
  );
}
Next, you should see the updated header:
Click on “Blogs” to see the blogs loading:
Wrapping Up
And there we have it! We created a fully functional end-to-end application in under 5 minutes!
Not only that, but we did this by preserving the maintainability of our codebase through reusable entities.
If you wish to check out a full implementation, here’s the Bit Scope.
I hope you find this article helpful.
Thank you for reading.
Learn More
Recommend
About Joyk
Aggregate valuable and interesting links.
Joyk means Joy of geeK