

Todo List Application using MEAN Stack
source link: https://www.geeksforgeeks.org/todo-list-application-using-mean-stack/
Go to the source link to view the article. You can view the picture content, updated content and better typesetting reading experience. If the link is broken, please click the button below to view the snapshot at that time.
Todo List Application using MEAN Stack
The todo list is very important tool to manage our tasks in this hectic schedule. This article explores how to build to-do list application using the MEAN stack—MongoDB, Express.js, Angular, and Node.js. We’ll walk you through the process of setting up backends with Node.js and Express.js, integrating MongoDB for data storage efficiency, and using Angular for connector interactions. By the end, you’ll have not only a working todo list app but a deeper understanding of MEAN stack synergy. Let’s start this journey of MEAN stack development together.
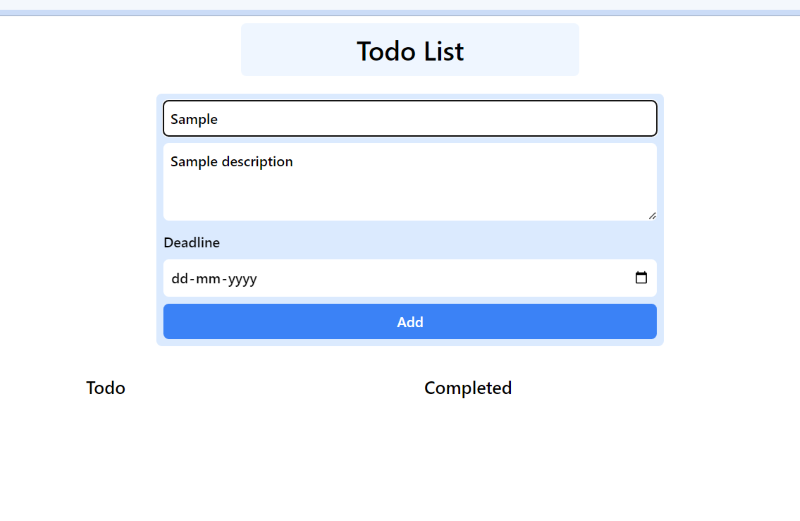
Output Preview: Let us have a look at how the final output will look like
Prerequisites:
Approach to create Todo List Application using MEAN Stack :
- To perform some basic operations like add, delete, edit and read tasks, we will make another folder controllers, inside that we will make one file employeeRouters.js, within this we will use express router. With the help of this we can tackle all the operations.
- Now, we will create mongodb database connection function, here we will use mongoose library. With the help of mongoose.connect method we can connect.
- After that, we will create models such as task contains title, description, createdAt, deadline and completed or not.
- App Component renders both completed and not completed tasks. Here, we can see the delete and edit functionality.
- TodoAdd Component only add tasks. Here, we will use EventEmitters, whenever user will click on Add button then it will emit that task to the App Component, so that, it can be easily added to the database and easily rendered.
- To add, delete or edit tasks seamlessly, we will use angular services, which will use httpClient, with the help of this we will send request to backend and accordingly the response will come.
Steps to create Application:
Step 1: Install node on your system depending on your Operating System:
Step 2: Make NodeJs directory and go to NodeJs
mkdir NodeJs
cd NodeJs
Step 3: Run npm init to initialize the Node application.
npm init -y
Step 4: Install the required dependencies:
npm i express mongoose cors body-parser
Folder Structure(Backend):
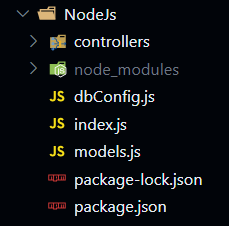
Backend
Dependencies:
  "dependencies": {
    "body-parser": "^1.20.2",
    "cors": "^2.8.5",
    "express": "^4.18.3",
    "mongoose": "^8.2.0"
  }
Code Example: Create the required files as shown in folder structure and add the following codes.
Javascript
// index.js

import express from 'express';
import bodyParser from 'body-parser';
import employeeRouters from './controllers/employeeRouters.js';
import cors from 'cors';

const app = express();
const port = 3001;

// CORS configuration
app.use(function (req, res, next) {
    res.header('Access-Control-Allow-Origin', '*');
    res.header(
        'Access-Control-Allow-Methods',
        'GET, POST, HEAD, OPTIONS, PUT, PATCH, DELETE'
    );
    res.header(
        'Access-Control-Allow-Headers',
        'Origin, X-Requested-With, Content-Type, Accept, x-access-token, x-refresh-token, _id'
    );

    res.header(
        'Access-Control-Expose-Headers',
        'x-access-token, x-refresh-token'
    );

    next();
});

app.use(bodyParser.json());

// Routes
app.use('/tasks', employeeRouters);

app.on('error', (err) => {
    console.error(`Error during startup: ${err.message}`);
});

app.listen(port, () => {
    console.log(`App has started on port ${port}`);
});
JavascriptJavascriptJavascript
Start the server using the following command.
node index.js
Step 5: Install Angular CLI, powerful tool to deal with angular project
npm install -g @angular/cli
Step 6: Create Project and change directory
ng new to-do-app
cd to-do-app
Step 7: Steup Tailwind
1. Install talwind CSS
npm install -D tailwindcss postcss autoprefixer
npx tailwindcss init
2. Configure your tailwind.config.js file.
/** @type {import('tailwindcss').Config} */
module.exports = {
  content: [
    "./src/**/*.{html,ts}",
  ],
  theme: {
    extend: {},
  },
  plugins: [],
}
3. Add the Tailwind directives to your CSS
Add the @tailwind directives in your ./src/styles.css file.
@tailwind base;
@tailwind components;
@tailwind utilities;
Step 8: Run the below command to make Angular service webrequest
ng g s webrequest
Step 9: Run the below command to create TodoAdd component
ng g c MyComponents/todo-add
Important Configurations in app.config.ts file:
// src/app/app.config.ts:

import { ApplicationConfig } from '@angular/core';
import { provideRouter } from '@angular/router';

import { routes } from './app.routes';
import { provideClientHydration } from '@angular/platform-browser';
import { provideHttpClient, withFetch } from '@angular/common/http';

export const appConfig: ApplicationConfig = {
      providers: [provideRouter(routes), provideClientHydration(),provideHttpClient(withFetch())]
};
Folder Structure(Frontend):
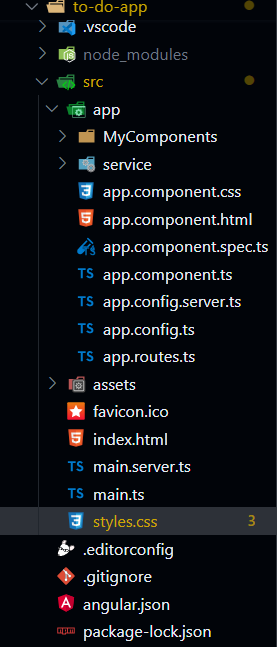
Frontend
Dependencies:
  "dependencies": {
    "@angular/animations": "^17.2.0",
    "@angular/common": "^17.2.0",
    "@angular/compiler": "^17.2.0",
    "@angular/core": "^17.2.0",
    "@angular/forms": "^17.2.0",
    "@angular/platform-browser": "^17.2.0",
    "@angular/platform-browser-dynamic": "^17.2.0",
    "@angular/platform-server": "^17.2.0",
    "@angular/router": "^17.2.0",
    "@angular/ssr": "^17.2.2",
    "express": "^4.18.2",
    "rxjs": "~7.8.0",
    "tslib": "^2.3.0",
    "zone.js": "~0.14.3"
  },
  "devDependencies": {
    "@angular-devkit/build-angular": "^17.2.2",
    "@angular/cli": "^17.2.2",
    "@angular/compiler-cli": "^17.2.0",
    "@types/express": "^4.17.17",
    "@types/jasmine": "~5.1.0",
    "@types/node": "^18.18.0",
    "autoprefixer": "^10.4.18",
    "jasmine-core": "~5.1.0",
    "karma": "~6.4.0",
    "karma-chrome-launcher": "~3.2.0",
    "karma-coverage": "~2.2.0",
    "karma-jasmine": "~5.1.0",
    "karma-jasmine-html-reporter": "~2.1.0",
    "postcss": "^8.4.35",
    "tailwindcss": "^3.4.1",
    "typescript": "~5.3.2"
  }
Code Example: Create the required files and add the following codes.
HTML
<!-- src/app/app.component.html -->

<div>
    <div class="text-3xl font-semibold max-w-sm mx-auto
     bg-blue-50 text-center p-3 rounded-md mt-2
     hover:bg-blue-500 hover:text-white transition
     duration-500 ease-in-out my-5">
        Todo List
    </div>

    <app-todo-add (todoAdd)="addTask($event)"></app-todo-add>

    <div class="max-w-lg md:max-w-xl lg:max-w-3xl
     flex flex-col md:flex-row mx-auto">
        <div class="flex flex-col my-3 p-2 m-2 mb-1 rounded-md
      text-white font-semibold text-white font-semibold md:w-2/4 lg:w-2/4">
            <p class="font-semibold text-xl text-black">Todo</p>

            <ul *ngFor="let task of tasks" class="flex flex-col rounded-md">
                <div *ngIf="task.completed === false">
                    <ng-container *ngIf="edit === true && editTask._id === task._id; else elseBlock">
                        <div class="flex flex-col">
                            <input autofocus type="text" class="p-2 rounded-md font-semibold
                                                                bg-blue-300"
                                [(ngModel)]="editTask.name" />
                            <textarea rows="3" cols="10" class="p-2 rounded-md font-semibold
                                                                my-2 bg-blue-300"
                                [(ngModel)]="editTask.desc"></textarea>
                            <p class="font-semibold text-black mt-1">Deadline</p>
                            <input type="date" class="p-2 rounded-md font-semibold bg-blue-300 my-2"
                                [(ngModel)]="editTask.deadline" />
                            <button (click)="handleUpdate(task)" class="bg-green-500
                                                                        hover:bg-green-700 p-1
                rounded-md text-white font-semibold">
                                Update
                            </button>
                        </div>
                    </ng-container>

                    <ng-template #elseBlock>
                        <div class="p-2 m-2 mb-1 bg-blue-400 rounded-md">
                            <p class="leading-loose my-1">{{ task.name }}</p>
                            <p class="leading-loose my-2 overflow-auto">{{ task.desc }}</p>
                            <p class="font-semibold text-white mt-1">Deadline</p>
                            <p class="leading-loose mb-2 overflow-auto">
                                {{ task.deadline }}
                            </p>
                            <hr class="mb-2" />
                            <div class="flex flex-row justify-between bg-blue-50 p-2 rounded-md">
                                <span>
                                    <button (click)="handleEdit(task)" class="mr-2 bg-blue-500
                                         hover:bg-blue-700 p-2
                    rounded-md text-white font-semibold">
                                        Edit
                                    </button>
                                    <button (click)="handleDelete(task)" class="bg-red-500
                                           hover:bg-red-700 p-2
                    rounded-md text-white font-semibold">
                                        Delete
                                    </button>
                                </span>
                                <button (click)="handleComplete(task)" class="ml-2
                                         bg-green-500 hover:bg-green-700 p-2
                  rounded-md text-white font-semibold">
                                    Completed
                                </button>
                            </div>
                        </div>
                    </ng-template>
                </div>
            </ul>
        </div>
        <div class="flex flex-col my-3 p-2 m-2 mb-1 rounded-md
      font-semibold md:w-2/4 lg:2/4 text-black">
            <p class="font-semibold text-xl">Completed</p>
            <ul *ngFor="let task of tasks" class="flex flex-col">
                <div *ngIf="task.completed === true; else elseBlock">
                    <div class="my-3 bg-blue-100 p-2 rounded-md">
                        <p class="leading-loose my-1">{{ task.name }}</p>
                        <p class="leading-loose my-2 overflow-auto">{{ task.desc }}</p>
                        <p class="font-semibold text-black mt-1">Deadline</p>
                        <p class="leading-loose mb-2 overflow-auto">{{ task.deadline }}</p>
                        <hr class="mb-2" />
                        <div class="flex flex-row justify-between bg-blue-50 p-2 rounded-md">
                            <span>
                                <button (click)="handleDelete(task)" class="bg-red-500
                                  hover:bg-red-700 p-2
                  rounded-md text-white font-semibold">
                                    Delete
                                </button>
                            </span>
                        </div>
                    </div>
                </div>
                <ng-template #elseBlock> </ng-template>
            </ul>
        </div>
        <div></div>
    </div>
</div>
HTML
   Deadline


    Add
JavascriptJavaScriptJavaScript
Run the frontend application using the following command
ng serve --open
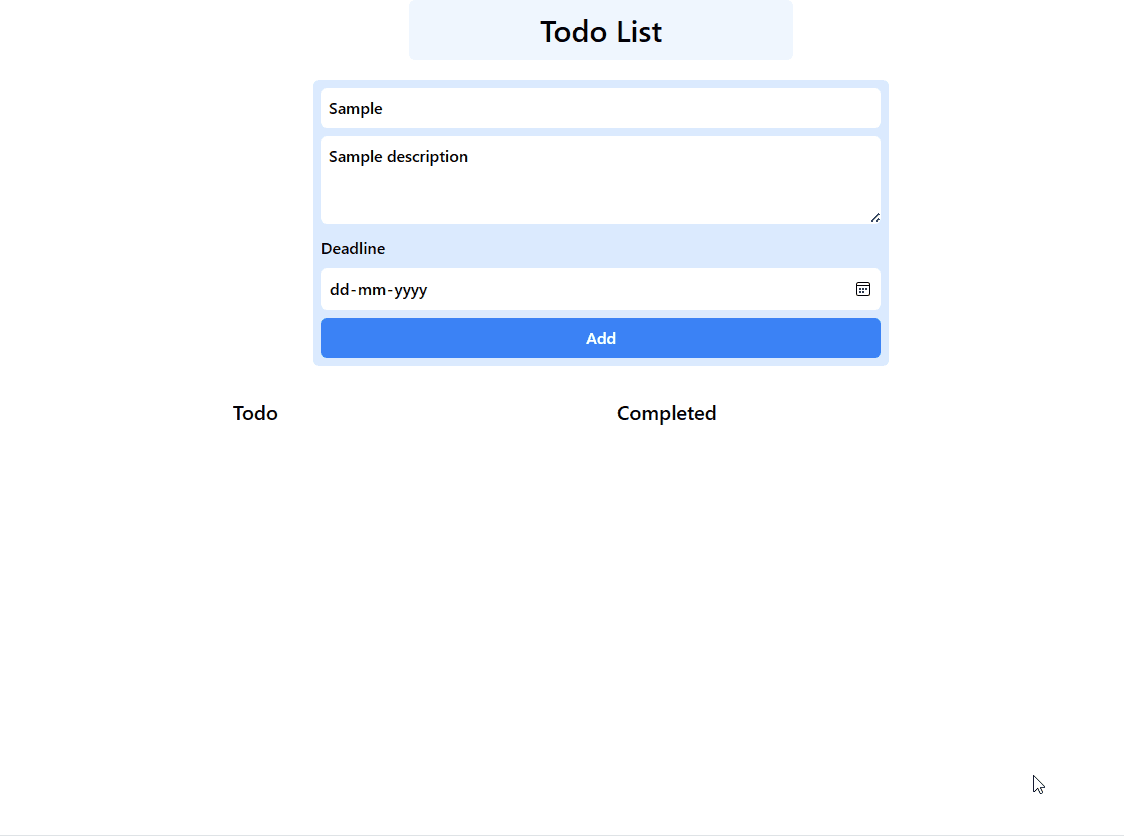
Output:
Here's a complete roadmap for you to become a developer: Learn DSA -> Master Frontend/Backend/Full Stack -> Build Projects -> Keep Applying to Jobs
And why go anywhere else when our DSA to Development: Coding Guide helps you do this in a single program! Apply now to our DSA to Development Program and our counsellors will connect with you for further guidance & support.
Recommend
About Joyk
Aggregate valuable and interesting links.
Joyk means Joy of geeK