

Set a static IP address with nmtui on Raspberry Pi OS 12 'Bookworm'
source link: https://www.jeffgeerling.com/blog/2024/set-static-ip-address-nmtui-on-raspberry-pi-os-12-bookworm
Go to the source link to view the article. You can view the picture content, updated content and better typesetting reading experience. If the link is broken, please click the button below to view the snapshot at that time.
Set a static IP address with nmtui on Raspberry Pi OS 12 'Bookworm'
Old advice for setting a Raspberry Pi IP address to a static IP on the Pi itself said to edit the /etc/dhcpcd.conf file, and add it there.
But on Raspberry Pi OS 12 and later, dhcpcd is no longer used, everything goes through Network Manager, which is configured via nmcli or nmtui. If you're booting into the Pi OS desktop environment, editing the IP settings there is pretty easy.
But setting a static IP via the command line is a little different.
First, get the interface information—you can get a list of all interfaces with nmcli device status:
$ nmcli device status
DEVICE         TYPE      STATE                   CONNECTION
eth0           ethernet  connected               Wired connection 1
lo             loopback  connected (externally)  lo
wlan0          wifi      disconnected            --
In my case, I want to set an IP on eth0, the built-in Ethernet.
I can get all the current information about that port with nmcli device show eth0, and I can edit the connection using the terminal UI (nmtui):
$ sudo nmtui edit "Wired connection 1"
This brings up a connection editor, where you can highlight "IPv4 CONFIGURATION" and change it from <Automatic> to <Manual>, and then use <Show> to show all the settings.
Go through each setting adding in at least an IPv4 address, Gateway, and DNS Server, for example:
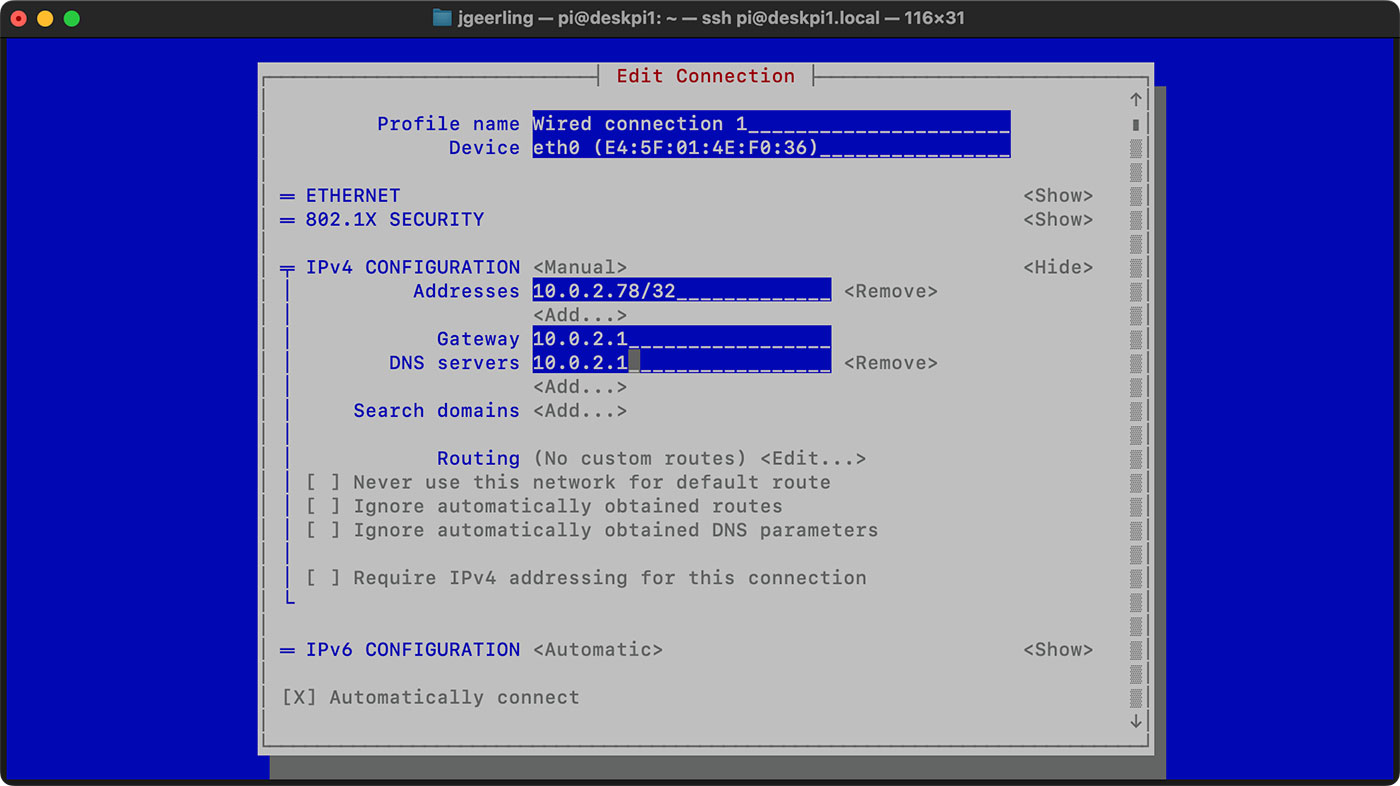
Then go down to the bottom and select 'OK'.
This saves the static IP configuration, but doesn't apply it immediately. To apply the changes, you need to restart NetworkManager:
$ sudo systemctl restart NetworkManager
Then if you run nmcli device show eth0, you should see the new IP address (the old one might still be attached to the interface at the same time until you reboot):
pi@deskpi1:~ $ nmcli device show eth0
GENERAL.DEVICE:                         eth0
...
IP4.ADDRESS[1]:                         10.0.2.78/24
IP4.ADDRESS[2]:                         10.0.2.90/24
You can also configure a static IP entirely via nmcli without using the UI; see this article on nmcli` from Cyberciti.biz.
For bonus points, you can easily automate changes to network interfaces with Ansible, for example:
    - name: Configure static IP address (using Network Manager).
      community.general.nmcli:
        conn_name: "Wired connection 1"
        ifname: eth0
        type: ethernet
        ip4: "10.0.2.78/24"
        gw4: "10.0.2.1"
        state: present
      notify: restart networkmanager
Recommend
About Joyk
Aggregate valuable and interesting links.
Joyk means Joy of geeK