

Vaadin Grid: Basic and Advanced example
source link: https://www.mastertheboss.com/web/vaadin/vaadin-grid-basic-and-advanced-example/
Go to the source link to view the article. You can view the picture content, updated content and better typesetting reading experience. If the link is broken, please click the button below to view the snapshot at that time.

In this tutorial, we’ll explore the versatility of Vaadin‘s Grid component. We will dive into two essential aspects: the creation of a basic grid and the implementation of an editable Grid. You’ll learn how to set up and populate Grids, handle user interactions, providing a seamless and interactive data visualization experience within your Vaadin-based web applications.
Before we start
Firstly, if you are new to Vaadin we recommend this introduction tutorial: Vaadin Tutorial: Building Modern Web Applications with Ease
In this article we will cover the details of project set up. You can easily bootstrap the Vaadin project with the starter available at: https://start.vaadin.com
A Simple Vaadin Grid
The Vaadin Grid component is a powerful and versatile UI element used for displaying tabular data in web applications. It provides a structured way to present and manipulate data in a grid or table format, offering various functionalities to enhance data visualization and interaction.
Here is a basic example of a Grid which will be available on the default Route of your View:
@Route
public class MainView extends VerticalLayout {

    private final CustomerRepository repo;
    final Grid<Customer> grid;

    public MainView(CustomerRepository repo) {
        this.repo = repo;
        this.grid = new Grid<>(Customer.class, false);

        grid.addColumn(Customer::getFirstName).setHeader("First Name").setSortable(true);
        grid.addColumn(Customer::getLastName).setHeader("Last Name").setSortable(true);

        grid.setItems(repo.findAll());

        add(grid);

    }

}
It creates a new Grid instance of type Customer and sets the
setItems() method to false, indicating that the grid should not add column automatically This is done manually as explained in the next section.
For the sake of brevity, we don’t discuss the Model / Repository and Service Class which is a basic implementation of the Spring Boot Repository pattern. You will find all the code at the end of this article.
Adding Columns:
The
addColumn() method is used to add columns to the grid. The first parameter specifies the getter method for the column data, which in this case is
Customer::getFirstName and
Customer::getLastName for the first and last name columns, respectively.
- The setHeader()
setHeader()method sets the header text for each column. - The setSortable()
setSortable()method enables sorting for each column, allowing users to rearrange the data by clicking on the column headers
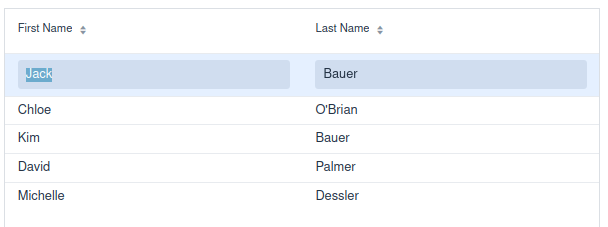
By running this example (http://localhost:8080) you will see some example Customer objects we have created from the main Application Class:

Coding an Editable Grid
The second Vaadin Grid example is a bit more complex. We will make the two Columns editable. This will require us a set of additional steps such as:
- Create an Editor for your Columns when you click on one of the fields
- Add a Listener upon modification so that you can persist the change on your Repository
Here is the new Route which includes an Editable Grid Component:
@Route("editable")
public class EditableView extends VerticalLayout {

    private final CustomerRepository repo;
    final Grid<Customer> grid;
    private Optional<Grid.Column<Customer>> currentColumn = Optional.empty();
    private Optional<Customer> currentItem = Optional.empty();

    public EditableView(CustomerRepository repo) {
        this.repo = repo;
        this.grid = new Grid<>(Customer.class, false);

        var binder = new BeanValidationBinder<>(Customer.class); // <1>

        // <2>
        var editor = grid.getEditor();
        editor.setBinder(binder);
        editor.setBuffered(true);

        editor.addSaveListener(event -> {
            Customer c = event.getItem();
            repo.save(c);
        });

        // <3>
        var txtFirstName = new TextField();
        txtFirstName.setWidthFull();
        binder.forField(txtFirstName).bind("firstName");
        grid.addColumn("firstName").setEditorComponent(txtFirstName).setAutoWidth(true);

        var txtLastName = new TextField();
        txtLastName.setWidthFull();
        binder.forField(txtLastName).bind("lastName");
        grid.addColumn("lastName").setEditorComponent(txtLastName).setAutoWidth(true);

        grid.setItems(repo.findAll());

        // <4>
        grid.addSelectionListener(event -> event.getFirstSelectedItem().ifPresent(samplePerson -> {
            editor.save();

            if (!editor.isOpen()) {
                grid.getEditor().editItem(samplePerson);

                currentColumn.ifPresent(column -> {
                    if (column.getEditorComponent() instanceof Focusable<?> focusable) {
                        focusable.focus();
                    }
                });
            }
        }));

        grid.addCellFocusListener(event -> {
            currentItem = event.getItem();
            currentColumn = event.getColumn();
        });
        add(grid);

    }

}
Here are the key takeaways from this Class:
<1>: BeanValidationBinder in Vaadin is a powerful tool that facilitates the binding between UI components and Java objects (beans) while enforcing validation based on bean validation annotations
<2>: The Grid Editor is available from the Grid object itself via
grid.getEditor(). In order to persist the change in the field, we have then attached a listener that will receive the Customer object as an Event.
<3>, We need to define which component we will use to edit the fields. We will be using the simplest one, which is a
TextField component as editor components for direct user input.
<4> Finally, to handle user interaction we have included:
addSelectionListener triggers when you select a row. addCellFocusListener stores the item and column information when there’s focus on a cell,
The Editable Grid in Action
Then, let’s check the result of our new Route. By surfing on localhost:8080/editable, you should be able to see the new version of your Grid. In the new version, you can edit the Cells by clicking on them:
Conclusion
In summary, the Vaadin Grid component is a powerful tool for displaying, managing, and interacting with tabular data in web applications. Its versatility and customization capabilities make it suitable for a wide range of use cases, including displaying large datasets, data exploration, editing data, handling dynamic data updates, and creating customized data grids.
Source code: https://github.com/fmarchioni/mastertheboss/tree/master/web/vaadin/editable-grid
Recommend
-
106
Alternative navigator in Vaadin In Vaadin, to change the components displayed on the screen, there are a few options. The most straightforward way is to use the setContent() method o...
-
9
Vaadin 10+: SASS Integration and CSS Refresh during Development Posted on Apr 15, 2019. Updated on Apr 17, 2019 Since Vaadin 10, SASS is no longer supported out of the box....
-
15
In this blog, I will show you how I got started with Vaadin Flow. With Vaadin Flow, you can create web apps without HTML or JavaScript, but entirely with Java. Let’s get started! 1. Introduction For some time, I have...
-
11
Vaadin 23.0.0 Released Vaadin 23.0.0 Released - Flow and Hilla Written by Nikos Vaggalis Monday, 21 March 2022 Vaadin, the versatile full stack Java-based f...
-
13
Blink a LED on a Raspberry Pi With Vaadin Build a respons...
-
12
Difference between two datesFields in Vaadin advertisements I'm having some problem with calculate days between two dateFie...
-
7
aire-wizard Aire-wizard is a full-featured wizard component for Vaadin flow Contributing Clone the repo: git clone [email protected]:aire-ux/aire-wizard Prepare package for development: gradl...
-
8
Vaadin CEO: Developers are the architects of the future Vaadin’s Steven Grandchamp explains why every company needs to listen to its software developers....
-
7
vaadin/hilla:前后端集成框架 解道Jdon ...
-
8
Vaadin Flow provides a comprehensive set of UI components and tools for creating rich and interactive user interfaces, while Quarkus offers a lightweight and efficient Java framework for developing cloud-native applications. In th...
About Joyk
Aggregate valuable and interesting links.
Joyk means Joy of geeK