

Different Tools For Linting JavaScript Components: A Practical Guide
source link: https://blog.bitsrc.io/javascript-linting-tools-f3d3b30a9a08
Go to the source link to view the article. You can view the picture content, updated content and better typesetting reading experience. If the link is broken, please click the button below to view the snapshot at that time.
Different Tools For Linting JavaScript Components: A Practical Guide
How to find the perfect Linting Tool for your project
In the fast-paced world of web development, having neat and error-free code is super important. JavaScript is a big player in today’s web applications, and developers are always on the lookout for ways to keep their code in top shape and catch any potential bugs early on.
This is where linting tools step in they’re like code detectives that analyze your JavaScript, spot issues, and make sure everyone follows the same coding rules. Think of linting tools as your code’s personal assistants, helping you write cleaner, more reliable code.
In this article, we’re going to explore the top 3 JavaScript linting tools, detailing their features. Additionally, we’ll provide a comprehensive guide on integrating linting tools into your JavaScript projects.
What are JavaScript Linting tools?
JavaScript linting tools analyze your JavaScript code to find and report potential bugs, stylistic issues, and other issues. They help developers maintain consistent and quality code by introducing coding standards and identifying common errors early in the development process.
Linting tools work by analyzing your code for patterns or structures that could cause you to make mistakes or deviate from defined code styles. Things like syntax errors, unreported changes, and potential bugs can be caught. Additionally, linting tools can enforce coding conventions, ensuring that your code follows a consistent path, which can improve readability and maintainability.
Using JavaScript linting tools provides many benefits for developers and teams of developers:
- Debugging: Linting tools help catch syntax errors and other common mistakes early in the development process. This prevents problems from entering the test or process, saving time and effort in debugging.
- Consistent regulation: Linting tools reinforce regulatory standards and conventions, and promote a consistent regulatory approach within the industry. This convergence improves code readability and makes it easier for developers to collaborate on the same codebase.
- Maintainability: Linting tools contribute to code maintainability by detecting and flagging potential problems. Manufacturers can address issues before they become critical, reducing maintenance and upgrade efforts.
- Positive Code: Linting tools are able to identify and highlight areas of the code that lack best practices. This helps developers write cleaner, more efficient, and better code.
- Security: Some linting tools, like JSLint, focus on identifying potentially insecure code structures. This can help catch security vulnerabilities earlier in the development process, reducing the risk of security issues being introduced into the codebase.
When we talk about the linting tools, there are many linting tools using JavaScript. let’s talk about the top three tools with their features and pros & cons.
1. ESLint
ESLint is a popular static analysis tool for JavaScript code. It uses a custom syntax definition to analyze your code and report on any issues it finds. ESLint can be configured to enforce specific coding styles and conventions, making it highly adaptable to various project requirements.
ESLint features:
- Customizable Rules: ESLint allows you to define your own set of rules for your project. You can use the built-in rules, create your own custom rules, or configure the rules from the ESLint plugin registry.
- Plugin extensions: ESLint supports plugins that provide additional code and other features. You can search for existing plugins or create your own.
- Configurable environments: ESLint can be configured to support different environments, such as Node.js, browsers, or AMD. This allows you to enable or disable rules based on the specific environment in which your code is running.
- Interface with build programs: ESLint can be used in conjunction with popular build programs, such as Grunt, Gulp, or webpack, to automate the linting process.
Pros of ESLint:
- Highly configurable: ESLint provides a great deal of flexibility, allowing you to tailor its behavior to your specific project requirements.
- Large community and ecosystem: ESLint has a large and active community, which means that it has a wide range of plugins and integrations available. Additionally, ESLint’s large number of built-in rules helps catch a wide variety of potential errors and coding mistakes.
- Automatic linting: ESLint can be integrated with build systems or text editors to automatically lint your code whenever you save a file. This can help you catch and fix errors quickly, reducing the chances of introducing bugs into your codebase.
Cons of ESLint:
- Can be slow: If your project contains a large number of JavaScript files, ESLint may take a long time to lint all of them. This can slow down your build process or editor.
- Initial learning curve: If you are new to ESLint or linting in general, there may be a steep.
2. JSHint

JSHint is a widely-used static analysis tool for JavaScript code. It uses a custom syntax definition to analyze your code and report on any issues it finds. JSHint is often used in combination with other linting tools, like ESLint, to ensure comprehensive code quality.
JSHint features:
- Code analysis: JSHint performs a static analysis of your JavaScript code to identify potential errors, unreported changes, unused changes and more.
- Configurable: JSHint allows you to customize its behavior by providing you with a configuration file. You can configure custom globals and more to enable or disable specific alerts.
- Extensible: JSHint supports the use of custom reporters and custom functions. This allows custom rules and combinations to be created.
- Integration with build programs: JSHint can be combined with popular build programs, such as Grunt, Gulp, or webpack, to automate the linting process.
Pros of JSHint:
- Configurable: JSHint allows you to customize it according to your specific project needs, which can be useful when working with different teams or legacy code.
- Lightweight: JSHint is relatively lightweight compared to ESLint, which may make it more suitable for small projects or environments with limited resources.
- Good documentation: The JSHint documentation is well-written and comprehensive, making it easy for new users to get started.
Cons of JSHint:
- Not as highly configurable as ESLint: Although JSHint is still highly configurable, it may not provide the same flexibility as ESLint. This can be a concern for developers who need specific linting rules.
- Smaller community and plugin ecosystem: JSHint has a smaller community and plugin ecosystem compared to ESLint, which can make it more difficult to find third-party support or plugins
- Not strictly maintained: JSHint’s latest commitment is September 2020, when ESLint receives regular updates and improvements. This can make a difference in terms of ongoing support and debugging.
3. SonarLint
SonarLint is an advanced code quality tool designed for agile and lean development teams, which allows them to write cleaner code and make it clearer to read and maintain. This product belongs to the SonarSource suite that also includes SonarQube and SonarCloud. SonarLint for IDEs such as Visual Studio Code, IntelliJ IDEA, and Eclipse.
Features of SonarLint:
- Code quality and security checks: SonarLint scans code in real-time, detecting bugs, vulnerabilities, and security issues.
- Automated bug fixes: SonarLint can provide immediate recommendations to fix known issues, making it easier for developers to fix problems as they arise
- On-the-fly code analysis: SonarLint actually works as you write, ensuring that the code is always checked for quality and security.
- Compatible with popular IDEs: SonarLint supports a variety of integrated development environments (IDEs) such as IntelliJ, Eclipse, and Visual Studio.
- Customizable rules: Developers can tailor the rules followed by SonarLint to their specific needs and requirements.
Pros of SonarLint:
- Increases productivity: SonarLint can detect and automatically fix many common problems, saving developers time and effort.
- Reduces errors and errors: By providing immediate feedback and suggestions for improvement, SonarLint can help reduce errors and errors in code.
- Ensures code quality: SonarLint’s automated code analysis ensures code complies with industry best practices and quality standards.
Cons of SonarLint:
- Important features: SonarLint can consume system resources at runtime, which can affect the performance of the IDE.
- Learning curve: If you are new to using static code analysis tools, it can be a learning curve to familiarize yourself with the features and functionality of SonarLint
How to use linting tools in JavaScript projects?
Linting tools are essential in JavaScript projects for identifying and fixing coding errors, ensuring consistency, and adhering to coding standards.
So, let’s see how we can to use linting tools like ESLint in JavaScript projects:
1. Install Linting tool
ESLint is a popular linting tool for JavaScript. It can be installed globally or locally within a project.
To install ESLint globally, use the following command:
npm install -g eslint
To install ESLint locally within a project, navigate to the project directory and run:
npm install --save-dev eslint
2. Create a configuration file
After installing ESLint, create a configuration file called .eslintrc.json in the root directory of your project. This file will contain the rules that ESLint will enforce.
Here’s an example of a basic ESLint configuration file:
{
 "extends": "eslint:recommended",
 "env": {
    "browser": true,
    "node": true,
    "es6": true
 },
 "rules": {
    "indent": [
      "error",
      2
    ],
    "linebreak-style": [
      "error",
      "unix"
    ],
    "quotes": [
      "error",
      "single"
    ],
    "semi": [
      "error",
      "always"
    ]
 }
}
3. Lint your JavaScript files
Now you can use ESLint to lint your JavaScript files. In your project directory, run the following command:
npx eslint your-javascript-file.js
ESLint will check your JavaScript file against the rules specified in your configuration file. If there are any issues, ESLint will report them. For example, consider the report shown below:
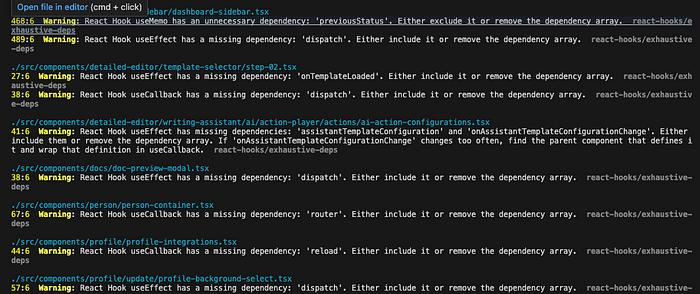
Figure: ESLint Output
As shown above, the ESLint shows issues in the code and actions that you can to do mitigate it.
4. Integrate ESLint with your build system
For a smoother development experience, consider integrating ESLint with your build system, such as Webpack. This will automatically lint your JavaScript files whenever you build your project. For example, you can modify your build command in your package.json file to execute an ESLint check before it begins the actual app build:
{
  "name": "your-project-name",
  "version": "1.0.0",
  "description": "Your project description",
  "scripts": {
    "lint": "eslint .", // This script runs ESLint on your project files
    "build": "your-build-command-here" // Replace with your actual build command
  },
  "devDependencies": {
    "eslint": "^7.32.0", // Replace with your preferred ESLint version
    // Other devDependencies...
  }
}
As shown above, in your CI server, you can have steps that executes the Linting command first, and then the build command. By doing so, the build will fail if there any linting error. You can integrate this using CI tools like GitHub actions and by defining simple workflows as shown below:
name: Lint and Build

on: [push]

jobs:
  lint-and-build:
    runs-on: ubuntu-latest

steps:
      - name: Checkout code
        uses: actions/checkout@v2

- name: Setup Node.js
        uses: actions/setup-node@v2
        with:
          node-version: '20' # You can change this to your desired Node.js version

- name: Install dependencies
        run: npm install # You can use yarn if preferred

- name: Run ESLint
        run: npm run lint

- name: Build project
        run: npm run build
As you can see, the linting phase executes before the build phase, so the entire workflow fails if the linting fails.
5. Use an editor extension

Many popular code editors, such as Visual Studio Code, have extensions available for ESLint. These extensions can provide real-time linting and automatic code fixing as you write your code. This can significantly improve your productivity and code quality.
The provided step-by-step guide ensures easy setup, while integration with build systems and editor extensions streamlines the development process.
What is a modernized linting approach for JavaScript?
But that’s not all. You should also consider using modernized build systems that support these linting features as a standard. So, this ideally streamlines your development workflow by giving you pre-configured linting configurations to consume.
Consider build systems like Bit.

Figure: Bit
Bit natively offers component linting with ESLint and it lints your components before every build on its Ripple CI. This ensures that the components that you ship out to production is error-free.
If this sounds interesting, check out this article.
With Bit, you can ensure that you bring about independent linting configurations to each of your components. For instance, you might have components that use different rules than your default configuration. In such cases, you’d have to turn off linters in these files, which results in unnecessary code. Instead, by using Bit, you can define linting configurations on a per-component basis and ensure that your components have independent, yet streamlined code quality guidelines.
Figure: A per-component linting configuration in Bit
Conclusion
Choosing a linter for your project relies on what your project needs, what your team likes, and the coding style rules you follow. No matter which linter you go for, adding linting to your development routine is a smart move. It helps you create code that’s cleaner and easier to keep up with.
I hope this article will help you to work with linting tools.
Thank you for reading.
Recommend
About Joyk
Aggregate valuable and interesting links.
Joyk means Joy of geeK