

研发必会-异步编程利器之CompletableFuture(含源码 中)
source link: https://blog.51cto.com/u_11866810/7872113
Go to the source link to view the article. You can view the picture content, updated content and better typesetting reading experience. If the link is broken, please click the button below to view the snapshot at that time.
研发必会-异步编程利器之CompletableFuture(含源码 中)
精选 原创微信公众号访问地址: 研发必会-异步编程利器之CompletableFuture(含源码 中)
近期热推文章:
1、springBoot对接kafka,批量、并发、异步获取消息,并动态、批量插入库表;
2、SpringBoot用线程池ThreadPoolTaskExecutor异步处理百万级数据;
3、基于Redis的Geo实现附近商铺搜索(含源码)
4、基于Redis实现关注、取关、共同关注及消息推送(含源码)
5、SpringBoot整合多数据源,并支持动态新增与切换(详细教程)
6、基于Redis实现点赞及排行榜功能
7、研发必会-异步编程利器之CompletableFuture(上)
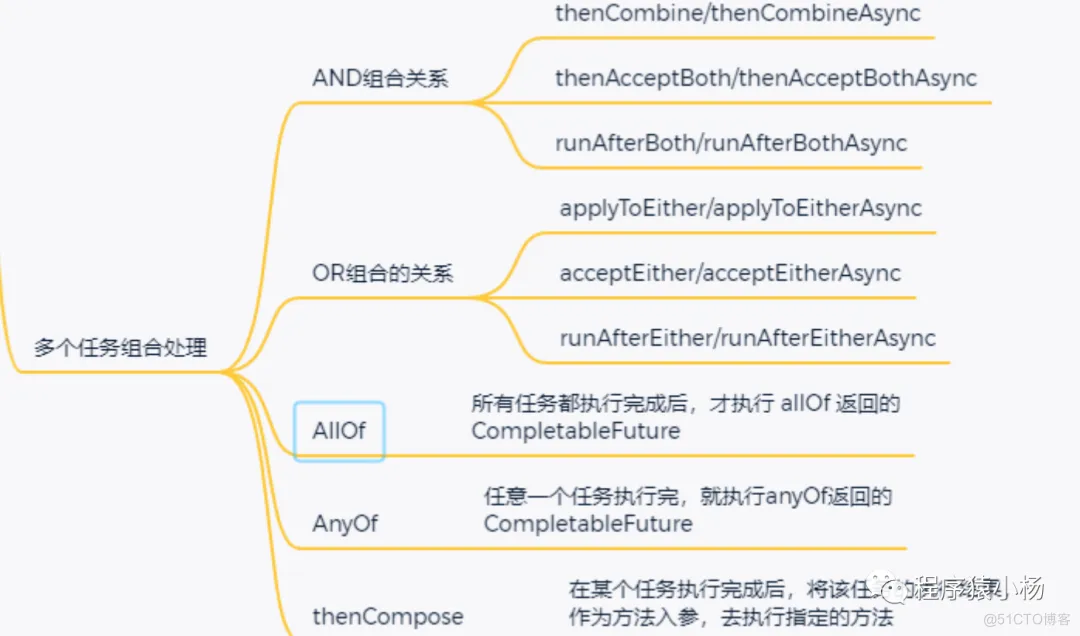
一、多任务组合回调
备注:源码获取方式在文底。
1.1、AND组合关系

thenCombine / thenAcceptBoth / runAfterBoth都表示:将两个CompletableFuture组合起来,只有这两个都正常执行完了,才会执行某个任务。也即:当任务一和任务二都完成再执行任务三(异步任务)。
区别在于:
1、runAfterBoth:不会把执行结果当做方法入参,且没有返回值。
2、thenAcceptBoth:会将两个任务的执行结果作为方法入参,传递到指定方法中,且无返回值。
3、thenCombine:会将两个任务的执行结果作为方法入参,传递到指定方法中,且有返回值。
代码案例:
/**
     * 功能描述:多任务组合回调:AND组合关系
     * @MethodName: testCompleteAnd
     * @MethodParam: []
     * @Return: void
     * @Author: yyalin
     * @CreateDate: 2023/10/11 17:30
     */
    public void  testCompleteAnd() throws ExecutionException, InterruptedException {
        //创建线程池
        ExecutorService executorService = Executors.newFixedThreadPool(10);
        long startTime = System.currentTimeMillis();
        //1、使用自定义线程池,开启异步任务01
        CompletableFuture<Integer" data-textnode-index-1697348844027="57" data-index-1697348844027="1072" data-index-len-1697348844027="1072" class="character" style="margin: 0px; padding: 0px; box-sizing: border-box; max-width: 100%; display: inline-block; text-indent: initial;">> supplyAsyncRes01=CompletableFuture.supplyAsync(()-" data-textnode-index-1697348844027="57" data-index-1697348844027="1124" data-index-len-1697348844027="1124" class="character" style="margin: 0px; padding: 0px; box-sizing: border-box; max-width: 100%; display: inline-block; text-indent: initial;">>{
            int res=1;
            try {
                //执行任务1 开始执行任务01,当前线程为:12
                log.info("开始执行任务01,当前线程为:"+Thread.currentThread().getId());
                //执行具体的事务
                Thread.sleep(600);
                res+=1; //模拟加1
            } catch (InterruptedException e) {
                e.printStackTrace();
            }
            //返回结果
            return res;
        },executorService);
        //2、使用自定义线程池,开启异步任务02
        CompletableFuture<Integer" data-textnode-index-1697348844027="72" data-index-1697348844027="1595" data-index-len-1697348844027="1595" class="character" style="margin: 0px; padding: 0px; box-sizing: border-box; max-width: 100%; display: inline-block; text-indent: initial;">> supplyAsyncRes02=CompletableFuture.supplyAsync(()-" data-textnode-index-1697348844027="72" data-index-1697348844027="1647" data-index-len-1697348844027="1647" class="character" style="margin: 0px; padding: 0px; box-sizing: border-box; max-width: 100%; display: inline-block; text-indent: initial;">>{
            int res=1;
            try {
                //执行任务02 开始执行任务02,当前线程为:13
                log.info("开始执行任务02,当前线程为:"+Thread.currentThread().getId());
                //执行具体的事务
                Thread.sleep(600);
                res+=2; //模拟加2
            } catch (InterruptedException e) {
                e.printStackTrace();
            }
            //返回结果
            return res;
        });
        //3、任务02:将任务1与任务2开始任务组合
        CompletableFuture<Integer" data-textnode-index-1697348844027="87" data-index-1697348844027="2105" data-index-len-1697348844027="2105" class="character" style="margin: 0px; padding: 0px; box-sizing: border-box; max-width: 100%; display: inline-block; text-indent: initial;">> thenCombineAsyncRes=supplyAsyncRes01.thenCombineAsync(supplyAsyncRes02,(res01, res02)-" data-textnode-index-1697348844027="87" data-index-1697348844027="2193" data-index-len-1697348844027="2193" class="character" style="margin: 0px; padding: 0px; box-sizing: border-box; max-width: 100%; display: inline-block; text-indent: initial;">>{
            //始执行任务03,当前线程为:14
            log.info("开始执行任务03,当前线程为:"+Thread.currentThread().getId());
            log.info("任务01返回值:"+res01);
            log.info("任务02返回值:"+res02);
            //任务组合返回值 可以拿到任务01和任务02的返回结果进行相关操作,然后统一返回结果
            return res01+res02;
        },executorService);
        //4、最终返回结果
        log.info("最终返回结果为:"+thenCombineAsyncRes.get());
        log.info("总共用时" + (System.currentTimeMillis() - startTime) + "ms");
    }
运行结果:

1.2、OR组合关系
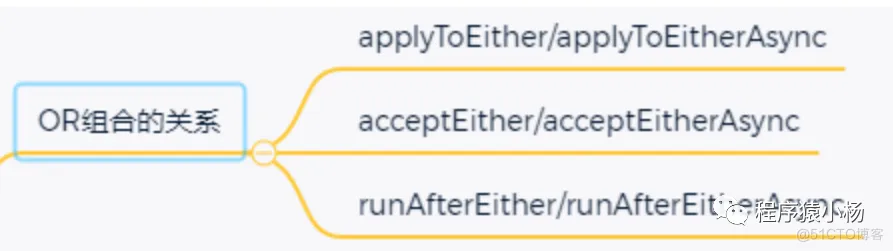
将两个CompletableFuture组合起来,只要其中一个执行完了,就会执行某个任务。(两个任务,只要有一个任务完成,就执行任务三)
区别在于:
1、runAfterEither:不会把执行结果当做方法入参,且没有返回值。
2、acceptEither: 会将已经执行完成的任务,作为方法入参,传递到指定方法中,且无返回值。
3、applyToEither:会将已经执行完成的任务,作为方法入参,传递到指定方法中,且有返回值。(个人推荐)
参考代码:
/**
     * 功能描述:OR组合关系
     * @MethodName: testCompleteOr
     * @MethodParam: []
     * @Return: void
     * @Author: yyalin
     * @CreateDate: 2023/10/11 18:14
     */
    public void  testCompleteOr(){
        //创建线程池
        ExecutorService executorService = Executors.newFixedThreadPool(10);
        long startTime = System.currentTimeMillis();
        //1、使用自定义线程池,开启异步任务01
        CompletableFuture<Integer" data-textnode-index-1697348844027="134" data-index-1697348844027="3291" data-index-len-1697348844027="3291" class="character" style="margin: 0px; padding: 0px; box-sizing: border-box; max-width: 100%; display: inline-block; text-indent: initial;">> supplyAsyncRes01=CompletableFuture.supplyAsync(()-" data-textnode-index-1697348844027="134" data-index-1697348844027="3343" data-index-len-1697348844027="3343" class="character" style="margin: 0px; padding: 0px; box-sizing: border-box; max-width: 100%; display: inline-block; text-indent: initial;">>{
            int res=1;
            try {
                //执行任务1 开始执行任务01,当前线程为:12
                log.info("开始执行任务01,当前线程为:"+Thread.currentThread().getId());
                //执行具体的事务
                Thread.sleep(600);
                res+=2; //模拟加1
            } catch (InterruptedException e) {
                e.printStackTrace();
            }
            //返回结果
            return res;
        },executorService);
        //2、使用自定义线程池,开启异步任务02
        CompletableFuture<Integer" data-textnode-index-1697348844027="149" data-index-1697348844027="3814" data-index-len-1697348844027="3814" class="character" style="margin: 0px; padding: 0px; box-sizing: border-box; max-width: 100%; display: inline-block; text-indent: initial;">> supplyAsyncRes02=CompletableFuture.supplyAsync(()-" data-textnode-index-1697348844027="149" data-index-1697348844027="3866" data-index-len-1697348844027="3866" class="character" style="margin: 0px; padding: 0px; box-sizing: border-box; max-width: 100%; display: inline-block; text-indent: initial;">>{
            int res=1;
            try {
                //执行任务02 开始执行任务02,当前线程为:13
                log.info("开始执行任务02,当前线程为:"+Thread.currentThread().getId());
                //执行具体的事务
                Thread.sleep(600);
                res+=3; //模拟加2
            } catch (InterruptedException e) {
                e.printStackTrace();
            }
            //返回结果
            return res;
        },executorService);
        //3、任务组合or
        supplyAsyncRes01.acceptEitherAsync(supplyAsyncRes02,(res)-" data-textnode-index-1697348844027="164" data-index-1697348844027="4360" data-index-len-1697348844027="4360" class="character" style="margin: 0px; padding: 0px; box-sizing: border-box; max-width: 100%; display: inline-block; text-indent: initial;">>{
            try {
                log.info("开始执行任务03,当前线程为:"+Thread.currentThread().getId());
                //执行具体的事务
                Thread.sleep(600);
                log.info("上一个任务返回值:"+res);
                log.info("总共用时" + (System.currentTimeMillis() - startTime) + "ms");
            } catch (InterruptedException e) {
                e.printStackTrace();
            }
        },executorService);
    }
返回结果:

若将异步任务02中的Thread.sleep(600)改为300,将输出的结果为:

从结果中不难对比发现,任务03的参数是任务01和任务02中执行最快的返回结果。
注意:若把核心线程数量改为1,会是什么样的呢?
ExecutorService executorService = Executors.newFixedThreadPool(1);运行结果:

从上面看出,改为1就变成单线程执行了。
1.3、多任务组合(allOf\anyOf)
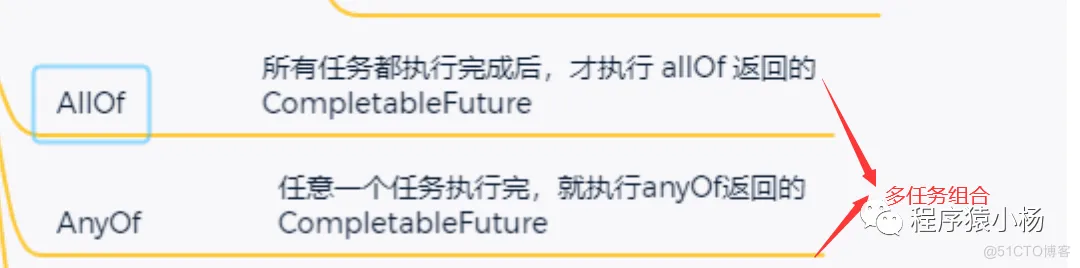
1.allOf:等待所有任务都执行完成后,才会执行 allOf 返回的CompletableFuture。如果任意一个任务异常,allOf的CompletableFuture,执行get方法,会抛出异常。(等待所有任务完成才会执行)
2.anyOf:任意一个任务执行完,就执行anyOf返回的CompletableFuture。如果执行的任务异常,anyOf的CompletableFuture,执行get方法,会抛出异常。(只要有一个任务完成)
参考案例:
public void testAllOfOrAnyOf() throws ExecutionException, InterruptedException {
        //创建线程池
        ExecutorService executorService = Executors.newFixedThreadPool(10);
        long startTime = System.currentTimeMillis();
        //1、使用自定义线程池,开启异步任务01
        CompletableFuture<Integer" data-textnode-index-1697348844027="205" data-index-1697348844027="5500" data-index-len-1697348844027="5500" class="character" style="margin: 0px; padding: 0px; box-sizing: border-box; max-width: 100%; display: inline-block; text-indent: initial;">> supplyAsyncRes01=CompletableFuture.supplyAsync(()-" data-textnode-index-1697348844027="205" data-index-1697348844027="5552" data-index-len-1697348844027="5552" class="character" style="margin: 0px; padding: 0px; box-sizing: border-box; max-width: 100%; display: inline-block; text-indent: initial;">>{
            int res=1;
            try {
                //执行任务1 开始执行任务01,当前线程为:12
                log.info("开始执行任务01,当前线程为:"+Thread.currentThread().getId());
                //执行具体的事务
                Thread.sleep(600);
                res+=3; //模拟加1
            } catch (InterruptedException e) {
                e.printStackTrace();
            }
            //返回结果
            return res;
        },executorService);
        //2、使用自定义线程池,开启异步任务02
        CompletableFuture<Integer" data-textnode-index-1697348844027="220" data-index-1697348844027="6023" data-index-len-1697348844027="6023" class="character" style="margin: 0px; padding: 0px; box-sizing: border-box; max-width: 100%; display: inline-block; text-indent: initial;">> supplyAsyncRes02=CompletableFuture.supplyAsync(()-" data-textnode-index-1697348844027="220" data-index-1697348844027="6075" data-index-len-1697348844027="6075" class="character" style="margin: 0px; padding: 0px; box-sizing: border-box; max-width: 100%; display: inline-block; text-indent: initial;">>{
            int res=1;
            try {
                //执行任务02 开始执行任务02,当前线程为:13
                log.info("开始执行任务02,当前线程为:"+Thread.currentThread().getId());
                //执行具体的事务
                Thread.sleep(600);
                res+=4; //模拟加2
            } catch (InterruptedException e) {
                e.printStackTrace();
            }
            //返回结果
            return res;
        },executorService);
        //3、使用自定义线程池,开启异步任务03
        CompletableFuture<Integer" data-textnode-index-1697348844027="235" data-index-1697348844027="6547" data-index-len-1697348844027="6547" class="character" style="margin: 0px; padding: 0px; box-sizing: border-box; max-width: 100%; display: inline-block; text-indent: initial;">> supplyAsyncRes03=CompletableFuture.supplyAsync(()-" data-textnode-index-1697348844027="235" data-index-1697348844027="6599" data-index-len-1697348844027="6599" class="character" style="margin: 0px; padding: 0px; box-sizing: border-box; max-width: 100%; display: inline-block; text-indent: initial;">>{
            int res=1;
            try {
                //执行任务02 开始执行任务02,当前线程为:13
                log.info("开始执行任务03,当前线程为:"+Thread.currentThread().getId());
                //执行具体的事务
                Thread.sleep(600);
                res+=5; //模拟加2
            } catch (InterruptedException e) {
                e.printStackTrace();
            }
            //返回结果
            return res;
        },executorService);
        //4、开始任务组合
        CompletableFuture<Void" data-textnode-index-1697348844027="250" data-index-1697348844027="7057" data-index-len-1697348844027="7057" class="character" style="margin: 0px; padding: 0px; box-sizing: border-box; max-width: 100%; display: inline-block; text-indent: initial;">> allOfRes=CompletableFuture.allOf(supplyAsyncRes01,supplyAsyncRes02,supplyAsyncRes03);
        //等待所有任务完成
        log.info("所有任务执行完成,组合后返回结果为:"+allOfRes.get());
        //获取所有任务的返回结果
        log.info("任务01返回值:"+supplyAsyncRes01.get());
        log.info("任务02返回值:"+supplyAsyncRes02.get());
        log.info("任务03返回值:"+supplyAsyncRes03.get());
        log.info("总共用时" + (System.currentTimeMillis() - startTime) + "ms");
    }
结果返回:
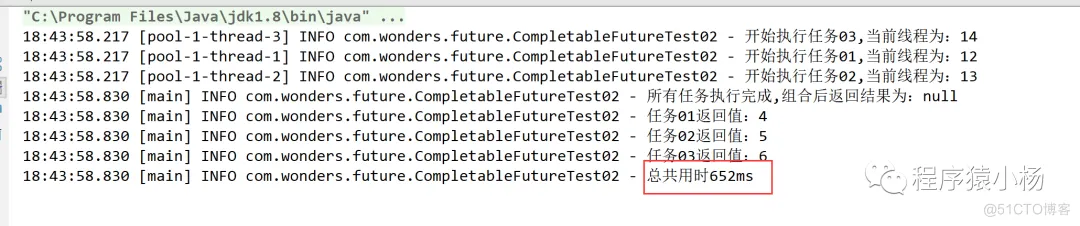
从结果中看出:等待所有任务都执行完成后,才会执行 allOf 返回的CompletableFuture。
同理anyOf,只需要调整代码:
CompletableFuture<Object" data-textnode-index-1697348844027="263" data-index-1697348844027="7571" data-index-len-1697348844027="7571" class="character" style="margin: 0px; padding: 0px; box-sizing: border-box; max-width: 100%; display: inline-block; text-indent: initial;">> allOfRes=CompletableFuture.anyOf(supplyAsyncRes01,supplyAsyncRes02,supplyAsyncRes03);运行结果:

1.4、thenCompose
thenCompose方法会在某个任务执行完成后,将该任务的执行结果,作为方法入参,去执行指定的方法。该方法会返回一个新的CompletableFuture实例。
1、如果该CompletableFuture实例的result不为null,则返回一个基于该result新的CompletableFuture实例;
2、如果该CompletableFuture实例为null,然后就执行这个新任务。
代码案例:
/**
     * 功能描述:thenCompose
     * @MethodName: testThenCompose
     * @MethodParam: []
     * @Return: void
     * @Author: yyalin
     * @CreateDate: 2023/10/12 9:38
     */
    public void testThenCompose() throws ExecutionException, InterruptedException {
        CompletableFuture<String" data-textnode-index-1697348844027="292" data-index-1697348844027="8166" data-index-len-1697348844027="8166" class="character" style="margin: 0px; padding: 0px; box-sizing: border-box; max-width: 100%; display: inline-block; text-indent: initial;">> res01=CompletableFuture.completedFuture("任务01");
        ExecutorService executor = Executors.newSingleThreadExecutor();
        //第二个任务 在某个任务执行完成后,将该任务的执行结果,作为方法入参,去执行指定的方法,
        // 该方法会返回一个新的CompletableFuture实例。
        CompletableFuture<String" data-textnode-index-1697348844027="300" data-index-1697348844027="8413" data-index-len-1697348844027="8413" class="character" style="margin: 0px; padding: 0px; box-sizing: border-box; max-width: 100%; display: inline-block; text-indent: initial;">> futureRes =CompletableFuture.supplyAsync(()-" data-textnode-index-1697348844027="300" data-index-1697348844027="8459" data-index-len-1697348844027="8459" class="character" style="margin: 0px; padding: 0px; box-sizing: border-box; max-width: 100%; display: inline-block; text-indent: initial;">> "第二个任务02"
        ,executor).thenComposeAsync(data-" data-textnode-index-1697348844027="304" data-index-1697348844027="8511" data-index-len-1697348844027="8511" class="character" style="margin: 0px; padding: 0px; box-sizing: border-box; max-width: 100%; display: inline-block; text-indent: initial;">>{
            log.info("data数据为:"+data);
            return res01;
        },executor);
        log.info("最终返回:"+futureRes.get());
        executor.shutdown();
    }
结果:

二、使用注意点
CompletableFuture 使异步编程更加便利的、代码更加优雅的同时,也要关注使用的一些注意点。

2.1、Future需要获取返回值,才能获取异常信息
代码案例:
/**
     * 功能描述:使用注意点
     * @MethodName: testFuture
     * @MethodParam: []
     * @Return: void
     * @Author: yyalin
     * @CreateDate: 2023/10/12 9:54
     */
    public void testFuture() throws ExecutionException, InterruptedException {
        //自定义线程池
        ExecutorService executorService = new ThreadPoolExecutor(
                5,
                10,
                5L,
                TimeUnit.SECONDS,
                new ArrayBlockingQueue<" data-textnode-index-1697348844027="343" data-index-1697348844027="9208" data-index-len-1697348844027="9208" class="character" style="margin: 0px; padding: 0px; box-sizing: border-box; max-width: 100%; display: inline-block; text-indent: initial;">>(10));
        //创建任务
        CompletableFuture<Void" data-textnode-index-1697348844027="345" data-index-1697348844027="9259" data-index-len-1697348844027="9259" class="character" style="margin: 0px; padding: 0px; box-sizing: border-box; max-width: 100%; display: inline-block; text-indent: initial;">> res01=CompletableFuture.supplyAsync(()-" data-textnode-index-1697348844027="345" data-index-1697348844027="9300" data-index-len-1697348844027="9300" class="character" style="margin: 0px; padding: 0px; box-sizing: border-box; max-width: 100%; display: inline-block; text-indent: initial;">>{
            int sum=1/0;
            return "分母不能为0";
        },executorService).thenAccept((res)-" data-textnode-index-1697348844027="348" data-index-1697348844027="9398" data-index-len-1697348844027="9398" class="character" style="margin: 0px; padding: 0px; box-sizing: border-box; max-width: 100%; display: inline-block; text-indent: initial;">>{  //3、异常捕获
            log.info("系统出现异常,需要处理:"+res);
        });
        log.info("返回结果:"+res01.get());
    }
输出结果:

Future需要获取返回值(res01.get()),才能获取到异常信息。如果不加 get()/join()方法,看不到异常信息。使用的时候,注意一下,考虑是否加try…catch…或者使用exceptionally方法。
若改成exceptionally方法,无需get或join也可以捕获异常信息:
CompletableFuture<String" data-textnode-index-1697348844027="358" data-index-1697348844027="9685" data-index-len-1697348844027="9685" class="character" style="margin: 0px; padding: 0px; box-sizing: border-box; max-width: 100%; display: inline-block; text-indent: initial;">> res01=CompletableFuture.supplyAsync(()-" data-textnode-index-1697348844027="358" data-index-1697348844027="9726" data-index-len-1697348844027="9726" class="character" style="margin: 0px; padding: 0px; box-sizing: border-box; max-width: 100%; display: inline-block; text-indent: initial;">>{
            int sum=1/0;
            return "分母不能为0";
        },executorService).exceptionally((throwable)-" data-textnode-index-1697348844027="361" data-index-1697348844027="9833" data-index-len-1697348844027="9833" class="character" style="margin: 0px; padding: 0px; box-sizing: border-box; max-width: 100%; display: inline-block; text-indent: initial;">>{  //3、异常捕获
            log.info("系统出现异常,需要处理:"+throwable.getMessage());
            return "00";
        });
//        log.info("返回结果:"+res01.get());
结果:

2.2、CompletableFuture的get()方法是阻塞的
CompletableFuture的get()方法是阻塞的,如果使用它来获取异步调用的返回值,需要添加超时时间。
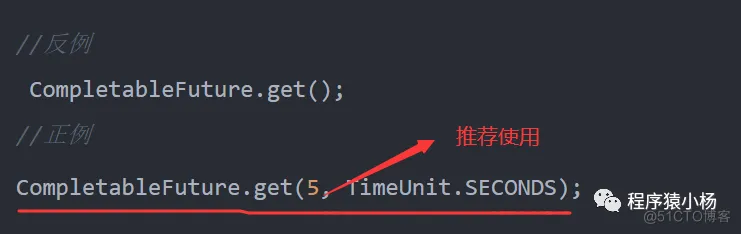
推荐使用:
log.info("返回结果:"+res01.get(5,TimeUnit.SECONDS));2.3、建议使用自定义线程池,不要使用默认的
CompletableFuture代码中使用了默认的线程池,处理的线程个数是电脑CPU核数-1。在大量请求过来的时候,处理逻辑复杂的话,响应会很慢。一般建议使用自定义线程池,优化线程池配置参数。
参考案例:
//自定义线程池
ExecutorService executorService = new ThreadPoolExecutor(
                 5,
                 10,
                 5L,
                TimeUnit.SECONDS,
new ArrayBlockingQueue<" data-textnode-index-1697348844027="399" data-index-1697348844027="10446" data-index-len-1697348844027="10446" class="character" style="margin: 0px; padding: 0px; box-sizing: border-box; max-width: 100%; display: inline-block; text-indent: initial;">>(10));但是如果线程池拒绝策略是DiscardPolicy或者DiscardOldestPolicy,当线程池饱和时,会直接丢弃任务,不会抛弃异常。因此建议,CompletableFuture线程池策略最好使用AbortPolicy,然后耗时的异步线程,做好线程池隔离。
/**
* 参数信息:
* int corePoolSize     核心线程大小
* int maximumPoolSize  线程池最大容量大小
* long keepAliveTime   线程空闲时,线程存活的时间
* TimeUnit unit        时间单位
* BlockingQueue<Runnable" data-textnode-index-1697348844027="411" data-index-1697348844027="10742" data-index-len-1697348844027="10742" class="character" style="margin: 0px; padding: 0px; box-sizing: border-box; max-width: 100%; display: inline-block; text-indent: initial;">> workQueue  任务队列。一个阻塞队列
* AbortPolicy(默认):直接抛弃
*/
ThreadPoolExecutor pool = new ThreadPoolExecutor(4,
        4,
        0L,
        TimeUnit.MILLISECONDS,
        new LinkedBlockingDeque<" data-textnode-index-1697348844027="418" data-index-1697348844027="10924" data-index-len-1697348844027="10924" class="character" style="margin: 0px; padding: 0px; box-sizing: border-box; max-width: 100%; display: inline-block; text-indent: initial;">>(10),
        new ThreadPoolExecutor.AbortPolicy());
AbortPolicy(默认):直接抛弃
CallerRunsPolicy:用调用者的线程执行任务
DiscardOldestPolicy:抛弃队列中最久的任务
DiscardPolicy:抛弃当前任务。
三、源码获取方式
更多优秀文章,请关注个人微信公众号或搜索“程序猿小杨”查阅。然后回复:源码,可以获取对应的源码,开箱即可使用。


如果大家对相关文章感兴趣,可以关注微信公众号"程序猿小杨",会持续更新优秀文章!欢迎大家 分享、收藏、点赞、在看,您的支持就是我坚持下去的最大动力!谢谢!

参考网站:
- 1赞
- 1收藏
- 评论
- 分享
- 举报
Recommend
About Joyk
Aggregate valuable and interesting links.
Joyk means Joy of geeK