

【深入浅出 Yarn 架构与实现】6-4 Container 生命周期源码分析 - 大数据王小皮
source link: https://www.cnblogs.com/shuofxz/p/17402897.html
Go to the source link to view the article. You can view the picture content, updated content and better typesetting reading experience. If the link is broken, please click the button below to view the snapshot at that time.
本文将深入探讨 AM 向 RM 申请并获得 Container 资源后,在 NM 节点上如何启动和清理 Container。将详细分析整个过程的源码实现。
一、Container 生命周期介绍#
Container 的启动由 ApplicationMaster 通过调用 RPC 函数 ContainerManagementProtocol#startContainers() 发起请求,NM 中的 ContainerManagerImpl 组件负责接收并处理该函数发来的请求。
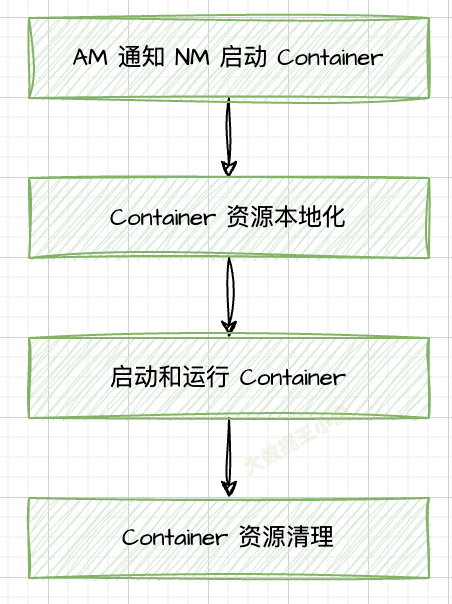
Container 启动过程主要分为四个阶段:通知 NM 启动 Container、资源本地化、启动并运行 Container、资源清理。
资源本地化:
主要是指分布式缓存机制完成的工作(详见上一篇《6-3 NodeManager 分布式缓存》)。
功能包括初始化各种服务组件、创建工作目录、从 HDFS 下载运行所需的各种资源(比如文本文件、JAR 包、可执行文件)等。
Container 启动:
由 ContainerLauncher 服务完成,该服务将进一步调用插拔式组件 ContainerExecutor。Yarn 中提供了三种 ContainerExecutor 实现,分别为 DefaultContainerExecutor、LinuxContainerExecutor、DockerContainerExecutor。
资源清理:
是资源本地化的逆过程,它负责清理各类资源,均由 ResourceLocalizationService 服务完成。
二、Container 生命周期源码分析#
一)AM 通知 NM 启动 Container#
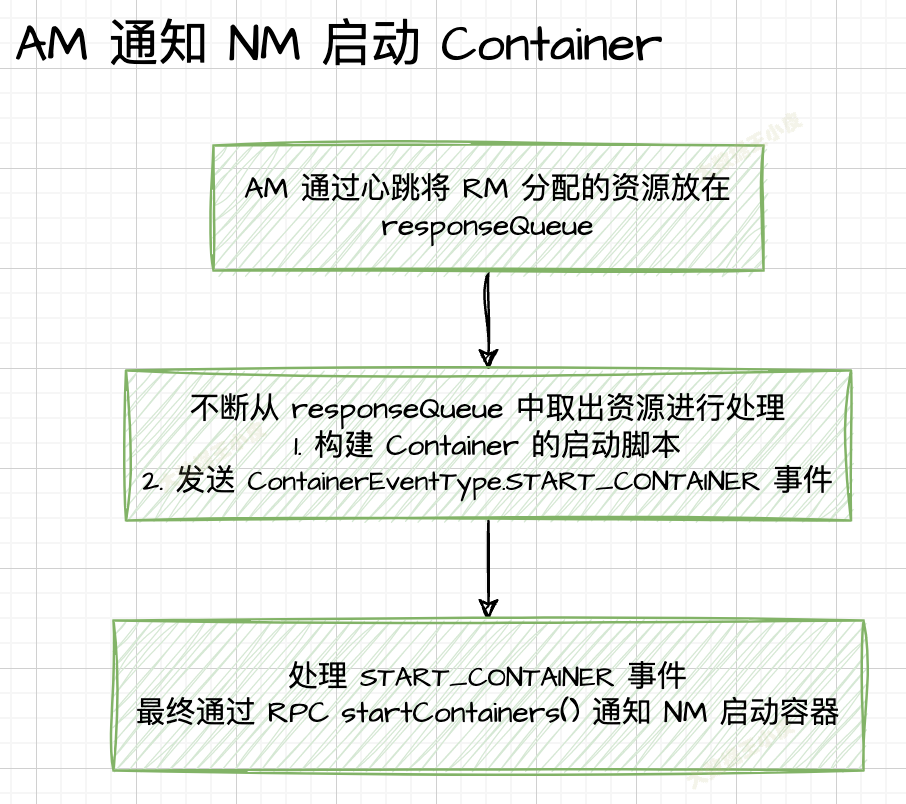
AM AMRMClientAsyncImpl 通过 RPC 函数 ApplicationMaster#allocate() 周期性向 RM 申请资源,并将申请到的资源保存在阻塞队列 responseQueue 中。
(下面仅截取重要逻辑的源码)
  private class HeartbeatThread extends Thread {
    public void run() {
      while (true) {
        AllocateResponse response = null;

          try {
            // 发心跳。发给 RM 当前的进度,从 RM 领取分配的 Container 及其他信息。
            response = client.allocate(progress);
          }

          // 将 RM 通过心跳返回的信息放到阻塞队列 responseQueue 中,等待处理
          responseQueue.put(response);
跟踪 responseQueue,其在 CallbackHandlerThread 进行取出,处理分配到的 Container。
  private class CallbackHandlerThread extends Thread {
    public void run() {
      while (true) {
        try {
          AllocateResponse response;
          try {
            // 从 responseQueue 取出资源,对应心跳线程中 responseQueue.put(response)
            response = responseQueue.take();
          }

          // 重点:处理分配到的 Container
          List<Container> allocated = response.getAllocatedContainers();
          if (!allocated.isEmpty()) {
            // 到 ApplicationMaster#onContainersAllocated() 处理
            handler.onContainersAllocated(allocated);
          }
ApplicationMaster#onContainersAllocated() 会对分配出来的 Container 资源进行处理。
    public void onContainersAllocated(List<Container> allocatedContainers) {
      for (Container allocatedContainer : allocatedContainers) {
        // 创建运行 Container 的 LaunchContainerRunnable 线程
        Thread launchThread = createLaunchContainerThread(allocatedContainer,
            yarnShellId);

        // launch and start the container on a separate thread to keep
        // the main thread unblocked
        // as all containers may not be allocated at one go.
        launchThreads.add(launchThread);
        launchedContainers.add(allocatedContainer.getId());
        // 启动 LaunchContainerRunnable 线程
        launchThread.start();
      }
    }
launchThread 是内部类 LaunchContainerRunnable 的实例,关注其 run() 方法干了啥,主要两件事:
- 构建 Container 的启动脚本
- 调用
NMClientAsync#startContainerAsync()api 接口发送ContainerEventType.START_CONTAINER事件
	  // 1. 构建 Container 的启动脚本(省略了构建的细节)
	  ContainerLaunchContext ctx = ContainerLaunchContext.newInstance(
        localResources, myShellEnv, commands, null, allTokens.duplicate(),
          null);
      containerListener.addContainer(container.getId(), container);
	  // 2. 重点:通过 NMClientAsync api 发送 ContainerEventType.START_CONTAINER 事件
      nmClientAsync.startContainerAsync(container, ctx);
后续就是处理这个事件,并调用 NM RPC 函数启动 container 的过程,具体如下:
- 放到
BlockingQueue<ContainerEvent> events中 NMClientAsyncImpl的eventDispatcherThread会不断处理events中的事件START_CONTAINER事件对应的状态机处理类是StartContainerTransition- 其中执行
container.nmClientAsync.getClient().startContainer() - 这里调用 NM RPC
**ContainerManagementProtocol#startContainers()**通知 NM 启动 Container。
// yarn/client/api/impl/NMClientImpl.java
  public Map<String, ByteBuffer> startContainer(
      Container container, ContainerLaunchContext containerLaunchContext)
          throws YarnException, IOException {

        // 获取 RPC 代理(stub)
        proxy =
            cmProxy.getProxy(container.getNodeId().toString(),
                container.getId());

        // 重点:获取到 RPC 调用协议 ContainerManagementProtocol,并通过 RPC 函数 startContainers 启动 Container
        StartContainersResponse response =
            proxy
                .getContainerManagementProtocol().startContainers(allRequests);
至此,AM 与 NM 的交互流程已实现,通过 RPC 函数 ContainerManagementProtocol#startContainers() 来启动 Container。后面我们将继续在 NM 端看是如何处理这个 RPC 请求的。
二)Container 资源本地化#
在 NM 端处理上述 RPC 请求的是:yarn/server/nodemanager/containermanager/ContainerManagerImpl#startContainers。
主要完成两个事情:
- 应用程序初始化工作(该 Container 是 AM 发送到该节点的第一个 Container)
- Container 本地化工作(非第一个 Container,会尝试下载前面 Container 还未开始下载的文件,以加快文件下载速度)
1、程序初始化操作#
里面会先做一些权限检查、初始化等,然后调用函数 startContainerInternal(),我们重点关注这里面的逻辑。
// org/apache/hadoop/yarn/server/nodemanager/containermanager/ContainerManagerImpl.java
  private void startContainerInternal(NMTokenIdentifier nmTokenIdentifier,
      ContainerTokenIdentifier containerTokenIdentifier,
      StartContainerRequest request) throws YarnException, IOException {
    // 省略 Token 认证及 ContainerLaunchContext上下文初始化
    // 真正处理逻辑
    this.readLock.lock();
    try {
      if (!serviceStopped) {
        // Create the application
        Application application =
            new ApplicationImpl(dispatcher, user, applicationID, credentials, context);
        // 应用程序的初始化,供后续 container 使用,这个逻辑只调用一次,通常由来自 ApplicationMaster 的第一个 container 完成
        if (null == context.getApplications().putIfAbsent(applicationID,
          application)) {
          // 1. 发送事件 ApplicationEventType.INIT_APPLICATION(资源本地化)
          dispatcher.getEventHandler().handle(
            new ApplicationInitEvent(applicationID, appAcls,
              logAggregationContext));
        }

        this.context.getNMStateStore().storeContainer(containerId,
            containerTokenIdentifier.getVersion(), request);
        // 2. 发送事件 ApplicationEventType.INIT_CONTAINER(启动和运行 Container)
        dispatcher.getEventHandler().handle(
          new ApplicationContainerInitEvent(container));

        this.context.getContainerTokenSecretManager().startContainerSuccessful(
          containerTokenIdentifier);
发送事件 ApplicationEventType.INIT_APPLICATION,AppInitTransition 状态机设置 ACL 属性后,向 LogHandler(目前有两种实现方式,分别是 LogAggregationService 和 NonAggregatingLogHandler,这里以 LogAggregationService 服务为例)发送事件 LogHandlerEventType.APPLICATION_STARTED。
当 LogHandler 收到 ApplicationEventType.APPLICATION_LOG_HANDLING_INITED 事件后,将创建应用程序日志目录、设置目录权限等。然后向 ApplicationImpl 发送一个 ApplicationEventType.APPLICATION_LOG_HANDLING_INITED 事件。
// yarn/server/nodemanager/containermanager/logaggregation/LogAggregationService.java
	case APPLICATION_STARTED:
        LogHandlerAppStartedEvent appStartEvent =
            (LogHandlerAppStartedEvent) event;
        initApp(appStartEvent.getApplicationId(), appStartEvent.getUser(),
            appStartEvent.getCredentials(),
            appStartEvent.getApplicationAcls(),
            appStartEvent.getLogAggregationContext());

  // initApp()
  private void initApp(final ApplicationId appId, String user,
      Credentials credentials, Map<ApplicationAccessType, String> appAcls,
      LogAggregationContext logAggregationContext) {
    ApplicationEvent eventResponse;
    try {
      verifyAndCreateRemoteLogDir(getConfig());
      initAppAggregator(appId, user, credentials, appAcls,
          logAggregationContext);
      // 发送事件
      eventResponse = new ApplicationEvent(appId,
          ApplicationEventType.APPLICATION_LOG_HANDLING_INITED);
    } catch (YarnRuntimeException e) {
      LOG.warn("Application failed to init aggregation", e);
      eventResponse = new ApplicationEvent(appId,
          ApplicationEventType.APPLICATION_LOG_HANDLING_FAILED);
    }
    this.dispatcher.getEventHandler().handle(eventResponse);
  }
ApplicationImpl 收到 ApplicationEventType.APPLICATION_LOG_HANDLING_INITED 事件后,直接向 ResourceLocalizationService 发送 LocalizationEventType.INIT_APPLICATION_RESOURCES 事件,此时 ApplicationImpl 仍处于 INITING 状态。
           .addTransition(ApplicationState.INITING, ApplicationState.INITING,
               ApplicationEventType.APPLICATION_LOG_HANDLING_INITED,
ResourceLocalizationService 收到事件请求时会创建一个 LocalResourcesTrackerImpl 对象,为接下来资源下载做准备,并向 ApplicationImpl 发送事件 ApplicationEventType.APPLICATION_INITED。
// yarn/server/nodemanager/containermanager/localizer/ResourceLocalizationService.java
  private void handleInitApplicationResources(Application app) {
    // 0) Create application tracking structs
    String userName = app.getUser();
    // 创建 LocalResourcesTrackerImpl 对象,为接下来的资源下载做准备
    privateRsrc.putIfAbsent(userName, new LocalResourcesTrackerImpl(userName,
        null, dispatcher, true, super.getConfig(), stateStore, dirsHandler));
    String appIdStr = app.getAppId().toString();
    appRsrc.putIfAbsent(appIdStr, new LocalResourcesTrackerImpl(app.getUser(),
        app.getAppId(), dispatcher, false, super.getConfig(), stateStore,
        dirsHandler));
    // 1) Signal container init
    //
    // This is handled by the ApplicationImpl state machine and allows
    // containers to proceed with launching.
    // 向 ApplicationImpl 发送 ApplicationEventType.APPLICATION_INITED 事件
    dispatcher.getEventHandler().handle(new ApplicationInitedEvent(
          app.getAppId()));
  }
ApplicationImpl 收到 ApplicationEventType.APPLICATION_INITED 事件后,依次向该应用程序已经保持的所有 Container 发送一个 INIT_CONTAINER 事件以通知它们进行初始化。此时,ApplicationImpl 运行状态由 INITING 转换为 RUNNING。
2、完成 Container 本地化工作#
之后的一些处理逻辑:
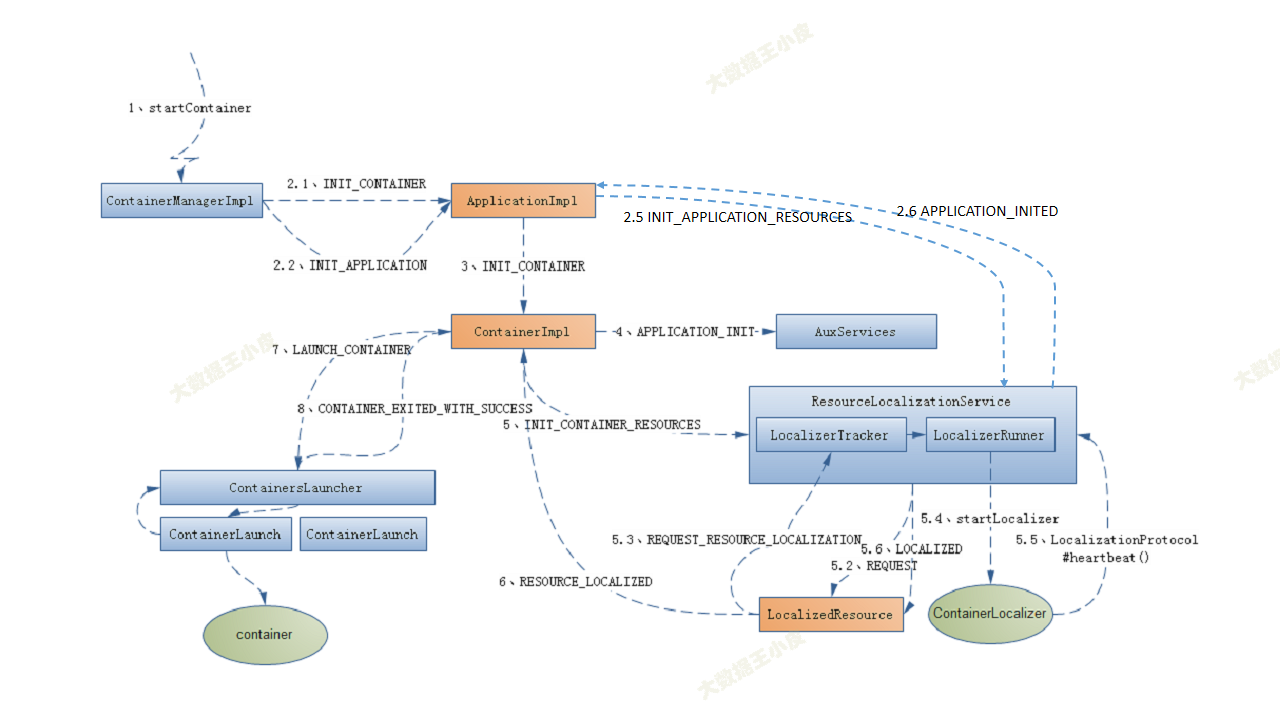
ContainerImpl收到 INIT_CONTAINER 事件后,先向附属服务AuxServices发送APPLICATION_INIT事件,以通知它有新的应用程序 Container 启动,然后从ContainerLaunchContext中获取各类可见性资源,并保存到ContainerImpl中特定的数据结构中,之后向ResourceLocalizationService发送LocalizationEventType.INIT_CONTAINER_RESOURCES事件,此时ContainerImpl运行状态已由 NEW 转换为 LOCALIZING。ResourceLocalizationService收到LocalizationEventType.INIT_CONTAINER_RESOURCES事件后,依次将 Container 所需的资源封装成一个 REQUEST 事件,发送给对应的资源状态追踪器LocalResourcesTrackerImpl。LocalResourcesTrackerImpl收到 REQUEST 事件后,将为对应的资源创建一个状态机对象LocalizeResource以跟踪资源的生命周期,并将 REQUEST 事件进一步传送给LocalizedResource。LocalizedResource收到 REQUEST 事件后,将待下载资源信息通过LocalizerEventType.REQUEST_RESOURCE_LOCALIZATION事件发送给资源下载服务ResourceLocalizationService,之后LocalizedResource状态由 NEW 转换为 DOWNLOADING。
【这里是重点,对应的下载逻辑】ResourceLocalizationService 收到 LocalizerEventType.REQUEST_RESOURCE_LOCALIZATION 事件后,将交给 LocalizerTracker(ResourceLocalizationService 的内部类) 服务处理。
- 如果是 PUBLIC 资源,则统一交给 PublicLocalizer 处理。
- 如果该 Container 未创建 LocalizerRunner 线程,则创建一个。
- 然后添加到该线程的下载队列中。
该线程会调用 ContainerExecutor#startLocalizer() 函数下载资源,该函数通过协议 LocalizationProtocol 与 ResourceLocalizationService 通信,以顺序获取待下载资源位置下载。待资源下载完成后,向 LocalizedResource 发送一个 LOCALIZED 事件。
    public void handle(LocalizerEvent event) {
      String locId = event.getLocalizerId();
      switch (event.getType()) {
      case REQUEST_RESOURCE_LOCALIZATION:
        // 0) find running localizer or start new thread
        LocalizerResourceRequestEvent req =
          (LocalizerResourceRequestEvent)event;
        switch (req.getVisibility()) {
        case PUBLIC:
          // 如果是 PUBLIC 资源,则统一交给 PublicLocalizer 处理
          publicLocalizer.addResource(req);
          break;
        case PRIVATE:
        case APPLICATION:
          // 检查是否已经为该 Container 创建了 LocalizerRunner 线程,
          // 如果没有,则创建一个,
          // 然后添加到该线程的下载队列中,该线程会调用 ContainerExecutor#startLocalizer() 函数下载资源
          synchronized (privLocalizers) {
            LocalizerRunner localizer = privLocalizers.get(locId);
            if (null == localizer) {
              LOG.info("Created localizer for " + locId);
              localizer = new LocalizerRunner(req.getContext(), locId);
              privLocalizers.put(locId, localizer);
              localizer.start();
            }
            // 1) propagate event
            localizer.addResource(req);
          }
          break;
        }
        break;
      }
    }
LocalizedResource 收到 LOCALIZED 事件后,会向 ContainerImpl 发送一个 ContainerEventType.RESOURCE_LOCALIZED 事件,并且将状态从 DOWNLOADING 转换为 LOCALIZED。ContainerImpl 收到事件后,会检查所依赖的资源是否全部下载完毕,如果下载完成则向 ContainersLauncher 服务发送一个 LAUNCH_CONTAINER 事件,以启动对应 Container。
资源本地化过程可概括为:
- 在 NM 上,同一个应用程序的所有
ContainerImpl异步并发向资源下载服务ResourceLocalizationService发送待下载的资源。 ResourceLocalizationService下载完一类资源后,将通知依赖该资源的所有Container- 一旦一个 Container 依赖的资源已经全部下载完成,则该Container进入运行阶段。
三)启动和运行 Container#
我们再回到 ContainerManagerImpl,INIT_APPLICATION 事件的处理完成了「资源本地化」的操作,后续发送 INIT_CONTAINER 事件,是本节「启动和运行 Container」要分析的部分。
// org/apache/hadoop/yarn/server/nodemanager/containermanager/ContainerManagerImpl.java
  private void startContainerInternal(NMTokenIdentifier nmTokenIdentifier,
      ContainerTokenIdentifier containerTokenIdentifier,
      StartContainerRequest request) throws YarnException, IOException {
          // 1. 发送事件 ApplicationEventType.INIT_APPLICATION(资源本地化)
          dispatcher.getEventHandler().handle(
            new ApplicationInitEvent(applicationID, appAcls,
              logAggregationContext));

        // 2. 发送事件 ApplicationEventType.INIT_CONTAINER(启动和运行 Container)
        dispatcher.getEventHandler().handle(
          new ApplicationContainerInitEvent(container));
发送事件 ApplicationEventType.INIT_CONTAINER,由 ApplicationImpl 处理
    .addTransition(ApplicationState.NEW, ApplicationState.NEW,
        ApplicationEventType.INIT_CONTAINER,
        INIT_CONTAINER_TRANSITION)
- 发送
ContainerEventType.INIT_CONTAINER事件 - 在
ContainerImpl.RequestResourcesTransition中处理 - 其中重点逻辑是启动 Container
container.sendLaunchEvent() - 又发送
ContainersLauncherEventType.LAUNCH_CONTAINER事件
这里探究下 LAUNCH_CONTAINER 事件的处理流程。从这里去跟踪的时候会发现,没有状态机注册这个事件,找不到对应的处理逻辑,那么这个事件是如何被处理的呢?
我们去找到这个事件类型注册的地方:
// yarn/server/nodemanager/containermanager/ContainerManagerImpl.java
dispatcher.register(ContainersLauncherEventType.class, containersLauncher);
其注册的事件处理器为 ContainersLauncher 类,在这里我们找到了 handle() 方法,里面对事件进行处理。
// yarn/server/nodemanager/containermanager/launcher/ContainersLauncher.java
  public void handle(ContainersLauncherEvent event) {
    // TODO: ContainersLauncher launches containers one by one!!
    Container container = event.getContainer();
    ContainerId containerId = container.getContainerId();
    switch (event.getType()) {
      case LAUNCH_CONTAINER:
        Application app =
          context.getApplications().get(
              containerId.getApplicationAttemptId().getApplicationId());

        // LAUNCH_CONTAINER 事件的处理逻辑,创建 ContainerLaunch 线程并启动线程
        ContainerLaunch launch =
            new ContainerLaunch(context, getConfig(), dispatcher, exec, app,
              event.getContainer(), dirsHandler, containerManager);
        // 提交到线程池
        containerLauncher.submit(launch);
        // 将其加入到运行的 Container 数据结构 running 中
        running.put(containerId, launch);
        break;
ContainerLaunch 类继承自 Callable 类,通过 submit() 提交到线程池中,之后调用 Callable 类的实现方法 call() 来真正执行线程,主要逻辑如下:
- 准备 Container 的执行环境
- shell启动脚本的封装与拓展(添加自定义脚本)
- 创建本地工作目录
- 设置token的保存路径
- 更新 Container 状态,从 LOCALIZED 转换为 RUNNING
- 发送
CONTAINER_LAUNCHED事件 - 发送
START_MONITORING_CONTAINER事件,启动对该 container 的资源监控
- 发送
- 调用 ContainerExecutor 对象在 NM 节点上启动 Container
- ContainerExecutor 由用户指定(
DefaultContainerExecutor,LinuxContainerExecutor,DockerContainerExecutor) - 通过具体的 ContainerExecutor 在 NM 上启动 Container
- ContainerExecutor 由用户指定(
// yarn/server/nodemanager/containermanager/launcher/ContainerLaunch.java
  public Integer call() {
    // 启动 Container 前的准备工作:
    // 1.shell启动脚本的封装与拓展(添加自定义脚本)
    // 2.创建本地工作目录
    // 3.设置token的保存路径
    final ContainerLaunchContext launchContext = container.getLaunchContext();

      // 发送 CONTAINER_LAUNCHED 事件 & START_MONITORING_CONTAINER 事件
      dispatcher.getEventHandler().handle(new ContainerEvent(
            containerID,
            ContainerEventType.CONTAINER_LAUNCHED));
      context.getNMStateStore().storeContainerLaunched(containerID);

        // 重点:调用 ContainerExecutor 对象启动 Container
        // ContainerExecutor 由用户指定(DefaultContainerExecutor, LinuxContainerExecutor, DockerContainerExecutor)
        exec.activateContainer(containerID, pidFilePath);
        ret = exec.launchContainer(new ContainerStartContext.Builder()
            .setContainer(container)
            .setLocalizedResources(localResources)
            .setNmPrivateContainerScriptPath(nmPrivateContainerScriptPath)
            .setNmPrivateTokensPath(nmPrivateTokensPath)
            .setUser(user)
            .setAppId(appIdStr)
            .setContainerWorkDir(containerWorkDir)
            .setLocalDirs(localDirs)
            .setLogDirs(logDirs)
            .build());


    // 完成发送 CONTAINER_EXITED_WITH_SUCCESS 事件
    LOG.info("Container " + containerIdStr + " succeeded ");
    dispatcher.getEventHandler().handle(
        new ContainerEvent(containerID,
            ContainerEventType.CONTAINER_EXITED_WITH_SUCCESS));
同时,由于 ContainerExecutor#launchContainer 函数是阻塞式的,因此只有当脚本执行完成后才退出,这使得 ContainerLauncher 可在第一时间知道 Container 完成时间,之后向 ContainerImpl 发送一个 CONTAINER_EXITED_WITH_SUCCESS 事件,此时 ContainerImpl 状态由 RUNNING 转换为 EXITED_WITH_SUCCESS。
至此,一个 Container 运行完成,接下来将进入该 Container 的资源清理阶段。
四)Container 资源清理#
当 Container 运行完成后(成功或失败),会执行资源清理工作。主要清理下面两类资源:
ResourceLocalizationService:从 HDFS 下载到本地的数据文件ContainerExecutor:为 Container 创建私有工作目录,并保存一些临时文件(比如 Container 进程 pid 文件)
在上一步 call() 方法最后,Container 运行完成时,会发送 CONTAINER_EXITED_WITH_SUCCESS 事件。
// yarn/server/nodemanager/containermanager/container/ContainerImpl.java
    .addTransition(ContainerState.RUNNING,
        ContainerState.EXITED_WITH_SUCCESS,
        ContainerEventType.CONTAINER_EXITED_WITH_SUCCESS,
        new ExitedWithSuccessTransition(true))

// ------------------------
  static class ExitedWithSuccessTransition extends ContainerTransition {
    public void transition(ContainerImpl container, ContainerEvent event) {
      // Set exit code to 0 on success
      container.exitCode = 0;

      if (clCleanupRequired) {
        // 向 ContainerLauncher 发送 ContainersLauncherEventType.CLEANUP_CONTAINER 清理事件
        container.dispatcher.getEventHandler().handle(
            new ContainersLauncherEvent(container,
                ContainersLauncherEventType.CLEANUP_CONTAINER));
      }

      // 向 ResourceLocalizationService 发送 LocalizationEventType.CLEANUP_CONTAINER_RESOURCES 清理事件
      container.cleanup();
    }
  }
1、ContainerLauncher 清理临时目录#
处理 ContainersLauncherEventType.CLEANUP_CONTAINER 事件。
处理逻辑会进入到 ContainersLauncher 的 handle() 方法,将 Container 从正在运行的 Container 列表中移除,并调用 ContainerLaunch#cleanupContainer() 方法清除 Container 占用的临时目录。
      case CLEANUP_CONTAINER:
        // 将 Container 从正在运行 Container 列表中移除
        ContainerLaunch launcher = running.remove(containerId);
        if (launcher == null) {
          // Container not launched. So nothing needs to be done.
          return;
        }

        // Cleanup a container whether it is running/killed/completed, so that
        // no sub-processes are alive.
        try {
          // 清理 Container 占用的临时目录(kill进程,删除 pid 文件等)
          launcher.cleanupContainer();
        } catch (IOException e) {
          LOG.warn("Got exception while cleaning container " + containerId
              + ". Ignoring.");
        }
        break;
2、ResourceLocalizationService 清理用户工作目录和私有目录#
处理 LocalizationEventType.CLEANUP_CONTAINER_RESOURCES 事件。
    case CLEANUP_CONTAINER_RESOURCES:
      handleCleanupContainerResources((ContainerLocalizationCleanupEvent)event);
      break;
handleCleanupContainerResources() 将会删除
- 用户工作的数据(即从 HDFS 下载的数据)
${yarn.nodemanager.local-dirs}/usercache/<user>/appcache/${appid}/${containerid} - 私有目录数据
${yarn.nodemanager.local-dirs}/nmPrivate/${appid}/${containerid}(执行脚本、token文件、pid文件)- 其中 执行脚本、token 会在 Container 启动时复制到 「用户工作的数据」目录中
这两个目标都存放了 Tokens 文件和 Shell 运行脚本。
3、保留的目录#
注意:{yarn.nodemanager.local-dirs}/usercache/{appid}/output 并不会删除,计算任务之间有依赖关系,因此 NodeManager 不能在 Container 运行完成之后立刻清理它占用的所有资源,尤其是产生的中间数据,而只有当所有 Container 运行完成之后,才能够全部清空这些资源。
当一个应用程序运行结束时,需要由它广播给各个NodeManager,再进一步由NodeManager清理应用程序占用的所有资源,包括产生的中间数据。
到这里 container 清理工作完成。
三、小结#
本节深入源码介绍了 Container 生命周期的整体流程。从通知 NM 启动 Container、资源本地化、启动 Container、资源清理四个方面进行了介绍。
参考文章:
《Hadoop技术内幕:深入解析YARN架构设计与实现原理》
Yarn Container启动流程源码分析
NodeManager详细组件及功能
深入解析yarn架构设计与技术实现-NodeManager2
hadoop-yarn-src-read - 一些 yarn 学习笔记
Recommend
About Joyk
Aggregate valuable and interesting links.
Joyk means Joy of geeK