

Securing Node.js Applications with JWT and Passport.js
source link: https://soshace.com/securing-node-js-applications-with-jwt-and-passport-js/
Go to the source link to view the article. You can view the picture content, updated content and better typesetting reading experience. If the link is broken, please click the button below to view the snapshot at that time.
Securing Node.js Applications with JWT and Passport.js

Securing Node.js Applications with JWT and Passport.js
In this tutorial, I’ll share with you how to secure your Node.js applications using JSON Web Tokens (JWT) and Passport.js. We’ll build a sample app together, and I’ll walk you through each step, explaining the code snippets along the way.
Prerequisites
Before getting started with this tutorial, ensure you have the following installed on your computer:
Also, the code for this tutorial is available here on my Github account, feel free to clone it to follow along.
Introduction to JWT
JSON Web Tokens (JWT) is a compact and self-contained technique for securely transferring data between parties as a JSON object is defined by the open standard. They are useful for authorization and authentication. They are useful for authorization and authentication.
JWTs are frequently used in web application authentication and authorization. When a user logs into a web application, the server can generate a JWT with the user’s information (such as their username or user ID) and sign it with a secret key. This signed JWT is then returned to the client as a response to the login request, and the client can use it to verify their identity and access protected resources in subsequent server requests.
JWTs are designed to be self-contained and tamper-proof, which means that the data contained within the token can be trusted and verified without the need for a separate server-side state. JWTs can also include an expiration date after which the token is no longer valid, which aids in the prevention of token misuse and unauthorized access.
What is Passport.js
Passport.js is an authentication middleware for Node.js. It is designed to be extremely adaptable and modular, allowing developers to easily integrate various authentication strategies into their applications.
Passport.js accepts various authentication methods, including username and password, social media logins (such as Facebook and Twitter), JSON Web Tokens (JWTs), and others. Each strategy is implemented as a separate module, which allows developers to mix and match strategies as needed.
Passport.js is based on a set of middleware functions that handle authentication and authorization in a standardized manner. These middleware functions, which provide fine-grained authentication control, can be added to individual routes or applied to the entire application.
Setting up the Project
Let’s get started by making a new directory for our project and launching a new Node.js application:
mkdir jwt-passport-demo cd jwt-passport-demo npm init -y |
Now, we need to install the required dependencies:
npm install express jsonwebtoken passport passport-jwt bcryptjs |
Create a new file named app.js and set up a basic Express server:
const express = require('express'); const app = express(); app.get('/', (req, res) => { res.send('Hello, World!'); const PORT = process.env.PORT || 3000; app.listen(PORT, () => { console.log(`Server running on port ${PORT}`); |
In the above code snippet, I imported the express library and created an instance of an Express app. Then I defined a root route handler that sends a ‘Hello, World!‘ message when the route is requested, setting a variable PORT to the value of the environment variable process.env.PORT if it exists, or to the value 3000 if it does not exist, and started the server listening on the specified port using app.listen().
How It works
Before I dive into implementing JWT in our Express Application, quickly look at the diagram below to get an overview of how JWT Authentication works.
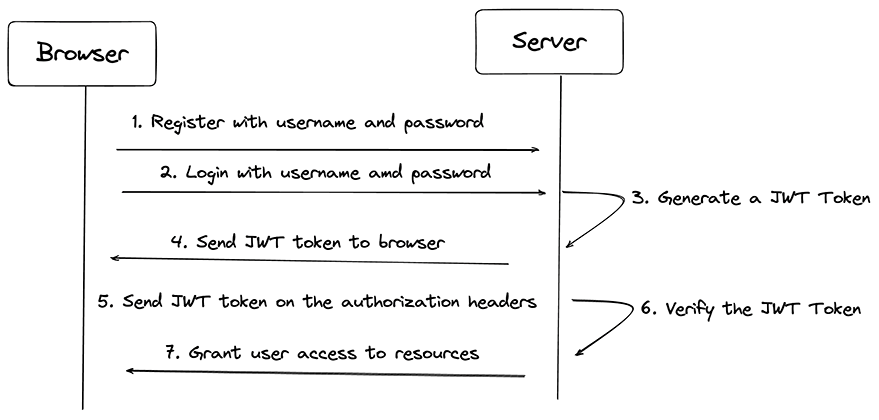
Diagram of how JWT Authentication works
Implementing JWT Authentication
I’ll start by implementing user registration and login routes. To do this, I’ll create a user array to act as a simple in-memory database.
First, create a new folder named routes and add a file named auth.js. This file will contain our authentication routes.
Next, add the following code to auth.js:
const express = require('express'); const jwt = require('jsonwebtoken'); const bcrypt = require('bcryptjs'); const router = express.Router(); const users = []; module.exports = { router, users }; |
In the above code snippet, I imported the jwt and bcrypt modules. The JWT module will allow you to sign and verify users’ tokens, while the bcrypt allows you to add an extra layer of protection to your user’s password by creating a hashed version of the password before saving it. Then I created a variable to store the user’s details since I don’t have a database setup for this tutorial.
Now let’s create the /register route and use bcryptjs to hash the user’s password:
router.post("/register", async (req, res) => { const { username, password } = req.body; const hashedPassword = await bcrypt.hash(password, 10); const newUser = { username, password: hashedPassword }; users.push(newUser); .status(201) .json({ message: "User registered successfully", user: newUser }); } catch (e) { console.log(e.message); |
Next, let’s implement the /login route. We’ll compare the provided password with the stored hashed password and, if successful, generate a JWT:
router.post("/login", async (req, res) => { const { username, password } = req.body; const user = users.find((u) => u.username === username); if (!user) { return res.status(400).json({ message: "Invalid username or password" }); const passwordMatch = await bcrypt.compare(password, user.password); if (!passwordMatch) { return res.status(400).json({ message: "Invalid username or password" }); const token = jwt.sign( { username: user.username }, process.env.JWT_SECRET, expiresIn: "1h", res.json({ message: "Logged in successfully", token }); } catch (e) { console.log(e.message); |
In the above code, I created a route handler for the /login path using the HTTP POST method. The route handler accepts a username and password from the request body, searches for a user with the specified username in an array of users, and checks if the password matches the user’s password. If the login is successful, a JWT is generated and returned to the client in the response
Now, let’s import the auth routes into app.js and add a middleware route for the authRoutes:
const { router } = require("./routes/auth"); app.use(express.json()); app.use('/auth', router); |
Securing Routes with Passport.js
Now that you have the authentication routes, let’s secure some routes using Passport.js and JWT.
First, create a new file named passport-config.js in the root directory. This file will contain our Passport.js configuration. Add the following code to passport-config.js:
const JwtStrategy = require('passport-jwt').Strategy; const ExtractJwt = require('passport-jwt').ExtractJwt; const users = require('./routes/auth').users; const opts = { jwtFromRequest: ExtractJwt.fromAuthHeaderAsBearerToken(), secretOrKey: process.env.JWT_SECRET module.exports = passport => { passport.use( new JwtStrategy(opts, (jwt_payload, done) => { const user = users.find(u => u.username === jwt_payload.username); if (user) { return done(null, user); return done(null, false); |
This code exports a function that configures a Passport.js JWT authentication strategy using the passport-jwt library. In the function, I defined an options object that specifies how to extract the JWT from the request, and the secret key used to sign the JWT. Then I created a new JwtStrategy object and sets up a callback function to be called when the JWT is verified. Finally, I exported the Passport.js middleware.
To keep your JWT secret key safe, create a .env file in the root directory of the project and add the credential for your JWT secret.
JWT_SECRET = SLEPe87w7eEue337ehndn3hHDjjKKDK |
You can use run the command below on your terminal to generate a more secure secret for your application.
node -e "console.log(require('crypto').randomBytes(256).toString('base64'));" |
Then install the dotenv package to load the environment variables from your .env file:
npm install dotenv |
Open the app.js file and import the dotenv package with code below:
require('dotenv').config(); |
Now, let’s import and initialize Passport.js in our app.js:
const passport = require('passport'); require('./passport-config')(passport); app.use(passport.initialize()); |
Finally, let’s create a protected route that requires a user to have a valid JWT token to access:
app.get('/protected', passport.authenticate('jwt', { session: false }), (req, res) => { res.send('You have accessed a protected route!'); |
Implementing refresh tokens
To enhance the security of a web application that uses JWT for authentication, it is also important to implement a JWT refresh token. In the login route, I will generate a refresh token along with the access token, and store it in the user object:
const crypto = require('crypto'); //... const refreshToken = crypto.randomBytes(64).toString('hex'); user.refreshToken = refreshToken; //... res.json({ message: "Logged in successfully", token, refreshToken }); |
Next, create an endpoint for exchanging refresh tokens:
router.post("/token", (req, res) => { const { refreshToken } = req.body; const user = users.find((u) => u.refreshToken === refreshToken); if (!user) { return res.status(403).json({ message: "Invalid refresh token" }); //... |
Generating new access tokens using refresh tokens
Now that we have implemented refresh tokens and stored them securely, let’s move on to the next step, which is using them to generate new access tokens. When the access token has expired, the client will use the refresh token to obtain a new access token instead of asking the user to log in again. This process is transparent to the user and allows them to use the application seamlessly without having to provide their login credentials repeatedly. Let’s see how we can implement it. In the /token endpoint, generate a new access token using the user’s refreshToken:
// ... const newToken = jwt.sign( { username: user.username }, process.env.JWT_SECRET, { expiresIn: "1h" } res.json({ message: "New access token generated", token: newToken }); |
Token revocation
Now that we have implemented refresh tokens and the ability to generate new access tokens, let’s take a look at how to handle token revocation. This is an important security feature that allows users to log out of their session or revoke access to their account in the case of a security incident. Create a logout endpoint and clear the refreshToken from the user object:
router.post("/logout", (req, res) => { const { refreshToken } = req.body; const user = users.find((u) => u.refreshToken === refreshToken); if (!user) { return res.status(400).json({ message: "Invalid refresh token" }); user.refreshToken = null; res.json({ message: "User logged out successfully" }); |
Best Practices for JWT and Passport.js
- Secure token storage on the client-side: Store tokens securely in the client, preferably using HttpOnly cookies or the localStorage or sessionStorage APIs.
- Handling token expiration and renewal: Monitor token expiration on the client-side and request a new token using the refreshToken before the current token expires.
- Monitoring and logging authentication events: Use logging and monitoring tools like Winston, Loggly, or Sentry to track user authentication events for audit and troubleshooting purposes.
- Regularly updating dependencies and security patches: Keep your dependencies updated using tools like npm audit or Dependabot, and apply security patches as needed to keep your application secure.
Testing the Application
To test our application, we can use tools like Postman or cURL to send HTTP requests. For this demonstration, I will use cURL to test the application. Register a new user by sending a POST request http://localhost:3000/auth/register with a JSON payload containing a username and password.
curl -X POST -H "Content-Type: application/json" -d '{"username":"clinton","password":"12345gor"}' http://localhost:3000/auth/register |

Message: “User registered successfully”
Next, log in with the new user by sending a POST request to http://localhost:3000/auth/login with the same JSON payload.
curl -X POST -H "Content-Type: application/json" -d '{"username":"clinton","password":"12345gor"}' http://localhost:3000/auth/register |

Message: “Logged in successfully”
Lastly, copy the JWT returned in the response, and use it as a Bearer token to access the protected route at http://localhost:3000/protected.
curl -X GET -H "Authorization: Bearer your_token_here" http://localhost:3000/protected |

You have accessed a protected route
Replace your_token_here with an actual authorization token that you have obtained through a successful authentication process with your web service. The -H option sets the Authorization header in the request to the specified token.
If the token is valid and the user is authorized to access the protected resource, the server will respond with the requested resource (You have accessed a protected route!). If the token is invalid or the user is not authorized, the server will return a 401 Unauthorized error response. You can go ahead to test other endpoints like the /auth/tokens and /auth/logout endpoints.
Conclusion
Congratulations! You’ve successfully secured a Node.js application using JWT and Passport.js. You can now adapt this tutorial to fit the needs of your own applications. Remember to always keep your JWT secret secure and never store sensitive information in the JWT payload. Happy coding!
About the author
Recommend
About Joyk
Aggregate valuable and interesting links.
Joyk means Joy of geeK