

mysql+proxysql+replication-manager的主从半同步复制+高可用+读写分离 - 逆水寒龙
source link: https://www.cnblogs.com/24la/p/mysql-proxysql-replication-manager-read-write-split-mha.html
Go to the source link to view the article. You can view the picture content, updated content and better typesetting reading experience. If the link is broken, please click the button below to view the snapshot at that time.

mysql+proxysql+replication-manager的主从半同步复制+高可用+读写分离
AlmaLinux release 9.1
MySQL Community Server Ver 8.0.33
Replication Manager v2.2.40 for MariaDB 10.x and MySQL 5.7 Series
ProxySQL version 2.5.1-90-gbedaa6c
主机分配情况:
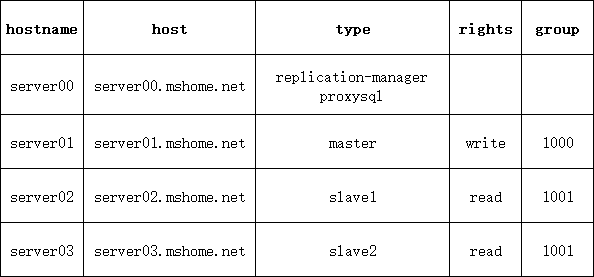
采用hyper-v创建虚拟机的方式进行的,创建1台模板之后另外3台导入虚拟机复制。
1、安装mysql
mysql8的默认加密插件变为了caching_sha2_password需要修改成mysql_native_password,因为proxysql不支持caching_sha2_password
安装完成后在server01、02、03上创建以下用户
rep-manager供replication-manager使用,repl供主从复制使用
mysql> create user 'rep-manager'@'%' identified by 'your password';
Query OK, 0 rows affected (0.01 sec)

mysql> create user 'repl'@'%' identified by 'your password';
Query OK, 0 rows affected (0.02 sec)

mysql> create user 'proxysql'@'%' identified by 'your password';
Query OK, 0 rows affected (0.02 sec)

mysql> grant process,replication slave,replication client on *.* to 'proxysql'@'%';
Query OK, 0 rows affected (0.01 sec)

mysql> grant select,replication slave,replication client,reload,super on *.* to 'repl'@'%';
Query OK, 0 rows affected, 1 warning (0.01 sec)

mysql> grant all privileges on *.* to 'rep-manager'@'%' with grant option;
Query OK, 0 rows affected (0.01 sec)

mysql> flush privileges;
Query OK, 0 rows affected (0.01 sec)
2、复制虚拟机
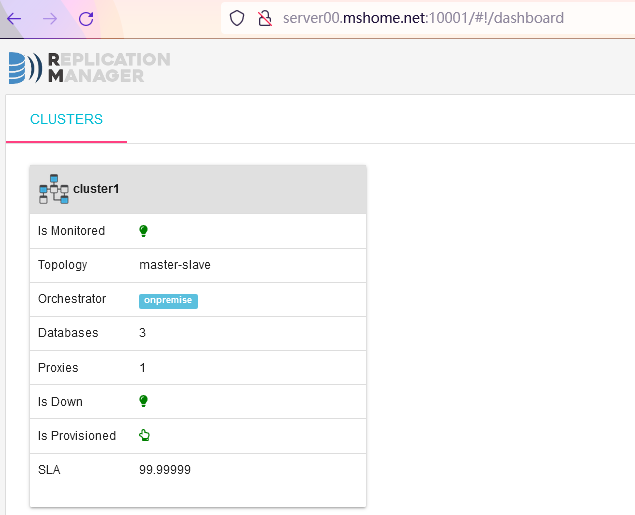
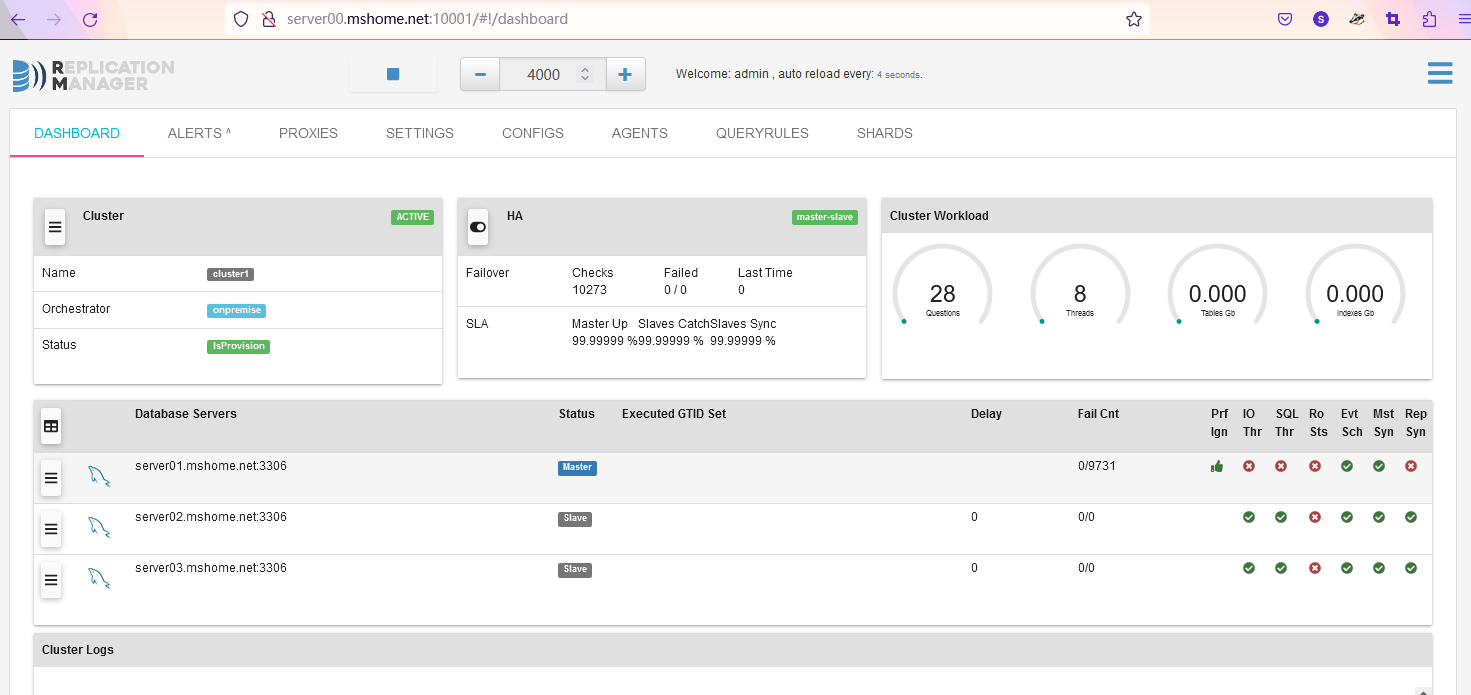
3、在server00上安装replication-manager
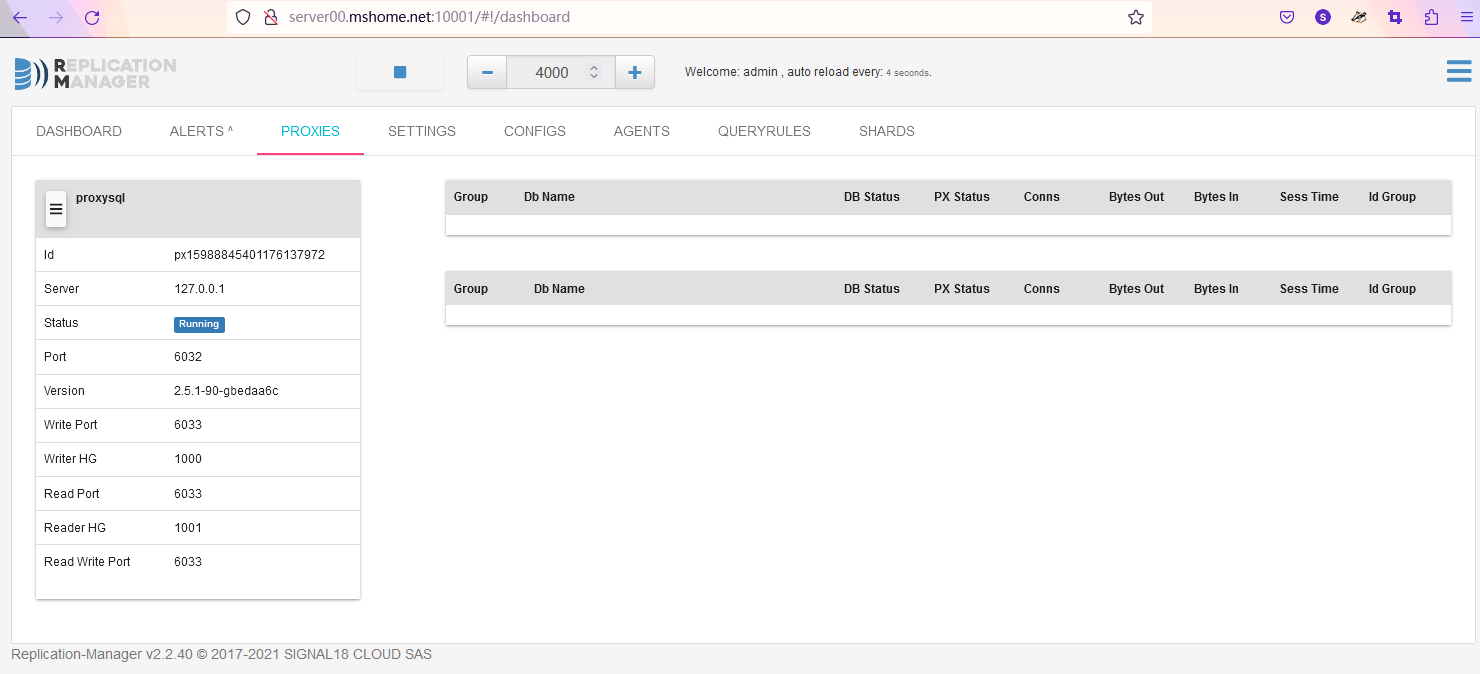
4、在server00上安装proxysql
5、启动mysql,创建主从半同步复制
半同步需要安装插件,在主库和从库上都安装
mysql> install plugin rpl_semi_sync_source soname 'semisync_source.so';
mysql> install plugin rpl_semi_sync_replica soname 'semisync_replica.so';
mysql> show plugins;
+----------------------------------+----------+--------------------+---------------------+---------+
| Name                             | Status   | Type               | Library             | License |
+----------------------------------+----------+--------------------+---------------------+---------+
| binlog                           | ACTIVE   | STORAGE ENGINE     | NULL                | GPL     |
| mysql_native_password            | ACTIVE   | AUTHENTICATION     | NULL                | GPL     |
| sha256_password                  | ACTIVE   | AUTHENTICATION     | NULL                | GPL     |
| caching_sha2_password            | ACTIVE   | AUTHENTICATION     | NULL                | GPL     |
| sha2_cache_cleaner               | ACTIVE   | AUDIT              | NULL                | GPL     |
| daemon_keyring_proxy_plugin      | ACTIVE   | DAEMON             | NULL                | GPL     |
| CSV                              | ACTIVE   | STORAGE ENGINE     | NULL                | GPL     |
| MEMORY                           | ACTIVE   | STORAGE ENGINE     | NULL                | GPL     |
| InnoDB                           | ACTIVE   | STORAGE ENGINE     | NULL                | GPL     |
| INNODB_TRX                       | ACTIVE   | INFORMATION SCHEMA | NULL                | GPL     |
| INNODB_CMP                       | ACTIVE   | INFORMATION SCHEMA | NULL                | GPL     |
| INNODB_CMP_RESET                 | ACTIVE   | INFORMATION SCHEMA | NULL                | GPL     |
| INNODB_CMPMEM                    | ACTIVE   | INFORMATION SCHEMA | NULL                | GPL     |
| INNODB_CMPMEM_RESET              | ACTIVE   | INFORMATION SCHEMA | NULL                | GPL     |
| INNODB_CMP_PER_INDEX             | ACTIVE   | INFORMATION SCHEMA | NULL                | GPL     |
| INNODB_CMP_PER_INDEX_RESET       | ACTIVE   | INFORMATION SCHEMA | NULL                | GPL     |
| INNODB_BUFFER_PAGE               | ACTIVE   | INFORMATION SCHEMA | NULL                | GPL     |
| INNODB_BUFFER_PAGE_LRU           | ACTIVE   | INFORMATION SCHEMA | NULL                | GPL     |
| INNODB_BUFFER_POOL_STATS         | ACTIVE   | INFORMATION SCHEMA | NULL                | GPL     |
| INNODB_TEMP_TABLE_INFO           | ACTIVE   | INFORMATION SCHEMA | NULL                | GPL     |
| INNODB_METRICS                   | ACTIVE   | INFORMATION SCHEMA | NULL                | GPL     |
| INNODB_FT_DEFAULT_STOPWORD       | ACTIVE   | INFORMATION SCHEMA | NULL                | GPL     |
| INNODB_FT_DELETED                | ACTIVE   | INFORMATION SCHEMA | NULL                | GPL     |
| INNODB_FT_BEING_DELETED          | ACTIVE   | INFORMATION SCHEMA | NULL                | GPL     |
| INNODB_FT_CONFIG                 | ACTIVE   | INFORMATION SCHEMA | NULL                | GPL     |
| INNODB_FT_INDEX_CACHE            | ACTIVE   | INFORMATION SCHEMA | NULL                | GPL     |
| INNODB_FT_INDEX_TABLE            | ACTIVE   | INFORMATION SCHEMA | NULL                | GPL     |
| INNODB_TABLES                    | ACTIVE   | INFORMATION SCHEMA | NULL                | GPL     |
| INNODB_TABLESTATS                | ACTIVE   | INFORMATION SCHEMA | NULL                | GPL     |
| INNODB_INDEXES                   | ACTIVE   | INFORMATION SCHEMA | NULL                | GPL     |
| INNODB_TABLESPACES               | ACTIVE   | INFORMATION SCHEMA | NULL                | GPL     |
| INNODB_COLUMNS                   | ACTIVE   | INFORMATION SCHEMA | NULL                | GPL     |
| INNODB_VIRTUAL                   | ACTIVE   | INFORMATION SCHEMA | NULL                | GPL     |
| INNODB_CACHED_INDEXES            | ACTIVE   | INFORMATION SCHEMA | NULL                | GPL     |
| INNODB_SESSION_TEMP_TABLESPACES  | ACTIVE   | INFORMATION SCHEMA | NULL                | GPL     |
| MyISAM                           | ACTIVE   | STORAGE ENGINE     | NULL                | GPL     |
| MRG_MYISAM                       | ACTIVE   | STORAGE ENGINE     | NULL                | GPL     |
| PERFORMANCE_SCHEMA               | ACTIVE   | STORAGE ENGINE     | NULL                | GPL     |
| TempTable                        | ACTIVE   | STORAGE ENGINE     | NULL                | GPL     |
| ARCHIVE                          | ACTIVE   | STORAGE ENGINE     | NULL                | GPL     |
| BLACKHOLE                        | ACTIVE   | STORAGE ENGINE     | NULL                | GPL     |
| FEDERATED                        | DISABLED | STORAGE ENGINE     | NULL                | GPL     |
| ndbcluster                       | DISABLED | STORAGE ENGINE     | NULL                | GPL     |
| ndbinfo                          | DISABLED | STORAGE ENGINE     | NULL                | GPL     |
| ndb_transid_mysql_connection_map | DISABLED | INFORMATION SCHEMA | NULL                | GPL     |
| ngram                            | ACTIVE   | FTPARSER           | NULL                | GPL     |
| mysqlx_cache_cleaner             | ACTIVE   | AUDIT              | NULL                | GPL     |
| mysqlx                           | ACTIVE   | DAEMON             | NULL                | GPL     |
| rpl_semi_sync_source             | ACTIVE   | REPLICATION        | semisync_source.so  | GPL     |
| rpl_semi_sync_replica            | ACTIVE   | REPLICATION        | semisync_replica.so | GPL     |
+----------------------------------+----------+--------------------+---------------------+---------+
50 rows in set (0.00 sec)
要想永久启用半同步需将配置写入my.cnf看下面的配置即可。
在主库上查看是否启用了半同步
 mysql> show variables like 'rpl_semi%';
+---------------------------------------------+------------+
| Variable_name                               | Value      |
+---------------------------------------------+------------+
| rpl_semi_sync_replica_enabled               | OFF        |
| rpl_semi_sync_replica_trace_level           | 32         |
| rpl_semi_sync_source_enabled                | ON         |
| rpl_semi_sync_source_timeout                | 10000      |
| rpl_semi_sync_source_trace_level            | 32         |
| rpl_semi_sync_source_wait_for_replica_count | 1          |
| rpl_semi_sync_source_wait_no_replica        | ON         |
| rpl_semi_sync_source_wait_point             | AFTER_SYNC |
+---------------------------------------------+------------+
从库上
mysql> show variables like 'rpl_semi%';
+---------------------------------------------+------------+
| Variable_name                               | Value      |
+---------------------------------------------+------------+
| rpl_semi_sync_replica_enabled               | ON         |
| rpl_semi_sync_replica_trace_level           | 32         |
| rpl_semi_sync_source_enabled                | ON         |
| rpl_semi_sync_source_timeout                | 10000      |
| rpl_semi_sync_source_trace_level            | 32         |
| rpl_semi_sync_source_wait_for_replica_count | 1          |
| rpl_semi_sync_source_wait_no_replica        | ON         |
| rpl_semi_sync_source_wait_point             | AFTER_SYNC |
+---------------------------------------------+------------+
8 rows in set (0.01 sec)
master主机mysql配置my.cnf如下
# For advice on how to change settings please see
# http://dev.mysql.com/doc/refman/8.0/en/server-configuration-defaults.html

[mysqld]
#
# Remove leading # and set to the amount of RAM for the most important data
# cache in MySQL. Start at 70% of total RAM for dedicated server, else 10%.
# innodb_buffer_pool_size = 128M
#
# Remove the leading "# " to disable binary logging
# Binary logging captures changes between backups and is enabled by
# default. It's default setting is log_bin=binlog
# disable_log_bin
#
# Remove leading # to set options mainly useful for reporting servers.
# The server defaults are faster for transactions and fast SELECTs.
# Adjust sizes as needed, experiment to find the optimal values.
# join_buffer_size = 128M
# sort_buffer_size = 2M
# read_rnd_buffer_size = 2M
#
# Remove leading # to revert to previous value for default_authentication_plugin,
# this will increase compatibility with older clients. For background, see:
# https://dev.mysql.com/doc/refman/8.0/en/server-system-variables.html#sysvar_default_authentication_plugin
# default-authentication-plugin=mysql_native_password

datadir=/var/lib/mysql
socket=/var/lib/mysql/mysql.sock

log-error=/var/log/mysqld.log
pid-file=/var/run/mysqld/mysqld.pid
default_authentication_plugin=mysql_native_password
######replication settings######
server-id=1001
log-bin=mysql-bin
binlog_format=row

binlog-ignore-db=mysql
binlog-ignore-db=information_schema
binlog-ignore-db=performance_schema
binlog-ignore-db=sys

######gtid#######
gtid_mode=on
enforce_gtid_consistency=on
binlog_gtid_simple_recovery=on

relay_log_recovery = ON
relay-log-index=mysql-relay
relay-log=mysql-relay

rpl_semi_sync_source_enabled = ON
rpl_semi_sync_replica_enabled = ON
log_slow_replica_statements = 1
slave主机myql的配置如下:
# For advice on how to change settings please see
# http://dev.mysql.com/doc/refman/8.0/en/server-configuration-defaults.html

[mysqld]
#
# Remove leading # and set to the amount of RAM for the most important data
# cache in MySQL. Start at 70% of total RAM for dedicated server, else 10%.
# innodb_buffer_pool_size = 128M
#
# Remove the leading "# " to disable binary logging
# Binary logging captures changes between backups and is enabled by
# default. It's default setting is log_bin=binlog
# disable_log_bin
#
# Remove leading # to set options mainly useful for reporting servers.
# The server defaults are faster for transactions and fast SELECTs.
# Adjust sizes as needed, experiment to find the optimal values.
# join_buffer_size = 128M
# sort_buffer_size = 2M
# read_rnd_buffer_size = 2M
#
# Remove leading # to revert to previous value for default_authentication_plugin,
# this will increase compatibility with older clients. For background, see:
# https://dev.mysql.com/doc/refman/8.0/en/server-system-variables.html#sysvar_default_authentication_plugin
# default-authentication-plugin=mysql_native_password

datadir=/var/lib/mysql
socket=/var/lib/mysql/mysql.sock

log-error=/var/log/mysqld.log
pid-file=/var/run/mysqld/mysqld.pid
default_authentication_plugin=mysql_native_password
######replication settings######
server-id=1002
log-bin=mysql-bin
binlog_format=row
log_slave_updates=on
relay_log_recovery=1

binlog-ignore-db=mysql
binlog-ignore-db=information_schema
binlog-ignore-db=performance_schema
binlog-ignore-db=sys

######gtid#######
gtid_mode=on
enforce_gtid_consistency=on
binlog_gtid_simple_recovery=on

relay_log_recovery = ON
relay-log-index=mysql-relay
relay-log=mysql-relay

rpl_semi_sync_source_enabled = ON
rpl_semi_sync_replica_enabled = ON
log_slow_replica_statements = 1

read_only = on
mysql> CHANGE REPLICATION SOURCE to SOURCE_HOST='server01.mshome.net',SOURCE_USER='repl',SOURCE_PASSWORD='your password',SOURCE_PORT=3306;
Query OK, 0 rows affected, 3 warnings (0.03 sec)

mysql> start replica;
Query OK, 0 rows affected (0.02 sec)

mysql> show replica status\G;
*************************** 1. row ***************************
             Replica_IO_State: Waiting for source to send event
                  Source_Host: server01.mshome.net
                  Source_User: repl
                  Source_Port: 3306
                Connect_Retry: 60
              Source_Log_File: mysql-bin.000009
          Read_Source_Log_Pos: 157
               Relay_Log_File: mysql-relay.000010
                Relay_Log_Pos: 373
        Relay_Source_Log_File: mysql-bin.000009
           Replica_IO_Running: Yes
          Replica_SQL_Running: Yes
              Replicate_Do_DB:
          Replicate_Ignore_DB:
           Replicate_Do_Table:
       Replicate_Ignore_Table:
      Replicate_Wild_Do_Table:
  Replicate_Wild_Ignore_Table:
                   Last_Errno: 0
                   Last_Error:
                 Skip_Counter: 0
          Exec_Source_Log_Pos: 157
              Relay_Log_Space: 795
              Until_Condition: None
               Until_Log_File:
                Until_Log_Pos: 0
           Source_SSL_Allowed: No
           Source_SSL_CA_File:
           Source_SSL_CA_Path:
              Source_SSL_Cert:
            Source_SSL_Cipher:
               Source_SSL_Key:
        Seconds_Behind_Source: 0
Source_SSL_Verify_Server_Cert: No
                Last_IO_Errno: 0
                Last_IO_Error:
               Last_SQL_Errno: 0
               Last_SQL_Error:
  Replicate_Ignore_Server_Ids:
             Source_Server_Id: 1001
                  Source_UUID: 590af332-e04e-11ed-8935-00155d030202
             Source_Info_File: mysql.slave_master_info
                    SQL_Delay: 0
          SQL_Remaining_Delay: NULL
    Replica_SQL_Running_State: Replica has read all relay log; waiting for more updates
           Source_Retry_Count: 86400
                  Source_Bind:
      Last_IO_Error_Timestamp:
     Last_SQL_Error_Timestamp:
               Source_SSL_Crl:
           Source_SSL_Crlpath:
           Retrieved_Gtid_Set:
            Executed_Gtid_Set:
                Auto_Position: 0
         Replicate_Rewrite_DB:
                 Channel_Name:
           Source_TLS_Version:
       Source_public_key_path:
        Get_Source_public_key: 1
            Network_Namespace:
1 row in set (0.00 sec)

ERROR:
No query specified
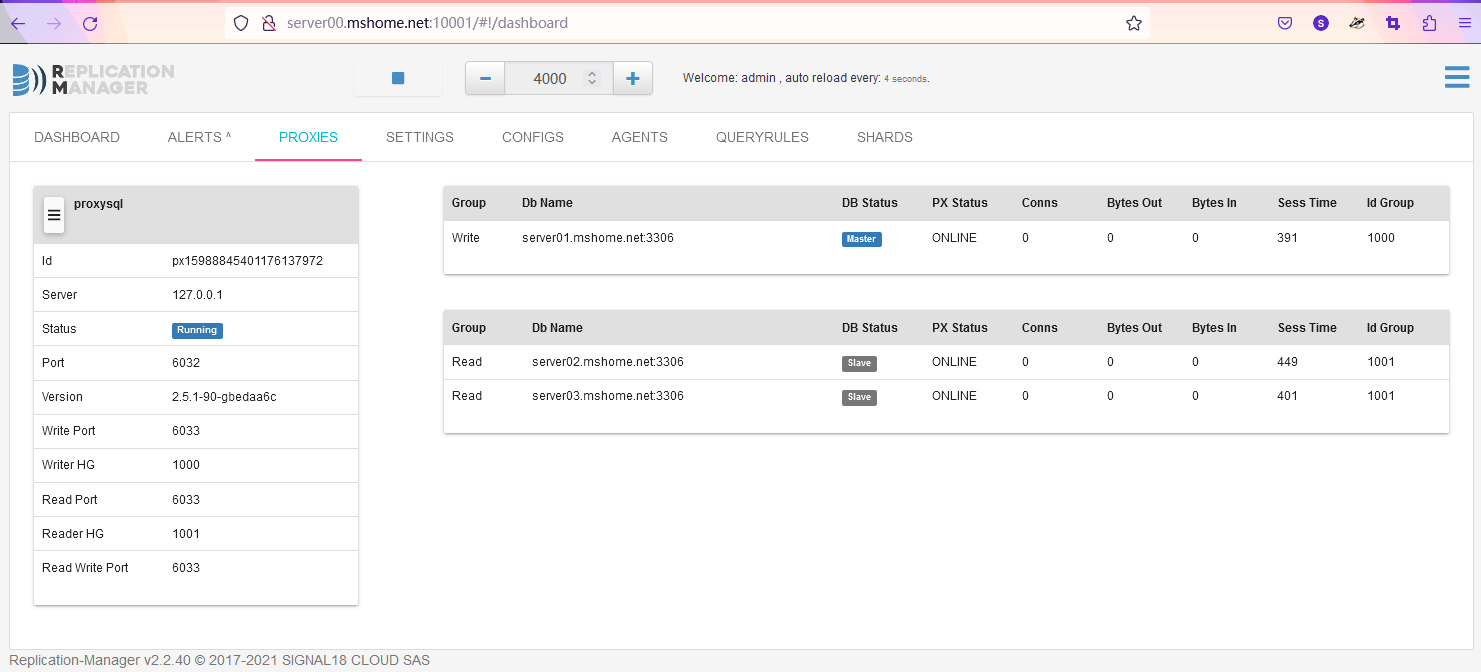
server00主机上安装了replication-manager和proxysql
replication-manager的配置如下
查看replication-manager配置文件cluster1.toml
cat /etc/replication-manager/cluster.d/cluster1.toml
[cluster1]
title = "cluster1"
prov-orchestrator = "onpremise"
prov-db-tags = "innodb,noquerycache,slow,pfs,pkg,linux,smallredolog,logtotable"
prov-db-memory = "256"
prov-db-memory-shared-pct = "threads:16,innodb:60,myisam:10,aria:10,rocksdb:1,tokudb:1,s3:1,archive:1,querycache:0"
prov-db-disk-size = "1"
prov-db-cpu-cores = "1"
prov-db-disk-iops = "300"

db-servers-hosts = "server01.mshome.net:3306,server02.mshome.net:3306,server03.mshome.net:3306"
db-servers-prefered-master = "server01.mshome.net:3306"
db-servers-credential = "rep-manager:yourpassword"
db-servers-connect-timeout = 5
replication-credential = "rep-manager:yourpassword"


verbose = false
log-failed-election  = true
log-level = 1
log-rotate-max-age = 7
log-rotate-max-backup = 7
log-rotate-max-size = 5
log-sql-in-monitoring   = true
log-sst = true

##############
## TOPOLOGY ##
##############

replication-multi-master = false
replication-multi-tier-slave = false

############
# BACKUPS ##
###########


backup-streaming = false
backup-streaming-aws-access-key-id = "admin"
backup-streaming-aws-access-secret = "xxxx"
backup-streaming-endpoint= "https://s3.signal18.io/"
backup-streaming-region= "fr-1"
backup-streaming-bucket= "repman"

#####这里可以设置备份工具restic,工具可以跨服务器,结合minio备份就很爽了,后续再介绍吧
backup-restic = false
backup-restic-aws =  false
backup-physical-type = "mariabackup"
backup-logical-type = "mysqldump"
backup-restic-aws-access-secret = "xxxx"
backup-restic-password = "xxxx"
backup-restic-binary-path = "/usr/bin/restic"

monitoring-scheduler = true
scheduler-db-servers-logical-backup  = true
scheduler-db-servers-logical-backup-cron= "0 30 23 * * 6"
scheduler-db-servers-logs   =  false
scheduler-db-servers-logs-cron = "0 0 * * * *"
scheduler-db-servers-logs-table-keep = 4
scheduler-db-servers-logs-table-rotate  = false
scheduler-db-servers-logs-table-rotate-cron = "0 0 0/6 * * *"
scheduler-db-servers-optimize  = false
scheduler-db-servers-optimize-cron = "0 0 3 1 * 5"
scheduler-db-servers-physical-backup = true
scheduler-db-servers-physical-backup-cron = "0 30 23 * * *"

##############
## FAILOVER ##
##############

failover-mode = "manual"
failover-pre-script = ""
failover-post-script = ""

## Slaves will re enter with read-only

failover-readonly-state = true
failover-event-scheduler = false
failover-event-status = false

## Failover after N failures detection

failover-falsepositive-ping-counter = 5

## Cancel failover if already N failover
## Cancel failover if last failover was N seconds before
## Cancel failover in semi-sync when one slave is not in sync
## Cancel failover if one slave receive master heartbeat
## Cancel failover when replication delay is more than N seconds

failover-limit = 0
failover-time-limit = 0
failover-at-sync = false
failover-max-slave-delay = 30
failover-restart-unsafe = false

# failover-falsepositive-heartbeat = true
# failover-falsepositive-heartbeat-timeout = 3
# failover-falsepositive-maxscale = false
# failover-falsepositive-maxscale-timeout = 14
# failover-falsepositive-external = false
# failover-falsepositive-external-port = 80

################
## SWITCHOVER ##
################

## In switchover Wait N milliseconds before killing long running transactions
## Cancel switchover if transaction running more than N seconds
## Cancel switchover if write query running more than N seconds
## Cancel switchover if one of the slaves is not synced based on GTID equality

switchover-wait-kill = 5000
switchover-wait-trx = 10
switchover-wait-write-query = 10
switchover-at-equal-gtid = false
switchover-at-sync = false
switchover-max-slave-delay = 30

############
## REJOIN ##
############

autorejoin = true
autorejoin-script = ""
autorejoin-semisync = true
autorejoin-backup-binlog = true
autorejoin-flashback = false
autorejoin-mysqldump = false

####################
## CHECKS & FORCE ##
####################

check-replication-filters = true
check-binlog-filters = true
check-replication-state = true

force-slave-heartbeat= false
force-slave-heartbeat-retry = 5
force-slave-heartbeat-time = 3
force-slave-gtid-mode = false
force-slave-semisync = false
force-slave-failover-readonly-state = false
force-binlog-row = false
force-binlog-annotate = false
force-binlog-slowqueries = false
force-binlog-compress = false
force-binlog-checksum = false
force-inmemory-binlog-cache-size = false
force-disk-relaylog-size-limit = false
force-disk-relaylog-size-limit-size = 1000000000
force-sync-binlog = false
force-sync-innodb = false

##############
## MAXSCALE ##
##############

## for 2 nodes cluster maxscale can be driven by replication manager

maxscale = false
maxscale-binlog = false
maxscale-servers = "192.168.0.201"
maxscale-port = 4003
maxscale-user = "admin"
maxscale-pass = "mariadb"

## When true replication manager drive maxscale server state
## Not required unless multiple maxscale or release does not support detect_stale_slave

maxscale-disable-monitor = false

## maxinfo|maxadmin

maxscale-get-info-method = "maxadmin"
maxscale-maxinfo-port = 4002

maxscale-write-port = 4007
maxscale-read-port = 4008
maxscale-read-write-port = 4006
maxscale-binlog-port = 4000

#############
## HAPROXY ##
#############

## Wrapper mode unless maxscale or proxysql required to be located with replication-manager

haproxy = false
haproxy-binary-path = "/usr/sbin/haproxy"

## Read write traffic
## Read only load balance least connection traffic
haproxy-write-port = 3306
haproxy-read-port = 3307

####################
## SHARDING PROXY ##
####################

mdbshardproxy = false
mdbshardproxy-hosts = "127.0.0.1:3306"
mdbshardproxy-user = "root:mariadb"

#################################
###### proxysql settings ########
#################################
proxysql = true
proxysql-servers = "127.0.0.1"
proxysql-port = "6033"
proxysql-admin-port = "6032"
proxysql-writer-hostgroup = "1000"
proxysql-reader-hostgroup = "1001"
proxysql-user = "admin"
proxysql-password = "admin"
proxysql-bootstrap = false
proxysql-bootstrap-users = false #不从master复制用户到proxysql,因为复制会出问题
proxysql-bootstrap-hostgroups = false
proxysql-bootstrap-variables = false
查看replication-manager配置文件config.toml
cat /etc/replication-manager/config.toml
[Default]

include = "/etc/replication-manager/cluster.d"

monitoring-save-config = false
monitoring-datadir = "/var/lib/replication-manager"
#monitoring-sharedir = "/usr/share/replication-manager"

## Timeout in seconds between consecutive monitoring

monitoring-ticker = 2

#########
## LOG ##
#########

log-file = "/var/log/replication-manager.log"
log-heartbeat = false
log-syslog = false


#################
## ARBITRATION ##
#################

arbitration-external = false
arbitration-external-secret = "13787932529099014144"
arbitration-external-hosts = "88.191.151.84:80"
arbitration-peer-hosts ="127.0.0.1:10002"

## Unique value on each replication-manager

arbitration-external-unique-id = 0

##########
## HTTP ##
##########

http-server = true
http-bind-address = "0.0.0.0"
http-port = "10001"
http-auth = false
http-session-lifetime =   3600
http-bootstrap-button = false
http-refresh-interval = 4000

#########
## API ##
#########

api-credentials = "admin:repman"
api-port = "10005"
api-https-bind = false

api-credentials-acl-allow =  "admin:cluster proxy db prov,dba:cluster proxy db,foo:"
api-credentials-acl-discard = false
api-credentials-external = "dba:repman,foo:bar"

############
## ALERTS ##
############

mail-from = "replication-manager@localhost"
mail-smtp-addr = "localhost:25"
mail-to = "[email protected]"
mail-smtp-password=""
mail-smtp-user=""

alert-slack-channel = "#support"
alert-slack-url = ""
alert-slack-user = "svar"

##########
# STATS ##
##########

graphite-metrics = false
graphite-carbon-host = "127.0.0.1"
graphite-carbon-port = 2003
graphite-embedded = false
graphite-carbon-api-port = 10002
graphite-carbon-server-port = 10003
graphite-carbon-link-port = 7002
graphite-carbon-pickle-port = 2004
graphite-carbon-pprof-port = 7007

####这里可以设置逻辑备份和物理备份的程序,结合上面的配置里的restic做备份,很不错,后续有时间了再继续配置吧
backup-mydumper-path = "/usr/local/bin/mydumper"
backup-myloader-path = "/usr/local/bin/myloader"
backup-mysqlbinlog-path = "/usr/local/bin/mysqlbinlog"
backup-mysqldump-path = "/usr/local/bin/mysqldump"


##############
# BENCHMARK ##
##############

sysbench-binary-path = "/usr/bin/sysbench"
sysbench-threads = 4
sysbench-time = 100
sysbench-v1 = true
查看proxysql的配置
cat /etc/proxysql.cnf
#file proxysql.cfg

########################################################################################
# This config file is parsed using libconfig , and its grammar is described in:
# http://www.hyperrealm.com/libconfig/libconfig_manual.html#Configuration-File-Grammar
# Grammar is also copied at the end of this file
########################################################################################

########################################################################################
# IMPORTANT INFORMATION REGARDING THIS CONFIGURATION FILE:
########################################################################################
# On startup, ProxySQL reads its config file (if present) to determine its datadir.
# What happens next depends on if the database file (disk) is present in the defined
# datadir (i.e. "/var/lib/proxysql/proxysql.db").
#
# If the database file is found, ProxySQL initializes its in-memory configuration from
# the persisted on-disk database. So, disk configuration gets loaded into memory and
# then propagated towards the runtime configuration.
#
# If the database file is not found and a config file exists, the config file is parsed
# and its content is loaded into the in-memory database, to then be both saved on-disk
# database and loaded at runtime.
#
# IMPORTANT: If a database file is found, the config file is NOT parsed. In this case
#            ProxySQL initializes its in-memory configuration from the persisted on-disk
#            database ONLY. In other words, the configuration found in the proxysql.cnf
#            file is only used to initial the on-disk database read on the first startup.
#
# In order to FORCE a re-initialise of the on-disk database from the configuration file
# the ProxySQL service should be started with "systemctl start proxysql-initial".
#
########################################################################################

datadir="/var/lib/proxysql"
errorlog="/var/lib/proxysql/proxysql.log"

admin_variables=
{
    admin_credentials="admin:admin"
#    mysql_ifaces="127.0.0.1:6032;/tmp/proxysql_admin.sock"
    mysql_ifaces="0.0.0.0:6032"
#    refresh_interval=2000
#    debug=true
}

mysql_variables=
{
    threads=4
    max_connections=2048
    default_query_delay=0
    default_query_timeout=36000000
    have_compress=true
    poll_timeout=2000
#    interfaces="0.0.0.0:6033;/tmp/proxysql.sock"
    interfaces="0.0.0.0:6033"
    default_schema="information_schema"
    stacksize=1048576
    server_version="5.5.30"
    connect_timeout_server=3000
# make sure to configure monitor username and password
# https://github.com/sysown/proxysql/wiki/Global-variables#mysql-monitor_username-mysql-monitor_password
    monitor_username="monitor"
    monitor_password="monitor"
    monitor_history=600000
    monitor_connect_interval=60000
    monitor_ping_interval=10000
    monitor_read_only_interval=1500
    monitor_read_only_timeout=500
    ping_interval_server_msec=120000
    ping_timeout_server=500
    commands_stats=true
    sessions_sort=true
    connect_retries_on_failure=10
}


# defines all the MySQL servers
mysql_servers =
(
#    {
#        address = "127.0.0.1" # no default, required . If port is 0 , address is interpred as a Unix Socket Domain
#        port = 3306           # no default, required . If port is 0 , address is interpred as a Unix Socket Domain
#        hostgroup = 0            # no default, required
#        status = "ONLINE"     # default: ONLINE
#        weight = 1            # default: 1
#        compression = 0       # default: 0
#   max_replication_lag = 10  # default 0 . If greater than 0 and replication lag passes such threshold, the server is shunned
#    },
#    {
#        address = "/var/lib/mysql/mysql.sock"
#        port = 0
#        hostgroup = 0
#    },
#    {
#        address="127.0.0.1"
#        port=21891
#        hostgroup=0
#        max_connections=200
#    },
#    { address="127.0.0.2" , port=3306 , hostgroup=0, max_connections=5 },
#    { address="127.0.0.1" , port=21892 , hostgroup=1 },
#    { address="127.0.0.1" , port=21893 , hostgroup=1 }
#    { address="127.0.0.2" , port=3306 , hostgroup=1 },
#    { address="127.0.0.3" , port=3306 , hostgroup=1 },
#    { address="127.0.0.4" , port=3306 , hostgroup=1 },
#    { address="/var/lib/mysql/mysql.sock" , port=0 , hostgroup=1 }
)


# defines all the MySQL users
mysql_users:
(
#    {
#        username = "username" # no default , required
#        password = "password" # default: ''
#        default_hostgroup = 0 # default: 0
#        active = 1            # default: 1
#    },
#    {
#        username = "root"
#        password = ""
#        default_hostgroup = 0
#        max_connections=1000
#        default_schema="test"
#        active = 1
#    },
#    { username = "user1" , password = "password" , default_hostgroup = 0 , active = 0 }
)


#defines MySQL Query Rules
mysql_query_rules:
(
#    {
#        rule_id=1
#        active=1
#        match_pattern="^SELECT .* FOR UPDATE$"
#        destination_hostgroup=0
#        apply=1
#    },
#    {
#        rule_id=2
#        active=1
#        match_pattern="^SELECT"
#        destination_hostgroup=1
#        apply=1
#    }
)

scheduler=
(
#  {
#    id=1
#    active=0
#    interval_ms=10000
#    filename="/var/lib/proxysql/proxysql_galera_checker.sh"
#    arg1="0"
#    arg2="0"
#    arg3="0"
#    arg4="1"
#    arg5="/var/lib/proxysql/proxysql_galera_checker.log"
#  }
)


mysql_replication_hostgroups=
(
#        {
#                writer_hostgroup=30
#                reader_hostgroup=40
#                comment="test repl 1"
#       },
#       {
#                writer_hostgroup=50
#                reader_hostgroup=60
#                comment="test repl 2"
#        }
)


# http://www.hyperrealm.com/libconfig/libconfig_manual.html#Configuration-File-Grammar
#
# Below is the BNF grammar for configuration files. Comments and include directives are not part of the grammar, so they are not included here.
#
# configuration = setting-list | empty
#
# setting-list = setting | setting-list setting
#
# setting = name (":" | "=") value (";" | "," | empty)
#
# value = scalar-value | array | list | group
#
# value-list = value | value-list "," value
#
# scalar-value = boolean | integer | integer64 | hex | hex64 | float
#                | string
#
# scalar-value-list = scalar-value | scalar-value-list "," scalar-value
#
# array = "[" (scalar-value-list | empty) "]"
#
# list = "(" (value-list | empty) ")"
#
# group = "{" (setting-list | empty) "}"
#
# empty =
其实proxysql配置基本上在启动了之后都是通过数据库来设置的配置文件
proxysql的配置如下,进入proxysql
[root@server00 ~]# mysql -uadmin -p -P6032 -h127.0.0.1 --prompt='proxysql Admin> '
Enter password:
Welcome to the MySQL monitor.  Commands end with ; or \g.
Your MySQL connection id is 9037
Server version: 5.5.30 (ProxySQL Admin Module)

Copyright (c) 2000, 2023, Oracle and/or its affiliates.

Oracle is a registered trademark of Oracle Corporation and/or its
affiliates. Other names may be trademarks of their respective
owners.

Type 'help;' or '\h' for help. Type '\c' to clear the current input statement.

proxysql Admin>
proxysql Admin> set mysql-monitor_username='proxysql';
Query OK, 1 row affected (0.00 sec)

proxysql Admin> set mysql-monitor_password='your password';
Query OK, 1 row affected (0.00 sec)
proxysql Admin> select * from global_variables;

| mysql-monitor_username                                               | proxysql                                   |
| mysql-monitor_password                                               | your password                              |
| mysql-monitor_history                                                | 600000                                     |
| mysql-monitor_connect_interval                                       | 60000                                      |
| mysql-monitor_ping_interval                                          | 10000                                      |
| mysql-monitor_read_only_interval                                     | 1500                                       |
| mysql-monitor_read_only_timeout                                      | 500                                        |
| mysql-ping_interval_server_msec                                      | 120000                                     |
| mysql-ping_timeout_server                                            | 500                                        |
| mysql-commands_stats                                                 | true                                       |
| mysql-sessions_sort                                                  | true                                       |
| mysql-connect_retries_on_failure                                     | 10                                         |
| mysql-server_capabilities                                            | 569899                                     |
+----------------------------------------------------------------------+--------------------------------------------+
proxysql Admin> load mysql variables to runtime;
Query OK, 0 rows affected (0.00 sec)

proxysql Admin> save mysql variables to disk;
Query OK, 155 rows affected (0.01 sec)
proxysql Admin> insert into mysql_replication_hostgroups values(1000,1001,'read_only','读1000写1001分离');
Query OK, 1 row affected (0.00 sec)

proxysql Admin> insert into mysql_servers(hostgroup_id,hostname,port) values(1000,'server01.mshome.net',3306);
Query OK, 1 row affected (0.00 sec)

proxysql Admin> insert into mysql_servers(hostgroup_id,hostname,port) values(1001,'server02.mshome.net',3306);
Query OK, 1 row affected (0.00 sec)

proxysql Admin> insert into mysql_servers(hostgroup_id,hostname,port) values(1001,'server03.mshome.net',3306);
Query OK, 1 row affected (0.00 sec)

proxysql Admin> load mysql servers to runtime;
Query OK, 0 rows affected (0.00 sec)

proxysql Admin> save mysql servers to disk;
Query OK, 0 rows affected (0.05 sec)
proxysql Admin> delete from mysql_users;
Query OK, 1 row affected (0.00 sec)

proxysql Admin> insert into mysql_users(username,password,default_hostgroup) values('appbox','Appbox@123',1000);
Query OK, 1 row affected (0.00 sec)

proxysql Admin> load mysql users to runtime;
Query OK, 0 rows affected (0.00 sec)

proxysql Admin> save mysql users to disk;
Query OK, 0 rows affected (0.02 sec)
按照以上配置打开replication-manager的web管理端,默认账号admin密码repman
在server01的主库上创建appbox用户
mysql> create user appbox@'%' identified by 'Appbox@123';
Query OK, 0 rows affected (0.01 sec)

mysql> create database appboxdb character set utf8mb4;
Query OK, 1 row affected (0.01 sec)

mysql> grant all privileges on appboxdb.* to appbox@'%';
Query OK, 0 rows affected (0.01 sec)

mysql>
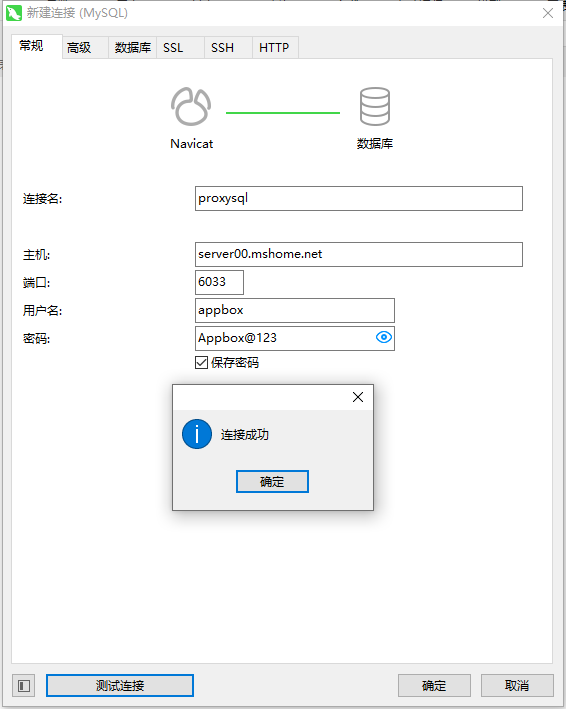
用Navicat连proxysql
在proxysql中插入读写规则
insert into mysql_query_rules(rule_id,active,match_digest,destination_hostgroup,apply)values(1,1,'^SELECT.*FOR UPDATE$',100,1);
insert into mysql_query_rules(rule_id,active,match_digest,destination_hostgroup,apply)values(2,1,'^SELECT',1000,1);
load mysql query rules to runtime;
save mysql query rules to disk;
bash下进行读写测试
for i in {1..100}; do mysql -uappbox -pAppbox@123 -h server00.mshome.net -P6033 -e 'select * from mysql.user LIMIT 2;' ; sleep 0.5; done
如果有用,欢迎打赏,不限金额

Recommend
-
31
前面我们说了mysql的安装配置(并提供一键安装脚本),mysql语句使用以及备份恢复mysql数据;本次要介绍的是mysql的主从复制,读写分离;及高可用MHA;环境如下:master:CentOS7_x64 mysq...
-
58
While we’ve had MySQL Group Replication support in ProxySQL since version 1.3 (native as of v1.4), development has continued in subsequent vers...
-
18
Replication-manager+proxysql 读写分离部署笔记 官方文档地址: https://docs.signal18.io/ 搭建主从复制环境 我这里用的是dbdeploy...
-
14
redis安装和高可用配置,持久化,主从模式,哨兵模式,集群模式 发表于
-
14
欢迎关注公众号【 Ccww技术博客 】,原创技术文章第一时间推出 越努力,越幸运, 本文已收藏在GitHub中JavaCommuni...
-
11
Redis 高可用篇:你管这叫主从架构数据同步原理?发布于 3 月 19 日在《Redis 核心篇:唯快不破的秘密》中...
-
10
您现在的位置:首页 --> MySQL --> MySQL 5.6 测试之 Replication(主从复制) MySQL 5.6 测试之 Repl...
-
7
ProxySQL 2.3.0: Enhanced Support for MySQL Group Replication Back to the Blog
-
7
RocketMQ高可用设计之主从复制和读写分离 RocketMQ为了提高消费的高可用性,避免Broker发生单点故障引起Broker上的消息无法及时消费,同时避免单个机器上硬盘坏损出现消费数据丢失。 RocketMQ采用Broker数据主从复制机制,当...
-
5
Redis知识整合(三):高可用-主从 要想提高一个有状态服务的可用性,最简单直接的办法就是扩展从节点,这样主节点挂了,从节点就可以上位并代替原先的节点继续对外提供服务,同时也可用从节点做负载均衡,作为目前最好用的分布式缓存之一...
About Joyk
Aggregate valuable and interesting links.
Joyk means Joy of geeK