

mysql主从复制读写分离与高可用配置-~学无止境,学以致用 ^ _ ^
source link: http://blog.51cto.com/dyc2005/2094382
Go to the source link to view the article. You can view the picture content, updated content and better typesetting reading experience. If the link is broken, please click the button below to view the snapshot at that time.
前面我们说了mysql的安装配置(并提供一键安装脚本),mysql语句使用以及备份恢复mysql数据;本次要介绍的是mysql的主从复制,读写分离;及高可用MHA;
环境如下:
master:CentOS7_x64 mysql5.721 172.16.3.175 db1
slave1:CentOS7_x64 mysql5.7.21 172.16.3.235 db2
slave2:CentOS7_x64 mysql5.7.21 172.16.3.235 db3
proxysql/MHA:CentOS7_x64 mysql5.7.21 172.16.3.235 proxysql
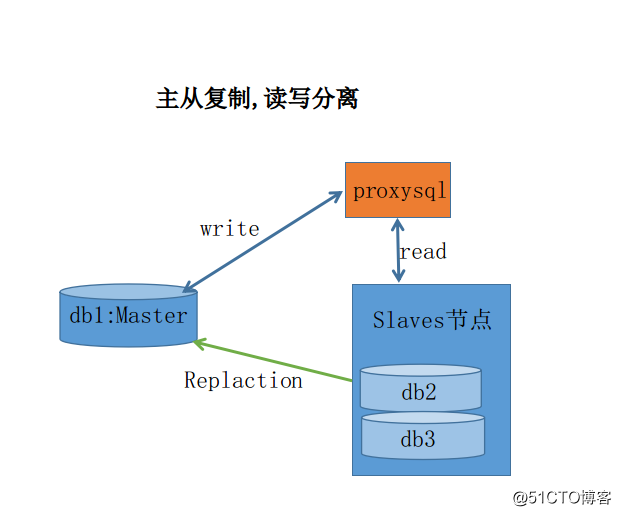
架构图:
说明:
配置测试时为了方便关闭了防火墙头,selinux安全策略;
现实中请开放防火墙策略;myslqdb的安装已经有脚本一键安装并配置好;这里就不在重复配置;只对对应的角色贴出对应的配置或安装与之相关的软件;
二、主从复制配置
一台主数据库,N从节点;从节点开启两个线程,通过Slave_IO_Running线程和主节点上有权限的账号从 主数据库节点复制binlog日志到本地,能过Slave_SQL_Running线程在本地执行binlog日志,达到主从节点内容同步;
master配置:
egrep -v '(^$|^#)' /usr/local/mysql/etc/my.cnf
[mysqld]
datadir=/data1/mysqldb
socket=/tmp/mysql.sock
key_buffer_size         = 16M
max_allowed_packet      = 16M
thread_stack            = 192K
thread_cache_size       = 8
query_cache_limit       = 1M
query_cache_size        = 64M
query_cache_type        = 1
symbolic-links=0
innodb_file_per_table=ON
skip_name_resolve=ON

server-id       = 1
log_bin         = /data1/mysqldb/mysql-bin.log
[mysqld_safe]
log-error=/usr/local/mysql/logs/error.log
pid-file=/data1/mysqldb/mysql.pid
!includedir  /usr/local/mysql/etc/my.cnf.d
创建从节点同步账号:
mysql > grant replication client,replication slave on *.* to 'repluser'@'172.16.3.%' identified by 'replpass';
mysql > flush privileges;
mysql >show master logs;
+------------------+-----------+
| Log_name         | File_size |
+------------------+-----------+
| mysql-bin.000001 |       622 |

主节点上的binlog日志文件及位置;请记下;从节点第一次同步时需要用;
slave节点:
egrep -v '(^$|^#)' /usr/local/mysql/etc/my.cnf
[mysqld]
datadir=/data1/mysqldb
socket=/data1/mysqldb/mysql.sock
key_buffer_size         = 16M
max_allowed_packet      = 16M
thread_stack            = 192K
thread_cache_size       = 8
query_cache_limit       = 1M
query_cache_size        = 64M
query_cache_type        = 1
symbolic-links=0

innodb_file_per_table=ON
skip_name_resolve=ON

server-id               = 11         #从节点标识ID  各从节点均不一样
relay_log = relay-log
read_only=ON

[mysqld_safe]
log-error=/usr/local/mysql/log/error.log
pid-file=/var/run/mysql/mysql.pid
!includedir /usr/local/mysql/etc/my.cnf.d
启动mysq数据库
注意:两台从节点的server-id 值不一样;其他的都一样;因此从节点只展示一个配置文件;
登录数据库并同步数据启动slave
两台slave均要同步并启动
mysql > CHANGE MASTER TO MASTER_HOST="172.16.3.175",MASTER_USER="repluser",MASTER_PASSWORD="replpass",MASTER_PORT=3306,MASTER_LOG_FILE="mysql-bin.000001",MASTER_LOG_POS=622;MASTER_CONNECT_RETRY=10,MASTER_HEARTBEAT_PERIOD=2;
mysql > start slave;     #启动从节点()

#查看从节点状态
mysql > SHOW SLAVE STATUS;
*************************** 1. row ***************************
               Slave_IO_State: Waiting for master to send event
                  Master_Host: 172.16.3.175                  #主节点
                  Master_User: repluser                          #同步账号
                  Master_Port: 3306
                Connect_Retry: 60
              Master_Log_File: mysql-bin.000001
          Read_Master_Log_Pos: 622
               Relay_Log_File: relay-log.000001
                Relay_Log_Pos: 582
        Relay_Master_Log_File: mysql-bin.000001
             Slave_IO_Running: Yes                      #同步线程正常
            Slave_SQL_Running: Yes                   #本地写线程正常
              Replicate_Do_DB:                              #同步过滤为空(可以只同步某个或某些库)
          Replicate_Ignore_DB:                             #不同步的库
           Replicate_Do_Table:
       Replicate_Ignore_Table:
      Replicate_Wild_Do_Table:
  Replicate_Wild_Ignore_Table:
                   Last_Errno: 0               #最后同步的错误 0表示正常同步
                   Last_Error:
                 Skip_Counter: 0
          Exec_Master_Log_Pos: 622
              Relay_Log_Space: 615
              Until_Condition: None
               Until_Log_File:
                Until_Log_Pos: 0
           Master_SSL_Allowed: No
           Master_SSL_CA_File:
           Master_SSL_CA_Path:
              Master_SSL_Cert:
            Master_SSL_Cipher:
               Master_SSL_Key:
        Seconds_Behind_Master: 0
Master_SSL_Verify_Server_Cert: No
                Last_IO_Errno: 0
                Last_IO_Error:
               Last_SQL_Errno: 0
               Last_SQL_Error:
  Replicate_Ignore_Server_Ids:
             Master_Server_Id: 1
                  Master_UUID: 57017c43-36e3-11e8-ac76-080027393fc7
             Master_Info_File: /data1/mysqldb/master.info
                    SQL_Delay: 0
          SQL_Remaining_Delay: NULL
      Slave_SQL_Running_State: Slave has read all relay log; waiting for more updates
           Master_Retry_Count: 86400
                  Master_Bind:
      Last_IO_Error_Timestamp:
     Last_SQL_Error_Timestamp:
               Master_SSL_Crl:
           Master_SSL_Crlpath:
           Retrieved_Gtid_Set:
            Executed_Gtid_Set:
                Auto_Position: 0
         Replicate_Rewrite_DB:
                 Channel_Name:
           Master_TLS_Version:
1 row in set (0.00 sec)
ERROR:
No query specified
测试主从同步
在master导入测试数据;修改数据并查看slave 中的数据是否一致;
[root@db1 ~]# mysql < Testdb.sql
登录数据库
[root@db1 ~]# mysql -uroot -p
mysql> show databases;
+--------------------+
| Database           |
+--------------------+
 study              |
+--------------------+
5 rows in set (0.00 sec)
###study测试数据库导入成功
mysql> use study;
Database changed
mysql> show tables;
+-----------------+
| Tables_in_study |
+-----------------+
| class           |
| course          |
| part            |
| score           |
| student         |
| tb31            |
| tb32            |
| teacher         |
| test1           |
| test2           |
| user_info       |
+-----------------+
11 rows in set (0.00 sec)
#删除test1 test2表
slave从节点上查看
mysql> show tables;
+-----------------+
| Tables_in_study |
+-----------------+
| class           |
| course          |
| part            |
| score           |
| student         |
| tb31            |
| tb32            |
| teacher         |
| user_info       |
+-----------------+
9 rows in set (0.00 sec)
数据已经可以正常同步;注意主从同步只需要第一次手动启动;之后都随mysql服务自动启动;主从同步架构只方便了数据的同步,此时如果没有 第三方工具介入想做到读写分离就需要在程序中去做,难免出错;而出错了,就需要手动同步数据;这里通过proxysql来做读写分离;
三、proxysql之读写分离
以上已经完成了主从复制配置;然而这只是一个基本配置,加上一个proxysql实现mysql读写分离,proxysql类似haproxy七层代理路由功能且支持MySQL 协议的的数据库代理;是dba开发给dba使用的;用户请求发向proxysql,如果是写请求发往主节点;读请求发下从节点组中;以此实现读写分离;一定程序上减轻了主数据库的io压力;
下载安装proxysql
目前最新版本是1.4.7-1(由于最新版本有问题)
我们这里下载使用1.3.6-1的基于CentOS7的rpm包;下载到本地并yum安装
[root@proxysql ~]# yum install   proxysql-1.3.6-1-centos7.x86_64.rpm -y
[root@proxysql ~]# rpm -ql proxysql
/etc/init.d/proxysql
/etc/proxysql.cnf       #主配置文件
/usr/bin/proxysql
/usr/share/proxysql/tools/proxysql_galera_checker.sh
/usr/share/proxysql/tools/proxysql_galera_writer.pl
配置如下:
在配置proxysql之前需要在主节点配置授权账号以作proxysql对主从节点操作;另外proxysql上的mysql客户端工具需要和主从节点上的保持一致;
在主节点master上授权登录账号:
mysql > GRANT ALL ON *.* TO 'myadmin'@'172.16.3.%' identified by 'mypass';proxysql.cnf配置
[root@proxysql ~]# egrep -v '(^$|^#)' /etc/proxysql.cnf
datadir="/var/lib/proxysql"
admin_variables=
{
    admin_credentials="admin:admin"               #proxysql自己的管理用户名密码
    mysql_ifaces="127.0.0.1:6032;/tmp/proxysql_admin.sock"
}
mysql_variables=
{
    threads=4                         #线程数,建议和cpu核心数一致
    max_connections=2048      #最大连接
    default_query_delay=0
    default_query_timeout=36000000
    have_compress=true
    poll_timeout=2000
    interfaces="0.0.0.0:3306;/tmp/proxysql.sock"             #对外接口
    default_schema="information_schema"
    stacksize=1048576
    server_version="5.5.30"
    connect_timeout_server=3000
  monitor_username="monitor"
    monitor_password="monitor"
    monitor_history=600000
    monitor_connect_interval=60000
    monitor_ping_interval=10000
    monitor_read_only_interval=1500
    monitor_read_only_timeout=500
    ping_interval_server_msec=120000
    ping_timeout_server=500
    commands_stats=true
    sessions_sort=true
    connect_retries_on_failure=10
}

#####主从节点的配置
mysql_servers =
(
    {
        address = "172.16.3.175" # no default, required . If port is 0 , address is interpred as a Unix Socket Domain
        port = 3306           # no default, required . If port is 0 , address is interpred as a Unix Socket Domain
        hostgroup = 1           # 设置组号
        status = "ONLINE"     # default: ONLINE
        weight = 1            # default: 1
        compression = 0       # default: 0
        max_connections = 200            ###定义最大的连接
    },
    {
        address = "172.16.3.235" # no default, required . If port is 0 , address is interpred as a Unix Socket Domain
        port = 3306           # no default, required . If port is 0 , address is interpred as a Unix Socket Domain
        hostgroup = 2           # no default, required
        status = "ONLINE"     # default: ONLINE
        weight = 1            # default: 1
        compression = 0       # default: 0
        max_connections=1000
    },
    {
        address = "172.16.3.241" # no default, required . If port is 0 , address is interpred as a Unix Socket Domain
        port = 3306           # no default, required . If port is 0 , address is interpred as a Unix Socket Domain
        hostgroup = 2           # no default, required
        status = "ONLINE"     # default: ONLINE
        weight = 1            # default: 1
        compression = 0       # default: 0
        max_connections=1000
    }
)
mysql_users:
(
    {
        username = "myadmin" # no default , required
        password = "mypass" # default: ''
        default_hostgroup = 1 # default: 0
        max_connections=1000
        default_schema="test"
        active = 1            #是否激活
    }
)
mysql_query_rules:
(
)
scheduler=
(
)
mysql_replication_hostgroups=
(
        {
                writer_hostgroup=1         #定义写组号1
                reader_hostgroup=2      #定义读组号2
                comment="test repl 1"   #注释内容
       }
)
启动proxysql服务[root@proxysql ~]# service proxysql start
测试proxysql
模拟通过proxysql使用数据库
[root@proxysql ]# mysql -h172.16.3.175 -umyadmin -pmypass
mysql: [Warning] Using a password on the command line interface can be insecure.
Welcome to the MySQL monitor.  Commands end with ; or \g.
Your MySQL connection id is 17406
Server version: 5.7.21-log MySQL Community Server (GPL)
Copyright (c) 2000, 2018, Oracle and/or its affiliates. All rights reserved.
Oracle is a registered trademark of Oracle Corporation and/or its
affiliates. Other names may be trademarks of their respective
owners.
Type 'help;' or '\h' for help. Type '\c' to clear the current input statement.
mysql>

mysql > show databases;
mysql> show databases;
+--------------------+
| Database           |
+--------------------+
| information_schema |
| mysql              |
| performance_schema |
| study              |
| sys                |
+--------------------+
5 rows in set (0.00 sec)
###删除study数据库user_info中6 -12之间的数据
删除之前:
mysql> select * from user_info;
+-----+-------+------+--------+----------+
| nid | name  | age  | gender | part_nid |
+-----+-------+------+--------+----------+
|   1 | san   |   20 | 男     |        1 |
|   2 | dong  |   29 | 男     |        2 |
|   4 | Ling  |   28 | 男     |        4 |
|   5 | ling  |   28 | 男     |        3 |
|   6 | dong  |   30 | 男     |        1 |
|   7 | b     |   11 | 女     |        1 |
|   8 | c     |   12 | 女     |        1 |
|   9 | d     |   18 | 女     |        4 |
|  10 | e     |   22 | 男     |        3 |
|  11 | f     |   23 | 男     |        2 |
|  12 | dongy |   22 | 男     |        1 |
+-----+-------+------+--------+----------+
11 rows in set (0.00 sec)
删除之后:
mysql> delete from user_info where nid >6 and nid <12;
Query OK, 5 rows affected (0.03 sec)

mysql> select * from user_info;
+-----+-------+------+--------+----------+
| nid | name  | age  | gender | part_nid |
+-----+-------+------+--------+----------+
|   1 | san   |   20 | 男     |        1 |
|   2 | dong  |   29 | 男     |        2 |
|   4 | Ling  |   28 | 男     |        4 |
|   5 | ling  |   28 | 男     |        3 |
|   6 | dong  |   30 | 男     |        1 |
|  12 | dongy |   22 | 男     |        1 |
+-----+-------+------+--------+----------+
6 rows in set (0.00 sec)
到主从节点上查看,会发现以上的查和修改数据都被proxysql正确的代理到后端处理了;
以上看了并不直观;为了查看proxysql与各主从节点通讯我们在主从节点上安装tcpdump并过滤包
主节点:
类似如下:
[root@db1 ~]# tcpdump -i enp0s3 -nn tcp port 3306
tcpdump: verbose output suppressed, use -v or -vv for full protocol decode
listening on enp0s3, link-type EN10MB (Ethernet), capture size 262144 bytes
18:04:34.678861 IP 172.16.3.254.42191 > 172.16.3.175.3306: Flags [S], seq 3385407732, win 29200, options [mss 1460,sackOK,TS val 17576713 ecr 0,nop,wscale 7], length 0
18:04:34.678908 IP 172.16.3.175.3306 > 172.16.3.254.42191: Flags [S.], seq 1579426335, ack 3385407733, win 28960, options [mss 1460,sackOK,TS val 29413673 ecr 17576713,nop,wscale 7], length 0
18:04:34.680902 IP 172.16.3.254.42191 > 172.16.3.175.3306: Flags [.], ack 1, win 229, options [nop,nop,TS val 17576715 ecr 29413673], length 0
18:04:34.681264 IP 172.16.3.175.3306 > 172.16.3.254.42191: Flags [P.], seq 1:83, ack 1, win 227, options [nop,nop,TS val 29413675 ecr 17576715], length 82
....
从节点:
类似如下:
[root@db2 data1]# tcpdump -i enp0s3 -nn tcp port 3306
tcpdump: verbose output suppressed, use -v or -vv for full protocol decode
listening on enp0s3, link-type EN10MB (Ethernet), capture size 262144 bytes
18:02:57.932043 IP 172.16.3.254.42733 > 172.16.3.235.3306: Flags [S], seq 76520456, win 29200, options [mss 1460,sackOK,TS val 17479189 ecr 0,nop,wscale 7], length 0
...........
proxysql命令行管理接口:支持运行时修改
 [root@proxysql]#  mysql -u admin -padmin -h 127.0.0.1 -P6032 --prompt='Admin> '
Admin> show databases;
+-----+---------+-------------------------------+
| seq | name    | file                          |
+-----+---------+-------------------------------+
| 0   | main    |                               |
| 2   | disk    | /var/lib/proxysql/proxysql.db |
| 3   | stats   |                               |
| 4   | monitor |                               |
+-----+---------+-------------------------------+
4 rows in set (0.00 sec)
以上stats,monitor,main都从配置文件中获取的数据库;可以通过类似mysql运行时修改;而不需要重启;更多命令行的配置请参考github;
至此我们基于proxysql主从复制读写分离架构已经完成;
双主或多主模型是无须实现读写分离,仅需要负载均衡:haproxy, nginx, lvs等;
proxysql并没有解决,当主数据岩机时的问题;此时就需要量MHA来解决 ;后续再介绍;
Recommend
About Joyk
Aggregate valuable and interesting links.
Joyk means Joy of geeK