

Purchasing Power Parity: fair pricing for your SaaS product
source link: https://scastiel.dev/implement-ppp-fair-pricing-for-your-product
Go to the source link to view the article. You can view the picture content, updated content and better typesetting reading experience. If the link is broken, please click the button below to view the snapshot at that time.
Purchasing Power Parity: fair pricing for your SaaS product
Posted on February 22, 2021

I released my course about React hooks a couple of weeks ago. As with any SaaS product, I asked myself the usual question: what should be my product's price?
Economists would say that the right price should be when the offer curve crosses the demand one. But I’m not an economist, and this model seems to be valid for a given place (country), not when you sell something worldwide.
Using Purchasing Power Parity will help me solve this problem. After I explained what it is, I’ll show you how I implemented it on my course’s selling page using serverless functions and a little bit of React.
What is Purchasing Power Parity?
At the core of the Purchasing Power Parity (PPP) is the following idea: a fair price in Switzerland will have no chance to convince anyone to buy in Somalia. It is an extreme example, but you get the idea.
And it isn’t new when you think about it: the same Spotify subscription doesn’t cost the same depending on where you are:
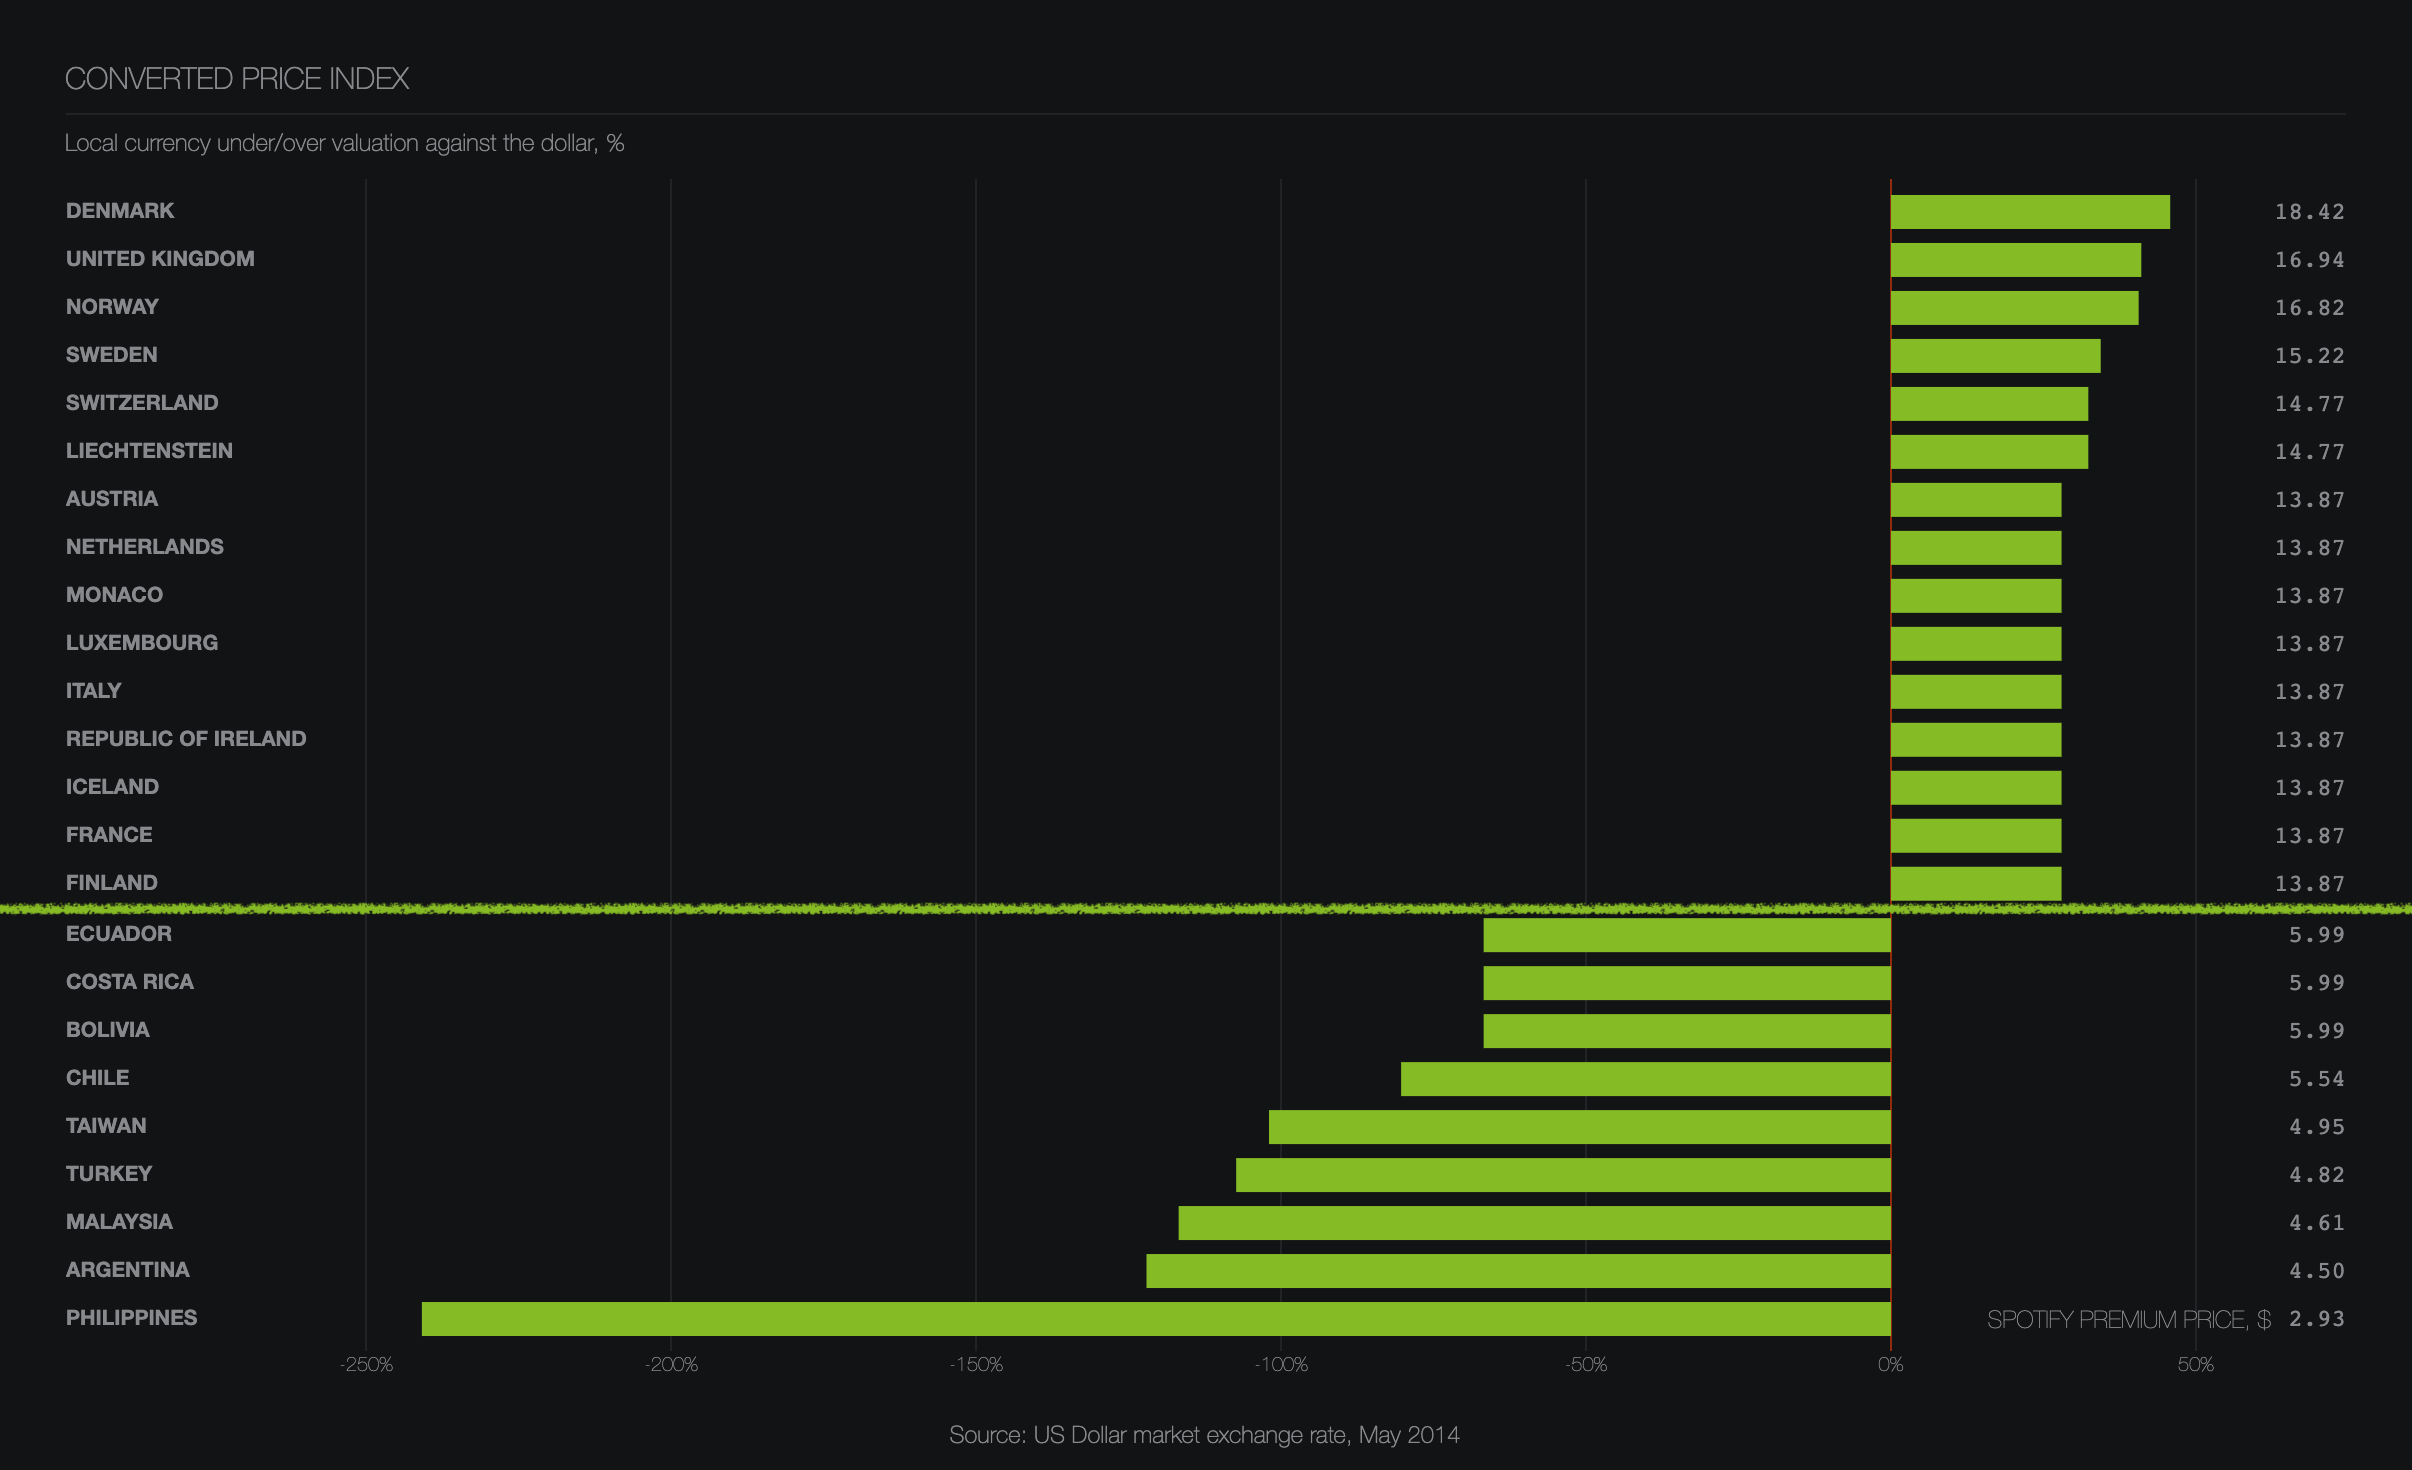
And the reason for this difference is obvious: purchasing power is not the same across the world. Several indices exist to measure this phenomenon, the most famous in popular culture being the Big Mac Index.
Big companies such as Spotify can adjust their pricing in every country they are in, but what about you with your SaaS? You don’t have headquarters in all countries, yet you sell your product worldwide.
To solve this problem, a tendency emerged these past few months: using PPP to offer your product at a lower price where the purchasing power is lower.
For instance, you can purchase my course at its base price of $50 (when I’m writing this post) in Switzerland or Denmark, $25 in Romania or Albania, and $5 in Somalia or Liberia.
To me, using PPP for your pricing has two advantages:
- it is fair: I want my course to be available to the most people, especially people who could use it to improve their economic situation by learning new skills;
- it is profitable: even if low-PPP countries won’t be the ones bringing you the most significant revenue, it is still better than nothing, i.e., a pricing way too high for these countries.
Note that I’m not yet able to confirm the second hypothesis for my case since I just released my course. And even then, confirming it would require an experimental system with a large sample.
Let’s say I convinced you to use PPP for your product’s pricing; how can you implement it?
How to add PPP to your site?
For the rest of this post, I’ll suppose you have a product, and its selling page uses Stripe, React and serverless functions (e.g. with Next.js or Netlify functions).
It’s quite a big assumption, but it shouldn’t be too much trouble to use the principles to adapt them to your use case.
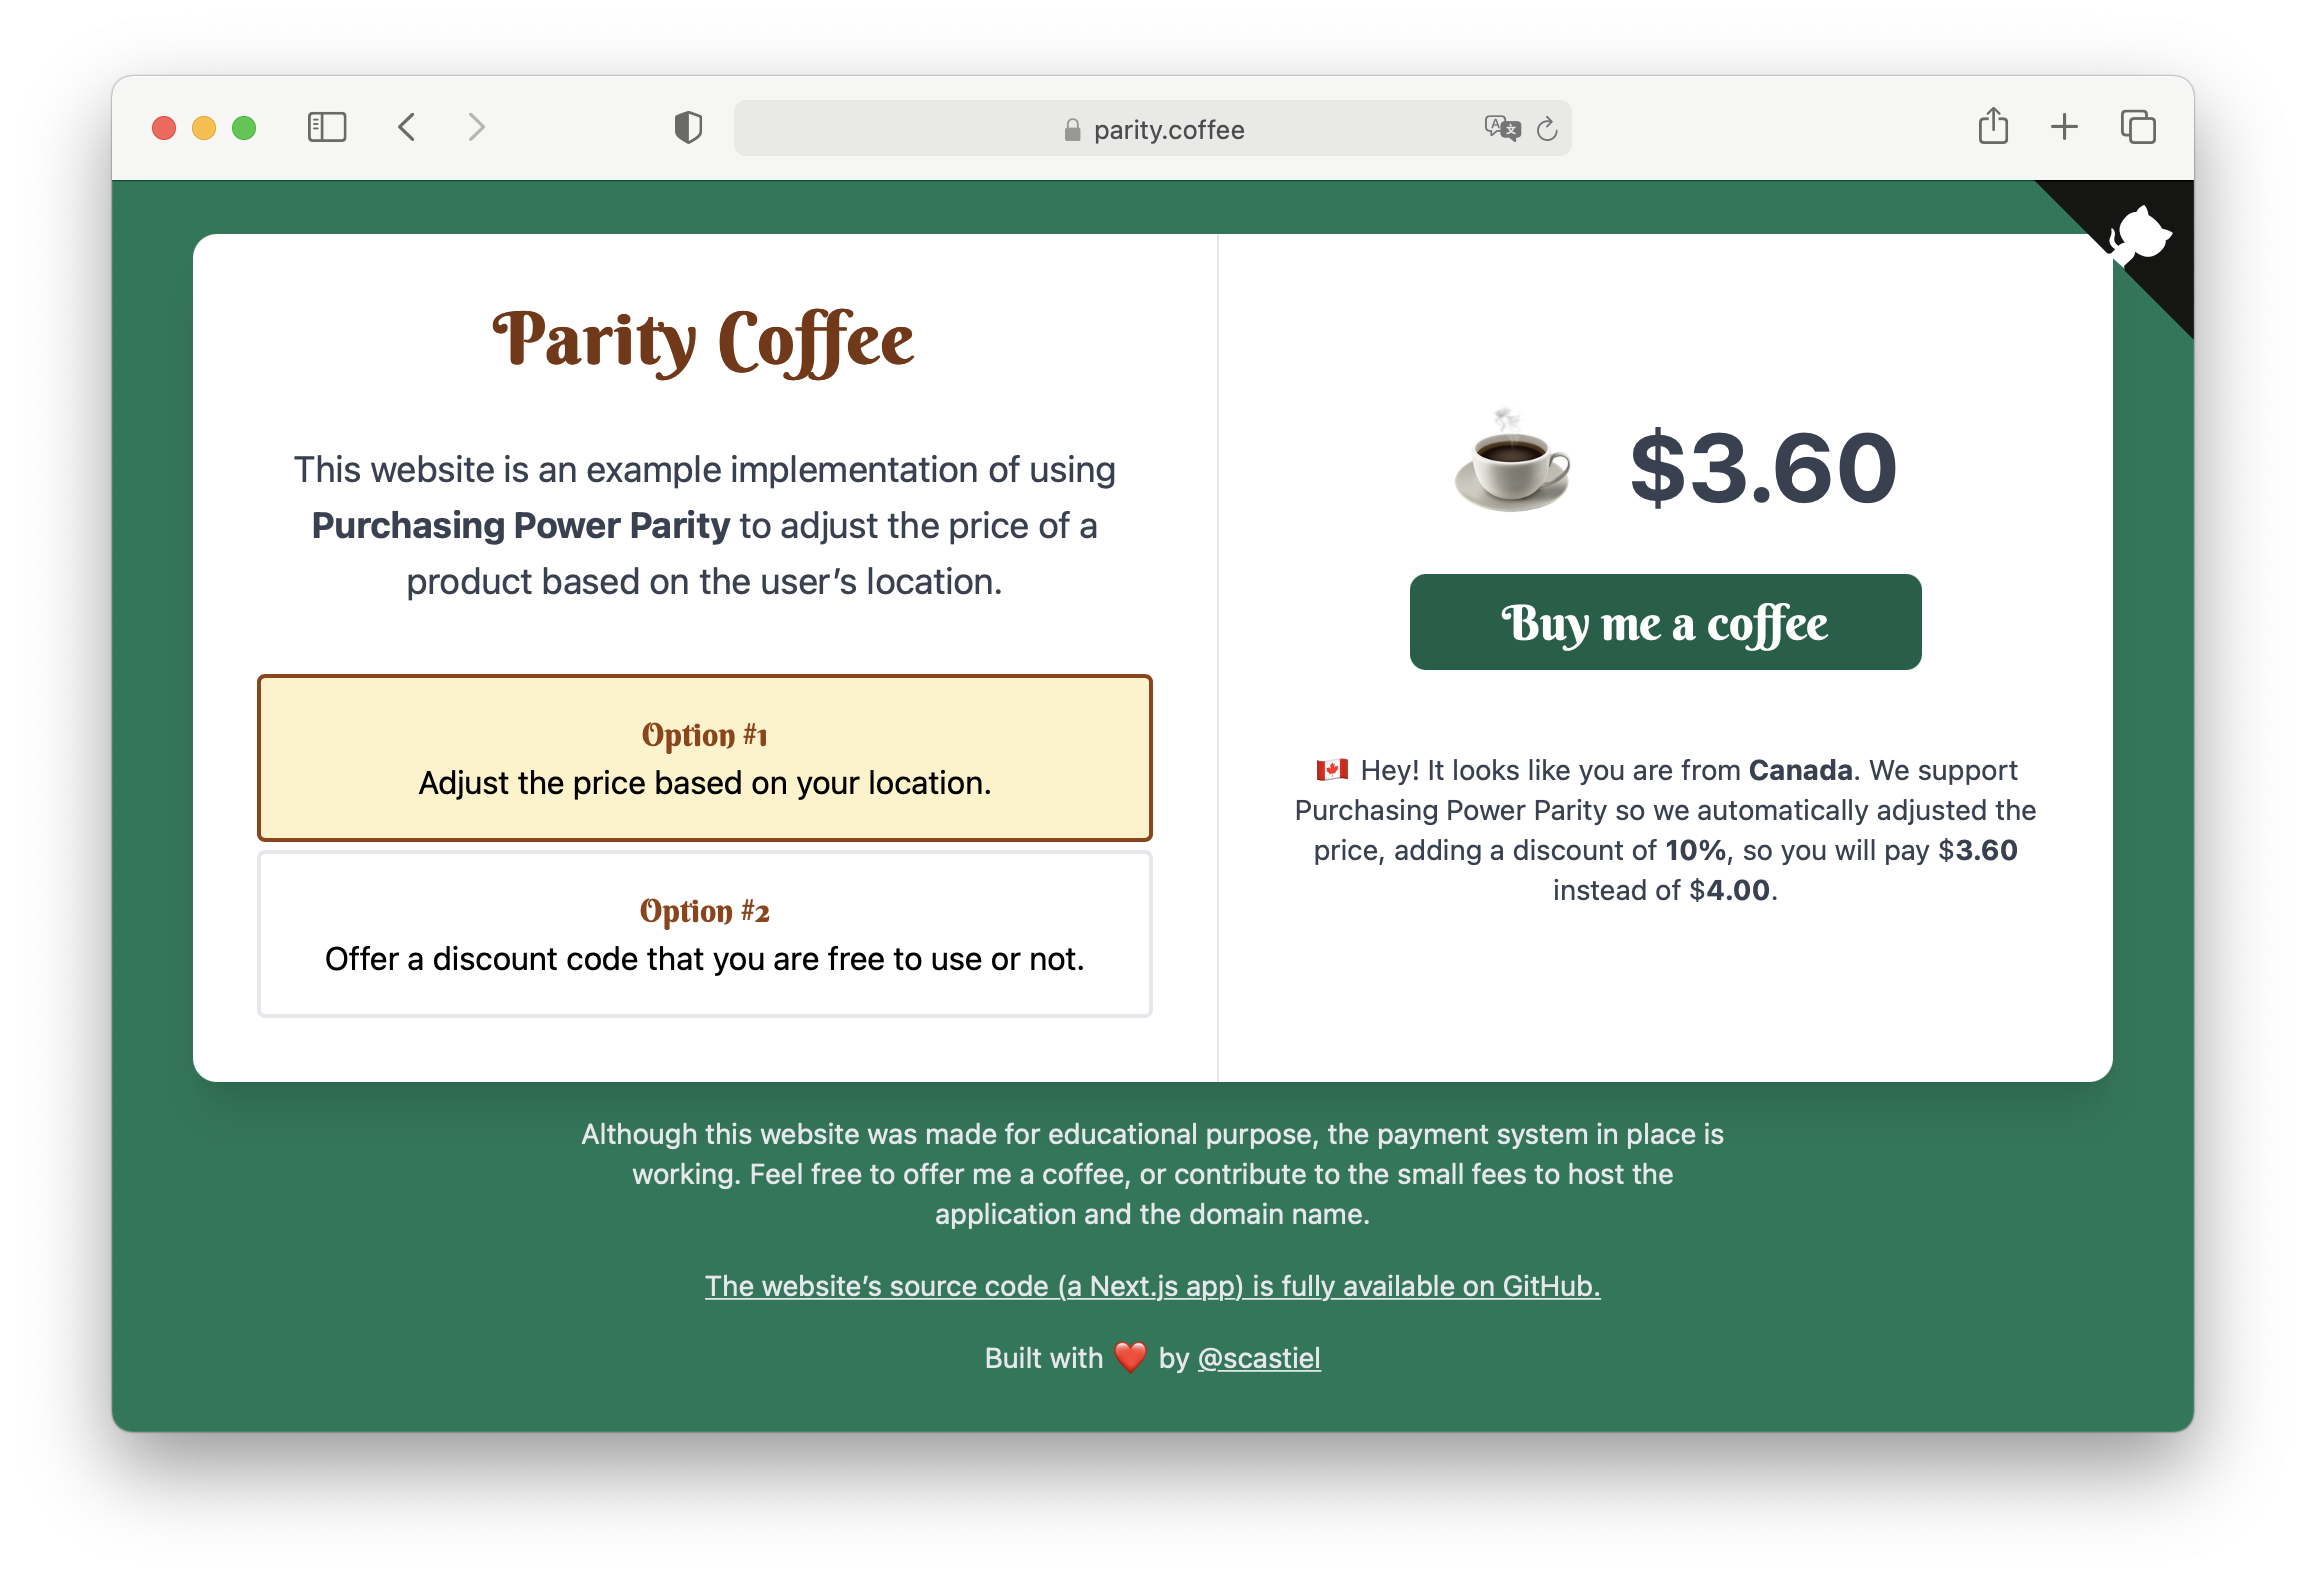
I created a small demo website to understand what it can look like when you offer purchasing power parity. Its source code is available on GitHub, and it presents an implementation for the two first options I will describe here.
For the payment with Stripe, I tried to be as close as possible to what they describe in their documentation about accepting a payment.
Option #1: adjust the price automatically
The first solution I tried on my course was to offer a price automatically inferred from the user’s country, using geolocation of their IP address.
This can be done using request-ip and geoip-lite packages with Node.js:
async function getCountryForRequest(req) {
  try {
    const clientIp = requestIp.getClientIp(req)
    return geoip.lookup(clientIp).country || null
  } catch (err) {
    console.error(err)
    return null
  }
}
When you have the country, the next step is to get the PPP conversion factor for this country. I used an API created by Robin Wieruch. Still, you can also use any list you find on the Internet with countries associated with their PPP conversion factor (or any other index: Spotify subscription price, Big Mac index…)
async function getConversionFactorForCountry(country) {
  try {
    const url = `https://api.purchasing-power-parity.com/?target=${country}`
    const res = await fetch(url)
    const { ppp } = await res.json()
    return ppp.pppConversionFactor
  } catch (err) {
    console.error(err)
    return 1
  }
}
Last step: we use the conversion factor to calculate your product's price dynamically from the user’s request.
import { BASE_PRICE } from '../prices'
// BASE_PRICE is 5000 in my case; note that the price in in
// cents to avoid issues with floating numbers in JavaScript.

async function getPriceFromRequest(req) {
  const country = await getCountryForRequest(req)
  const pppConversionFactor =
    (country && (await getConversionFactorForCountry(country))) || 1
  if (pppConversionFactor >= 1) {
    // Some countries have a PPP > 1, but
    // we don’t want to offer a negative discount!
    return { price: BASE_PRICE, discount: 0, country }
  }
  const price = Math.round(BASE_PRICE * pppConversionFactor)
  const discount = Math.round(100 * (1 - price / BASE_PRICE))
  return { price, discount, country }
}
This function has to be called at least in two places:
- in an endpoint called to display the price on your page, and
- in the endpoint used to create the checkout session.
To display the price on my course page, I created an endpoint /api/get-price, with this function:
async function getPrice(req, res) {
  const { price, discount, country } = await getPriceFromRequest(req)
  res.send({ price, discount, country })
}
Notice that I also return the discount (vs. the base price) and the country; they will be useful, as we’ll see in a minute.
I call this endpoint in my component, using a combination of useState and useEffect hooks:
const [priceInfo, setPriceInfo] = useState(null)

useEffect(() => {
  fetch('/api/get-price')
    .then((res) => res.json())
    .then((priceInfo) => setPriceInfo(price))
    .catch((err) => console.error(err))
}, [])
I can then display this price in my page:
<span>
{priceInfo ? (
// Reminder: the price is in cents
<span>${(priceInfo / 100).toFixed(2)}</span>
) : (
<span>Loading…</span>
)}
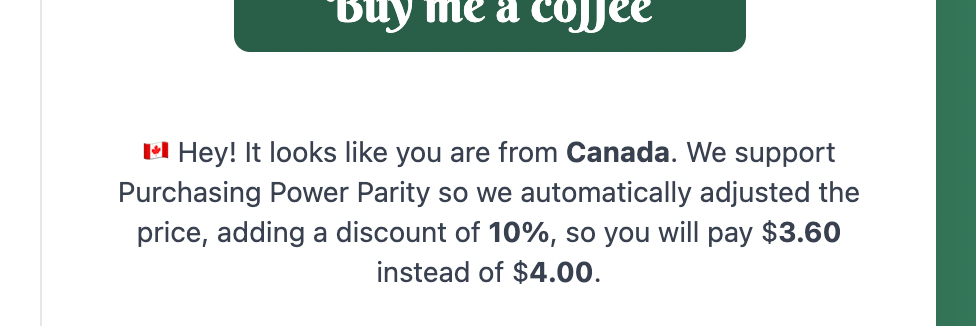
</span>I also asked the question (to myself and on Twitter): should I inform the user that they got a discount because of their location? And the answer I got (and it seems very wise) was a big YES.
So we can use the country and the discount returned by the endpoint to display a customized message:
{
  priceInfo.discount > 0 && (
    <p>
      {countryEmoji} Hey! It looks like you are from {countryName}. We support
      Purchasing Power Parity so we automatically adjusted the price, adding a
      discount of {priceInfo.discount}%.
    </p>
  )
}
Have a look here to know how to get the country name and emoji 😉
Ok, the price is automatically adjusted on the page, but we still need to adjust it when the user goes to the checkout page on Stripe. To do this, we have to call our getPriceFromRequest function in the create-checkout-session endpoint used to create the Stripe session:
export default async function createCheckoutSession(req, res) {
  const { price } = await getPriceFromRequest(req)

  const session = await stripe.checkout.sessions.create({
    payment_method_types: ['card'],
    line_items: [
      {
        price_data: {
          currency: 'usd',
          product_data: { name: 'One coffee' },
          unit_amount: price,
        },
        quantity: 1,
      },
    ],
    mode: 'payment',
    success_url: `${process.env.DOMAIN}?success=true`,
    cancel_url: `${process.env.DOMAIN}?cancel=true`,
  })
  res.json({ id: session.id })
}
With this solution, the discount is almost transparent for the user (we still display a message to inform them). They could almost believe that the price they see is the same as everyone sees.
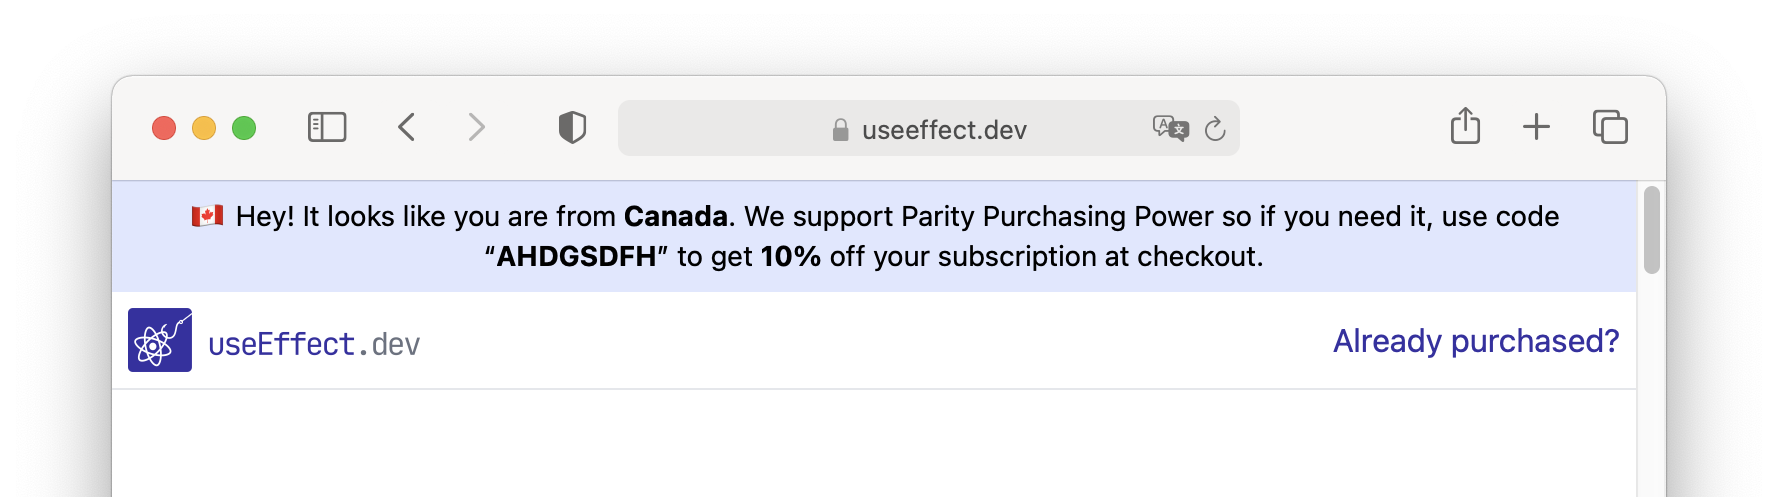
When I thought about it, something didn’t feel perfect with this solution. I felt the discount would be more convincing if the user had to enter a code during the checkout, so I tested the second option.
Option #2: offer a discount code
This option’s implementation is not very different from the first one. First, we’ll need the same functions getCountryForRequest and getConversionFactorForCountry. But, whereas in the previous implementation, we calculated the price using the conversion factor, this time, we’ll infer a discount code from this factor.
The idea is to define that for a factor between 0.9 and 1 there will be a code, another one for factors between 0.8 and 0.9, etc. You can put this association in a database for instance, but for my case it was good enough to hardcode them:
function getDiscountForConversionFactor(pppConversionFactor) {
  if (pppConversionFactor <= 0.1) return { code: 'CSVVSDVV', discount: 90 }
  if (pppConversionFactor <= 0.2) return { code: 'LLSJDLWF', discount: 80 }
  if (pppConversionFactor <= 0.3) return { code: 'KRUFLDLF', discount: 70 }
  if (pppConversionFactor <= 0.4) return { code: 'PJLKHJHI', discount: 60 }
  if (pppConversionFactor <= 0.5) return { code: 'AGEFDXSL', discount: 50 }
  if (pppConversionFactor <= 0.6) return { code: 'FDJGFYLX', discount: 40 }
  if (pppConversionFactor <= 0.7) return { code: 'SYSDJSMF', discount: 30 }
  if (pppConversionFactor <= 0.8) return { code: 'WUEJCCFJ', discount: 20 }
  if (pppConversionFactor <= 1.0) return { code: 'DHFVUFKE', discount: 10 }
  return { code: null, discount: null }
}
Note that I offer a discount for countries with a PPP of 1 (but not higher). I think being offered a discount code is always well-perceived by visitors.
Of course, the codes you have here must exist for your Stripe product, and they must remain secret! (These are for parity.coffee and can be used freely 😉.)
This time, you don’t have to fetch the price from an endpoint (it will be the same for everyone), but you have to fetch the user’s country's discount code.
async function getPrice(req, res) {
  const country = await getCountryForRequest(req)
  const pppConversionFactor =
    (country && (await getConversionFactorForCountry(country))) || 1
  const { discount, code } = await getDiscountForConversionFactor(
    pppConversionFactor
  )
  res.send({ discount, code, country })
}
Same as before, let’s display a banner to inform the user that they can get a discount:
{
  priceInfo.discount > 0 && (
    <p>
      {countryEmoji} Hey! It looks like you are from {countryName}. We support
      Purchasing Power Parity so if you need it, use code “{priceInfo.code}” to
      get {priceInfo.discount}% off your purchase at checkout.
    </p>
  )
}
Regarding the Stripe checkout session creation endpoint, there is no need here to adjust anything, except making sure to allow the client to enter a discount code:
export default async function createCheckoutSession(req, res) {
  const session = await stripe.checkout.sessions.create({
    payment_method_types: ['card'],
    line_items: [
      // ...
    ],
    allow_promotion_codes: true, // <-- Here!
    // ...
  })
  res.json({ id: session.id })
}
This option using discount codes is the one I currently use for my course. I can’t be sure it is better than the first one, neither will I ever be. But it makes more sense to me; plus, from what I’ve seen, it is more used than the first one, so it’s a good indicator.
Option #3: use an external service
The third option is not really another one, as it is the same principle as the second one (using discount codes), the difference being that you use an external service.
I’ve heard of two websites offering this service:
- ParityBar is a free website that will add a banner on your site informing the user that they can use a discount code (you configure your codes in their admin panel, and add them to Stripe too);
- Exportator offers roughly the same service, but as I can understand from their home page, it also offers premium features such as protection against VPNs, Stripe integration, and A/B testing.
I haven’t used any of these solutions since I was interested in developing my custom solution (and as I am trying to convince you here, it is not too complicated). But I assume ParityBar and Exportator target people who don’t have the desire or skills to code. I can imagine how convenient it can be to integrate a one-line script on a WordPress website to get PPP!
Which option should I choose?
I presented three options, and of course, now you expect me to reveal the best one. I’m afraid there isn’t! As I said, I chose the second one for my course (using discount codes), but it’s more by instinct, and each solution has its advantages and drawbacks:
- #1: Adjust the price automatically
- Advantages: almost transparent for the user. They don’t have anything to do to get the discount.
- Drawbacks: I fear that they don’t perceive that they get a discount. You have to code the price adjustment yourself.
- #2: Offer a discount code
- Advantages: by entering the discount code, the user can choose to use it or not (not everyone does!).
- Drawbacks: you have to maintain your discount codes in Stripe. You still have to code yourself the logic to get the applicable discount code.
- #3: Use an external service
- Advantages: you have nothing to code or maintain, just a script to add to your site. You can get premium features (protection against VPNs, integration with Stripe).
- Drawbacks: you don’t have control over the implementation. Premium features are not necessarily free.
I hope that with this exploration, you now have the elements to make your choice on how to use PPP to get fair pricing for your product.
On a personal note, I don’t have a lot of experience with serverless, and this small addition to my course selling page was also a fun exercise! I highly recommend you try it as well if you are in the same situation!
Additional resources
PPP is not a new concept, but I think it’s trending now, especially in the online course domain. As far as I know, Wes Bos was the first one to use it on his courses, and I heard about it for the first time by Zeno Rocha telling he used it for his Dracula Pro theme.
Jules Maregiano, creator of the Exportator service I mentioned earlier, published a list with excellent JavaScript online courses using PPP (I hope one day my course useEffect.dev will be in such lists 😇).
If you want to know more about the theory behind PPP, the dedicated pages on Investopedia and Wikipedia contain a lot of information. I also appreciated the article A Guide to the Purchasing Power Parity Theory on ThoughtCo.
Cover photo by Juliana Kozoski.
Recommend
About Joyk
Aggregate valuable and interesting links.
Joyk means Joy of geeK