

Blender Tutorial for Beginners: How To Make A Mushroom [FREE]
source link: https://www.kodeco.com/21459096-blender-tutorial-for-beginners-how-to-make-a-mushroom
Go to the source link to view the article. You can view the picture content, updated content and better typesetting reading experience. If the link is broken, please click the button below to view the snapshot at that time.
Learn how to make a 3D mushroom in this Blender tutorial for beginners!
Imagine you’re a game developer getting ready to make a 3D game. You’ve come up with some cool ideas and prepared some sound effects, everything is right in the world. That is, until you realize you have no clue how to create 3D models!
Don’t feel bad though, you’re not alone. In this situation, you have some options:
- Decide that a 2D game isn’t that bad after all
- Find free 3D models online
- Pay an artist to make some for you
- Create your own!
If you’ve never touched Blender before but want to be able to make some simple objects for use in your game, look no further – this tutorial is for you! Blender is a hugely popular free and open source 3D creation suite. Its main feature set includes 3D modeling, rigging, animating, simulating and rendering. Since version 2.8, Blender has become more streamlined and easier to use than ever. It’s now a perfect candidate for beginners delving into the world of 3D modeling!
In this Blender tutorial for beginners, you’ll learn the basic setup of Blender by creating a cute creature you will recognize from the 8-bit days. :]
This tutorial will only scratch the surface of what Blender can do, the stuff you need to know to get started making objects and using them in your games. At the end of this tutorial you’ll learn how to:
- Download and install Blender
- Navigate around the application
- Add and transform objects in Object Mode
- Edit objects in Edit Mode
- Unwrap an object’s UV map
- Create and use textures
- Exporting your files to common 3D formats
Getting Started
If you don’t have Blender installed on your computer, download the latest version here. This tutorial uses Blender 2.92, but with any version of Blender from 2.8 onward you’ll be able to follow along just fine.
Like other 3D modeling tools, Blender is a graphically intensive application; check out the system requirements before installing to make sure your rig will run Blender without any hiccups.
Once you have Blender installed, launch it and you’ll be greeted by a splash screen. Click anywhere outside of the splash screen to get started.

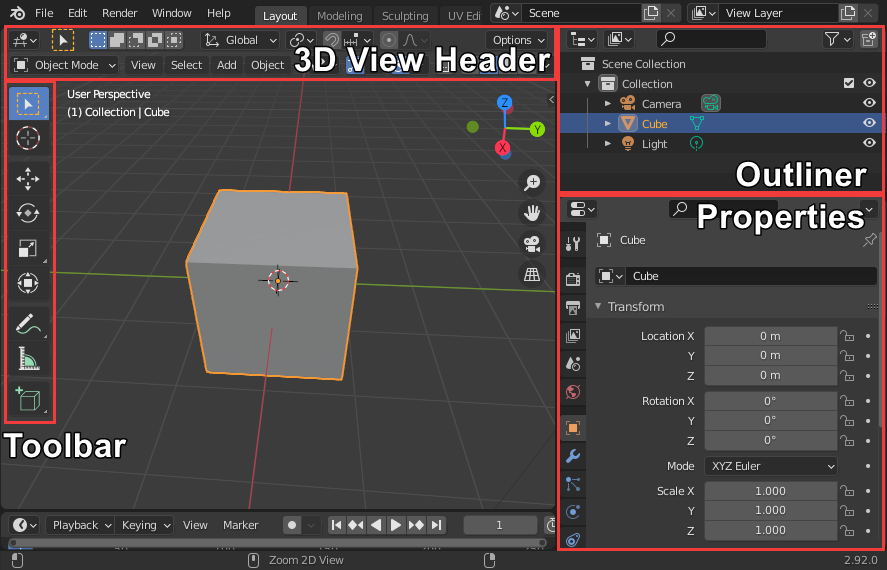
You now see the default scene that contains a cube, a camera and a light, as illustrated in the screenshot below:

These objects are located in the 3D view. You can orient yourself in the 3D space using the X, Y and Z axes:
- The X-axis is red and moves from left to right.
- The Y-axis is green and moves from front to back.
- The Z-axis is blue and moves from top to bottom.
To visualize this, Blender has a gizmo at the top right that acts like a 3D compass and colored lines on the grid.

There are five regions on the screen that you’ll use to create your 3D objects:
- Outliner: Lists all objects in your scene.
- Properties: Allows you to edit the properties of the selected scene and object.
- 3D View: Contains a 3D visualization of the objects in the scene.
- 3D View Header: A top menu with a collection of context-aware functions.
- Toolbar: Displays relevant tools for the mode you’re in.
Now that you know where to look, it’s time to cover a few more concepts that you’ll need before creating your first 3D model. Hang on tight!
Controlling Your View
Navigating around your 3D view is something you’ll be doing frequently, so you should get really comfortable with the navigational controls.
Navigating In a 3D Space
The primary ways to manipulate your view are as follows:
- To rotate around: hold the middle mouse button and drag around.
- To zoom in and out: Scroll up and down.
- To pan the view: Hold down Shift and the mouse scroll wheel, then drag around.

If you ever lose your way in the 3D view, press Period (.) on your numpad, this will snap your view back to the selected object.
Orthographic And Perspective Projection
There are two ways of projecting 3D objects on a 2D plane like your computer screen:
- Perspective : Objects further away in your view appear smaller, and lines on your objects display perspective distortion. This is how we perceive things with our eyes in real life.
- Orthographic: Objects are drawn linearly without any perspective distortion. This is more common for technical drawings and isometric games like SimCity and Diablo .

Although objects look more natural with a perspective projection, it’s easier to design your models using the orthographic projection where you can view and edit objects on a flat plane without any distortions caused by distance.
Perspective is the default projection for new scenes. To switch between projections, click on the projection toggle button at the top right of the 3D view. It looks like a grid:

Alternatively, press 5 on your numpad to do the same.

Customizing The Regions
To resize a region, simply mouse over the edge until your cursor changes to a resize icon and drag to change expand or shrink the region:

To create another region, click and drag the black corner at the top right or bottom left of the current region inwards. To merge it with an existing region, do the same but drag the corner outwards to another region. Here’s a demonstration:

Adding regions like this can be useful to get multiple angles of a 3D model at once while you’re modeling. This way, you can have a front view in one 3D view, and a side view in another!

Manipulating Objects in Object Mode
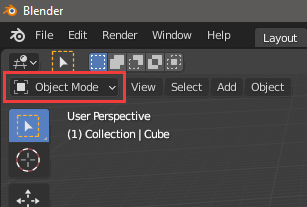
Blender works in different interaction modes. Up until now, you’ve been working in Object mode, where you can add, delete and manipulate objects. Later on in this tutorial, you’ll switch over to Edit mode, where you can edit the vertices, edges and faces of meshes. To check what mode you’re currently in, take a look at the left side of the 3D view.
Selecting Objects
The cube in your scene should have an orange outline; this means that it’s selected. Here are a few ways to quickly select and deselect objects:
- Select: Simply click on an object to select it.
- Deselect: Click anywhere outside the object to deselect it.
- Select all: Press the A key to select all objects.
- Deselect all: Press ALT/Option + A or double tap A to deselect all objects.

Deleting Objects
You’re here to create a mushroom, not a sugar cube, so you’ll need to get rid of the cube. Select it and press either the X or Delete key to banish it from the scene.

If you accidentally deleted the wrong object, you can undo your last action by pressing CTRL/Command + Z.
3D Cursor
Now you’re ready to add some new shapes to your scene. But how do you know where they’ll be added? That’s where the 3D cursor comes in!
The 3D cursor is a point in 3D space where new objects and other geometry will be created. It looks like a red and white circle with a 3D cross in the middle.

With every new scene, the 3D cursor is sitting in the middle of the grid, the origin. You can manually move the cursor by selecting the 3D Cursor tool in the toolbox and clicking anywhere in the 3D view.

Make sure to activate the Box Select tool again by clicking the top button in the toolbox once you’re done.
To reset your 3D cursor to the origin, select Object ► Snap ► Cursor to World Origin in the 3D View Header or press Shift + S and choose Cursor to World Origin.

Adding Objects
Press Shift + A to display the Add menu and select Mesh. You’ll be presented with all built-in shapes that you can add, select Cylinder here to generate a new cylinder.

Now that you have a cylinder in your scene, click on the Add Cylinder button on the bottom left of the 3D View. This pops out a menu with the available options for your new shape. These only appear immediately after you add an object and before you’ve done any other editing, so now’s your chance to get the settings right!
You can either click the field and type in the values, or you can scrub back and forth with the mouse to set the values. Modify the following properties in the left-hand panel as follows:
- Vertices: 10
- Radius: 1.5 m
- Depth: 3 m
- Cap Fill Type: Triangle Fan
Leave all other properties as-is. Your panel should appear as below:

The cylinder looks like this now:

Transforming Objects in Object Mode
In Object Mode, you can move, scale or rotate objects. This can be accomplished using shortcut keys, tools and using the Transform properties.
Transforming with Shortcut Keys
To transform an object using the shortcut keys, first ensure the object is selected. Next, press the key to begin the action and move the mouse to adjust the transform. The further you move the mouse, the greater the effect. To complete a transform, you simply left click, to discard the changes you right click.
The shortcut keys for transforms are as follows:
- Move: G
- Scale: S
- Rotate: R
Try scaling the cylinder up a bit! Make sure it’s selected, press the S key and move your cursor outwards until you’re satisfied with the change. Once the cylinder has grown a bit, left click anywhere in the 3D View to confirm:

You can constrain transforms to a particular axis by pressing its letter: X, Y, or Z. So, if you only want to scale along the Z axis, press S, and then press Z:

Feel free to play around with the cylinder by moving, scaling and rotating it. Just make sure to undo the action each time using CTRL/Command + Z.
Transforming Using Tools
The second method to transform your object is by using the Move, Rotate, Scale and Transform tools from the Toolbar.

Select the Move tool from the Toolbar and drag the blue arrow up with your mouse. You should see the object translate along the Z-axis. Undo this change by pressing CTRL/Command + Z.

The Scale and Rotate tools work exactly the same. The Transform tool combines the three other transform tool into a single gizmo.

Transforming with Properties
The third method of transforming — editing the object properties directly — offers the most control. You can use this method if you need very specific control over the shape and position of your object.
Make sure the Object Properties tab is active in Properties region. You can transform the object by changing its Location, Rotation, and Scale values directly, as shown below:


That covers the most important aspects of Object Mode. Now it’s time to edit the vertices, edges, and faces of the object!
Editing Objects in Edit Mode
Edit Mode is where you delve deep into the details of an object and change its geometry. To enter Edit Mode, select the object to be edited and press Tab.

You’ll see that the object turns orange and all of its edges and points are highlighted. The icons at the left of the 3D View Header tell you which select mode you are in: vertex mode (left icon), edge mode (middle icon), or face mode (right icon), as shown below:


At the moment, you’re in Vertex mode, with everything in your object selected. Double tap the A key to deselect everything and click one of the vertices to select it. Hold down Shift and click another vertex to add it to the selection. Finally deselect everything again.

Loop Cut and Slide
At the moment, your object doesn’t look much like a mushroom, does it? Before you can deform your cylinder to look like a mushroom, you’ll need to add a few more segments. To add segments you’ll need to do a loop cut; either activate the Loop Cut tool from the Toolbox or press the CTRL/Command + R shortcut to start creating a new loop cut.

Now move your mouse over the side of the cylinder, and you’ll see a yellow edge ring show up.

Now the exact way this works depends on the way you start the loop cut:
- Loop Cut Tool: Click and drag the ring, you’ll notice it will turn orange and will follow your cursor. Drag the ring about up until there’s about a third left, then release the mouse button.
- Loop Cut Shortcut: Click once so the ring turns orange and starts following your cursor. Drag the ring about up until there’s about a third left, then click to confirm.

If you don’t like where the loop ended up, use CTRL/Command + Z to undo the action.
Now double tap the A key to deselect all vertices.
Selecting Vertices, Edges, and Faces
You could select the edges to be moved by holding Shift and clicking, each of them, but that can be cumbersome when you’ve got a lot of edges to select. Fortunately, there are several ways to select multiple items!
Selection Tools
Click and hold the Select Box Tool in the Toolbox. Most of the tool icons have little arrows indicating they’re part of a group. In the case of the Select Box Tool, it’s part of a selection tools group, so you can switch to a Select Circle Tool or a Select Lasso Tool.

You can activate another tool in the same group by releasing your mouse button while hovering over the tool you want to use.

Here’s an overview of the selection tools:
- Select Box: Drag and hold a selection box around a selection. Release to confirm.
- Select Circle: Drag and hold a circle over a selection. Release to confirm
- Select Lasso: Drag and hold a free-form shape around a selection. Release to confirm.
With each of these, holding Shift while selecting will add to the selection and holding CTRL/Command will remove from the selection.

Edge Loop Selection Shortcut
Besides the selection tools, there’s another way to select an edge loop, with a handy shortcut! Hold ALT/Option and click on an edge in the loop you want to select, this will select the whole loop. As with other ways of selecting, holding Shift while doing this will add to your selection and holding CTRL/Command will subtract from the selection.
Transforming Edges, Vertices, and Faces
Transforming edges, vertices, and faces is very similar to transforming an entire object: you can use the same tools and shortcuts to move, rotate and scale your selection. I will focus on the shortcut keys as it’s good practice to use and remember those, but feel free to use the tools from the Toolbar instead.
Select the horizontal edge loop you added last if it isn’t selected yet, press the G key to move the vertices followed by the Z key to constrain the movement to the Z-axis. Now move your cursor up until the edge loop is near the top of the model and click to confirm.

Add some more detail to the cylinder by doing two more loop cuts near the bottom. Use either the Loop Cut Tool or the CTRL/Command + R shortcut to do this.

Now it’s time to alter the edges and faces to create the top of your mushroom!
Select the top edge loop and press S to scale the edge loop. Next, drag your cursor inwards so the edge loop shrinks and confirm with a click:

Next, you need to make the bottom edge of the top of the mushroom larger than the top. Select the second and third edge loops from the bottom and scale them up until you get a nice mushroom cap shape. Remember to hold Shift to add to your selection.

The lower edge of your mushroom looks a little thin, time to learn another trick! Double tap A to deselect everything and select just the third edge loop from the top. Now double tap the G key, this activates Edge Slide mode, which allows you to slide edges between edge loops smoothly. Move your cursor up until the bottom faces are a fair bit bigger and click to confirm.

It’s looking more like a mushroom now!
Using the Extrude Tool
Your mushroom head is looking pretty good, but every good mushroom needs a stalk! You’ll do this by using the extrude tool.
Move the view around so you can see the bottom of the mushroom head. You’re going to create the stalk by extruding the bottom faces of your mushroom head.
Switch to Face Select mode by clicking the Face Select icon or press the 3 key on your number row.

Now select the inner fan of faces on the bottom using any of the selection techniques and press the E key to start extruding. As soon as you do so, your mouse movement extrudes the selected faces, creating a stem. Move your cursor down until the stem is about as big as the cap and click to confirm.

Now extrude the same faces one more time just a bit to create the rounded bottom of the stalk.

Now scale the faces inward by a small amount to create a beveled edge.
[spoiler title=”Solution Inside: Can’t remember how to scale?”]
Press the S key, move inwards with your cursor and click to confirm.
[/spoiler]
Your mushroom should look similar to this fine specimen:

Changing the Object Origin
Your mushroom is sprouting up nicely! However, at the moment your mushroom is almost fully buried underground, as shown in this front view:

You’ll need to move your mushroom upwards a little bit to have it sitting properly on the XY plane. You could just eyeball it, select all faces and move the whole mesh up until it looks about right, but it’s good practice to align things neatly. In order to get the mushroom placed perfectly, you will need to do some steps:
- Move the 3D cursor to the lowest center point of the mushroom.
- Set the origin of the mushroom to to where the 3D cursor is at.
- Move the mushroom to the world origin.
To start off, double tap the A key to deselect everything. Next, switch to Vertex Select mode and select the center bottom vertex in the stalk.

Now press Shift + S and choose Cursor to Selected. The 3D cursor moved to the selected vertex, which is exactly where the origin should be placed.

Hit Tab to switch to Object Mode. Right click the mushroom and choose Set Origin ► Origin to 3D Cursor to move the origin to the bottom.

Now move the mushroom back to the world origin by setting its position to (X:0, Y:0, Z:0). Either change its Z location to 0 in the Properties region or simply press ALT/Option + G to clear the location, Blender is all about shortcuts after all!

Making a “pop” sound effect is optional while doing this, but it sure is fun. :]
Now don’t forget to save all your hard work. Navigate to File ► Save, or simply press CTRL/Command + S to open the save dialog. Next, choose a good location, name your project “Mushroom.blend” and hit Enter twice or click the Save As button.
At this point you’ve already created a mushroom from scratch so pat yourself on the back! While your mushroom could be used as-is if you really wanted to, I hope you’ll agree that a dash of color would make it even better.
Coloring the Mushroom
Coloring an object in Blender is done in three steps:
- Applying a material
- Unwrapping the mesh into a 2D texture that you can paint on (called a UV wrap)
- Painting on the UV wrap
Applying a Material
Start off with activating the Material Properties tab in the Poperties region.

The Material Properties tab contains a list of materials available to the selected object. Time to add the first material to the mushroom! Click the New button below the list, you’ll see a new material appear in the list with a bunch of material properties below it:

The material is currently named “Material.001”. Give it a more descriptive name by clicking the material name and type in “Mushroom” followed by Enter to confirm the name change.

There are lots of ways you can change your material, but leave it as-is for now, since you’ll be adding a texture later in this tutorial.
Unwrapping a Mesh
The next step is to unwrap the mesh so that you have a flat “canvas” to paint on. This is much like peeling an orange and laying the peel down flat on a table.
The easiest way to start the unwrapping process is by switching to the UV Editing workspace. You can switch workspaces by clicking on the tabs at the top, so click on the one that’s labeled UV Editing.

A workspace is a predefined region layout. Up until now you’ve been modeling in the Layout workspace, which is meant for general modeling tasks. The UV Editing workspace is split into two main regions: an UV Editor and a 3D View in Edit Mode.

Right now the UV editor is blank because you haven’t unwrapped anything yet. Place your cursor in the right-hand window and hit A to select all vertices. You might notice that the UV map on the left is displaying the default map for a cylinder now, since that gets generated automatically when creating a new mesh. That map won’t be usable though, since it doesn’t match the mushroom mesh. That would be like trying to wrap a nice poster around a plush doll, lots of weird bends all over the place.
Time to create a brand new UV map! Imagine your model as if it’s made out of paper and you need to make cuts in it along the edges until you can lay it out flat on a table in separate pieces. That’s basically the gist of what UV unwrapping is, fully mapping a 3D object to a 2D image.
The “cuts” in this case are called seams, just like the ones you’d find on your clothes or plushies. To start creating seams, you need to be in Edge Select mode first, so click on the Edge Select button in the 3D View Header or press 2 on your number row.

Deselect all edges by double tapping A. Next, select these four edge loops by holding ALT/Option and clicking the edges:

Now right click and select Mark Seam. You’ll notice that those edges have become bright red.

Blender can now figure out where to cut into the model to create a flat UV map. To update the UV map on the left based on the seams you made, press the A key to select all edges followed by U and select Unwrap.

You’ll now see a map similar to this in the UV Editor:

Creating the Texture
Now that you have unwrapped the mesh, you need to add an image for the mesh to be mapped to. This is like drawing or painting on the “paper pieces” you laid out on the table while having a copy of the original model that’s linked to the pieces, reflecting everything you do.
Click the New button in the header of the UV Editor on the left to start creating an image texture.

A small menu pops up for you to fill in, leave everything at their default values except for the name, put “MushroomTexture” in there and click OK.

The background of the UV Editor now becomes black, this is the image you just created. Before you start editing the image, it’s a good idea to save it as an image next to your .blend file. Select Image ► Save in the header (or press Alt/Option + S) and press the Save As Image button to save the image as a PNG.

Preparing the Material
You might have noticed that the mushroom still looks pretty gray. This is because the base color in its material is still set to a solid white color. To link your texture to the mushroom’s material, open the Material Properties tab in the Properties section and click the small yellow button next to Base Color. A selection menu will open up, select Image Texture here so Blender knows the colors will come from an image texture.

Next, click the image dropdown button left from the New button and select MushroomTexture.

Now switch to the Texture Paint workspace by clicking the tab with the same name at the top of the Blender window.

Now the mushroom looks pitch black and is finally ready for painting!

Using Your Brush
The Texture Paint workspace consists of two regions: an Image Editor in Paint Mode on the left and a 3D View in Texture Paint Mode on the right. The Image Editor is used to paint onto your texture, while you can paint directly on the 3D model in the 3D View.

Time to add a splash of color to this mushroom!
Right now, the edges of your virtual brush hold a lot less paint than the center, while you want more of a permanent marker at this point, nice and full. To achieve this, change the falloff curve of your brush in the Properties region to be a straight line by clicking the Falloff menu open en choosing the last icon in the series.

Now you’re ready to do some painting, choose a color you like in the color picker wheel. I’m going with a bright red. You can click the color on the left for a more detailed color menu where you can set the saturation or even the hex value.

With your color chosen, click and drag over the mushroom in the 3D View to paint its cap. Rotate the view around and zoom in and out to get a good look at what you’re doing. You can change the size of the brush by pressing the F key, moving your cursor until you found the right size and clicking to confirm.
Don’t worry if the color get somewhere you don’t want it, you can use CTRL/Command + Z to undo your last action, or just leave it as-is and fix it in the next steps!

Here’s how mine looks like after adding this first color:

If you take a look at the UV map, that could be a piece of art by itself!

Now for the rest of the mushroom, I’m going with an off-white color, but feel free to choose any color you like.

Using a Mask
It’s time for a new trick to make things easier! You can mask out parts of your model so only those faces can get paint on them. If you ever painted in real life before, this like applying painter’s tape next to the parts you’re giving a fresh lick of paint so you don’t accidentally paint something you didn’t want to.
To create a mask, press the Tab key when hovering over the 3D View to enter Edit Mode and activate Face Select mode by pressing 3 on your numpad or by clicking the corresponding icon in the header. Now select the faces you just painted and press the CTRL/Command + I to invert your selection, thus selecting the black faces.

Now switch back to Texture Paint Mode by pressing Tab and click the little button between the mode dropdown and the View button, this activates the Paint Mask. All faces of the mushroom where you can’t paint are now faded and lighter in color.

Now paint away all around the model without worry, you can’t paint over your first color.

For a final touch, I’m going to add white spots and a face to the mushroom. Why? Because I can! Make sure to disable the Paint Mask first by clicking that little button again, this way you can paint with total freedom once again.
For these final features, I’m going to be using pure white and pure black. First some white spots on the head, then two black stretched circles for the eyes and then a point of white in each to emulate some bright light hitting it. Like this:

You can do the same, or do something completely different. I’d love to see what you came up with so make sure to share your creation in the discussion below!
Now save your texture to its file by hovering over the Image Editor and pressing ALT/Option + S or by selecting Image ► Save in the header. This is a crucial step, as you can imagine the horror of forgetting to save your nice paint job and returning to Blender to see a black mushroom, ouch.
The last thing you need to do is export your masterpiece so you can use it in your game or application.
Exporting Files
Depending on the specifications of your game engine, API, etc. of choice you need to export to a different 3D format. Always check the documentation of your tool before choosing a format.
The two most popular formats are FBX and OBJ: FBX is a proprietary file format owned by Autodesk that holds both the mesh and material data in a single file. OBJ on the other hand is an open format developed by Wavefront Technologies. It’s a simple data format that only holds mesh data, the material description is stored in a separate MTL file. For both of these, any textures are stored separately in image formats like JPG, PNG or TIFF.
Blender has a lot more export options built-in and even more can be added via add-ons, but in this tutorial I’ll go over the basics of exporting FBX and OBJ files. For both of these, you’ll need the Mushroom.png image file to use as a texture, so keep both the exported 3D file(s) and that image in the same folder.
Before delving into exporting, switch back to the Layout workspace by clicking its tab at the top and make sure to select just the mushroom by clicking on it. It should have an orange outline.

By default, the exporters will export everything in the scene, including any cameras and lights. By selecting just the mesh(es), you can easily only export the 3D data you want.
Exporting to FBX
Select File ► Export ► FBX (.fbx) in the top menu to open an export window. This is essentially the same as the file save window, with some specific options on the right for exporting. Check the Selected Objects checkbox here to only export the mushroom mesh.

That’s it! You should already be in the same folder as your .blend file and the texture image, so click the blue Export FBX button at the bottom to create a brand new FBX.
Exporting to OBJ
The procedure for exporting to the OBJ is almost exactly the same.
Select File ► Export ► Wavefront (.obj) in the top menu to open an export window. Check the Selected Objects checkbox and click the blue Export OBJ button at the bottom. This creates two files: Mushroom.obj with the 3D mesh data and Mushroom.mtl which holds the material data.
Now that you have the model in popular 3D formats, you can put mushrooms in all of your games, applications or even 3D print some if you’re feeling wacky like yours truly!

Where to Go From Here?
I hope you enjoyed this Blender tutorial for beginners! If you want to learn more about Blender, there are lots of tutorials online:
- Blender Tutorials: Great official tutorials from Blender, especially the Get Started section.
- Blender Guru: This guy is a legend among Blender enthusiasts. His tutorials cover just about everything, from creating 3D donuts to mastering shaders.
- Grant Abbitt’s YouTube Channel: YouTube is full of great people that can tell you all about Blender, and Grant Abbitt is one of my personal favorites.
Now you’re ready to conquer the 3D world, and most importantly, have fun and be creative!
We hope you enjoyed this tutorial. If you have any questions or comments, please join the forum discussion below. Feel free to share your creations as well!

Created by Eric Van de Kerckhove.
Contributors
Over 300 content creators. Join our team.
Recommend
About Joyk
Aggregate valuable and interesting links.
Joyk means Joy of geeK