

大数据Hadoop之—Apache Hudi 数据湖实战操作
source link: https://www.51cto.com/article/721101.html
Go to the source link to view the article. You can view the picture content, updated content and better typesetting reading experience. If the link is broken, please click the button below to view the snapshot at that time.
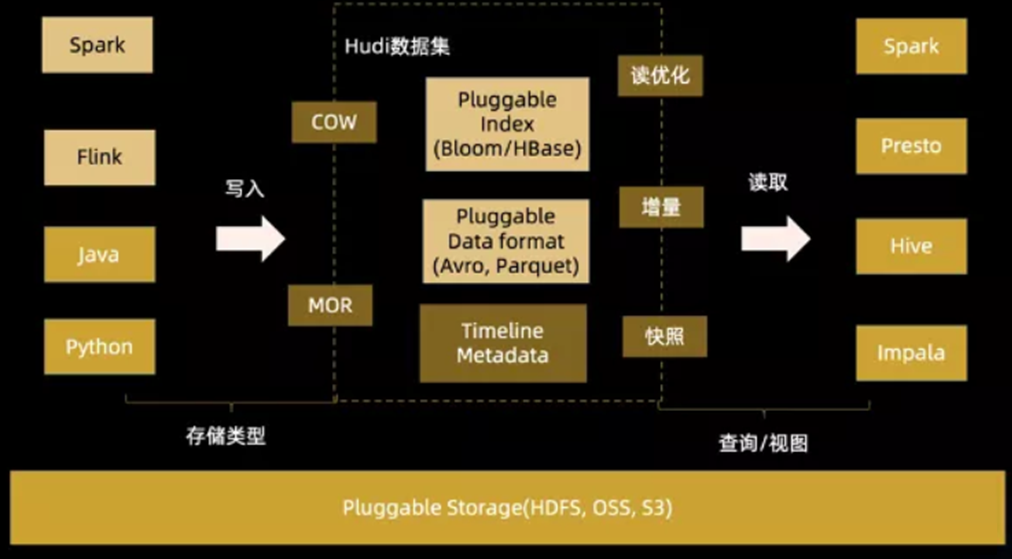
Hudi(Hadoop Upserts Deletes and Incrementals),简称Hudi,是一个流式数据湖平台,支持对海量数据快速更新,内置表格式,支持事务的存储层、 一系列表服务、数据服务(开箱即用的摄取工具)以及完善的运维监控工具,它可以以极低的延迟将数据快速存储到HDFS或云存储(S3)的工具,最主要的特点支持记录级别的插入更新(Upsert)和删除,同时还支持增量查询。
GitHub地址:https://github.com/apache/hudi
官方文档:https://hudi.apache.org/cn/docs/overview
关于Apache Hudi 数据湖 也可以参考我这篇文章:大数据Hadoop之——新一代流式数据湖平台 Apache Hudi
二、Hudi CLI
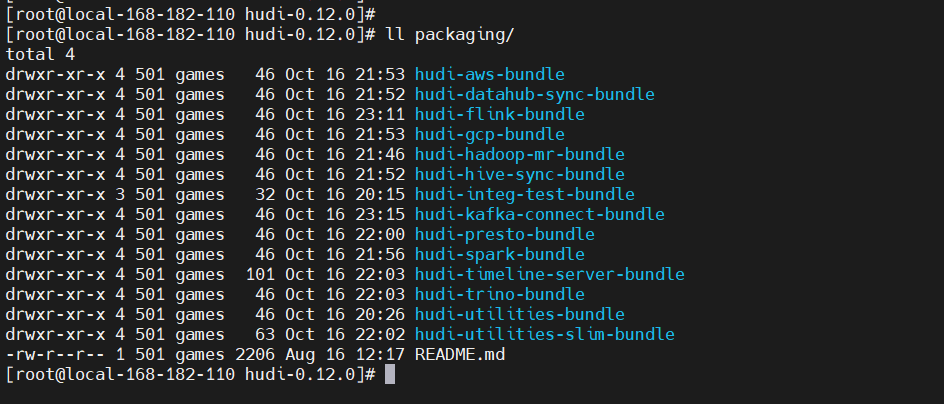
构建hudi后,可以通过cd hudi cli&&./hudi-cli.sh启动shell。一个hudi表驻留在DFS上的一个称为basePath的位置,我们需要这个位置才能连接到hudi表。Hudi库有效地在内部管理此表,使用.hoodie子文件夹跟踪所有元数据。
编译生成的包如下:
# 启动
./hudi-cli/hudi-cli.sh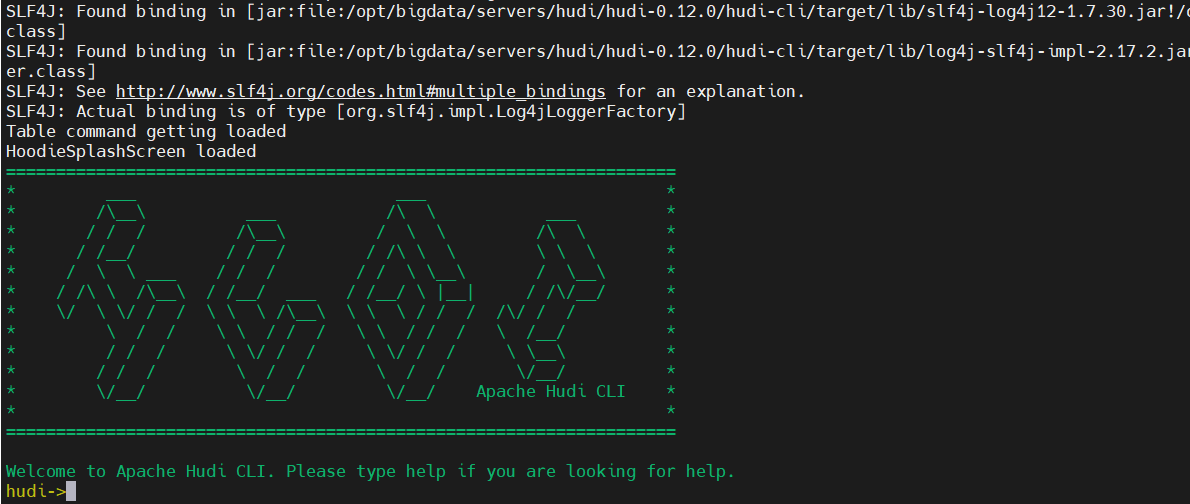
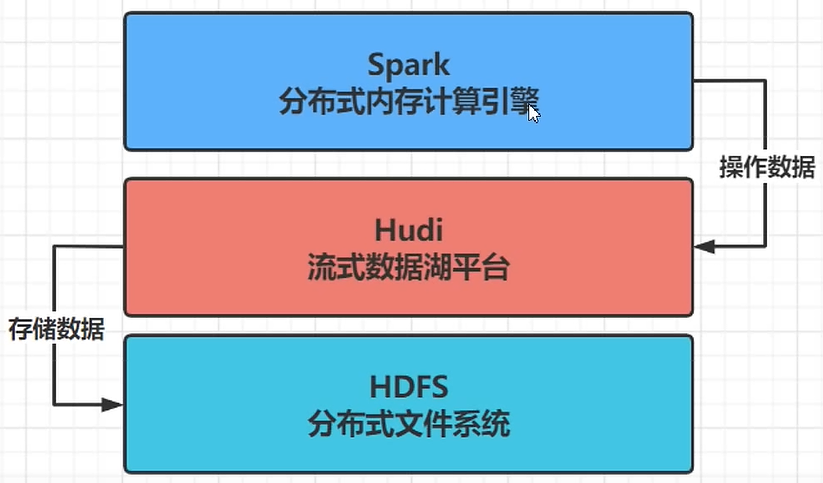
三、Spark 与 Hudi 整合使用
Hudi 流式数据湖平台,协助管理数据,借助HDFS文件系统存储数据,使用Spark操作数据。
1)Spark 测试
cd $SPARK_HOME
hdfs dfs -mkdir /tmp/
hdfs dfs -put README.md /tmp/
hdfs dfs -text /tmp/README.md

# 启动spark-shell
./bin/spark-shell --master local[2]

val datasRDD = sc.textFile("/tmp/README.md")
# 行数
datasRDD.count()
# 读取第一行数据
datasRDD.first()
val dataframe = spark.read.textFile("/tmp/README.md")
dataframe.printSchema
dataframe.show(10,false)
2)Spark 与 Hudi 整合使用
官方示例:https://hudi.apache.org/docs/quick-start-guide/在spark-shell命令行,对Hudi表数据进行操作,需要运行spark-shell命令是,添加相关的依赖包,命令如下:
- 启动spark-shell
【第一种方式】在线联网下载相关jar包
### 启动spark-shell,使用spark-shell操作hudi数据湖
### 第一种方式
./bin/spark-shell \
  --master local[2] \
  --packages org.apache.hudi:hudi-spark3.2-bundle_2.12:0.12.0 \
  --conf 'spark.serializer=org.apache.spark.serializer.KryoSerializer' \
  --conf 'spark.sql.catalog.spark_catalog=org.apache.spark.sql.hudi.catalog.HoodieCatalog' \
  --conf 'spark.sql.extensions=org.apache.spark.sql.hudi.HoodieSparkSessionExtension'

### 上述命令需要联网,基于ivy下载下载相关jar包到本地,然后加载到CLASSPATH,其中包含三个jar包。
【第二种方式】离线使用已经下载好的jar包。
### 第二种方式,使用--jars
cd /opt/apache
wget https://repo1.maven.org/maven2/org/apache/spark/spark-avro_2.12/3.3.0/spark-avro_2.12-3.3.0.jar

cd $SPARK_HOME
./bin/spark-shell \
--master local[2] \
--jars  /opt/apache/hudi-0.12.0/packaging/hudi-spark-bundle/target/hudi-spark3.2-bundle_2.12-0.12.0.jar,/opt/apache/hudi-0.12.0/hudi-examples/hudi-examples-spark/target/lib/unused-1.0.0.jar,/opt/apache/spark-avro_2.12-3.3.0.jar \
--conf 'spark.sql.catalog.spark_catalog=org.apache.spark.sql.hudi.catalog.HoodieCatalog' \
--conf "spark.serializer=org.apache.spark.serializer.KryoSerializer"- 导入park及Hudi相关包
import org.apache.hudi.QuickstartUtils._
import scala.collection.JavaConversions._
import org.apache.spark.sql.SaveMode._
import org.apache.hudi.DataSourceReadOptions._
import org.apache.hudi.DataSourceWriteOptions._
import org.apache.hudi.config.HoodieWriteConfig._
import org.apache.hudi.common.model.HoodieRecord
val tableName = "hudi_trips_cow"
# 存储到HDFS
val basePath = "hdfs://hadoop-hadoop-hdfs-nn:9000/tmp/hudi_trips_cow"
# 存储到本地
# val basePath = "file:///tmp/hudi_trips_cow"- 模拟生成Trip乘车数据
##构建DataGenerator对象,用于模拟生成10条Trip乘车数据
val dataGen = new DataGenerator

val inserts = convertToStringList(dataGen.generateInserts(10))
其中,DataGenerator可以用于生成测试数据,用来完成后续操作。
- 将模拟数据List转换为DataFrame数据集
##转成df
val df = spark.read.json(spark.sparkContext.parallelize(inserts,2))

##查看数据结构
df.printSchema()
##查看数据
df.show()
# 指定字段查询
df.select("rider","begin_lat","begin_lon","driver","end_lat","end_lon","fare","partitionpath","ts","uuid").show(10,truncate=false)- 将数据写入到hudi
# 将数据保存到hudi表中,由于Hudi诞生时基于Spark框架,所以SparkSQL支持Hudi数据源,直接通过format指定数据源Source,设置相关属性保存数据即可,注意,hudi不是正真存储数据,而是管理数据。

df.write.format("hudi").
  options(getQuickstartWriteConfigs).
  option(PRECOMBINE_FIELD_OPT_KEY, "ts").
  option(RECORDKEY_FIELD_OPT_KEY, "uuid").
  option(PARTITIONPATH_FIELD_OPT_KEY, "partitionpath").
  option(TABLE_NAME, tableName).
  mode(Overwrite).
  save(basePath)

## 重要参数说明
#参数:getQuickstartWriteConfigs,设置写入/更新数据至Hudi时,Shuffle时分区数目
#参数:PRECOMBINE_FIELD_OPT_KEY,数据合并时,依据主键字段
#参数:RECORDKEY_FIELD_OPT_KEY,每条记录的唯一id,支持多个字段
#参数:PARTITIONPATH_FIELD_OPT_KEY,用于存放数据的分区字段
本地存储
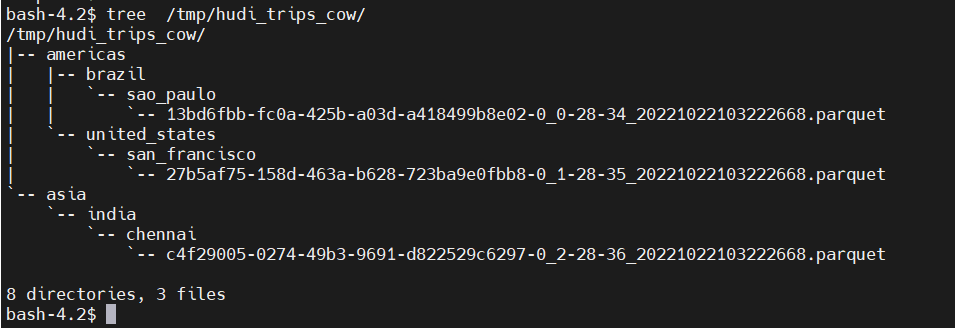
HDFS 存储
四、Flink 与 Hudi 整合使用
官方示例:https://hudi.apache.org/docs/flink-quick-start-guide
1)启动flink集群
下载地址:http://flink.apache.org/downloads.html
### 1、下载软件包
wget https://dlcdn.apache.org/flink/flink-1.14.6/flink-1.14.6-bin-scala_2.12.tgz
tar -xf flink-1.14.6-bin-scala_2.12.tgz
export FLINK_HOME=/opt/apache/flink-1.14.6

### 2、设置HADOOP_CLASSPATH
# HADOOP_HOME is your hadoop root directory after unpack the binary package.
export HADOOP_CLASSPATH=`$HADOOP_HOME/bin/hadoop classpath`
export HADOOP_CONF_DIR='/opt/apache/hadoop/etc/hadoop'

### 3、启动单节点flink 集群
# Start the Flink standalone cluster,这里先修改slot数量,默认是1,这里改成4
# taskmanager.numberOfTaskSlots: 4
cd $FLINK_HOME
./bin/start-cluster.sh

# 测试可用性
./bin/flink run  examples/batch/WordCount.jar
2) 启动flink SQL 客户端
# 【第一种方式】指定jar包
./bin/sql-client.sh embedded -j ../hudi-0.12.0/packaging/hudi-flink-bundle/target/hudi-flink1.14-bundle-0.12.0.jar shell

# 【第二种方式】还可以将jar包放在$FINK_HOME/lib目录下
3)添加数据
-- sets up the result mode to tableau to show the results directly in the CLI
SET 'sql-client.execution.result-mode' = 'tableau';

CREATE TABLE t1(
  uuid VARCHAR(20) PRIMARY KEY NOT ENFORCED,
  name VARCHAR(10),
  age INT,
  ts TIMESTAMP(3),
  `partition` VARCHAR(20)
)
PARTITIONED BY (`partition`)
WITH (
  'connector' = 'hudi',
  'path' = 'hdfs://hadoop-hadoop-hdfs-nn:9000/tmp/flink-hudi-t1',
  'table.type' = 'MERGE_ON_READ' -- this creates a MERGE_ON_READ table, by default is COPY_ON_WRITE
);

INSERT INTO t1 VALUES ('id1','Danny',23,TIMESTAMP '1970-01-01 00:00:01','par1');
-- insert data using values
INSERT INTO t1 VALUES
  ('id1','Danny',23,TIMESTAMP '1970-01-01 00:00:01','par1'),
  ('id2','Stephen',33,TIMESTAMP '1970-01-01 00:00:02','par1'),
  ('id3','Julian',53,TIMESTAMP '1970-01-01 00:00:03','par2'),
  ('id4','Fabian',31,TIMESTAMP '1970-01-01 00:00:04','par2'),
  ('id5','Sophia',18,TIMESTAMP '1970-01-01 00:00:05','par3'),
  ('id6','Emma',20,TIMESTAMP '1970-01-01 00:00:06','par3'),
  ('id7','Bob',44,TIMESTAMP '1970-01-01 00:00:07','par4'),
  ('id8','Han',56,TIMESTAMP '1970-01-01 00:00:08','par4');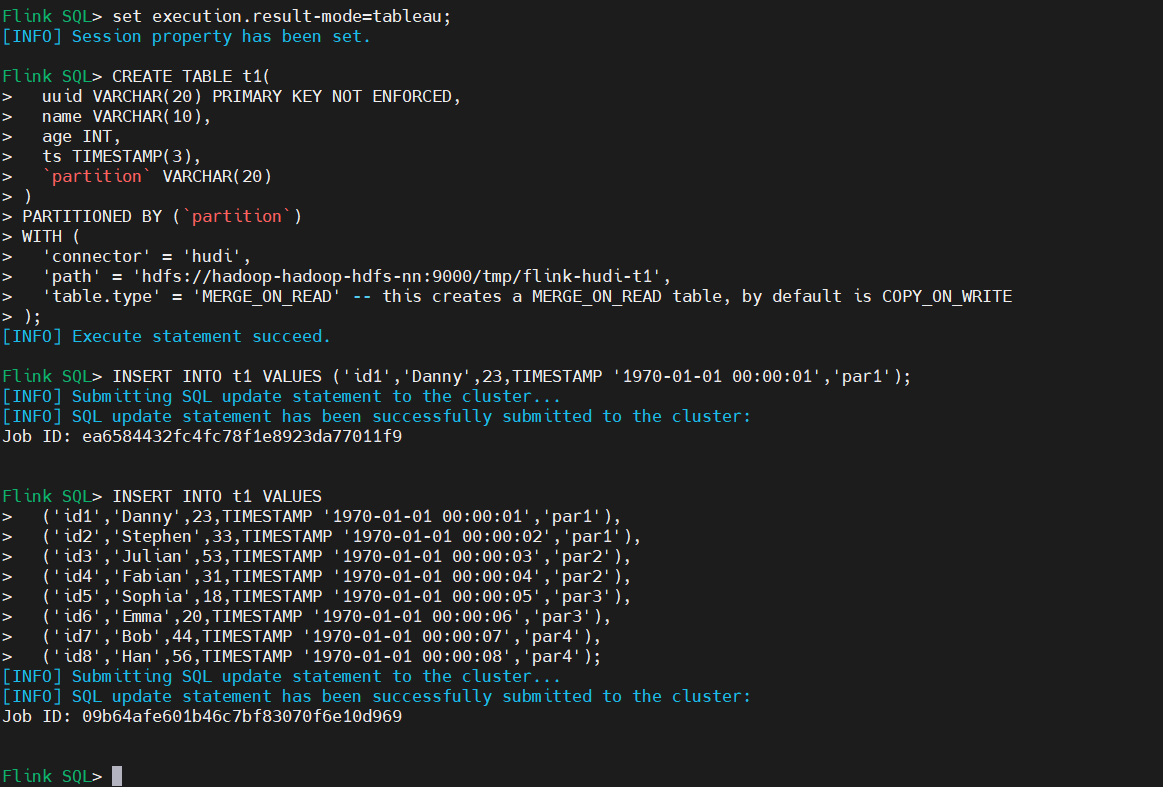
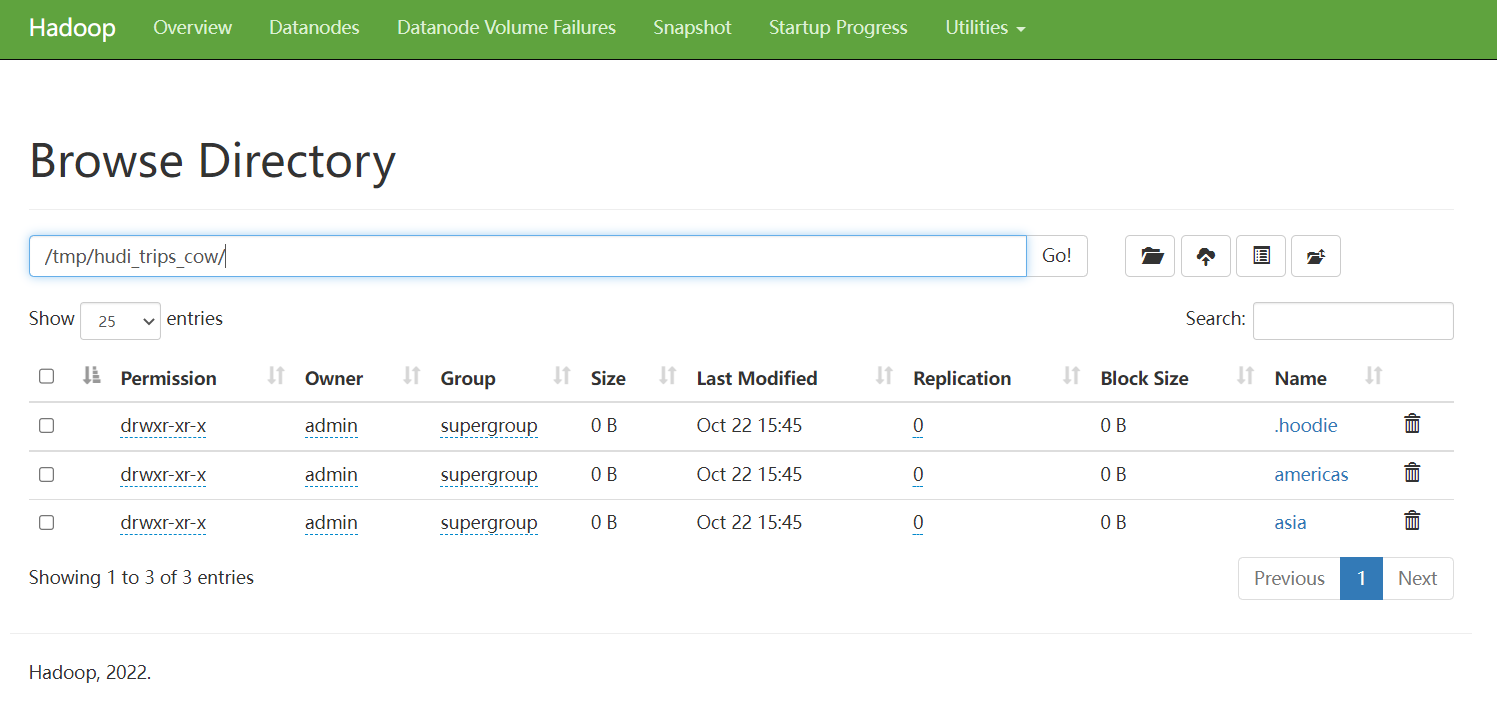
HDFS上查看

4)查询数据(批式查询)
select * from t1;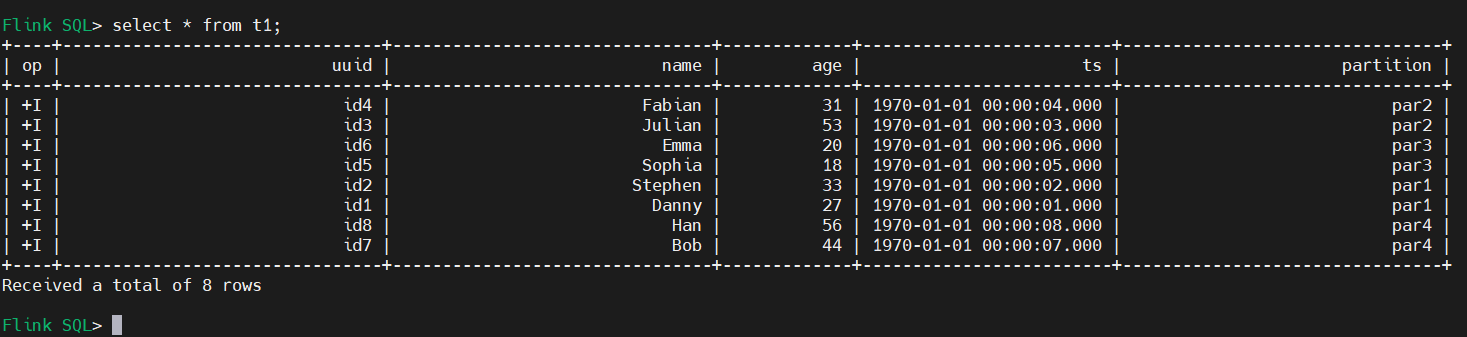
5)更新数据
-- this would update the record with key 'id1'
insert into t1 values
  ('id1','Danny',27,TIMESTAMP '1970-01-01 00:00:01','par1');
6)Streaming Query(流式查询)
首先创建表t2,设置相关属性,以流的方式查询读取,映射到上面表:t1。
- read.streaming.enabled设置为true,表明通过streaming的方式读取表数据;
- read.streaming.check-interval指定了source监控新的commits的间隔时间4s;
- table.type设置表类型为 MERGE_ON_READ;
CREATE TABLE t2(
  uuid VARCHAR(20) PRIMARY KEY NOT ENFORCED,
  name VARCHAR(10),
  age INT,
  ts TIMESTAMP(3),
  `partition` VARCHAR(20)
)
PARTITIONED BY (`partition`)
WITH (
  'connector' = 'hudi',
  'path' = 'hdfs://hadoop-hadoop-hdfs-nn:9000/tmp/flink-hudi-t1',
  'table.type' = 'MERGE_ON_READ',
  'read.streaming.enabled' = 'true',  -- this option enable the streaming read
  'read.start-commit' = '20210316134557', -- specifies the start commit instant time
  'read.streaming.check-interval' = '4' -- specifies the check interval for finding new source commits, default 60s.
);

-- Then query the table in stream mode
select * from t2;
注意:查看可能会遇到如下错误:
[ERROR] Could not execute SQL statement. Reason:
java.lang.ClassNotFoundException:
org.apache.hadoop.hive.ql.io.parquet.MapredParquetInputFormat
【解决】添加hadoop-mapreduce-client-core-xxx.jar和hive-exec-xxx.jar到Flink lib中。
cp /opt/apache/hadoop-3.3.2/share/hadoop/mapreduce/hadoop-mapreduce-client-core-3.3.2.jar $FLINK_HOME/lib
cp ./hudi-0.12.0/hudi-examples/hudi-examples-spark/target/lib/hive-exec-2.3.1-core.jar $FLINK_HOME/lib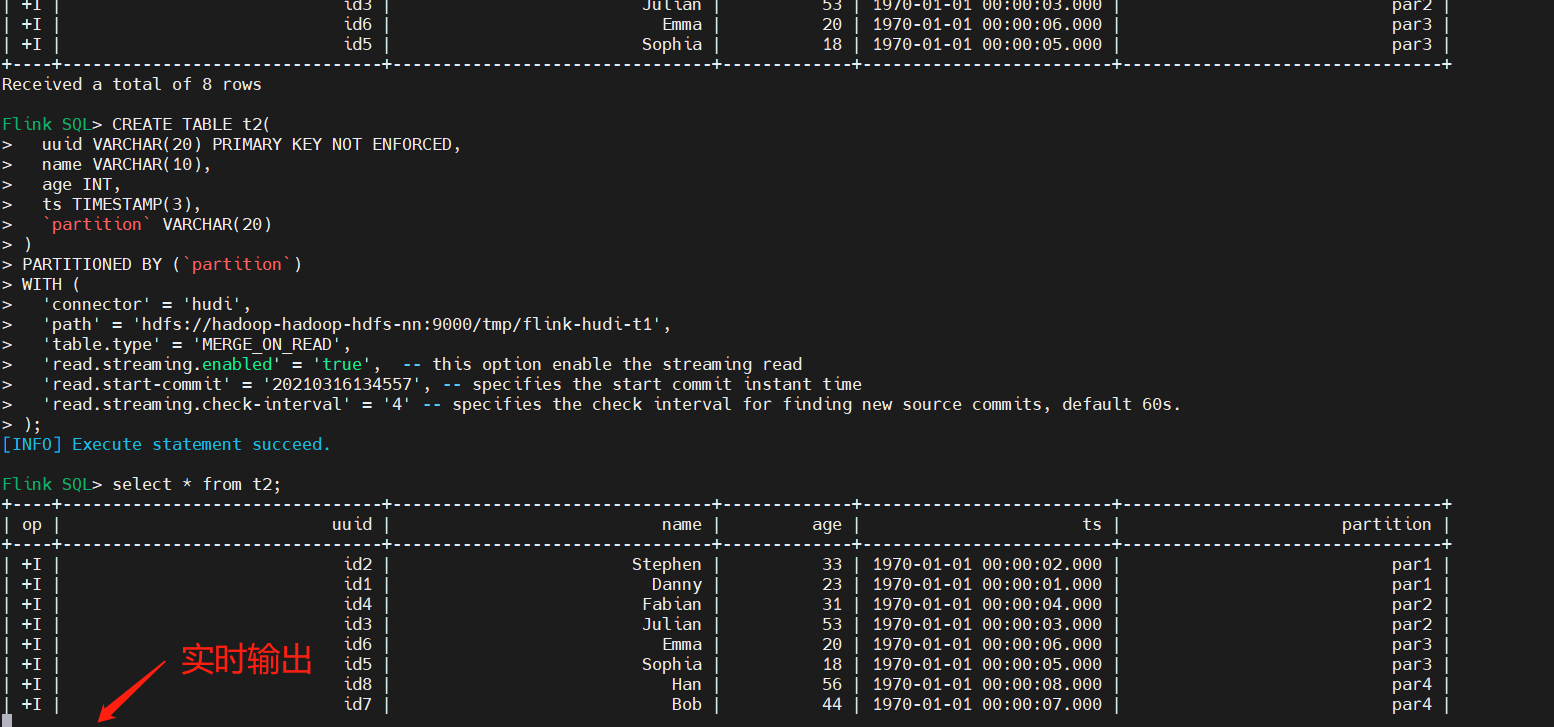
Recommend
About Joyk
Aggregate valuable and interesting links.
Joyk means Joy of geeK