

OpenHarmony - 基于ArkUI(eTS)开发石英钟表自定义组件
source link: https://blog.51cto.com/harmonyos/5682399
Go to the source link to view the article. You can view the picture content, updated content and better typesetting reading experience. If the link is broken, please click the button below to view the snapshot at that time.
OpenHarmony - 基于ArkUI(eTS)开发石英钟表自定义组件
精选 原创作者: 余香鑫
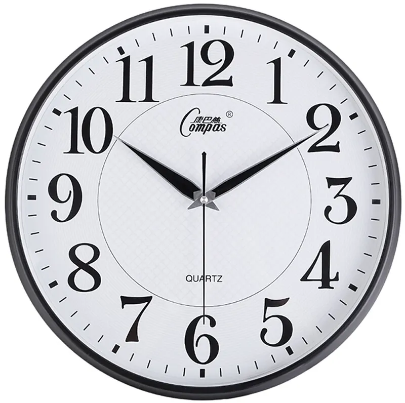
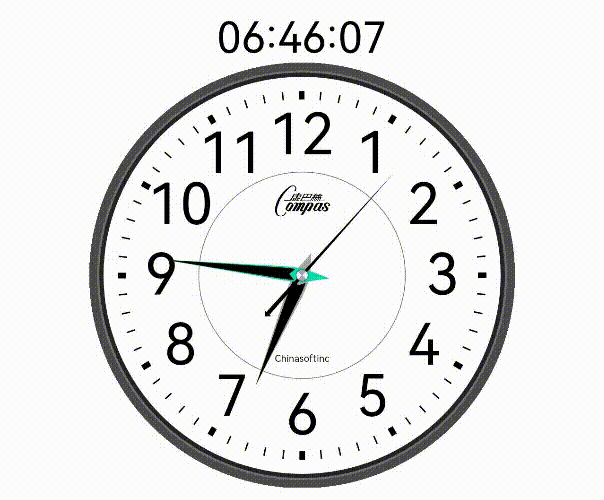
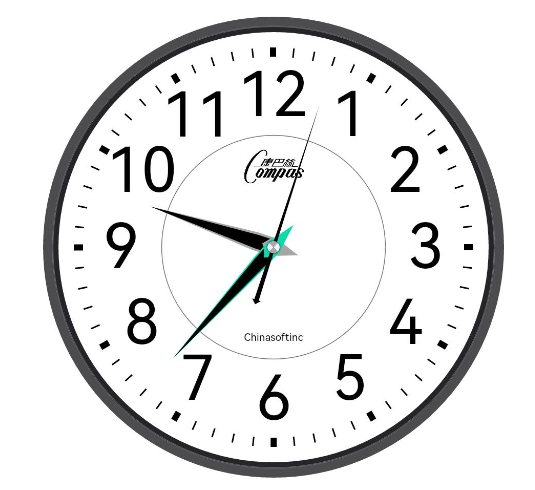
最近项目有用到Canvas组件,想扩展熟悉下eTS Canvas组件,便有了这个项目。先看下实现效果,左边是参考样例, 右边是最终实现效果
(原生字体看起来不太协调, 但没有找到换字体的方法)
| 原型 | 实现效果 |
|---|---|
 |
 |
-
开发环境
-
IDE: DevEco Studio 3.0 Beta4
-
SDK: API9,3.2.5.5
开始之前, 我们需要对Canvas有一些基础概念
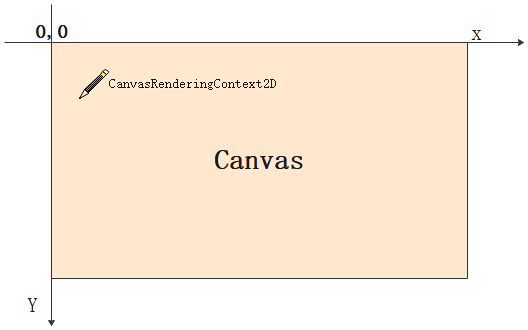
- Canvas是画布组件, 默认坐标原点在左上顶点. 构造函数接收一个
CanvasRenderingContext2D对象, 可以理解为画笔Paint, 它提供了绘制矩形、文字、图片等API, 还支持对Canvas缩放、
旋转、平移等能力, 基于这些能力, 我们可以实现常规组件难以实现的效果
-
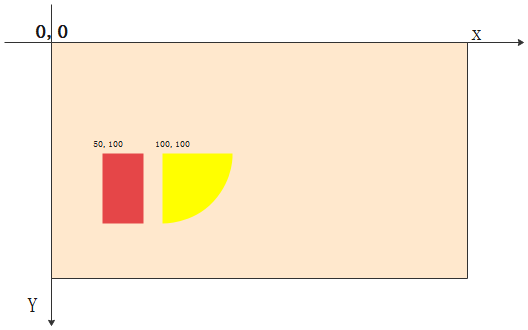
beginPath和closePath接口, 一个Canvas只能设置一个CanvasRenderingContext2D对象, 在绘制不同区域不同样式时为了不了会互相干扰,
绘制之前调用CanvasRenderingContext2D#beginPath()方法重置路径, 绘制结束调用 CanvasRenderingContext2D#closePath()方法结束绘制区间, 以下为示例// 绘制一个直角, 填充色为 Red canvas.beginPath() canvas.fillStyle = Color.Red.toString() // 起点为 50, 100; width=30, height=50 canvas.fillRect(50, 100, 30, 50) canvas.closePath() // 绘制一个0-90度的弧形, 填充色为 Yellow canvas.beginPath() canvas.fillStyle = Color.Yellow.toString() canvas.moveTo(100, 100) // 起点为 100, 100; 半径=50 canvas.arc(100, 100, 50, 0, toCanvasAngle(90)) canvas.fill() canvas.closePath()
-
需求拆解: 参照原型图示, 按动静模型可以拆分为背景表盘和旋转的分秒指针. 背景表盘由由外框和时间刻度组成, 主要使用绘制弧形和文字接口, 时分秒指针需要根据时间计算出旋转角度, 对画布旋转对应角度后再绘制上即可
-
封装RectF: Canvas绘制时经常需要用到坐标点和大小, 我们可以定义一个class RectF, 维护表盘绘制区域的上下左右4个点的位置, 以便计算绘制区域大小和中心点
class RectF {
  public left: number
  public top: number
  public right: number
  public bottom: number

  constructor(left: number, top: number, right: number, bottom: number) {
    this.left = left
    this.top = top
    this.right = right
    this.bottom = bottom
  }

  width(): number{
    return this.right - this.left
  }

  height(): number{
    return this.bottom - this.top
  }

  centerX(): number{
    return (this.right + this.left) * 0.5
  }

  centerY(): number{
    return (this.top + this.bottom) * 0.5
  }
}
1. 绘制Canvas组件
在页面build函数下添加Canvas组件, 初始化CanvasRenderingContext2D对象, 确定绘制区域
@Entry
@Component
struct Clocks {
  // 表盘绘制大小
  componentSize = 300
  // 表盘显示区域
  displayRect: RectF
  // 画笔
  canvas: CanvasRenderingContext2D = new CanvasRenderingContext2D(new RenderingContextSettings(true))

  aboutToAppear() {
    this.displayRect = new RectF(0, 0, this.componentSize, this.componentSize)
  }

  build() {
    Column() {
      Canvas(this.canvas)
        .height(this.componentSize)
        .width(this.componentSize)
        .onReady(() => {
          let canvas = this.canvas
          let displayRect = this.displayRect

          canvas.fillStyle = '#ffe0ad5d'
          canvas.fillRect(0, 0, displayRect.width(), displayRect.height())
        })
    }
    .width('100%')
    .height('100%')
    .justifyContent(FlexAlign.Center)
  }
2. 绘制表盘外圈和内圈
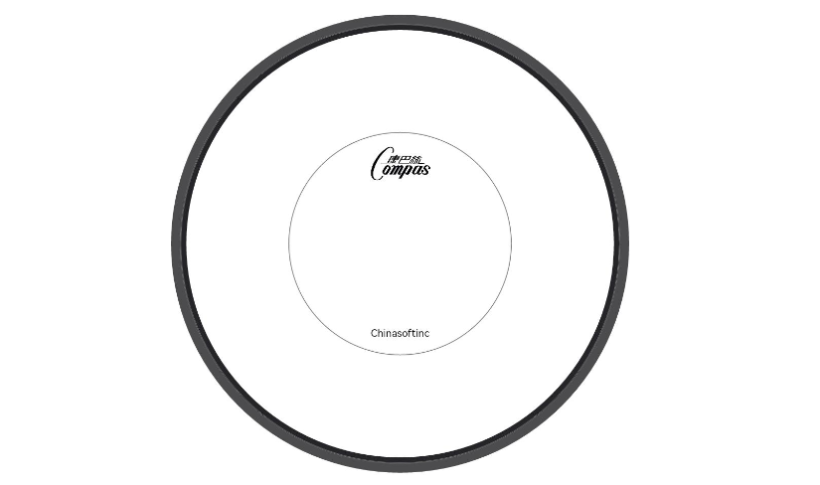
表盘外圈由一个深灰色#4C4C4E的外层和和黑色#252529内层组合, 使用绘制弧形再填充即可实现. 但还需要镂空中部使用canvas.globalCompositeOperation属性可以实现
  drawDial(canvas: CanvasRenderingContext2D, displayRect: RectF, innerRect: RectF) {
    // 绘制外圈
    canvas.save()
    this.fillCircle(displayRect.centerX(), displayRect.centerY(), displayRect.radius(), '#4C4C4E')
    this.fillCircle(displayRect.centerX(), displayRect.centerY(), displayRect.radius() - this.outCircleWidth, '#252529')
    // 镂空中部
    canvas.globalCompositeOperation = 'destination-out'
    this.fillCircle(displayRect.centerX(), displayRect.centerY(), displayRect.radius() - this.outCircleWidth - this.outCircleInnerWidth)
    canvas.restore()

    // 外圈中线
    canvas.beginPath()
    canvas.strokeStyle = '#ff726f6f'
    canvas.arc(displayRect.centerX(), displayRect.centerY(), displayRect.radius() - this.outCircleWidth, 0, toCanvasAngle(360))
    canvas.arc(displayRect.centerX(), displayRect.centerY(), displayRect.radius() - this.outCircleWidth - 0.5, 0, toCanvasAngle(360))
    canvas.stroke()
    canvas.closePath()

    // 轮盘下方文字
    canvas.beginPath()
    canvas.fillStyle = Color.Black.toString()
    canvas.font = '20px sans-serif'
    let bottomText = 'Chinasoftinc'
    let bottomTextMetrics = canvas.measureText(bottomText)
    canvas.fillText(bottomText, innerRect.centerX() - bottomTextMetrics.width / 2, innerRect.centerY() + this.innerRadius - 12)
    canvas.closePath()

    // 上方品牌标识
    let vendorImgWidth = 45
    let vendorImgHeight = vendorImgWidth / 1.74
    canvas.drawImage(this.vendorImg, innerRect.centerX() - vendorImgWidth / 2, innerRect.centerY() - this.innerRadius + 7, vendorImgWidth, vendorImgHeight)

    // 内圆
    canvas.beginPath()
    canvas.lineWidth = 0.5
    canvas.strokeStyle = '#727478'
    canvas.arc(innerRect.centerX(), innerRect.centerY(), this.innerRadius, 0, toCanvasAngle(360))
    canvas.stroke()
    canvas.closePath()
  }
3. 绘制时间刻度线和小时数
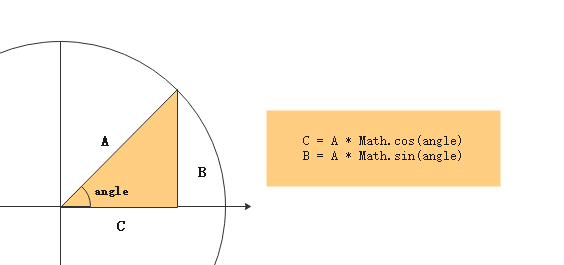
绘制时间刻度使用lineTo方法可以实现, 关键点在如何确定起点和钟点位置, 这里需要用到直角三角形边长和角度关系公式, 使用Math.con和sin函数可以计算出任意角度的坐标. 绘制文字也同理, 实现效果如下
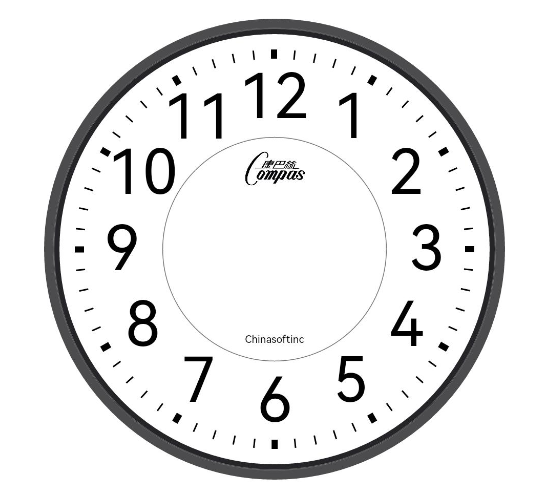
  drawAxis(canvas: CanvasRenderingContext2D, displayRect: RectF, innerRect: RectF) {
    canvas.save()
    canvas.beginPath()
    // 刻度线总个数
    let axisCount = 12 * 5
    // 每个刻度线角度
    let eachAxisAngle = 360 / axisCount
    let radius = innerRect.radius()
    canvas.strokeStyle = Color.Black.toString()
    canvas.font = '120px GarnetItalic.ttf'
    let axisLineRadius = radius - this.axisLineLength
    let axisFontRadius = axisLineRadius - this.axisFontMargin

    canvas.textBaseline = 'middle'
    for (let i = 0; i < axisCount; i++) {
      let ange = eachAxisAngle * i - (2 / 3 * 90)
      let x = radius * Math.cos(toCanvasAngle(ange))
      let y = radius * Math.sin(toCanvasAngle(ange))
      let xTo = axisLineRadius * Math.cos(toCanvasAngle(ange))
      let yTo = axisLineRadius * Math.sin(toCanvasAngle(ange))
      // 绘制刻度线
      canvas.beginPath()
      canvas.lineWidth = i % 5 == 0 ? this.axisLineAtHourWidth : 1
      canvas.moveTo(innerRect.centerX() + x, innerRect.centerY() + y)
      canvas.lineTo(innerRect.centerX() + xTo, innerRect.centerY() + yTo)
      canvas.stroke()
      canvas.closePath()

      // 绘制小时数
            // 绘制小时数
      if (i % 5 == 0) {
        canvas.fillStyle = Color.Black.toString()
        let fontX = axisFontRadius * Math.cos(toCanvasAngle(ange))
        let fontY = axisFontRadius * Math.sin(toCanvasAngle(ange))

        let text = String((i + 5) / 5)
        let textMetrics = canvas.measureText(text);
        canvas.fillText(text, innerRect.centerX() + fontX - textMetrics.width / 2, innerRect.centerY() + fontY)
      }
    }
    canvas.closePath()
    canvas.restore()
  }
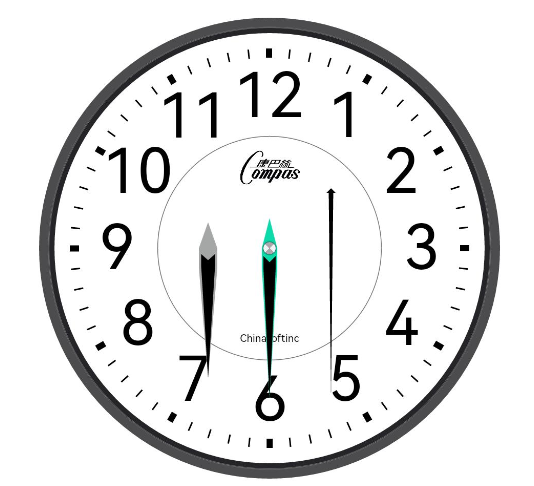
4. 绘制时分秒指针
指针可以使用Canvas提供的连线能力完成, 主要工作在计算各个点的位置, 难点不大
  /**
   * 绘制小时指针
   */
  drawHourPointer(canvas: Canvas2, innerRect: RectF) {
    canvas.canvas.lineJoin = 'round'
    let topPoint = new Point(innerRect.centerX() - 40 /**预览用**/, innerRect.centerY() - innerRect.radius() * 0.13)
    let bottomPoint = new Point(topPoint.x, topPoint.y + innerRect.radius() * 0.78)
    // 底部灰色区域
    canvas.save()
      .beginPath()
      .fillStyle('#A5A7A7')
      .moveToPoint(topPoint)
      .lineTo(topPoint.x + 6, innerRect.centerY())
      .lineTo(topPoint.x + 6, innerRect.centerY() + innerRect.radius() * 0.1)
      .lineToPoint(bottomPoint)
      .lineTo(topPoint.x - 6, innerRect.centerY() + innerRect.radius() * 0.1)
      .lineTo(topPoint.x - 6, innerRect.centerY())
      .lineToPoint(topPoint)
      .fill()
      .closePath()

    // 黑色指针区域
    let innerTopPoint = new Point(topPoint.x, topPoint.y + innerRect.radius() * 0.19)
    canvas.fillStyle(Color.Black.toString())
      .beginPath()
      .moveTo(innerTopPoint.x, innerTopPoint.y) // 顶部凹点
      .lineTo(innerTopPoint.x + 4.5, innerTopPoint.y - 4) // 右上
      .lineTo(innerTopPoint.x + 4.5, innerTopPoint.y + 4) // 右中
      .lineToPoint(bottomPoint)
      .lineTo(innerTopPoint.x - 4.5, innerTopPoint.y + 4) // 右中
      .lineTo(innerTopPoint.x - 4.5, innerTopPoint.y - 4) // 右上
      .fill()
      .closePath()
      .restore()
  }

  /**
   * 绘制秒钟指针
   */
  drawSecondPointer(canvas: Canvas2, innerRect: RectF) {
    canvas.canvas.lineWidth = 1
    // 秒钟顶部三角形
    let topPoint = new Point(innerRect.centerX() + 40 /**预览用**/, innerRect.centerY() - innerRect.radius() * 0.30)
    let topRightPoint = new Point(topPoint.x + 3, topPoint.y + 3)
    let topLeftPoint = new Point(topPoint.x - 3, topPoint.y + 3)
    let lineRightPoint = new Point(topRightPoint.x - 1.5, topRightPoint.y)
    let lineLeftPoint = new Point(topLeftPoint.x + 1.5, topLeftPoint.y)
    let bottomPoint = new Point(topPoint.x, innerRect.centerY() + innerRect.radius() * 0.75)
    canvas.save()
      .beginPath()
      .fillStyle(Color.Black.toString())
      .moveToPoint(topPoint)
      .lineToPoint(topRightPoint)
      .lineToPoint(lineRightPoint)
      .lineToPoint(bottomPoint)
      .lineToPoint(lineLeftPoint)
      .lineToPoint(topLeftPoint)
      .lineToPoint(topPoint)
      .fill()
      .closePath()
      .restore()
  }

  /**
   * 绘制分钟指针
   */
  drawMinutePointer(canvas: Canvas2, innerRect: RectF) {
    canvas.canvas.lineJoin = 'round'
    let topPoint = new Point(innerRect.centerX(), innerRect.centerY() - innerRect.radius() * 0.15)
    let bottomPoint = new Point(topPoint.x, topPoint.y + innerRect.radius() * 0.90)
    canvas.save()
      .beginPath()
      .fillStyle('#A5A7A7')
      .fillStyle('#ff0bdbaa')
      .beginPath()
      .moveToPoint(topPoint)
      .lineTo(topPoint.x + 5, innerRect.centerY())
      .lineTo(topPoint.x + 5, innerRect.centerY() + innerRect.radius() * 0.1)
      .lineToPoint(bottomPoint)
      .lineTo(topPoint.x - 5, innerRect.centerY() + innerRect.radius() * 0.1)
      .lineTo(topPoint.x - 5, innerRect.centerY())
      .lineToPoint(topPoint)
      .fill()
      .closePath()

    let innerTopPoint = new Point(topPoint.x, topPoint.y + innerRect.radius() * 0.22)
    canvas.fillStyle(Color.Black.toString())
      .beginPath()
      .moveTo(innerTopPoint.x, innerTopPoint.y) // 顶部凹点
      .lineTo(innerTopPoint.x + 4, innerTopPoint.y - 4) // 右上
      .lineTo(innerTopPoint.x + 4, innerTopPoint.y + 4) // 右中
      .lineToPoint(bottomPoint)
      .lineTo(innerTopPoint.x - 4, innerTopPoint.y + 4) // 右中
      .lineTo(innerTopPoint.x - 4, innerTopPoint.y - 4) // 右上
      .fill()
      .closePath()
      .restore()
  }

  /**
   * 绘制指针中心点
   */
  drawClockCenter(canvas: CanvasRenderingContext2D, innerRect: RectF) {
    let centerRadius = 4
    canvas.save()
    canvas.beginPath()
    canvas.shadowBlur = 2
    canvas.shadowColor = 'rgba(12, 12, 12, 1.00)'
    canvas.moveTo(innerRect.centerX(), innerRect.centerY())
    canvas.arc(innerRect.centerX(), innerRect.centerY(), centerRadius, toCanvasAngle(0), toCanvasAngle(360))
    canvas.fill()
    canvas.closePath()

    canvas.restore()
    for (let i = 0; i < 360; i += 90) {
      let startAngle = i + 90 / 2
      canvas.beginPath()
      canvas.fillStyle = i / 90 % 2 == 0 ? '#A9A8AD' : '#F3F3F7'
      canvas.moveTo(innerRect.centerX(), innerRect.centerY())
      canvas.arc(innerRect.centerX(), innerRect.centerY(), centerRadius, toCanvasAngle(startAngle), toCanvasAngle(startAngle + 90))
      canvas.fill()
      canvas.closePath()
    }
  }
5. 时分秒指针联动
到现在我们绘制的主要工作均已完成, 还剩下最后一个工作, 启动一个定时器, 定时计算出时分秒各指针的旋转角度, 在绘制的指针前对画布做旋转操作即可
  /**
   * 组件初始化时创建定时任务
   */
  aboutToAppear(){
    ...
    setInterval(() => {
      this.date = this.getDate()
    }, 1000)
  }

  /**
   * 计算时分秒
   */
  getDate(): string{
    let current = new Date();
    this.currentHours = current.getHours()
    this.currentMinutes = current.getMinutes()
    this.currentSeconds = current.getSeconds()
    return `${complement(this.currentHours)}:${complement(this.currentMinutes)}:${complement(this.currentSeconds)}`
  }
  // 根据时间转换分针旋转角度
  this.currentMinutes / 60 * 360 + this.currentSeconds / 60 / 12 / 5 * 360
  // 根据时间转换时针旋转角度
  this.currentHours * 5 / 60 * 360 + this.currentMinutes / 60 / 12 * 360
  // 根据时间转换秒针旋转角度
  this.currentSeconds / 60 * 360

  /**
   * 绘制分钟指针
   */
  drawMinutePointer(){
    canvas.save()
      .beginPath()
      .translate(innerRect.centerX(), innerRect.centerY())
      .rotate(toCanvasAngle(this.conventDateMinuteToAngle() + 180))
      .translate(-innerRect.centerX(), -innerRect.centerY())}
      ...
  }
至此一块石英钟表组件已经完成,总体来说技术难点不大,主要使用Canvas绘制弧形和Path方法。迫于篇幅原因, 本篇只贴出了关键代码, 完整代码请前往Gitee查看: OpenHarmony - 基于ArkUI(eTS开发石英钟表自定义组件
更多原创内容请关注: 中软国际 HarmonyOS 技术团队
入门到精通、技巧到案例,系统化分享HarmonyOS开发技术,欢迎投稿和订阅,让我们一起携手前行共建鸿蒙生态。
Recommend
About Joyk
Aggregate valuable and interesting links.
Joyk means Joy of geeK