

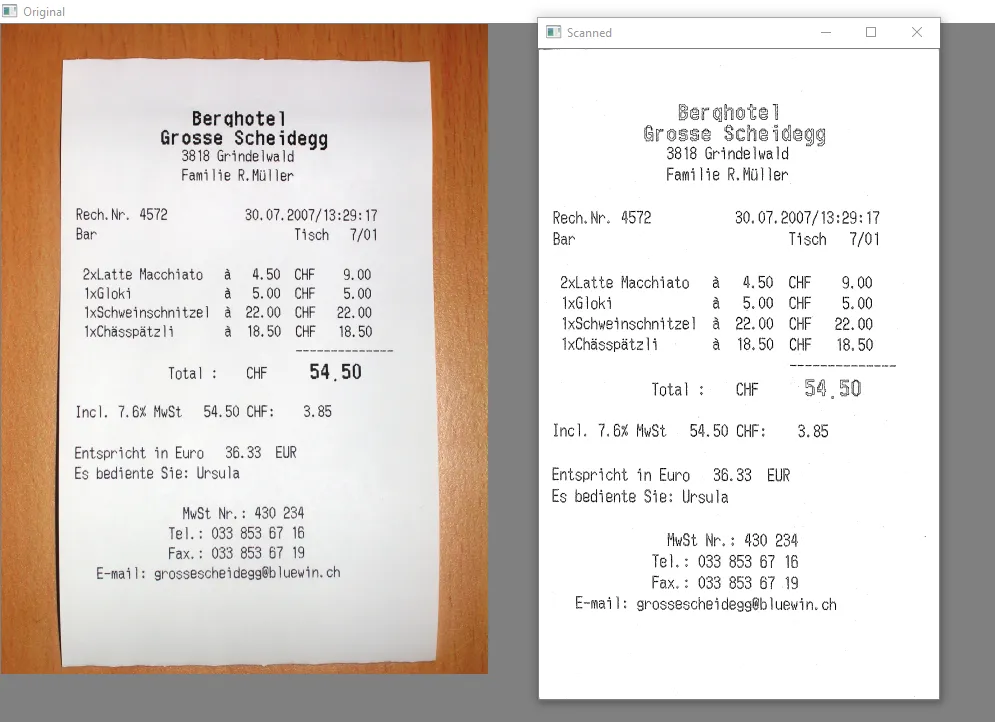
Building a Document Scanner using OpenCV
source link: https://www.analyticsvidhya.com/blog/2022/09/building-a-document-scanner-using-opencv/
Go to the source link to view the article. You can view the picture content, updated content and better typesetting reading experience. If the link is broken, please click the button below to view the snapshot at that time.

This article was published as a part of the Data Science Blogathon.
Introduction
Hello Readers; in this article, we’ll use the OpenCV Library to develop a Python Document Scanner.
A brief overview of OpenCV: In a nutshell, OpenCV is an open-source library used in image processing in various computer languages, including Python, C++, etc. It may be used to detect photographs (e.g. faces using a face detection system), among many other things. To know more about OpenCV, you can refer to their official documentation here: https://pypi.org/project/opencv-python/
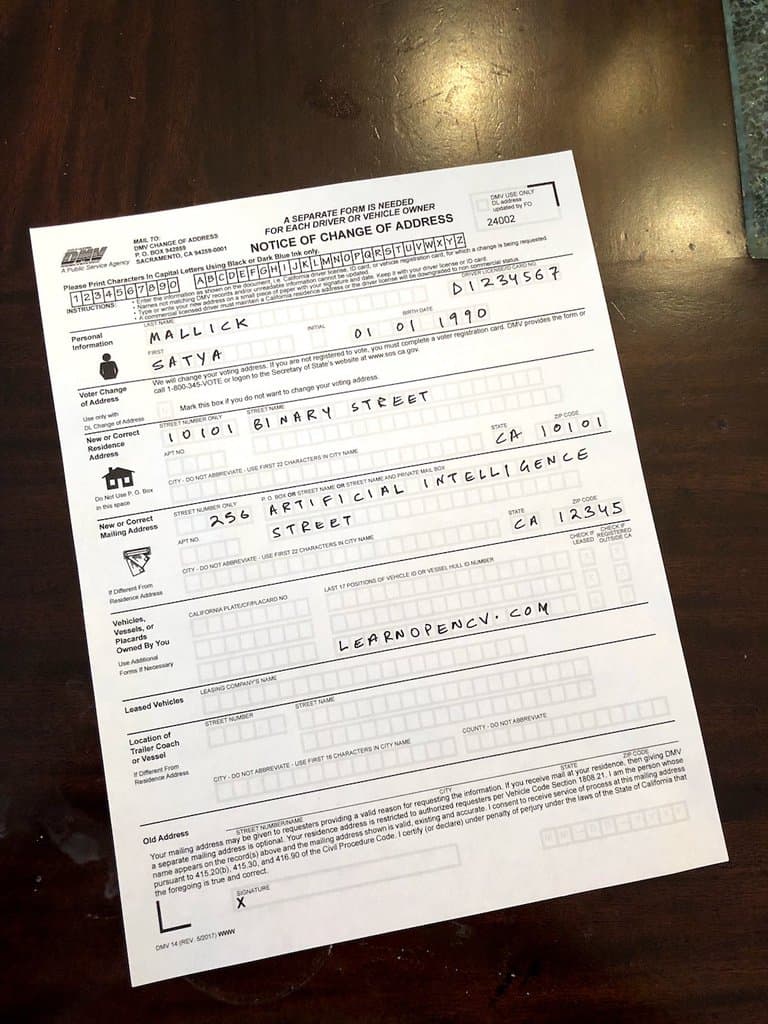
Our software should be able to correctly align the document, detect the borders of the captured image, uplift the document’s quality, and ultimately provide a better image as output. Essentially, we will input a document, an unedited image that is taken with a camera. OpenCV will handle the image processing area.

Source: https://www.codespeedy.com/document-scanner-using-python/
Our Basic Workflow to achieve our goal will be :
- Morphological Operations
- Edge and Contour Detection
- Identifying Corners
- Transforming the perspective
Project Components
Splitting the project into modules, it can be classified into the following sub-topics :
Performing Morphological Operations
Morphology: is a series of image processing procedures and algorithms that handle pictures based on their height and width. Their magnitudes, rather than their relative pixel value ordering, matter most.
kernel = np.ones((5,5),np.uint8)
img = cv2.morphologyEx(img, cv2.MORPH_CLOSE, kernel, iterations= 3)
We can perform operations using morphologyEx() function. The “close” operation in Morphology is the same as Erosion, which is preceded by the process of Dilation before that.

Source: https://learnopencv.com/automatic-document-scanner-using-opencv/
We will create a blank document since the contents will get in the way while dealing with the edges, and we don’t want to risk removing them.
Removing the Background from the Captured Image
The parts of the photographs that are not our subjects must also be removed. Similar to cropping an image, we will just concentrate on maintaining the required portion of the image. Use of the GrabCut library is possible.
GrabCut eliminates all the elements outside the border after receiving the input picture with its boundaries.
To utilize GrabCut to identify the backdrop, we may also provide users the option of manually setting the document’s border.
For the time being, however, GrabCut will be able to automatically identify the foreground by taking 20 pixels from each corner of the image to serve as the background.
mask = np.zeros(img.shape[:2],np.uint8)
bgdModel = np.zeros((1,65),np.float64)
fgdModel = np.zeros((1,65),np.float64)
rect = (20,20,img.shape[1]-20,img.shape[0]-20)
cv2.grabCut(img,mask,rect,bgdModel,fgdModel,5,cv2.GC_INIT_WITH_RECT)
mask2 = np.where((mask==2)|(mask==0),0,1).astype('uint8')
img = img*mask2[:,:,np.newaxis]
The “rect” variable here signifies the boundary we are willing to separate. You may encounter a situation where part of the background goes inside the line, but that is acceptable. Our goal is that no portion of the object should extend outside the boundary.

Source: https://learnopencv.com/wp-content/uploads/2022/07/Detected-Edge-Contour-1.png
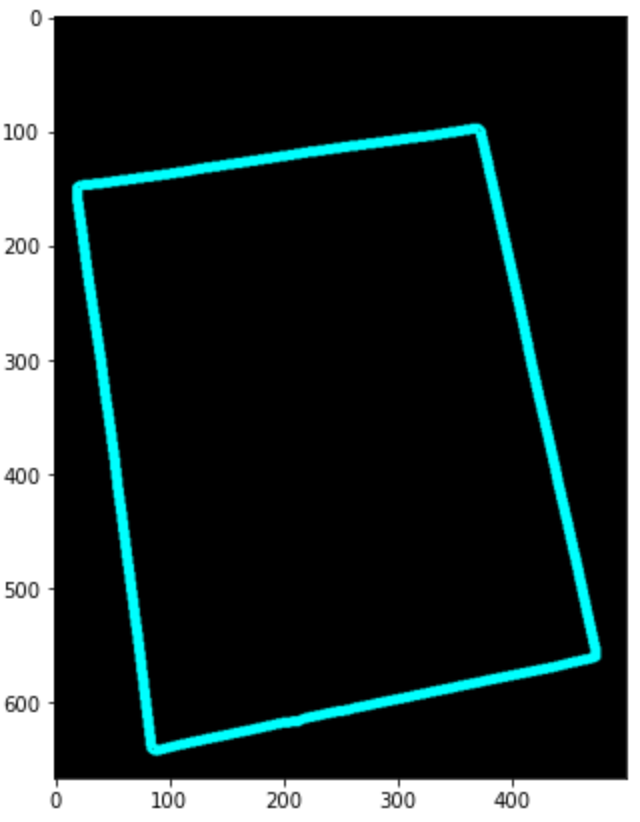
Edge and Contour Detection
We currently possess a blank document the same size as the original document. On the same, we will do edge detection. We’ll employ the Canny function for that.
To clean up the document’s noise, we additionally employ Gaussian Blur.
(Note: Canny function only works on grayscale images, So convert the image to grayscale if not already present).
gray = cv2.cvtColor(img, cv2.COLOR_BGR2GRAY)
gray = cv2.GaussianBlur(gray, (11, 11), 0)
# Edge Detection.
canny = cv2.Canny(gray, 0, 200)
canny = cv2.dilate(canny, cv2.getStructuringElement(cv2.MORPH_ELLIPSE, (5, 5)))
We finally dilate the image in the last line.
After this, we can proceed with the contour detection :
We will only record the largest contour and reciprocate it on a new blank document.
gray = cv2.cvtColor(img, cv2.COLOR_BGR2GRAY)
gray = cv2.GaussianBlur(gray, (11, 11), 0)
# Edge Detection.
canny = cv2.Canny(gray, 0, 200)
canny = cv2.dilate(canny, cv2.getStructuringElement(cv2.MORPH_ELLIPSE, (5, 5)))
Source: https://learnopencv.com/wp-content/uploads/2022/07/Detected-Edge-Contour-1.png
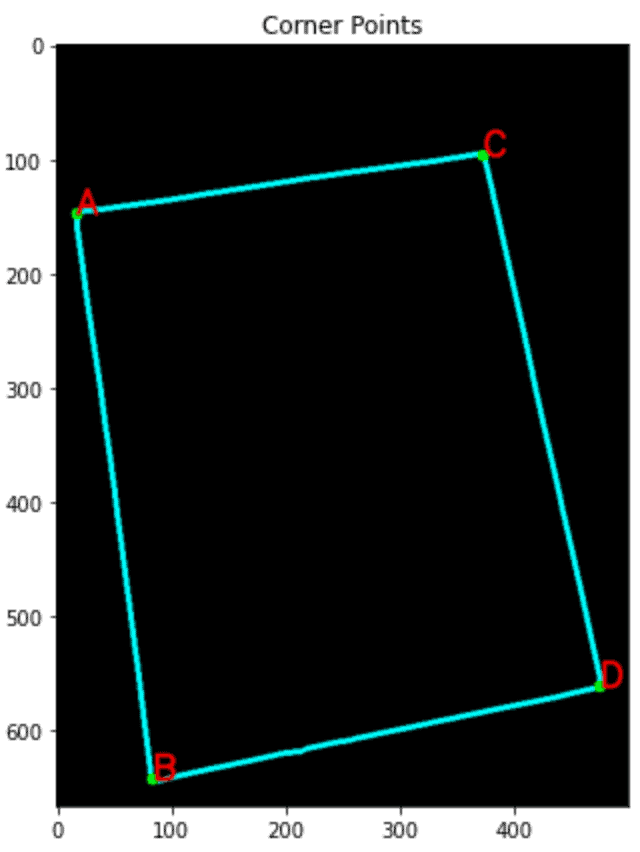
Identifying Corners
We will align the paper using the four corners that have already been noted. Using the “Douglas-Peucker” approach and the approxPolyDp() function.
con = np.zeros_like(img)
# Loop over the contours.
for c in page:
  # Approximate the contour.
  epsilon = 0.02 * cv2.arcLength(c, True)
  corners = cv2.approxPolyDP(c, epsilon, True)
  # If our approximated contour has four points
  if len(corners) == 4:
      break
cv2.drawContours(con, c, -1, (0, 255, 255), 3)
cv2.drawContours(con, corners, -1, (0, 255, 0), 10)
corners = sorted(np.concatenate(corners).tolist())
for index, c in enumerate(corners):
  character = chr(65 + index)
  cv2.putText(con, character, tuple(c), cv2.FONT_HERSHEY_SIMPLEX, 1, (255, 0, 0), 1, cv2.LINE_AA)
Source: https://learnopencv.com/wp-content/uploads/2022/07/Detected-Corner-Points-1.png
Standardizing Orientation of the four points
def order_points(pts):
    rect = np.zeros((4, 2), dtype='float32')
    pts = np.array(pts)
    s = pts.sum(axis=1)
    rect[0] = pts[np.argmin(s)]
    rect[2] = pts[np.argmax(s)]
    diff = np.diff(pts, axis=1)
    rect[1] = pts[np.argmin(diff)]
    rect[3] = pts[np.argmax(diff)]
    return rect.astype('int').tolist()
Finding the Destination Co-ordinates :
The last set of coordinates can alter the image’s perspective. This will be helpful if the shot is taken at an angle from the usual view.
(tl, tr, br, bl) = pts
# Finding the maximum width.
widthA = np.sqrt(((br[0] - bl[0]) ** 2) + ((br[1] - bl[1]) ** 2))
widthB = np.sqrt(((tr[0] - tl[0]) ** 2) + ((tr[1] - tl[1]) ** 2))
maxWidth = max(int(widthA), int(widthB))
# Finding the maximum height.
heightA = np.sqrt(((tr[0] - br[0]) ** 2) + ((tr[1] - br[1]) ** 2))
heightB = np.sqrt(((tl[0] - bl[0]) ** 2) + ((tl[1] - bl[1]) ** 2))
maxHeight = max(int(heightA), int(heightB))
# Final destination co-ordinates.
destination_corners = [[0, 0], [maxWidth, 0], [maxWidth, maxHeight], [0, maxHeight]]
Perspective Transformtion
The coordinates of the source photos must now line up with the destination coordinates we discovered beforehand. After completing this stage, the image will appear like it was captured from above from a perfectly regular perspective.
# Getting the homography.
M = cv2.getPerspectiveTransform(np.float32(corners), np.float32(destination_corners))
final = cv2.warpPerspective(orig_img, M, (destination_corners[2][0], destination_corners[2][1]), flags=cv2.INTER_LINEAR)
Source: https://learnopencv.com/wp-content/uploads/2022/07/Final-Output.jpg
It is now clear that the image, which was captured at an angle, has now been perfectly captured, with a 0-degree transform.
Observations on Testing
I have tested these codes on numerous photos of different orientations, and you can do the same. On every one of them, it has excelled.
Even if the image’s background is white (that is, a color that resembles the color of the page itself), GrabCut has effectively and clearly defined the boundary line.
Conclusion
This tutorial taught us how to create a document scanner quickly and easily using OpenCV.
Summing up what we did :
After Uploading the images, we performed :
- Morphological operations to generate a blank doc with the same height and width as the original
- Removed the Background from the images.
- Detected the Contours and the boundaries in the image.
- Detected Corners of the image, in the form of a rectangle
- Transformed the perspective of the image (if any)
Some Limitations of this Document Scanner: This project should properly function even if a portion of the document lay outside the boundary frame when it was captured. It would also result in an inaccurate perspective transformation as well.
Several Deep Learning algorithms are employed for the widely used document scanner applications because their results are much more thorough and accurate.
Thanks for Reading!
Connect with me through my Linked-in
The media shown in this article is not owned by Analytics Vidhya and is used at the Author’s discretion.
Recommend
-
25
About Photoroid Photoroid is the fastest, Lightweight, easy to use...
-
20
OTP scanner in Python using OpenCV and Tesseract (Part 4) Jan 28, 2018 In the previous three posts, we were able to successfully extract the OTP from an image of our phone’s scre...
-
13
OTP scanner in Python using OpenCV and Tesseract (Part 3) Jan 28, 2018 In the previous two posts, we have seen how to gather the interesting regions of the image for further analysis. We h...
-
9
OTP scanner in Python using OpenCV and Tesseract (Part 2) Jan 28, 2018 We saw in the previous post how t...
-
12
OTP scanner in Python using OpenCV and Tesseract (Part 1) Jan 28, 2018 The company I work for uses a one-time-password (OTP) generated on a mobile phone app to login to its virtu...
-
15
react-native-document-scanner Document scanner with border detection, perspective correction and custom crop/resize. Android
-
8
Why SwiftScan is my favorite document scanner [Awesome Apps]
-
11
-
8
Introduction to ML Kit Document Scanner for Android
-
10
ML Kit Document Scanner in action5 min read6 days ago
About Joyk
Aggregate valuable and interesting links.
Joyk means Joy of geeK