

Introduction to ML Kit Document Scanner for Android
source link: https://proandroiddev.com/introduction-to-ml-kit-document-scanner-for-android-a85e90d992e4
Go to the source link to view the article. You can view the picture content, updated content and better typesetting reading experience. If the link is broken, please click the button below to view the snapshot at that time.
Introduction to ML Kit Document Scanner for Android

Ever wanted to create your own document scanning app or perhaps add document scanning functionality to your existing app? Well look no further cause ML kit has come to the rescue with its new document scanning API.
The ML Kit Document Scanner API provides users with a consistent UI for digitising physical documents and provides users with a number of standard features based on the chosen scanning mode. For those worried about the impact the API may have on their app’s size the API boasts a low download size increase of only 300KB. This low download size is due to the ML models, scanning logic and UI flow being dynamically downloaded via the Google Play Services.
Other beneficial functionalities include:
- The ability to automatically capture documents using document detection
- Show documents upright using automatic rotation detection
- For optimal crop results the API makes use of accurate edge detection
- In order to preserve user privacy the API makes use of on-device processing. This means that the user might be required to download the models, logic and UI flow when they first make use of the API, but for any subsequent usages the ML Kit Document Scanner API can be used completely offline on the user’s device, thus ensuring privacy.
- Provides editing functionalities such as being able to crop, remove shadows, apply filters, clean stains, as well as send digitised files back to the app in a seamless manner.
- Requires no camera permissions seeing as the document scanner makes use of the Google Play Services camera permission.
It’s also important to note that the API is currently in Beta and may be subject to changes that break backward compatibility. Furthermore, the API requires Android API 21 or higher. Finally, the API requires a minimal device total RAM of 1.7GB. If the minimal device RAM is lower than 1.7GB the API will return an MlKitException with error code UNSUPPORTED when invoking the API.
Now that we have a better understanding of the API let’s get to the fun part, CODING!😀
Let’s get started!
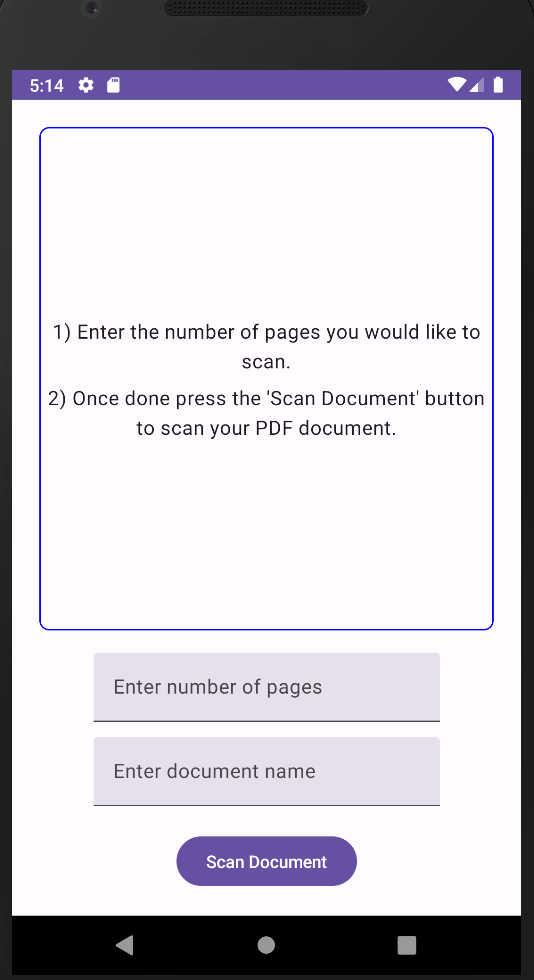
Import the starter projectinto Android Studio. Once done, Build and run the app. You’ll see a screen with some text instructing the user to enter the desired number of pages and to press the “Scan Document” button when the user wants to initiate the scan process. When pressing the scan button a toast will appear indicting that the scan button has been pressed. See below:
Add Gradle dependencies
Our first objective is to add the required Gradle dependency after which we will add the functionality for the app to initiate the scan process when the user has entered his/her desired number of pages/document name and pressed the scan button. You can get the latest dependency here. At the time of writing this article, the below was the latest, so go ahead and add it to your app-level build.gradle. Once added, sync your project and you should now be able to use make use of the ML Kit document scanner library:
implementation ("com.google.android.gms:play-services-mlkit-document-scanner:16.0.0-beta1")
Add document scan functionality
Our next step is to add the functionality that will enable the user to scan their documents. Navigate to the “MainActivity”. Loop through the code in order to famiarize yourself. You’ll notice the code for the UI is already added as well as some empty methods that we will complete in order to add the required functional. In order to complete this tutorial we will complete a set of TODO’s that were added in the starter project. The TODO’s contain steps 1 to 9 that needs to be completed in sequence in order to complete the tutorial. Let’s start with step 1:
Step 1: Uncomment the variables in onCreate
Uncomment the variables in the onCreate method. These variables will be used later in the project to make the number of pages the user wants to scan, the document name and the list of pages(images) globally accessible in the application.
Step 2: Add the Activity Result Launcher variable
Next, add the below variable which will be use to launch the scanner and wait for the results to be returned. More on this a bit later.
private lateinit var scannerLauncher: ActivityResultLauncher<IntentSenderRequest>
Step 3: Add the Scanner options
Here we instantiate “GmsDocumentScannerOptions” which will enable us to configure the document scanner. Uncomment the “configureDucumentScannerOptions” method and add the below snippet of code to the method body.
Let’s take a closer look at what we are aiming to achieve with the above code snippet:
GmsDocumentScannerOptions.Builder()
The above code snippet is used to instantiate the scanner options builder.
.setScannerMode(GmsDocumentScannerOptions.SCANNER_MODE_FULL)
Here we choose a scan mode. The scan modes provide the user of the application with different editing capabilities:
SCANNER_MODE_BASE: provides basic editing capabilities such as being to crop, reorder pages, rotate and more. This mode only maintains its current features and received minor refinements.
SCANNER_MODE_BASE_WITH
_FILTER: In addition to the basic editing features provided in SCANNER_MODE_BASE, this mode also provides image filter capabilities such grayscale, auto image enhancement and more. This mode also only maintains its current features and received minor refinements.
SCANNER_FULL_MODE: This is the default scanning mode. In addition to the basic editing features provided in SCANNER_MODE_BASE_WITH
_FILTER, this mode also adds ML-enabled image cleaning capabilities such as removing finger prints, erasing stains and more. In contrast to the two previously mentioned modes this mode also allows for future major features to be automatically added along with Google Play services updates.
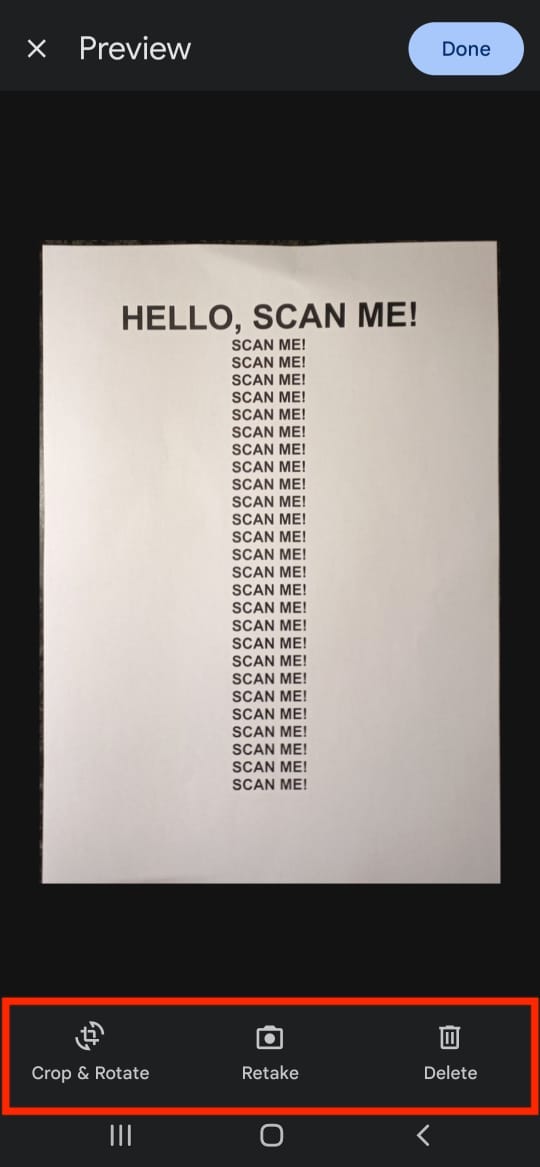
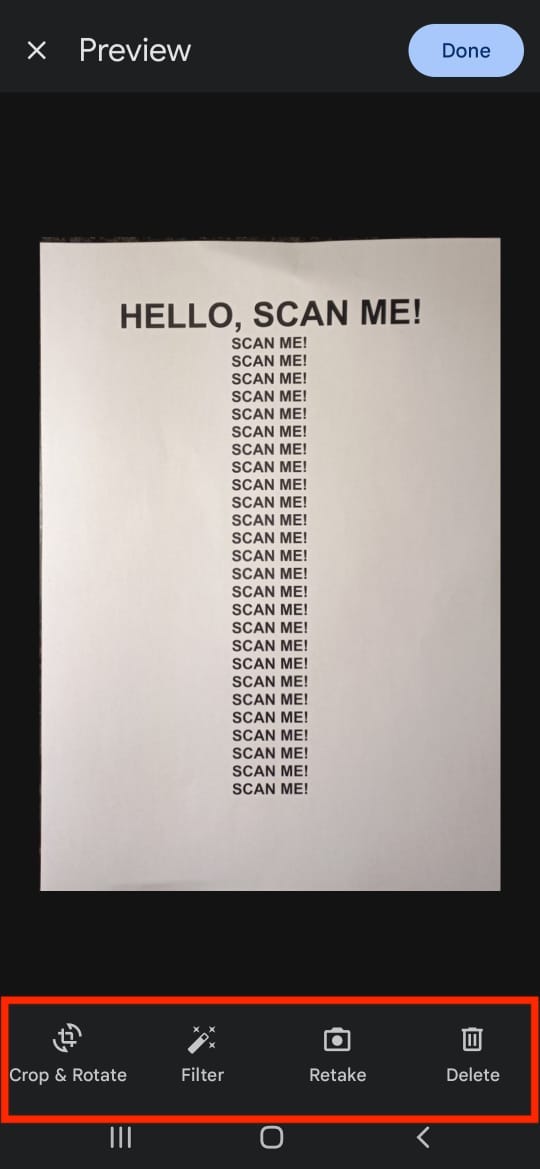
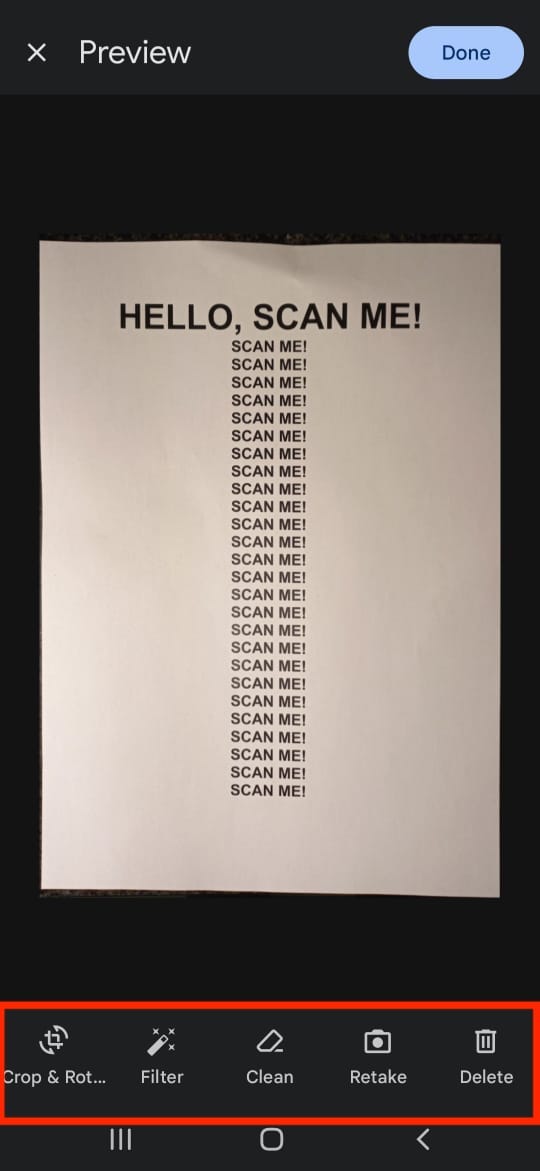
Below are example of the features included based on the mode:
Example of SCANNER_MODE_BASE
Example of SCANNER_MODE_BASE_WITH
_FILTER
Example of SCANNER_FULL_MODE
In our case we will be making use of SCANNER_FULL_MODE in order to gain access to all the features.
Next line of code:
.setGalleryImportAllowed(true)
The above line of code, when set to true, enables the application to get access to images from the phone’s gallery and allows for images to be imported into the app.
.setPageLimit(numberOfPages.toInt())
The above line of code enables us to set the maximum number of pages to be scanned. In this app the user can enter the number of pages they want to scan in the appropriate text field.
.setPageLimit(numberOfPages.toInt()).setResultFormats(
        GmsDocumentScannerOptions.RESULT_FORMAT_JPEG,
        GmsDocumentScannerOptions.RESULT_FORMAT_PDF
    )
This code snippet determines in which format the results are returned. In this application we will request that both the JPEG images as well as the PDF document be returned. We will display the images to the user once the user is done with their editing and we will store the PDF within the app.
Step 4: Receive scanning results
Replace the TODO with the below code snippet:
First we create a variable that will hold a list of URIs. Since the document scanner is an activity that is launched with the intent of returning a result, we will launch an activity for result and retrieve the number of pages scanned, the image URI’s in PDF or JPEG format from the GmsDocumentScannerResult object.
pages = result?.pages?.map { it.imageUri } ?: emptyList()
The above line of code retrieves the pages(images) and stores them in the pages variable. This list of images are then passed to the UI in order to be displayed to the user once they are done editing their document.
In the above code snippet we retrieve the PDF document that was scanned and store it in the app’s internal storage. In another case the application could also have uploaded the PDF to some backend that requires the document. You will also notice that we saved the PDF using the name provided by the user.
Step 5: Pass the images to the UI
DocumentScannerScreen(pages)
Pass the image pages to the UI by replacing the emptyList() parameter with the pages variable.
Step 6: Launch the document scanner
Next we will add the functionality to launch the document scanner when the user clicks on the scan button. Replace the the TODO with the below code snippet:
Let’s loop through the code and see what it does:
val options = configureDucumentScannerOptions()
Here we invoke the configureDucumentScannerOptions method to configure the scanning options and store it in the options variable.
val scanner = GmsDocumentScanning.getClient(options)
We then create a scanner instance to which we will pass the options.
Next we use the scanner instance to launch the activity for result. If there is a camera available the addOnSuccessListener will be invoked else for any exceptions the addOnFailureListener is invoked. In the addOnSuccessListener we make use of the IntentSender to launch the activity for result launcher which will then open a screen that enables us to scan documents.
Step 7: Uncomment numberOfPages variable
Uncomment in order to update the numberOfPages global variable with the most recent page number entered into the text field by the user. This variable is used to define the maximum number of pages when configuring the document scanner options.
numberOfPages = it.value
Step 8: Uncomment documentName variable
Uncomment in order to update the documentName global variable with the most recent document name entered into the text field by the user. This variable is used to provide the PDF document with the name given by the user.
documentName = it.value
Step 9: Uncomment the scan button code
Finally, delete the showToast() methodand uncomment the code that will add some validation to the scan button and if all the validations are in the desired state invoke the onScanPDFButtonClick() method.
Phew! That was a lot. 😅
Lucky for us we can now run our app, scan some awesome documents and enjoy our hard work!
Conclusion
The ML Kit Document Scanner API provides users with advanced document scanning and editing functionality that enables users to digitise their physical documents. The API provides a light weight solution to applications that require users to scan and upload documents and could be a perfect solution to add in your application. So give it a try!
I look forward to your feedback and if for some reason, you got stuck I would advise you to take a look at the repo containing the completed project.
Thank you for reading this article. Click the 👏 button as much as you can, 🌟 the Github repo, and follow me on Twitter, LinkedIn and Medium for future articles.
Recommend
About Joyk
Aggregate valuable and interesting links.
Joyk means Joy of geeK