

在 GPUImage 中实现染发效果
source link: http://www.lymanli.com/2022/08/27/ios-gpuimage-hair-segmentation/
Go to the source link to view the article. You can view the picture content, updated content and better typesetting reading experience. If the link is broken, please click the button below to view the snapshot at that time.

本文介绍了拍摄场景中染发效果的实现。主要涉及头发分割能力的接入,Metal 与 OpenGL 之间的纹理转换。
实现染发效果首先需要依赖头发分割能力识别头发区域,然后在 Shader 中对头发区域做染色处理。
一、头发分割能力
之前我们有介绍过推理框架 TNN 的使用。TNN 不仅开源了代码,而且还提供了一些算法模型,其中就有我们需要的头发分割能力。
在项目中使用 TNN 头发分割能力分为三步:
第一步:SDK 集成
TNN 的集成步骤在之前的文章已经介绍过了,不再赘述。
算法模型的执行流程也类似,主要分为预处理、执行网络、后处理三步。
不同的是算法模型的预处理和后处理参数(MatConvertParam),这个也可以在 TNN 的附带 Demo 里找到。
预处理参数:
MatConvertParam HairSegmentation::GetConvertParamForInput(std::string tag) {
    MatConvertParam input_convert_param;
    input_convert_param.scale = {1.0 / (255 * 0.229), 1.0 / (255 * 0.224), 1.0 / (255 * 0.225), 0.0};
    input_convert_param.bias  = {-0.485 / 0.229, -0.456 / 0.224, -0.406 / 0.225, 0.0};
    return input_convert_param;
}
后处理参数:
TNN_NS::MatConvertParam TNNSDKSample::GetConvertParamForOutput(std::string name) {
    return TNN_NS::MatConvertParam();
}
第二步:原始帧获取
这里的「原始帧」是指用于跑算法模型的原始数据。
在 GPUImage 的渲染链中,每个滤镜传递给下个滤镜的帧数据类型是 GPUImageFramebuffer,GPUImageFilter 在完成单次渲染后,渲染结果保存在 GPUImageFramebuffer 的 renderTarget 中,renderTarget 是 CVPixelbufferRef 类型。
我们知道,iOS 平台的 TNN 框架是基于 Metal 运行的,数据输入类型为 MTLTexture 或者 MTLBuffer。
所以在我们这个例子中,在执行染发滤镜前,需要把上一个滤镜的渲染结果转成 MTLTexture,也就是把 CVPixelbufferRef 转成 MTLTexture。
CVPixelbufferRef 是一种支持缓冲区共享的图像格式,在使用 IOSurface 的情况下,可以将缓冲区扩展成 OpenGL 或 Metal 的纹理。
也就是说,在渲染过程中,CVPixelbufferRef 允许 OpenGL 和 Metal 使用同一个纹理,而不用做额外的数据拷贝。这无疑能极大提高渲染的性能。
我们来看一下 GPUImageFramebuffer 中创建 renderTarget 的代码:
CFDictionaryRef empty;
CFMutableDictionaryRef attrs;
empty = CFDictionaryCreate(kCFAllocatorDefault, NULL, NULL, 0, &kCFTypeDictionaryKeyCallBacks, &kCFTypeDictionaryValueCallBacks);
attrs = CFDictionaryCreateMutable(kCFAllocatorDefault, 1, &kCFTypeDictionaryKeyCallBacks, &kCFTypeDictionaryValueCallBacks);
CFDictionarySetValue(attrs, kCVPixelBufferIOSurfacePropertiesKey, empty);

CVReturn err = CVPixelBufferCreate(kCFAllocatorDefault, (int)_size.width, (int)_size.height, kCVPixelFormatType_32BGRA, attrs, &renderTarget);
可以看到 renderTarget 的创建确实使用了 IOSurface,也就是说 renderTarget 可以直接转成 MTLTexture。
CVPixelbufferRef 转 MTLTexture 的核心代码如下:
- (id<MTLTexture>)textureWithPixelBuffer:(CVPixelBufferRef)pixelBuffer {
    if (!pixelBuffer) {
        return nil;
    }
    CVPixelBufferRetain(pixelBuffer);
    CVMetalTextureRef texture = nil;
    CVReturn status = CVMetalTextureCacheCreateTextureFromImage(kCFAllocatorDefault,
                                                                self.textureCache,
                                                                pixelBuffer,
                                                                nil,
                                                                MTLPixelFormatBGRA8Unorm,
                                                                CVPixelBufferGetWidth(pixelBuffer),
                                                                CVPixelBufferGetHeight(pixelBuffer),
                                                                0,
                                                                &texture);
    if (status != kCVReturnSuccess) {
        NSLog(@"texture create fail");
        CVPixelBufferRelease(pixelBuffer);
        return nil;
    }
    id<MTLTexture> result = CVMetalTextureGetTexture(texture);

CFRelease(texture);
    CVPixelBufferRelease(pixelBuffer);

return result;
}
得到 MTLTexture 后,还需要 resize 成算法模型的输入大小,然后就可以丢给模型处理。
注意:这里的 resize 也是一次 Metal 渲染,整个过程需要保证所有的 Metal 渲染在同一个 MTLCommandQueue 上执行,否则会有同步或性能问题。
第三步:识别结果应用
算法模型处理完成后,会输出 MTLTexture 格式的头发 Mask 图,我们需要把 Mask 图转回 OpenGL 纹理才能使用。
与上面 CVPixelbufferRef 转 MTLTexture 类似,为了渲染的高性能,纹理转换过程需要避免额外的数据拷贝。
这里正确的做法是创建一个 OpenGL 和 Metal 可以共享缓冲区的 CVPixelbufferRef,把它扩展成 OpenGL 纹理和 Metal 纹理。
然后将 Metal 纹理作为算法模型的渲染目标,则渲染完成后,OpenGL 纹理也能得到头发 Mask 图。
因为 GPUImageFramebuffer 在创建的时候,就附带了 CVPixelbufferRef 格式的 renderTarget,所以我们直接创建 GPUImageFramebuffer 就可以:
- (void)newFrameReadyAtTime:(CMTime)frameTime atIndex:(NSInteger)textureIndex {
    CVPixelBufferRef inputPixelBuffer = firstInputFramebuffer.renderTarget;
    if (inputPixelBuffer) {
        [[SCAIManager shareManager] hairSegmentationWithSrcPixelBuffer:inputPixelBuffer dstTexture:self.hairTexture];
    }
    [super newFrameReadyAtTime:frameTime atIndex:textureIndex];
}

- (GPUImageFramebuffer *)hairFramebuffer {
    if (!_hairFramebuffer) {
        _hairFramebuffer = [[GPUImageContext sharedFramebufferCache] fetchFramebufferForSize:CGSizeMake(firstInputFramebuffer.size.width, firstInputFramebuffer.size.height) onlyTexture:NO];
    }
    return _hairFramebuffer;
}

- (id<MTLTexture>)hairTexture {
    if (!_hairTexture) {
        _hairTexture = [self.textureConverter textureWithPixelBuffer:self.hairFramebuffer.renderTarget];
    }
    return _hairTexture;
}
这里主要看第 4 行,在创建了 hairFramebuffer 后,将 renderTarget 转成 hairTexture,然后将 hairTexture 作为算法模型的最终输出,则算法模型执行完成后,会将结果写到 hairTexture 上。
在 hairTexture 写入完成后,就可以拿到 OpenGL 纹理开始做下一步渲染:
GLint maskUniform = [filterProgram uniformIndex:@"hairMask"];
glActiveTexture(GL_TEXTURE3);
glBindTexture(GL_TEXTURE_2D, self.hairFramebuffer.texture);
glUniform1i(maskUniform, 3);
这里我们拿到了 hairFramebuffer 对应的纹理 ID,将它传入 OpenGL 的 Shader 中做后续处理。
注意: CVPixelbufferRef 在共享缓冲区时,需要确保渲染命令被提交后才能同步。而 GPUImageFilter 在执行 glDrawArrays 后,并没有调用 glFlush。这样可能会导致在 CVPixelbufferRef 转 MTLTexture 时,读取到无效数据,造成闪屏。因此在 GPUImageFilter+BugFix.m 里补充了 glFlush 调用。
二、染发效果
在上面的步骤中,我们已经将头发的 Mask 图纹理传到 Shader 中,下面开始染发效果的实现。
实现自然的染发效果需要多个处理步骤,比如 Mask 图边缘模糊处理、LUT 滤镜叠加等。
今天我们只做最简单的染发效果实现:颜色通道叠加。
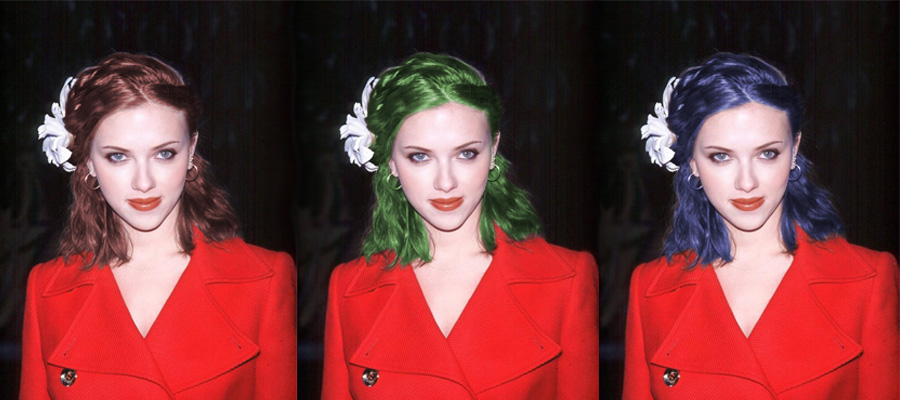
我们知道,在 RGB 色彩空间中,颜色分为 R、G、B 三个通道。那么只要把 R 通道的数值提高,就能让头发的颜色偏红。
Shader 关键代码如下:
void main (void) {
   vec4 mask = texture2D(hairMask, textureCoordinate);
   vec4 color = texture2D(inputImageTexture, textureCoordinate);

color.r = color.r + 0.3 * mask.g;

gl_FragColor = color;
}
这里的 mask 是头发的 Mask 图,由于结果保存在 G 通道里,所以通过 mask.g 读取结果。
原图和效果图对比:
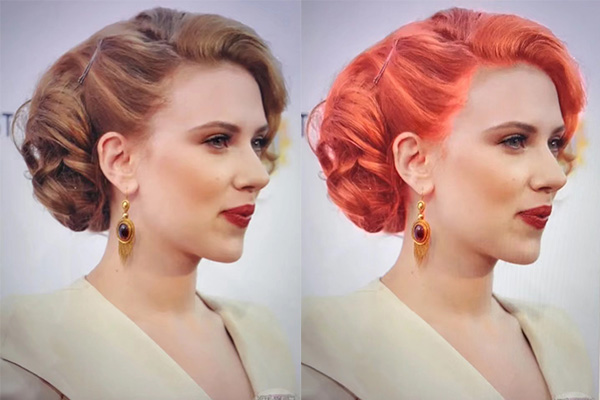
可以看到头发区域 R 通道数值提高后,颜色确实变红了。但同时也导致了头发区域亮度提升,整体不太自然。
在 HSL 空间中,可以由 RGB 算出亮度:
M = max(R, G, B)
m = min(R, G, B)
L = (M + m) / 2
其中 L 就表示颜色的亮度。
由上面的公式可以看出,颜色通道的数值提高,确实会影响颜色的亮度。
因此在单通道数值修改后,需要做一下亮度修正。
具体做法是算出颜色修改前后的亮度值,然后根据前后亮度比,对最终颜色的三个通道数值做等比缩放,保证前后亮度一致。
关键代码如下:
void main (void) {
   vec4 mask = texture2D(hairMask, textureCoordinate);
   vec4 color = texture2D(inputImageTexture, textureCoordinate);

float originLightness = lightness(color.rgb);

color.r = color.r + 0.3 * mask.g;

float resultLightness = lightness(color.rgb);

gl_FragColor = vec4(color.rgb * (originLightness / resultLightness), 1.0);
}
亮度修正前后对比:
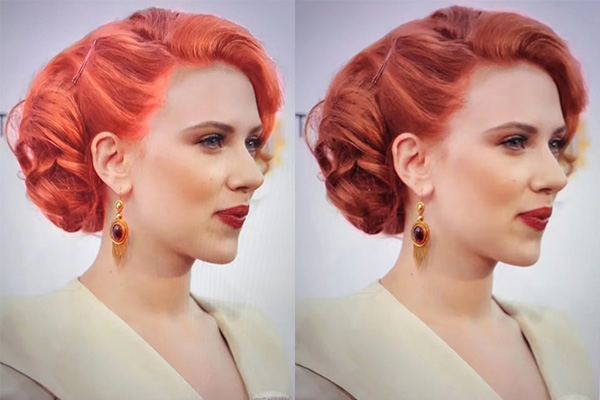
可以看到亮度修正后效果更加自然。
请到 GitHub 上查看完整代码。
</div
Recommend
About Joyk
Aggregate valuable and interesting links.
Joyk means Joy of geeK