

Razorpay Integration in the Flutter App – A Complete Guide
source link: https://www.simplifiedcoding.net/razorpay-integration-flutter/
Go to the source link to view the article. You can view the picture content, updated content and better typesetting reading experience. If the link is broken, please click the button below to view the snapshot at that time.
Razorpay Integration in the Flutter App – A Complete Guide
Hi, coders hope you all are doing good, in this post, we will learn how to integrate Razorpay into the flutter application.
Razorpay is an online payment solution also the fastest growing company in India.
Razorpay allows your business to accept, process, and disburse payments via its product suite.
Nowadays most companies are using Razorpay in their application like Spicejet, BookMyShow, Nykaa, Urbanclap, Zoho, Zomato, Goibibo, and many more. Razorpay provides UPI, credit & debit cards, and mobile wallet payment modes.
So, Now Let’s start step by step guide to integrating Razorpay into a flutter application
Package/Plugin Required to Check Internet Connection
Razorpay flutter – is a plugin to integrate Razorpay into your flutter application and accept payment from users. This plugin supports both Android and iOS. You can check out the documentation given below:
Android: https://razorpay.com/docs/checkout/android/
iOS: https://razorpay.com/docs/ios/
This plugin works on event-based communication and emits the event either payment succeeded or fail.
The events are:
EVENT_PAYMENT_SUCCESS – Payment Successful
EVENT_PAYMENT_ERROR – Error occurs while payment
EVENT_EXTERNAL_WALLET – The external wallet selected for payment
These events are assigned as constants in Razorpay class. The handling of events by creating a listener method, each event has its own listener method, you can see the code below:
//Events _razorpay?.on(Razorpay.EVENT_PAYMENT_SUCCESS, _handlePaymentSuccess); _razorpay?.on(Razorpay.EVENT_PAYMENT_ERROR, _handlePaymentError); _razorpay?.on(Razorpay.EVENT_EXTERNAL_WALLET, _handleExternalWallet); |
//Methods void _handlePaymentSuccess(PaymentSuccessResponse response) { // Do something when payment succeeds void _handlePaymentError(PaymentFailureResponse response) { // Do something when payment fails void _handleExternalWallet(ExternalWalletResponse response) { // Do something when an external wallet was selected |
To clear the listener use the clear() method:
_razorpay.clear(); |
http – is a flutter plugin that allows playing with HTTP requests with minimal hassle. http plugin supports multiplatform Android, iOS, Windows, MAC …etc.
fluttertoast – is a flutter plugin that is used to show a toast message in your flutter application.
Fluttertoast.showToast(msg: "Hello world!" ); |
You can add these three packages to your pubsec.yaml file in the dependencies section.
dependencies: flutter: sdk: flutter cupertino_icons: ^1.0.2 razorpay_flutter: ^1.2.7 http: ^0.13.4 fluttertoast: 8.0.6 |
After adding this to your dependencies use the “flutter pub get” command to get this in your dependencies.
Steps to Razorpay integration in Flutter
First of all, you have to set up your Razorpay account. Follow the steps given below:
- Create a Razorpay account here and log in to Dashboard.
- Select the mode (Test – testing purpose, Live – is used in production mode),
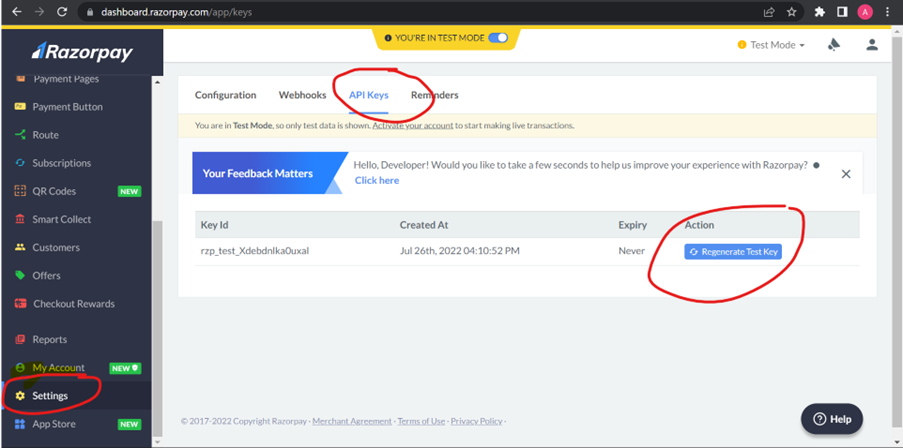
- Go to Settings where you can see API Keys.

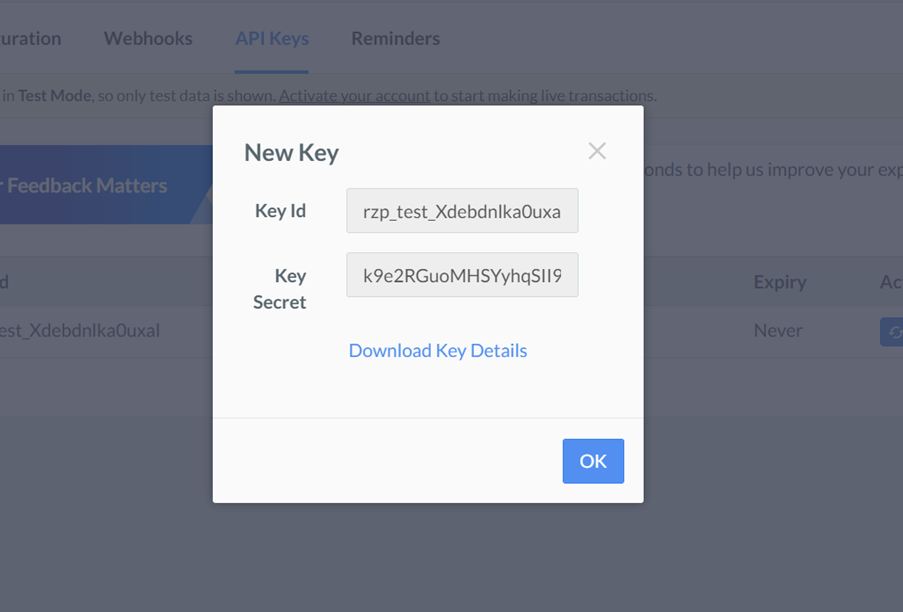
- Go to the API Keys section and generate API Key & Secret key.
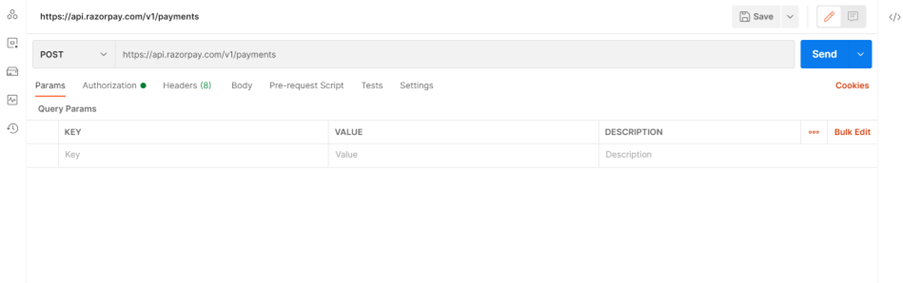
- Now, you must generate the basic auth token that secures your payment.
- Open Postman, create a new tab, and input https://api.razorpay.com/v1/payments with the POST method.

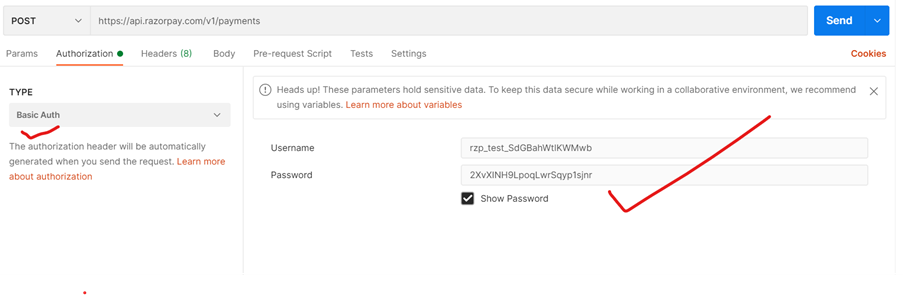
- Go to the authorization section select TYPE > Basic Auth, then input your razorpay API key with the secret key and send the request.

- Now, go to the header section, and you can see the basic token automatically generated.

Now, moving to the app, Create a file name payment_screen.dart .
Import packages by given below code
import 'package:fluttertoast/fluttertoast.dart'; import 'package:razorpay_flutter/razorpay_flutter.dart'; import 'package:http/http.dart' as http; |
Create an instance of Razorpay class by adding the below code
Razorpay? _razorpay; |
Now, initialize the instance and payment event listeners into initState() function.
@override void initState() { _razorpay = Razorpay(); _razorpay?.on(Razorpay.EVENT_PAYMENT_SUCCESS, _handlePaymentSuccess); _razorpay?.on(Razorpay.EVENT_PAYMENT_ERROR, _handlePaymentError); _razorpay?.on(Razorpay.EVENT_EXTERNAL_WALLET, _handleExternalWallet); super.initState(); |
Create handling methods that show a toast message
void _handlePaymentSuccess(PaymentSuccessResponse response) async { Fluttertoast.showToast(msg: " Payment Successfully"); void _handlePaymentError(PaymentFailureResponse response) { Fluttertoast.showToast(msg: "Payment failed"); void _handleExternalWallet(ExternalWalletResponse response) { Fluttertoast.showToast(msg: "Payment Successfully"); |
Now, create a function createOrder(), in this function, we create an order using Razorpay API that requires the Basic auth token, Amount, currency, and receipt name.
Future<dynamic> createOrder() async { var mapHeader = <String, String>{}; mapHeader['Authorization'] = "Basic cnpwX3Rlc3RfU2RHQmFoV3RsS1dNd2I6Mlh2WElOSDlMcG9xTHdyU3F5cDFzam5y"; mapHeader['Accept'] = "application/json"; mapHeader['Content-Type'] = "application/x-www-form-urlencoded"; var map = <String, String>{}; setState(() { map['amount'] = "${(num.parse(amount.text) * 100)}"; map['currency'] = "INR"; map['receipt'] = "receipt1"; print("map $map"); var response = await http.post(Uri.https("api.razorpay.com", "/v1/orders"), headers: mapHeader, body: map); print("...." + response.body); if (response.statusCode == 200) { RazorpayOrderResponse data = RazorpayOrderResponse.fromJson(json.decode(response.body)); openCheckout(data); } else { Fluttertoast.showToast(msg: "Something went wrong!"); |
If the API response success then you get the total details of your order and the response saved in the model.
Create a model with the name razorpay_response_model.dart
class RazorpayOrderResponse { "id": "order_HqIiXEtwbi6Cge", "entity": "order", "amount": 4000, "amount_paid": 0, "amount_due": 4000, "currency": "INR", "receipt": "1", "offer_id": null, "status": "created", "attempts": 0, "notes": [ "created_at": 1630084475 String? id; String? entity; int? amount; int? amountPaid; int? amountDue; String? currency; String? receipt; String? offerId; String? status; int? attempts; int? createdAt; RazorpayOrderResponse({ this.id, this.entity, this.amount, this.amountPaid, this.amountDue, this.currency, this.receipt, this.offerId, this.status, this.attempts, this.createdAt, RazorpayOrderResponse.fromJson(Map<String, dynamic> json) { id = json["id"]?.toString(); entity = json["entity"]?.toString(); amount = json["amount"]?.toInt(); amountPaid = json["amount_paid"]?.toInt(); amountDue = json["amount_due"]?.toInt(); currency = json["currency"]?.toString(); receipt = json["receipt"]?.toString(); offerId = json["offer_id"]?.toString(); status = json["status"]?.toString(); attempts = json["attempts"]?.toInt(); createdAt = json["created_at"]?.toInt(); Map<String, dynamic> toJson() { final Map<String, dynamic> data = Map<String, dynamic>(); data["id"] = id; data["entity"] = entity; data["amount"] = amount; data["amount_paid"] = amountPaid; data["amount_due"] = amountDue; data["currency"] = currency; data["receipt"] = receipt; data["offer_id"] = offerId; data["status"] = status; data["attempts"] = attempts; data["created_at"] = createdAt; return data; |
Now, create one more function openCheckout() that required API key, order id, amount, name, and description these details are stored in the options variable, and pass this variable in the _razorpay.open(options) function that open payment interface.
void openCheckout(RazorpayOrderResponse data) async { var options = { 'key': RazorpayApiKey, 'amount': "${(num.parse(amount.text) * 100)}", 'name': 'Razorpay Test', 'description': '', 'order_id': '${data.id}', _razorpay?.open(options); } catch (e) { debugPrint('Error: $e'); |
Now, call createOrder() function to make payment.
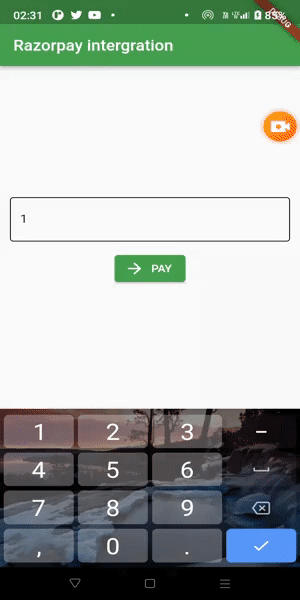
ElevatedButton.icon( onPressed: () => createOrder(), icon: Icon(Icons.arrow_forward_sharp), label: Text("PAY")) |
Result:
Conclusion
So, We successfully integrate Razorpay into our flutter application. I hope you enjoyed it and learned something. The complete code is available on GitHub. If you think this post was helpful, please share it with your friends. Thank You 🙂
Hi, I am Abhishek Kumar, a Flutter Developer, Problem solver & technical writer. For the past year, I am solving problems and implementing them as Apps using Flutter & Dart.
Checkout these tutorials as well:


Recommend
About Joyk
Aggregate valuable and interesting links.
Joyk means Joy of geeK