

从零开始构建向量数据库:Milvus 的源码编译安装(一)
source link: https://soulteary.com/2022/07/09/building-a-vector-database-from-scratch-source-code-compilation-and-installation-of-milvus-1.html
Go to the source link to view the article. You can view the picture content, updated content and better typesetting reading experience. If the link is broken, please click the button below to view the snapshot at that time.
从零开始构建向量数据库:Milvus 的源码编译安装(一)
我在知乎上开了一个新的专栏,想持续聊聊“向量数据库”相关的内容。本篇聊聊向量数据库领域,知名的开源技术项目:Milvus。
如果你在寻找如何从源码编译安装,如何在 x86 和 ARM 两种架构的 Linux 上折腾 Milvus,那么这篇文章应该是最为详细的教程向参考内容啦。
提到“向量数据库”、“Vector database”,“相似性检索引擎”,Milvus 作为 Linux Foundation AI & Data 基金会下的毕业项目,是众多技术方案中选型,你一定会遇到的开源解决方案之一。
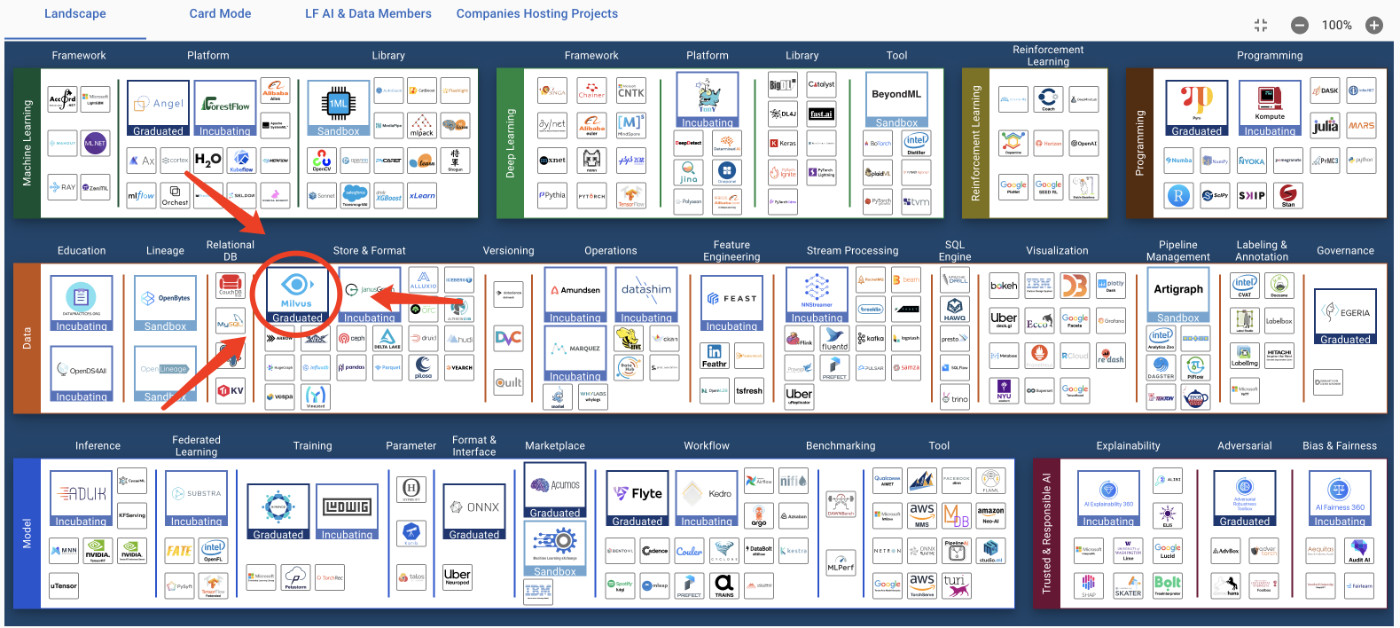
除了 LF 加持之外,在 DB-Engines 上,它也经常被拿来和 Weaviate 和 Elasticsearch 进行比较(后续的文章中,我会展开聊聊相关的部分)。
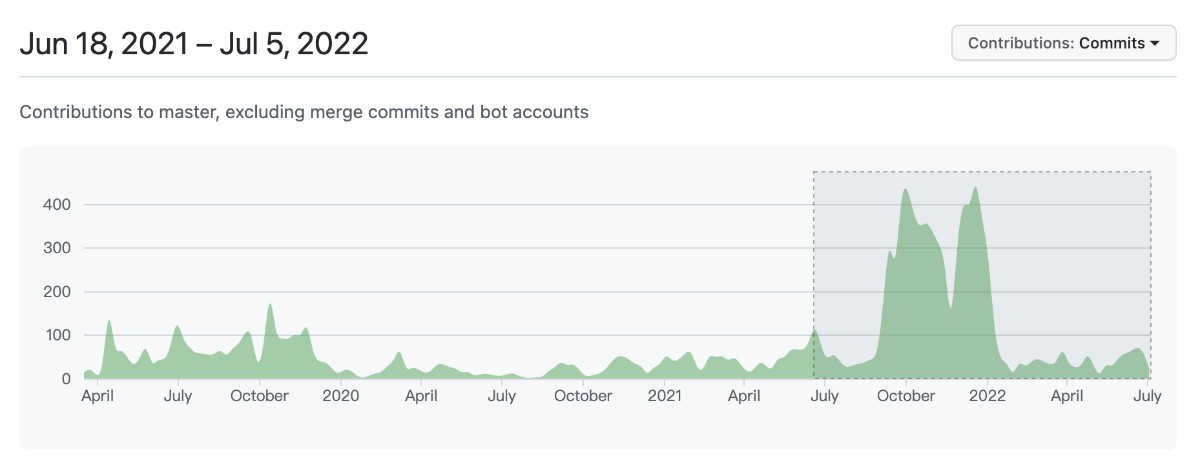
因为项目基本活动都在 GitHub 上,所以在网上,当我们通过搜索引擎(尤其是中文网络中),我们很少能够搜索到如何正确的对其进行编译、安装。甚至,很少能够在 GitHub Issue 之外的地方找到详尽的软件新版本的使用和讨论,更别说中文参考啦,能够找到的都是一些 1.x 版本的资料,然而 Milvus 1.x、2.x 差异还是很大的,一个是“单机版”,一个是现代的、可改造接入生产的分布式版本。
加上项目最近一年以来,2.x 版本迭代又特别快,目前也只为用户提供了 Docker 容器的安装和部署方案,对于想要进行本地开发或者调试的人来说,以及不希望“软件存在黑盒”的开发者来说,显然做的是不够好的。
接下来,我们就先从编译入手,从零到一的开始了解这个项目吧。
在正式折腾编译构建之前,我们先分别从操作系统、开发环境、容器环境、源码获取几个方面来展开聊聊要做哪些准备工作。
目前软件可以在 Linux、macOS、Windows 上完成编译,考虑到多数开发者的使用场景,本篇文章先介绍如何在 Linux 环境下从源码构建 Milvus:毕竟 Linux 是绝对主力的生产环境。
至于我们在大规模生产中高频使用的容器环境,我将单独写为它写一篇文章,聊聊如何进行镜像构建和优化。
Linux 操作系统发行版的选择,我推荐使用 Ubuntu,不论是作为服务器环境、容器基础镜像环境,亦或者是笔记本等本地趁手设备的图形界面环境。关于细节的原因,我在这篇问题(《笔记本电脑适合安装哪个Linux?》)中有回答过,就不过多展开了。
关于系统的安装和基础配置,可以参考我在《在笔记本上搭建高性价比的 Linux 学习环境:基础篇》中“安装 Ubuntu 22.04”和“进行系统基础配置”部分的内容,十来分钟左右应该就能完成系统的配置啦。
Golang 和 C++ 开发环境
Milvus 中绝大多数代码是由 Golang 编写的,但是核心的部分又包含了一大堆 C++ 的内容(internal/core/src),所以我们需要同时确保两种语言的运行环境。
为了让 Golang 环境的折腾能省点劲,我曾经介绍过如何在 Linux 环境中《搭建可维护的 Golang 开发环境》,相信应该能够解决你将会遇到各种 Golang 环境的问题。参考文章,大概十分钟内,你就能够用上“新鲜热乎”的 Golang 了。
相比较 Golang,折腾 C++ 的环境非常容易,在 Linux 环境中,基本能够用简单的命令行来快速下载预构建好的二进制软件包,这部分内容,我们将在下文中展开。
在正式开始之前,还有最后一项准备工作,就是“源代码的获取”。
获取 Milvus 源码的方式有两种:使用 Git Clone 的方式,通过 Git 客户端来下载代码;直接下载 GitHub 提供包含某个版本或包含最新提交的“master”分支的压缩包。
之所以单独提源码获取,是因为 Milvus 项目包含 1 万 5 千多次提交,直接通过 Git 客户端从 GitHub 下载可能会浪费一些时间,甚至会在下载过程中因为数据下载时间太久导致超时而中断下载。但是,如果想进行本地开发,查看提交历史,对比不同分支版本的差异,并且想和官方代码保持一定的版本同步,这个方式又是必须的。
解决这个问题的最佳方案是借助国内镜像做“加速”,完成基础部分的代码下载,然后再切换 Git 代码的上游,完成项目代码的完整下载。
先使用 git clone 从国内的镜像仓库获取包含了绝大多数提交内容的源代码。
git clone https://gitee.com/milvus-io/milvus.git
耐心等待仓库下载完毕。
git clone https://gitee.com/milvus-io/milvus.git
Cloning into 'milvus'...
remote: Enumerating objects: 160476, done.
remote: Counting objects: 100% (37509/37509), done.
remote: Compressing objects: 100% (12122/12122), done.
remote: Total 160476 (delta 29683), reused 31705 (delta 24611), pack-reused 122967
Receiving objects: 100% (160476/160476), 112.49 MiB | 15.33 MiB/s, done.
Resolving deltas: 100% (120888/120888), done.
接着进入仓库目录,删除掉原始的仓库上游,把地址切换为官方的 GitHub 地址。如果你计划对项目提交 PR 的话,也可以换成你自己的 fork 仓库地址。
# 进入下载完毕的仓库目录
cd milvus
# 删除仓库原始代码上游
git remote remove origin
# 根据自己情况选择,添加官方仓库地址为新的上游
git remote add origin https://github.com/milvus-io/milvus.git
# 或者添加自己的 fork 仓库(有读写权限,协议可以根据自己的情况选择 git 或者 https
# git remote add origin [email protected]:soulteary/milvus.git
根据自己的需求,设置完毕代码仓库的上游,我们先执行 git pull 手动同步一把仓库上游的数据。
git pull
From https://github.com/milvus-io/milvus
 * [new branch]          1.0                         -> origin/1.0
 * [new branch]          1.1                         -> origin/1.1
 * [new branch]          1.x                         -> origin/1.x
 * [new branch]          2.0                         -> origin/2.0
 * [new branch]          2.0.2                       -> origin/2.0.2
 * [new branch]          2.0.3                       -> origin/2.0.3
 * [new branch]          2.1.0                       -> origin/2.1.0
...
 * [new branch]          master                      -> origin/master
...
 * [new branch]          update_pytest_f73a87b1f282257aa972c3aaff9a450d864a785a -> origin/update_pytest_f73a87b1f282257aa972c3aaff9a450d864a785a
 * [new branch]          update_pytest_fc2839f254a2327520e6202f4a1fa31937628aa0 -> origin/update_pytest_fc2839f254a2327520e6202f4a1fa31937628aa0
There is no tracking information for the current branch.
Please specify which branch you want to merge with.
See git-pull(1) for details.

    git pull <remote> <branch>

If you wish to set tracking information for this branch you can do so with:

    git branch --set-upstream-to=origin/<branch> master
然后使用 git branch --set-upstream-to 命令,把本地的分支和上游的远程分支绑定到一块儿。
git branch --set-upstream-to=origin/master master
在执行完命令之后,我们将能够在终端里看到类似下面的内容输出:
git branch --set-upstream-to=origin/master master
Branch 'master' set up to track remote branch 'master' from 'origin'.
最后,再次执行一次 fetch 和 pull,确保本地的代码和远程一致。
git fetch && git pull origin master
命令执行完毕,不出意外,我们将能够得到 “Already up to date.” 的提示。
git fetch && git pull origin master
From https://github.com/milvus-io/milvus
 * branch                master     -> FETCH_HEAD
Already up to date.
编译基础依赖:OpenBLAS
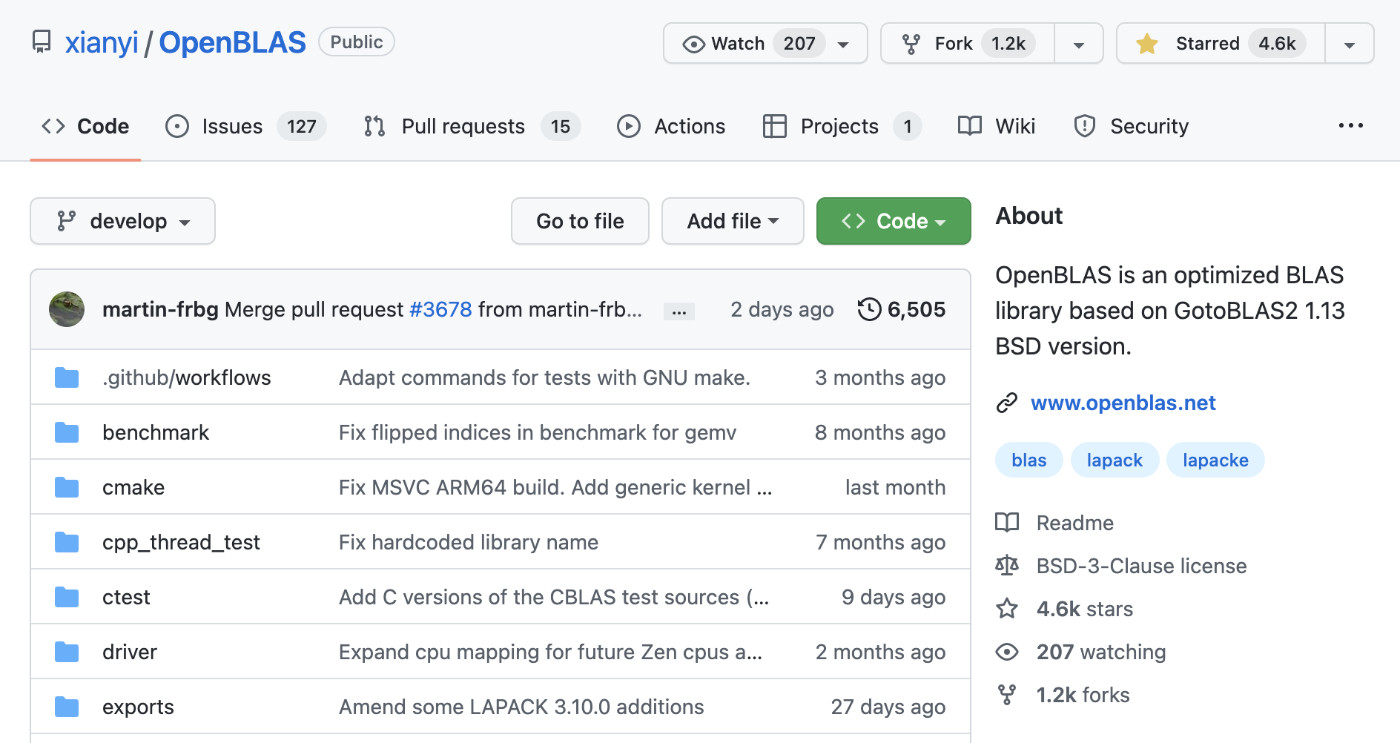
在许多项目中,都会选择通过 OpenBLAS 或者 MKL 来加速向量计算,比如 Facebook 的 faiss,或者和业务做结合,在 PyTorch、TensorFlow 中进行部分计算加速。
Milvus 项目的核心依赖 knowhere 中,目前也有使用到 OpenBLAS,所以为了能够顺利的编译构建项目,我们就需要先搞定 OpenBLAS。OpenBLAS 官方项目从 v0.3.6 版本开始,提供了 有限的 “预构建”二进制版本,可以帮助我们节约一些时间。但是在一些场景下,我们可能需要从源码进行编译。
在上一篇文章《走进向量计算:从源码编译 OpenBLAS》中,我详细的介绍了如何进行编译安装,在此就不展开了,相信你跟着文章,一定能够顺利的得到编译产物。
准备构建依赖:cmake
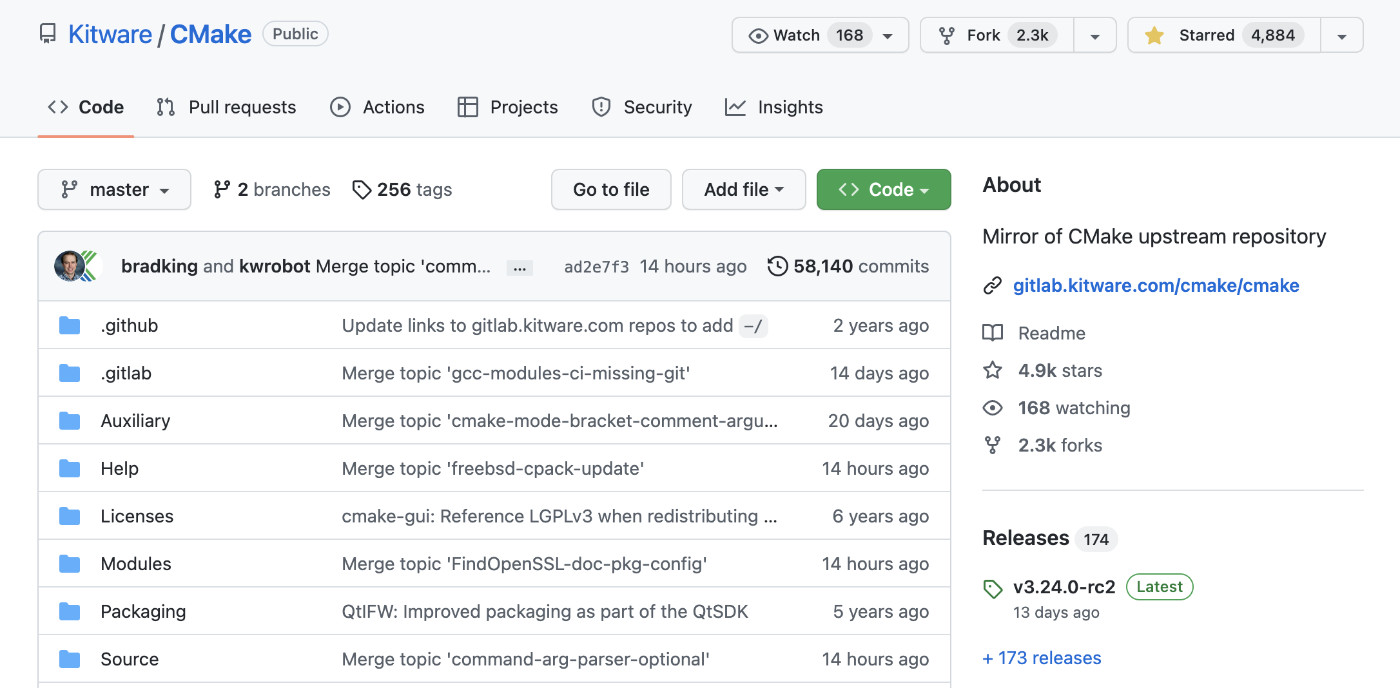
和 OpenBLAS 遇到的问题类似,Milvus 官方项目要求 cmake 的版本是大于或等于 3.18。但在 Ubuntu 20.04 以及 Ubuntu 18.04 版本中,我们能够找到的 cmake 最高版本在 3.16.3。
Ubuntu 20.04 环境的 cmake
如果我们选择使用 3.18.6 版本的 cmake,那么可以直接使用官方提供的二进制文件,来完成安装。(该版本只支持 x86_64):
wget -qO- "https://cmake.org/files/v3.18/cmake-3.18.6-Linux-x86_64.tar.gz" | sudo tar --strip-components=1 -xz -C /usr/local
安装完毕之后,我们可以使用 cmake --version 命令,来简单验证安装是否正确:
cmake --version
cmake version 3.18.6

CMake suite maintained and supported by Kitware (kitware.com/cmake).
针对 ARMv64 环境(比如 Apple M1 设备),如果想“偷懒”,那么我们只能选择使用 3.19.3 以上版本的 cmake:
https://github.com/Kitware/CMake/releases/download/v3.23.2/cmake-3.23.2-linux-aarch64.tar.gz
这个版本和 Milvus 官方文档中提到的 3.18.6 的变更其实挺多的,足足有 1647 次提交,包含了 3711 个文件的变动。在没有完整构建产物端到端测试的情况下,确实很难确保这个版本的 cmake 构建结果和 Milvus 官方构建结果是“近似一致”的。
所以,如果你想要得到基本和官方维护的版本近似的、相对有保障的构建产物,建议暂时还是使用 x86_64 环境的 Linux 和各种相同版本的工具依赖。
不过,我相信随着项目的发展,应该会有更好的解决方案,来解决这类“尚未被完全覆盖”的问题。
Ubuntu 22.04 环境的 cmake
在 Ubuntu 22.04 环境中,除了使用“源代码编译”这个方式之外,我们有一个更简单的方案:使用 apt install 来完成软件的安装,不过因为在 Ubuntu 22.04 的 cmake 软件包仓库页面,我们能够看到,目前官方只提供了稍低于官方 stable 版本的软件:3.22.1。
使用下面的命令,就能完成 cmake 的安装啦。
sudo apt update && \
sudo apt-get install -y cmake
不过,和上面提到的 ARM 环境会遇到的问题一样,这个版本和 Milvus 文档中使用的 cmake 版本是不一样的。所以,为了构建产物和官方相对一致,推荐使用官方的预构建版本:
wget -qO- "https://cmake.org/files/v3.18/cmake-3.18.6-Linux-x86_64.tar.gz" | sudo tar --strip-components=1 -xz -C /usr/local
准备构建依赖:clang-format、clang-tidy
在 Milvus 代码仓库里的构建工具镜像代码中,我们能够看到一个构建依赖叫做:clang-format-10 和 clang-tidy-10,这两个工具被用于构建过程中,对代码进行格式化和检查。
和上文中提到的依赖遇到的问题类似,在 Ubuntu 20.04 和 Ubuntu 22.04 中,这个包的安装使用上,就有了一些区别和需要注意的地方。
Ubuntu 20.04 环境的 clang-format、clang-tidy
在 Ubuntu 20.04 的软件包仓库中,我们能够找到 clang-format-10 和 clang-format 两个软件包,前者由 Ubuntu 官方团队(Ubuntu Developers)维护,后者则是由 Ubuntu 社区爱好者们(MOTU Developers)维护。
所以,在 Ubuntu 环境下,如果我们想要安装和使用这两个工具,推荐使用下面的命令,来安装来自官方团队维护的软件包:
sudo apt-get update && \
sudo apt install -y clang-format-10 clang-tidy-10
或者选择安装包含了 clang-format-10 这个版本的工具的 llvm-toolchain-10 软件包,同样是由 Ubuntu 官方团队维护的。
Ubuntu 22.04 环境的 clang-format、clang-tidy
在 Ubuntu 22.04 中,Ubuntu 官方团队(Ubuntu Developers)停止了维护 clang-format-10 clang-tidy-10 软件包,以及同样包含我们所需工具的 llvm-toolchain-10 版本的 llvm 软件包。我们的选择,只剩下了由社区爱好者们提供的 clang-format 和 clang-tidy 两个软件包。
如果我们不介意 clang 的版本由 v10 升级到了 v14,那么可以使用下面的命令来安装预构建好的二进制软件包:
sudo apt-get update && \
sudo apt install -y clang-format clang-tidy
当然,为了能够和 Milvus 官方构建保持一致,推荐还是使用版本为 v10 的 clang,默认情况下没有预构建好的二进制,那么我们依旧得从源码编译入手。
想要通过编译得到 10.x 版本 llvm-toolchain ,我们可以选择使用 Debian 代码仓库,LLVM Team 维护的 10.x 版本的代码;或者选择使用 Ubuntu 官方团队维护的 10.0.0 版本的代码,考虑到之前 Milvus 官方使用的代码包是来自 Ubuntu 官方团队的软件包,所以在这里选择后者。
通过 git clone 下载项目代码:
git clone -b ubuntu/focal https://git.launchpad.net/ubuntu/+source/llvm-toolchain-10
在切换到项目目录之后,创建一个新的目录,用于接下来的构建:
cd llvm-toolchain-10 && \
mkdir build && cd build
未来能够顺利构建 llvm-toolchain-10,我们还需要安装一个额外的开发依赖:
sudo apt-get update && \
sudo apt install -y ninja-build
在完成开发依赖的安装之后,先使用 cmake 生成构建配置文件(仅构建我们想要的 clang-toolchain):
cmake -DLLVM_ENABLE_PROJECTS="clang;clang-tools-extra" -DCMAKE_BUILD_TYPE=Release -DPYTHON_EXECUTABLE=$(which python3) -DBENCHMARK_DOWNLOAD_DEPENDENCIES=ON ../llvm
当命令执行完毕,我们将看到类似下面的输出日志:
-- clang project is enabled
-- clang-tools-extra project is enabled
-- compiler-rt project is disabled
-- debuginfo-tests project is disabled
-- libc project is disabled
-- libclc project is disabled
...
...
-- Performing Test HAVE_POSIX_REGEX -- success
-- Performing Test HAVE_STEADY_CLOCK
-- Performing Test HAVE_STEADY_CLOCK
-- Performing Test HAVE_STEADY_CLOCK -- success
-- Configuring done
-- Generating done
-- Build files have been written to: /app/milvus/llvm-toolchain-10/build
当我们确认构建文件都生成就绪之后,执行 cmake --build .,这里会经历极其漫长的等待,建议站起身来运动运动,喝点饮料放松一些。
cmake --build .
[4/4165] Building CXX object utils/TableGen/CMakeFiles/llvm-tblgen.dir/SubtargetEmitter.cpp.o
...
[2957/4165] Building CXX object tools/clang/lib/Frontend/CMakeFiles/obj.clangFrontend.dir/PrecompiledPreamble.cpp.
...
在构建过程中,我们会经历一次失败:FAILED: utils/benchmark/src/CMakeFiles/benchmark.dir/benchmark_register.cc.o。
经过查找,在 ONNX 社区里,我们看到了这个 issue。这是因为 llvm-toolchain-10/llvm/utils/benchmark/src/benchmark_register.h 代码中的引用头文件,在 Ubuntu 22.04 中需要“调整”。
#ifndef BENCHMARK_REGISTER_H
#define BENCHMARK_REGISTER_H

#include <vector>

#include "check.h"

template <typename T>
void AddRange(std::vector<T>* dst, T lo, T hi, int mult) {
  CHECK_GE(lo, 0);
  CHECK_GE(hi, lo);
  CHECK_GE(mult, 2);

  // Add "lo"
  dst->push_back(lo);

  static const T kmax = std::numeric_limits<T>::max();

  // Now space out the benchmarks in multiples of "mult"
  for (T i = 1; i < kmax / mult; i *= mult) {
    if (i >= hi) break;
    if (i > lo) {
      dst->push_back(i);
    }
  }

  // Add "hi" (if different from "lo")
  if (hi != lo) {
    dst->push_back(hi);
  }
}

#endif  // BENCHMARK_REGISTER_H
先将程序的引用的模块调整为下面这样:
#include <stdexcept>
#include <limits>
#include <vector>

#include "check.h"
然后再次执行 cmake --build . ,就能够看到 clang-tools 顺利编译完毕的结果了:
[3/3] Linking CXX static library lib/libbenchmark_main.a
在完成构建之后,我们使用 ./bin/clang-format --version 和 ./bin/clang-tidy --version 来简单验证下程序是否能够运行:
# ./bin/clang-format --version
clang-format version 10.0.0 (https://git.launchpad.net/ubuntu/+source/llvm-toolchain-10 6f319ce10f040c979f7bb074a7b7465b8c7bf9f7)

# ./bin/clang-tidy --version
LLVM (http://llvm.org/):
  LLVM version 10.0.0
  Optimized build.
  Default target: x86_64-unknown-linux-gnu
  Host CPU: znver1
因为我们不需要 clang-format 和 clang-tidy 之外的程序,所以我们可以手动将两个可执行文件复制到系统的可执行程序目录中:
sudo cp bin/clang-format /usr/local/bin && \
sudo cp bin/clang-tidy /usr/local/bin
最后,我们可以将 llvm-toolchain-10 目录删除掉,节约磁盘空间(约 4.7G)。
其余 C++ 开发环境的依赖
上文中,我们其实已经进行了一些 C++ 环境的依赖和工具的准备,不过为了让 C++ 部分程序能够顺利编译和使用,我们还需要继续补完一些内容。
Ubuntu 环境下的 C++ 开发环境
sudo apt update && \
sudo apt-get install -y g++ gcc make lcov libtool m4 autoconf automake ccache libssl-dev zlib1g-dev libboost-regex-dev libboost-program-options-dev libboost-system-dev libboost-filesystem-dev libboost-serialization-dev python3-dev libboost-python-dev libcurl4-openssl-dev gfortran libtbb-dev pkg-config && \
sudo apt-get remove --purge -y
当依赖全部安装完毕之后,C++ 部分的开发环境就完全就绪了。
Golang 开发环境调整
在文章的“前置准备”小节中,我们提到过 Golang 环境的快速安装配置。
因为 Milvus 当前发布的版本中,官方仓库目前实际使用的 Golang Runtime 版本是 1.16.9,所以我们需要使用 gvm 来快速安装和配置这个版本的 Golang:
gvm install go1.16.9 -B && \
gvm use go1.16.9 --default
当命令执行完毕,我们将能够看到类似下面的日志输出:
Installing go1.16.9 from binary source
Now using version go1.16.9
至此,适合 Milvus 项目使用的 Golang 的环境就准备就绪啦。
当然,我个人在试着使用更高版本的 Golang1.7 和 Golang 1.8 来编译 Milvus,也没有遇到任何问题,如果你希望让程序跑的更快一些,可以试着切换到更新的版本。
至于目前官方基于 Ubuntu 18.04 构建工具镜像中提到的一些工具镜像,可以根据你的需求进行选择性安装(此处可以忽略安装,未来我会单独写一篇内容,聊聊这块工具安装的问题和优化):
RUN ...
    curl -sSfL https://raw.githubusercontent.com/golangci/golangci-lint/master/install.sh | sh -s -- -b ${GOPATH}/bin v1.43.0 && \
    export GO111MODULE=on && go get github.com/quasilyte/go-ruleguard/cmd/[email protected] && \
    go get -v github.com/ramya-rao-a/go-outline && \
    go get -v golang.org/x/tools/gopls && \
    go get -v github.com/uudashr/gopkgs/v2/cmd/gopkgs && \
    go get -v github.com/go-delve/delve/cmd/dlv && \
    go get -v honnef.co/go/tools/cmd/staticcheck && \
    go clean --modcache && \
    chmod -R 777 "$GOPATH" && chmod -R a+w $(go env GOTOOLDIR)
...
RUN ln -s /go/bin/dlv /go/bin/dlv-dap
额外补充,在本文发布的前夕,官方维护团队已经将 master 分支 golang 版本升级到了 1.18,希望在后面的稳定版本中,能够看到用上“新版本” 的 Milvus。
从源码完成 Milvus 编译
看到这里,距离完成 Milvus 项目的构建,我们已经完成了 90% 的工作。接下来,我们就来解决剩下的 10% 的工作。
Linux 环境下的编译
切换到我们早早准备好的 Milvus 代码目录中,然后执行 make milvus:
cd milvus
make milvus
接下来是最后一次漫长的等待,再倒杯水,等待花花绿绿的终端命令行执行完毕即可:
Building Milvus cpp library ...
/app/milvus/milvus/cmake_build /app/milvus/milvus
==System:Linux
cmake -DBUILD_UNIT_TEST=OFF -DCMAKE_INSTALL_PREFIX=/app/milvus/milvus/scripts/../internal/core/output -DCMAKE_BUILD_TYPE=Release -DOpenBLAS_SOURCE=AUTO -DCMAKE_CUDA_COMPILER=/usr/local/cuda/bin/nvcc -DBUILD_COVERAGE=OFF -DMILVUS_DB_PATH=/tmp/milvus -DENABLE_CPU_PROFILING=OFF -DMILVUS_GPU_VERSION=OFF -DMILVUS_WITH_PROMETHEUS=ON -DMILVUS_CUDA_ARCH=DEFAULT -DCUSTOM_THIRDPARTY_DOWNLOAD_PATH= -DEMBEDDED_MILVUS=OFF /app/milvus/milvus/scripts/../internal/core
-- Building using CMake version: 3.18.6
-- The C compiler identification is GNU 11.2.0
-- The CXX compiler identification is GNU 11.2.0
...
[100%] Built target milvus_segcore
make[2]: Leaving directory '/app/milvus/milvus/cmake_build'
Install the project...
...
make[1]: Leaving directory '/app/milvus/milvus/cmake_build'
Summary:
  Hits:               0 /  914 (0.00 %)
    Direct:           0 /  914 (0.00 %)
    Preprocessed:     0 /  914 (0.00 %)
  Misses:           914
    Direct:         914
    Preprocessed:   914
  Uncacheable:       31
Primary storage:
  Hits:               0 / 1828 (0.00 %)
  Misses:          1828
  Cache size (GB): 0.20 / 5.00 (4.06 %)

Use the -v/--verbose option for more details.
/app/milvus/milvus
Build Tag: v2.1.0-testing-20220704-15-g44024c1b1
Build Time: 2022年 07月 06日 星期三 07:36:49 UTC
Git Commit: 44024c1b1
Go Version: go version go1.16.9 linux/amd64
Building Milvus ...
if build fails on Mac M1 machines, you probably need to rerun scripts/install_deps.sh and then run: `export PKG_CONFIG_PATH="/opt/homebrew/opt/openssl@3/lib/pkgconfig"`
...
go: downloading github.com/golang/protobuf v1.5.2
go: downloading github.com/gofrs/flock v0.8.1
go: downloading go.etcd.io/etcd v0.5.0-alpha.5.0.20200910180754-dd1b699fc489
go: downloading go.uber.org/automaxprocs v1.4.0
go: downloading go.uber.org/zap v1.17.0
go: downloading github.com/pkg/errors v0.9.1
go: downloading google.golang.org/grpc v1.44.0
...
当一切运行完毕之后,我们能够在代码目录子目录 ./bin/ 中,发现构建完毕的 milvus 二进制可执行文件,尝试运行一下 ./bin/milvus,可以看到类似下面的输出:
./bin/milvus
Usage:

milvus run [server type] [flags]
	Start a Milvus Server.
	Tips: Only the server type is 'mixture', flags about starting server can be used.
[flags]
	-rootcoord 'true'
		Start the rootcoord server.
	-querycoord 'true'
		Start the querycoord server.
	-indexcoord 'true'
		Start the indexcoord server.
	-datacoord 'true'
		Start the datacoord server.
	-alias ''
		Set alias


milvus stop [server type] [flags]
	Stop a Milvus Server.
[flags]
	-alias ''
		Set alias


milvus mck run [flags]
	Milvus data consistency check.
	Tips: The flags are optional.
[flags]
	-etcdIp ''
		Ip to connect the ectd server.
	-etcdRootPath ''
		The root path of operating the etcd data.
	-minioAddress ''
		Address to connect the minio server.
	-minioUsername ''
		The username to login the minio server.
	-minioPassword ''
		The password to login the minio server.
	-minioUseSSL 'false'
		Whether to use the ssl to connect the minio server.
	-minioBucketName ''
		The bucket to operate the data in it

milvus mck cleanTrash [flags]
	Clean the back inconsistent data
	Tips: The flags is the same as its of the 'milvus mck [flags]'


[server type]
	indexcoord
	datanode
	embedded
	proxy
	querycoord
	querynode
	standalone
	rootcoord
	indexnode
	datacoord
	mixture
聊到这里 ,Milvus 在 Ubuntu 20.04 / Ubuntu 22.04 环境中的编译安装就基本讲完啦。
目前因为覆盖多种场景,本篇文章又超过了一万字,所以就不再继续展开 Milvus 功能验证、以及相关 Issue 里编译安装的讨论、PR 里的故事啦。如果你想试玩 Milvus,可以直接访问官方的 Boot Camp 仓库,比如在笔记本上验证下 1 个亿的相似度查询有多快。
在接下来的内容中,我们会陆续聊聊上文中曾提到的一些内容:如何构建一个“知根知底”,更加“透明可控”的容器镜像,以及如何优化这个容器镜像的性能极限,让它在开发和生产环境中的性价比更高;在 MacOS (x86 和 M1 ARM)中,该怎么从零到一搞定 Milvus 这个分布式向量数据库的开发环境。
我们下一篇文章见。
Recommend
About Joyk
Aggregate valuable and interesting links.
Joyk means Joy of geeK