

How to use GraphQL to build Backend-For-Frontends (BFFs)
source link: https://blog.bitsrc.io/how-to-use-graphql-to-build-backend-for-frontends-bffs-4b7e5a0105d0
Go to the source link to view the article. You can view the picture content, updated content and better typesetting reading experience. If the link is broken, please click the button below to view the snapshot at that time.
How to use GraphQL to build Backend-For-Frontends (BFFs)
Step by step guide to implementing a GraphQL Backend-For-Frontend
Almost all modern-day applications use REST APIs for client-server communication. However, once an application scales with new requirements, it ultimately can drastically slow down an application due to a development anti-pattern.
This article will explore the Backend-For-Frontend pattern and how developers can implement this pattern using GraphQL to eliminate the negative aspects of conventional REST APIs.
Backend-For-Frontend (BFF) Pattern
When the API over-fetches data: the client application must process the data to create the required response for the page.
When the API under-fetches data: the client application has to perform additional HTTP requests to the RESP API to retrieve the required data.
It ultimately leads to a development anti-pattern called “Chatty I/O” between the client and the server and can drastically slow down an application.
A “Backend-For-Frontend” is a data transformation layer placed between a client and the API to avoid over-fetching and under-fetching and to eliminate the Chatty I/O development anti-pattern.
To better understand a BFF, let us consider the diagram below.
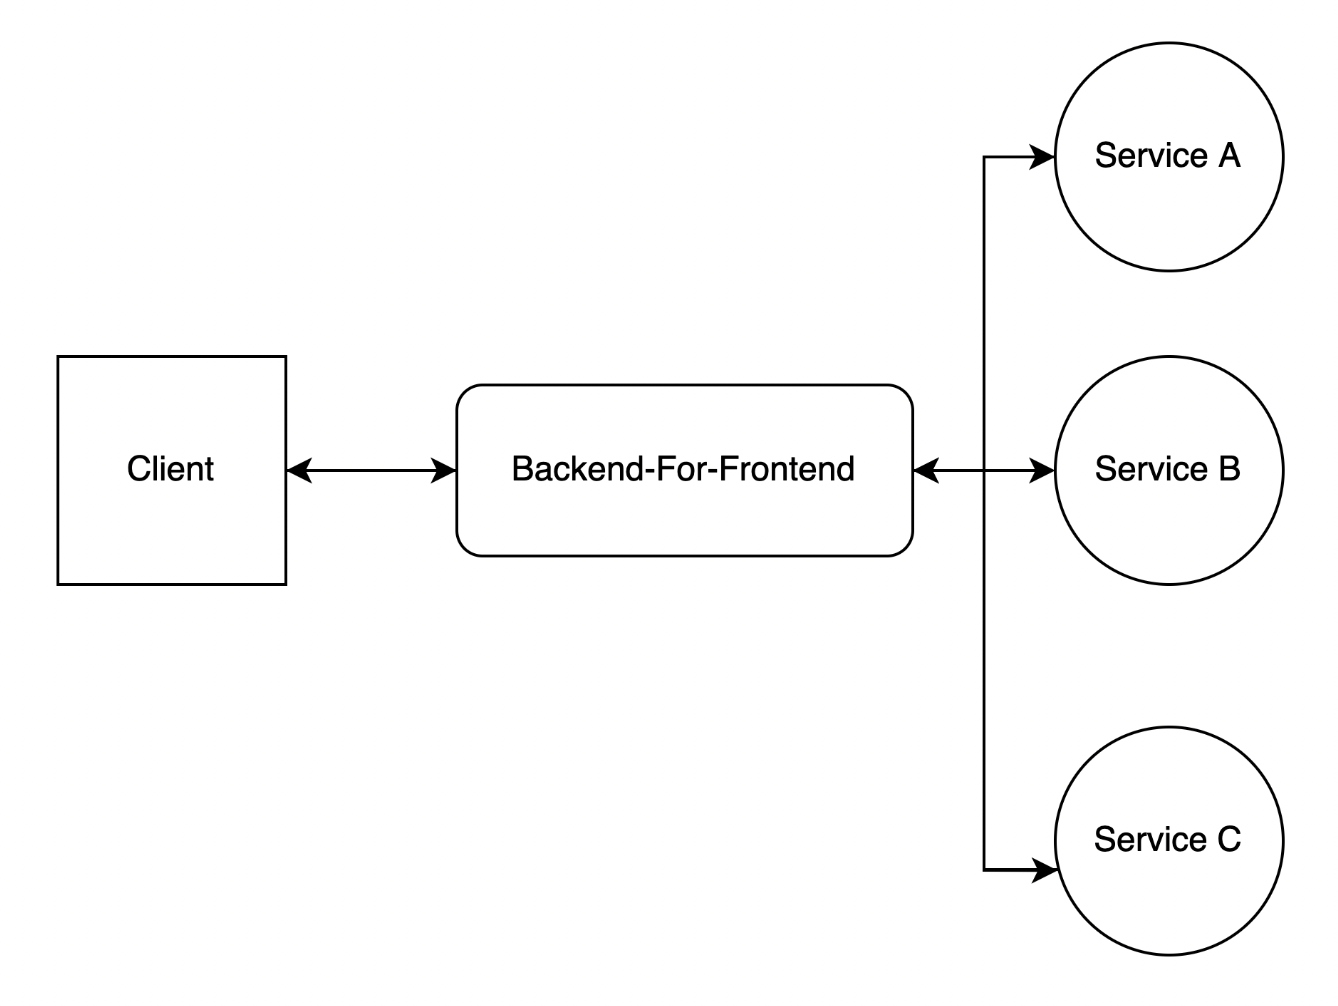
Figure 1: Illustrating an application implemented using a BFF
Figure 1 presents a simple design diagram of an application implemented using the Backend-For-Frontend pattern. In this diagram, we can observe the following request/response cycle.
- The client sends a request to the BFF.
- The Backend-For-Frontend then communicates with the internal services and collects the required data.
- It then aggregates the data into the shape required by the client
- It returns the shaped data to the client.
The client interacts with the BFF by adopting this approach and only receives the data required to populate the page (nothing more or less). Additionally, as the number of clients grows, BFFs can be implemented per client to retrieve data suited to its use case. You can see this in the diagram below.
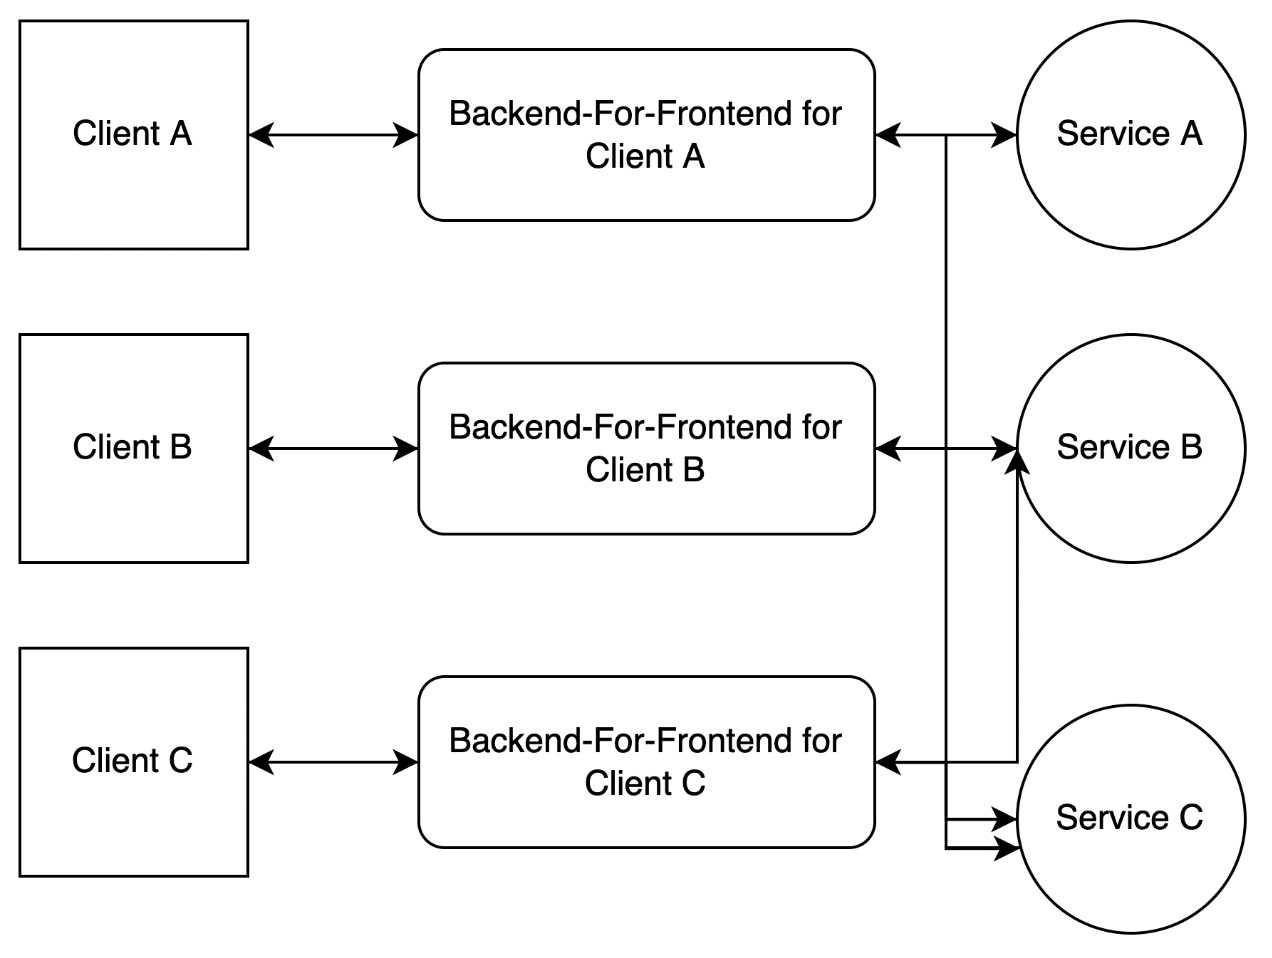
Figure 2 — Illustrating multiple BFFs per client
Figure 2 shows how multiple clients can access the API using its BFF. This approach ensures that each client communicates with an endpoint and retrieves only the data required to present data in its UI.
Hence, using a BFF creates faster page loads with a simplified response and eliminates additional network calls from the client-side, ultimately improving the application’s user experience.
Why is GraphQL the go-to technology for BFFs?
GraphQL is a query language for APIs and a runtime for fulling queries with existing application data.
GraphQL allows you to efficiently load data from a server to a client in laypeople’s terms.
What makes a GraphQL API different from a REST API is that GraphQL allows clients to define the shape of the response, unlike REST APIs (the server determines response shape).
Hence, GraphQL helps create efficient queries where clients can specify the data required to display content on the UI so that data is not over-fetched and under-fetched. This situation helps avoid a Chatty I/O, and more importantly, clients communicate to the backend with just one endpoint (by writing different queries).
Building a BFF using GraphQL
Now that we have understood what a Backend-For-Frontend is and why GraphQL is used to implement it. let us look at an implementation of a BFF using GraphQL.
You can implement GraphQL in any programming language, but I will be using Node.js to implement a GraphQL API that manages a collection of users in this demonstration.
Step 1: Pre-requisites
Before proceeding, make sure that you have installed Node.js and NPM on your computer.
To confirm the installation, run the following commands.
node -v
npm -v
You should see the outputs below if you’ve successfully installed the two.

Figure 1 — Successfully installing Node.js and NPM
Step 2: Installing the required libraries
First, create a new Node.js project by running the command npm init. It will generate a new package.json.
We will be implementing GraphQL with an Express web server. Therefore, we require three packages.
- GraphQL
- Express
- Express-GraphQL
Run the following command to install the packages given below.
npm install express express-graphql graphql
Step 3: Adding the sample data
Afterward, the API requires a data source to get data for requests. As shown below, I will mimic a data source by adding a sample data list in a file named “users.js" in the "data" directory for this walkthrough.
// sample data structure in data/users.js

const users = [
    {
        id: '1A',
        name: 'Lakindu Hewawasam',
        email: '[email protected]',
        username: 'lakindu',
        age: 19
    },
    {
        id: '2A',
        name: 'Joseph Pieris',
        email: '[email protected]',
        username: 'joseph',
        age: 25
    },
    {
        id: '3A',
        name: 'Andre Johns',
        email: '[email protected]',
        username: 'andre',
        age: 20
    },
    {
        id: '4A',
        name: 'Hakeem',
        email: '[email protected]',
        username: 'hakeem',
        age: 40
    },
    {
        id: '5A',
        name: 'Jamal',
        email: '[email protected]',
        username: 'jamal',
        age: 36
    },
    {
        id: '6A',
        name: 'Robert Downey Jr',
        email: '[email protected]',
        username: 'downey',
        age: 42
    },
    {
        id: '7A',
        name: 'Chris Hemsworth',
        email: '[email protected]',
        username: 'chris',
        age: 30
    }
]

module.exports = users;
Step 4: Declaring the Schema
Afterward, the GraphQL schema has to be defined. A GraphQL schema provides a shape of the data that clients can request from the API. Additionally, it allows you to declare queries and mutations that users can use to read/write data.
First, we must create a GraphQL Type (Entity) to define a User in the API. Then, create a new directory named types and create a file named users.js within the directory. Afterward, open the file and add the following code.
const { GraphQLObjectType, GraphQLString, GraphQLInt } = require('graphql');

// declare the user type.
const UserType = new GraphQLObjectType({
    name: 'user',
    fields: {
        id: {
            type: GraphQLString,
        },
        name: {
            type: GraphQLString
        },
        email: {
            type: GraphQLString
        },
        username: {
            type: GraphQLString
        },
        age: {
            type: GraphQLInt
        }
    }
})

module.exports = UserType;
The entity displayed above provides a Type declaration and defines the available attributes for the users present in the mock data source.
After declaring the User entity, we can define the business logic functions for our API. To add the business logic functions, create a new directory named “resolvers" and create a new file named "user-resolver.js"and add the code shown below.
const users = require('../data/users');

// declaring the query functions that get resolved by the resolver

const getAllUsers = () => {
   return users;
}

const getUserById = (id) => {
   return users.find((user) => user.id === id);
}
const getUserByUsername = (username) => {
   return users.find((user) => user.username === username);
}

module.exports = {
   getAllUsers,
   getUserById,
   getUserByUsername
}
The business functions shown above access the mock data source and perform sample queries. We can use these functions as resolvers for GraphQL queries.
After successfully adding the business functions, we can now define GraphQL queries that consumed these functions. Create a new directory named “schemas" and place a new file named "schema.js" inside the directory. Add the following code to the newly created file.
const { GraphQLObjectType, GraphQLString, GraphQLSchema, GraphQLList } = require('graphql');

// import the service functions.
const { getAllUsers,
        getUserById,
        getUserByUsername
} = require('../resolvers/user-resolver');

const UserType = require('../types/user'); // import the User Entity

// declare the queries with the resolvers
const RootQueries = new GraphQLObjectType({
    name: 'rootQuery',
    fields: {
        // available queries for the GraphQL APIgetAllUsers: {
            type: new GraphQLList(UserType), // return type- user list
            resolve: () => {
                // invoking the defined service functions
                return getAllUsers();
            }
        },
        getUserById: {
            type: UserType,
            // input args
            args: {
               userId: {
                    // input var - userId of type string
                    type: GraphQLString
                }
            },
            resolve: (_Îsource, args) => {
                // the resolver function to fetch data for the request// this can be replaced with an actual repository.
                const { userId } = args;
                return getUserById(userId);
            }
        },
        getUserByUsername: {
            type: UserType,
            args: {
                username: {
                    type: GraphQLString
                },
            },
            resolve: (_source, args) => {
                const { username } = args;
                return getUserByUsername(username);
            }
        }
    }
})

// create a GraphQL Schema
const schema = new GraphQLSchema({
   // the queries that users can use to fetch dataquery: RootQueries,
   // the data shape and descriptionstypes: [
       UserType
   ]
});

module.exports = schema;
The snippet shown above creates the schema for the GraphQL API. The object “RootQueries" defines the available queries that invoke the defined business functions (in the resolve callback).
The object “schema" creates the GraphQL schema with the available queries, types, and mutations (if any). This schema is used when invoking the GraphQL API to serve client requests.
One thing to note when defining these schemas is that we have used separate files to manage the Queries and the Types. You can define everything in a single file, but this is not maintainable as this ends up creating hard-to-read code as your application scales. Therefore, we have created two separate files for types and queries to make the code more readable.
Step 5: Building the GraphQL API (BFF)
After declaring the schemas, we can build the GraphQL API with Express. Create a file named “index.js" in the root directory and add the code shown below.
const express = require('express');
const expressGraph = require('express-graphql');
const { graphqlHTTP } = expressGraph;

const schema = require('./schemas/schema'); // import the schema that was created with the root query

const app = express();
const PORT = 4000;

// use the endpoint '/graph' and configure a graphql middleware to handle graphql requests
app.use('/graph', graphqlHTTP({
    schema,
    graphiql: true,
}))

// start the express server on the defined port
app.listen(PORT, () => {
    console.log(`Graph QL API is up and running on Port ${PORT}`);
})
The snippet above successfully configures the GraphQL API on the ‘/graph' endpoint with the schema defined earlier.
To launch the API, run node index.js. Afterward, visit http:localhost:4000/graph to view the GraphQL Playground.
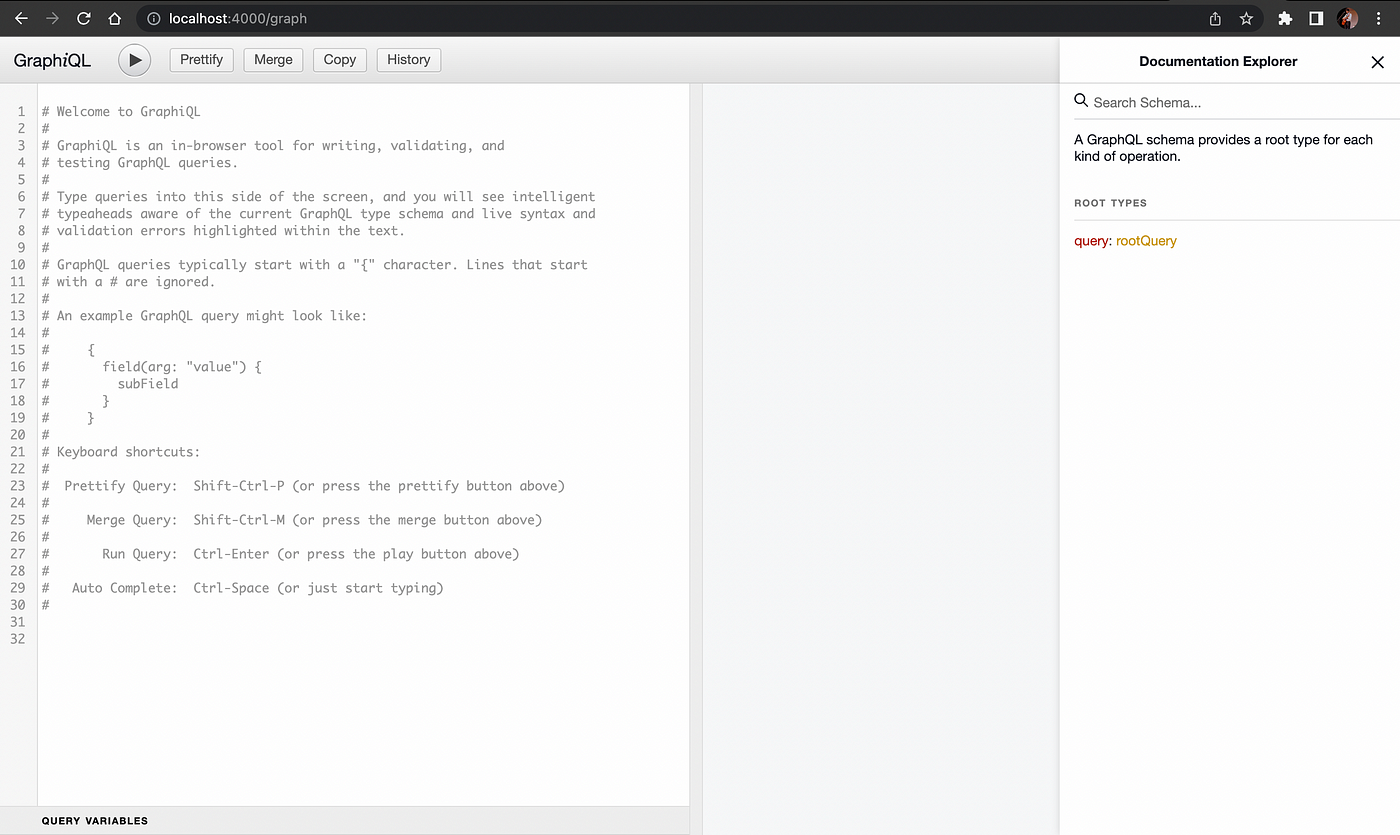
Figure 3: Launching the GraphQL API
Observing the BFF in Action
Once the API is launched, our Backend-For-Frontend is complete! With GraphQL, we can now perform queries to obtain user information with complete control of the data we retrieve. By doing so, different clients can obtain only the data that each client requires to populate the UI, thus eliminating over-fetching.
For example, we can use the single endpoint (localhost:4000/graph) to query data for two clients (Web/Mobile) with different data shapes.
This process is elaborated below, where the first snippet fetches four variables (Name, Email, Age, Id) for the web client. On the other hand, the second snippet fetches only two variables (Name and Email) for the mobile client.
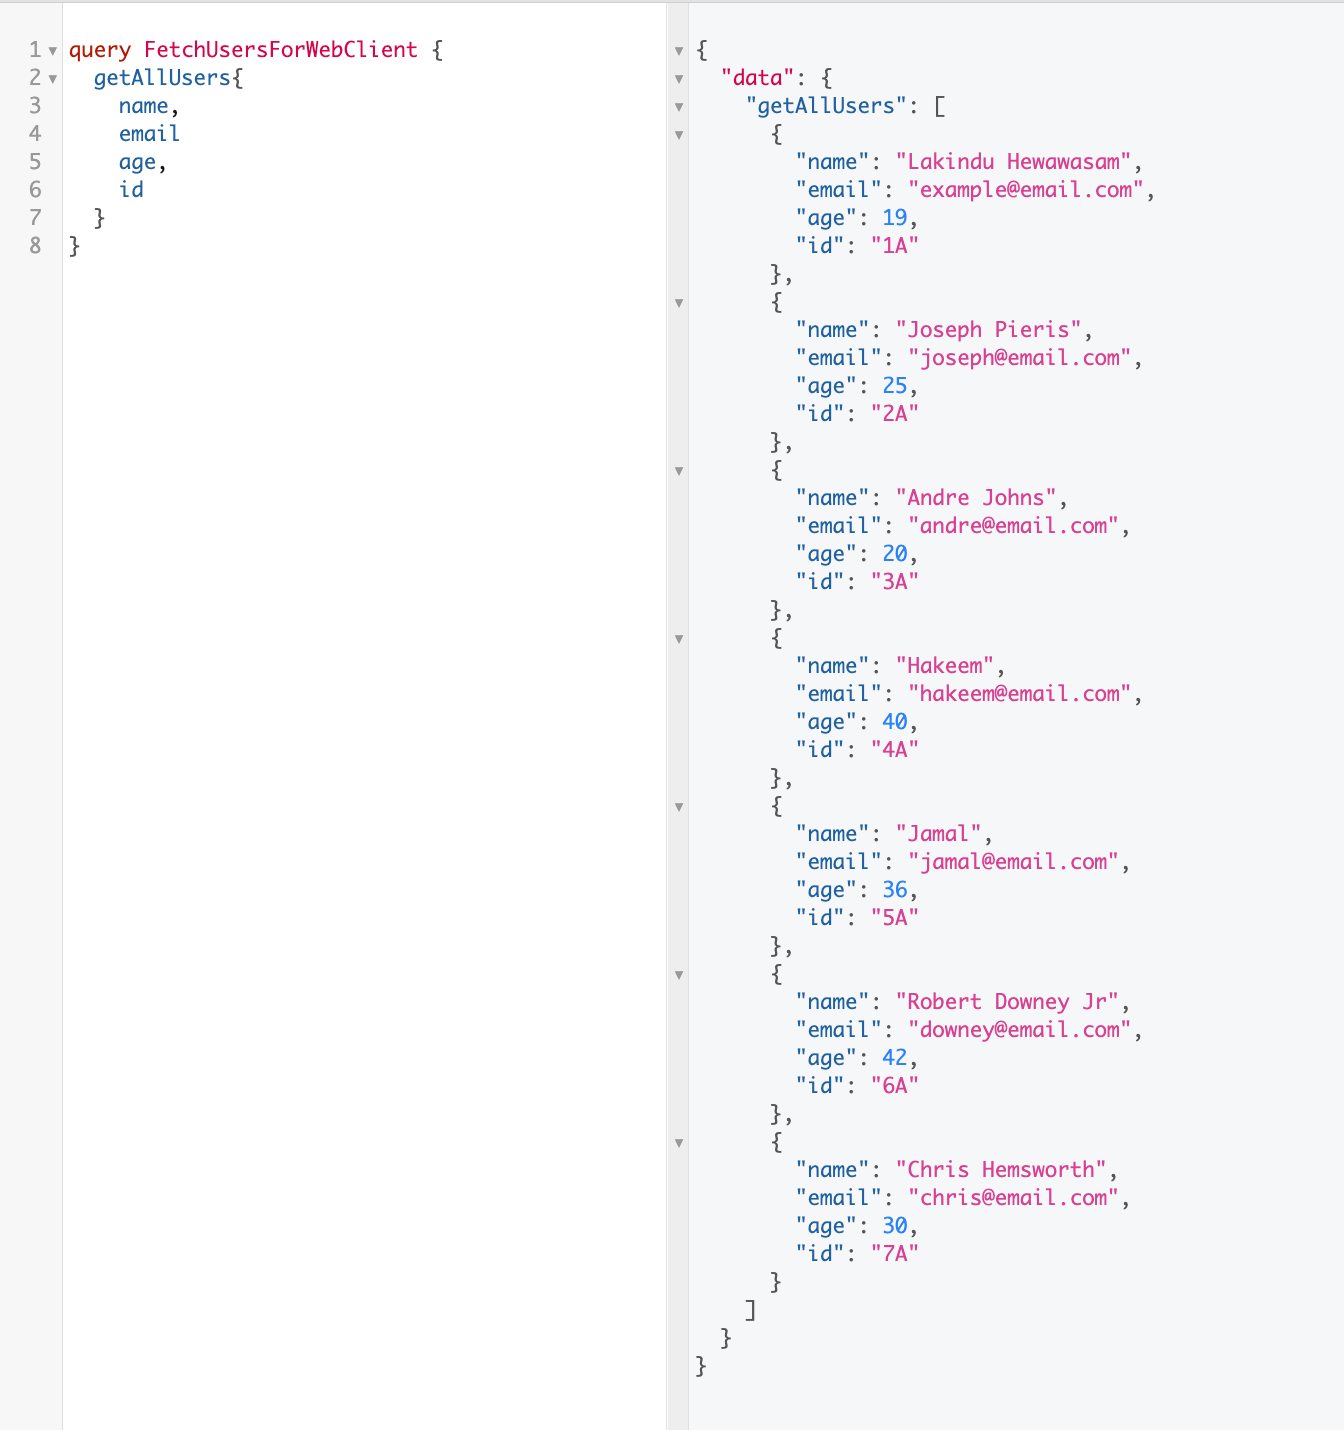
Figure 4: Fetching data for web client
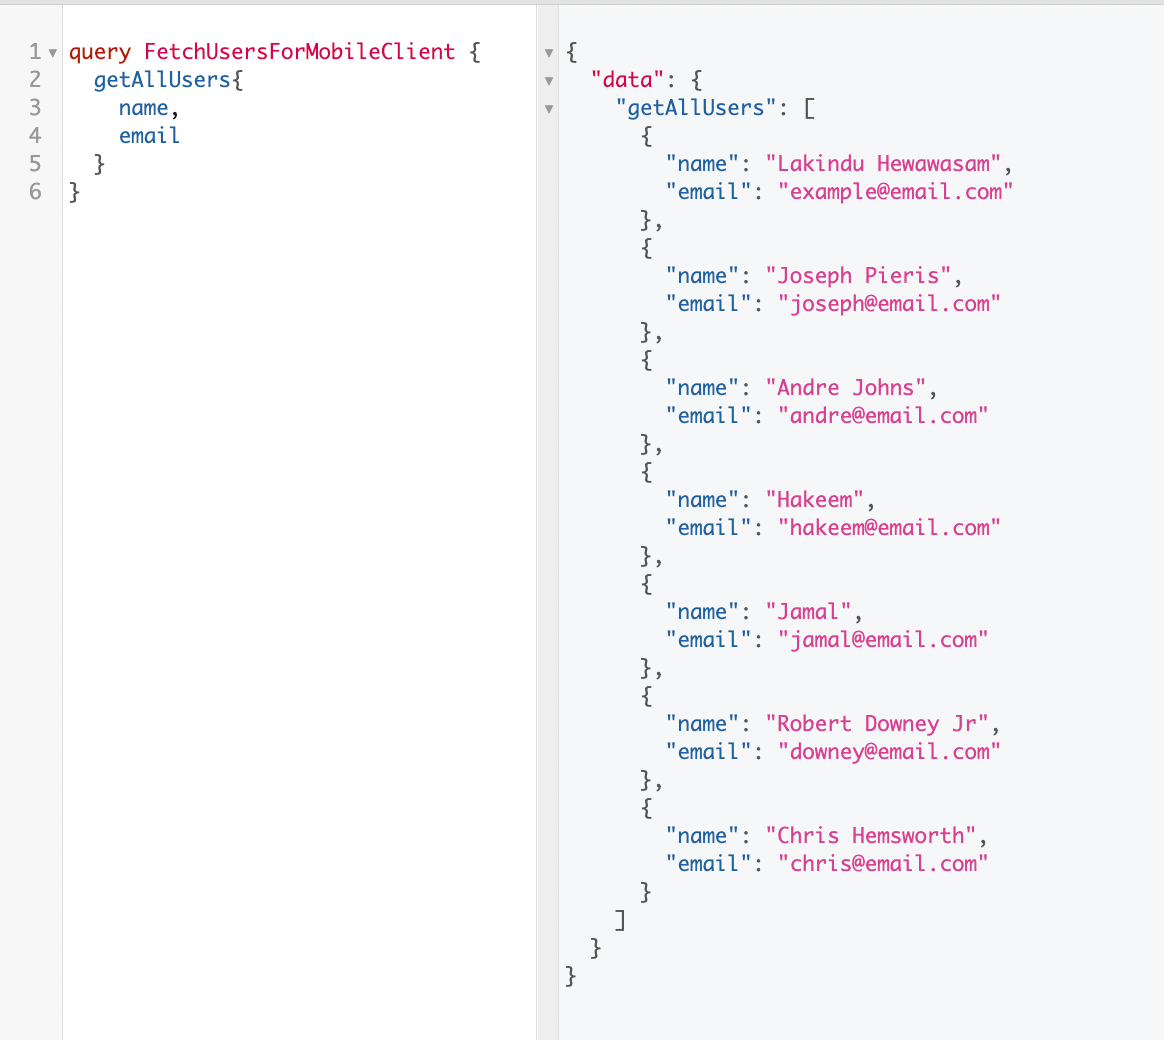
Figure 5: Fetching data for mobile client
Additionally, GraphQL allows you to group multiple queries. So, if your application has to display two sets of data on one page, you can use one HTTP request to fetch both sets of data, thus improving load times and performance.
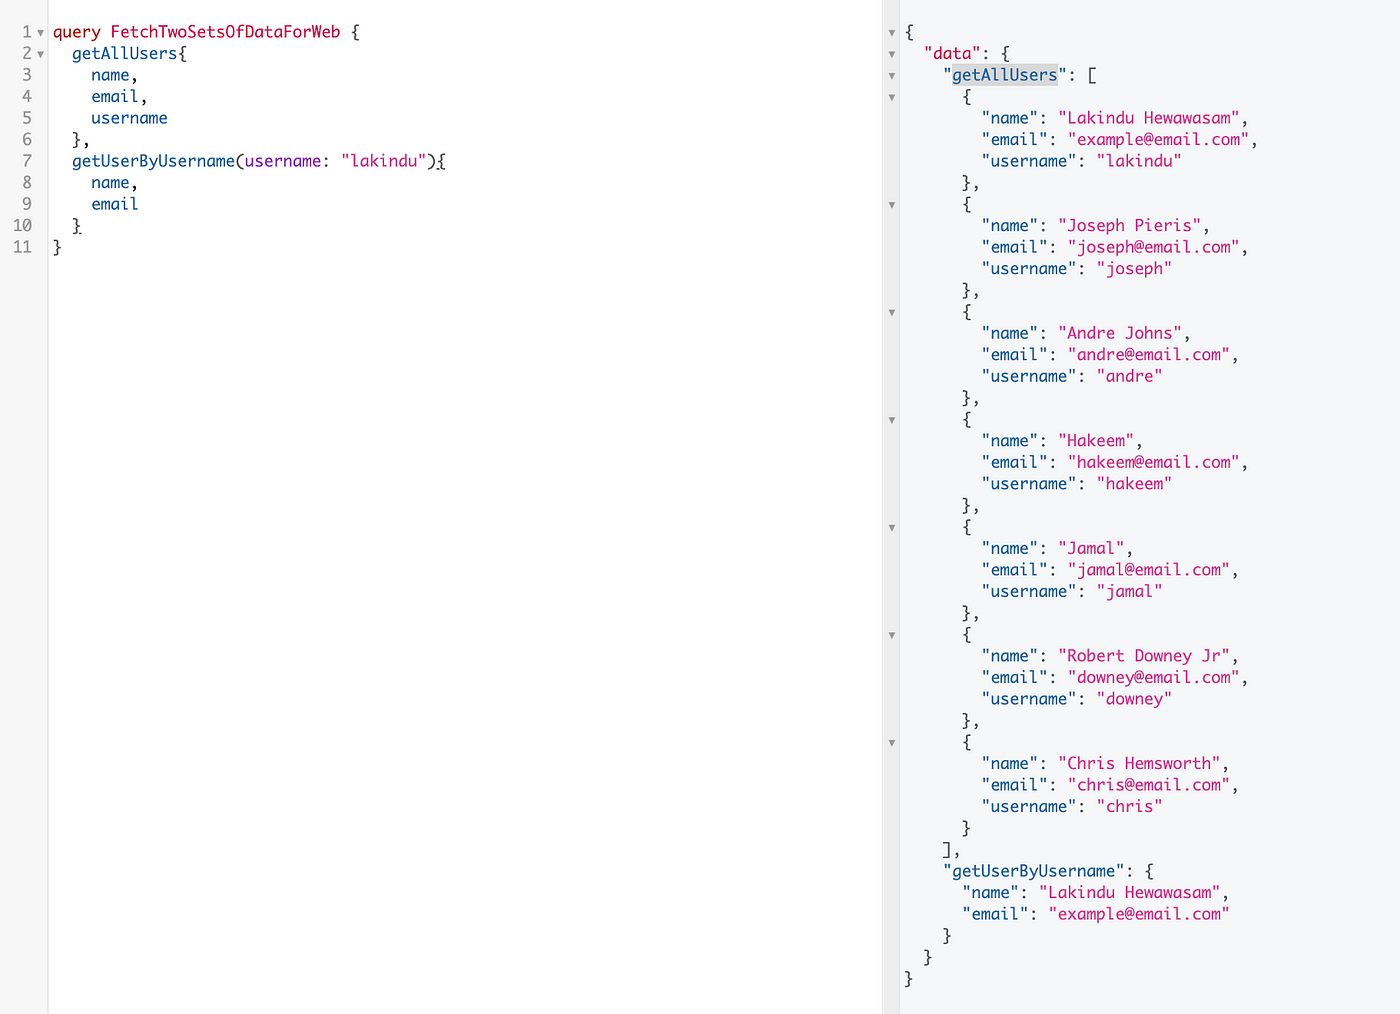
Figure 6: Executing two queries in one GraphQL Request
That is how we can use GraphQL to implement the Backend-For-Frontend pattern. This API allows multiple clients to use the single endpoint and fetch data by specifying what they require.
Conclusion
In this article, I have explored an introduction to Backend-For-Frontends (BFF) and a walkthrough on how GraphQL can help build a BFF.
The sample application implemented in this article is accessible in my GitHub repository.
I hope that you found this article helpful.
Thank you for reading.
Bit: Feel the power of component-driven dev
Say hey to Bit. It’s the #1 tool for component-driven app development.
With Bit, you can create any part of your app as a “component” that’s composable and reusable. You and your team can share a toolbox of components to build more apps faster and consistently together.
- Create and compose “app building blocks”: UI elements, full features, pages, applications, serverless, or micro-services. With any JS stack.
- Easily share, and reuse components as a team.
- Quickly update components across projects.
- Make hard things simple: Monorepos, design systems & micro-frontends.

Recommend
About Joyk
Aggregate valuable and interesting links.
Joyk means Joy of geeK